
Spider intake: Best way to install?
 06-25-2024, 11:09 AM
#46
Team Owner
TV thats a really nice intake what coating did you use to keep it so reflective?
The rest of the engine bay also looks neat clean and tidy.
NOTE that fuel pressure gauge should be removed and the cap and ball installed,
the gauges have been known to leak and cause a fire, the gauge is just for diagnostics.
The rest of the engine bay also looks neat clean and tidy.
NOTE that fuel pressure gauge should be removed and the cap and ball installed,
the gauges have been known to leak and cause a fire, the gauge is just for diagnostics.
 06-25-2024, 12:33 PM
#47
Drifting
TV thats a really nice intake what coating did you use to keep it so reflective?
The rest of the engine bay also looks neat clean and tidy.
NOTE that fuel pressure gauge should be removed and the cap and ball installed,
the gauges have been known to leak and cause a fire, the gauge is just for diagnostics.
The rest of the engine bay also looks neat clean and tidy.
NOTE that fuel pressure gauge should be removed and the cap and ball installed,
the gauges have been known to leak and cause a fire, the gauge is just for diagnostics.
https://rennlist.com/forums/928-foru...l#post18290409
Dec 2019 >PEAK 928
When I had the engine out years ago I refurbished the main cross member, cleaned everything and lately new cam gears, oil gear, injectors, brake system, sensors, coils, those little computers AND THEN passenger side HG went.
Right now I am just beginning to tear into the passenger side. TOTAL PITA. It's like being a beginner. I took apart my SPARE engine 19 years ago but the cam cover is crazy.
 06-25-2024, 01:52 PM
#48


To adjust the Air Flow Meter, remove this plastic cap

Using a long 3mm allen wrench, starting at the cap, reach thru this hole to the air flow meter screw

This hole at the bottom of the Spider will give you access to the AFM adjustment screw. There is no connection/hose required here otherwise.
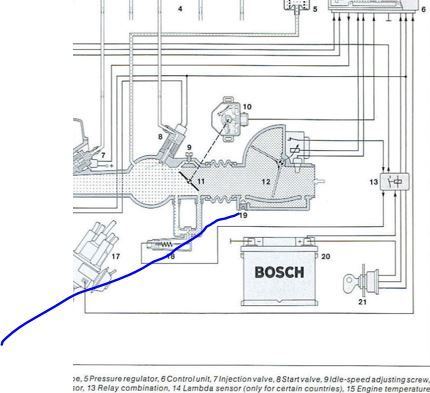
AFM #19 is what you can access/adjust
Many thanks to Wayne S. for his expert knowledge on this subject as my OCD would have told me I must have dislodged a hose/connector otherwise.