When you click on links to various merchants on this site and make a purchase, this can result in this site earning a commission. Affiliate programs and affiliations include, but are not limited to, the eBay Partner Network.
Unfortunately, the 2 piece plastic shields ahead of the front tire on the left side fender well needs to be removed to get access to the other end of this hose. You may need to postpone replacing it until after the car can be moved and the screws that hold that panel in place can be accessed (most easily done with the tire/wheel off, of course!.
The reservoir could have been overfilled and brake fluid flowed onto the master cylinder. Brake fluid QUICKLY dissolves paint, so it would become unprotected steel, which rusts quickly in air if the relative humidity is above 50-60%.
Great work you are doing in the Tabi garage'. Took a ride in one on a visit to Berlin a few years back. Certainly not built by Porsche!! - HA.
Gary
vour
I think you have somthing here...I pulled off the cap for the to the brake fluid resiviour and whe I put it back on it did not close completly...looks like the plastic threads are striped, so turn too far equals loose.
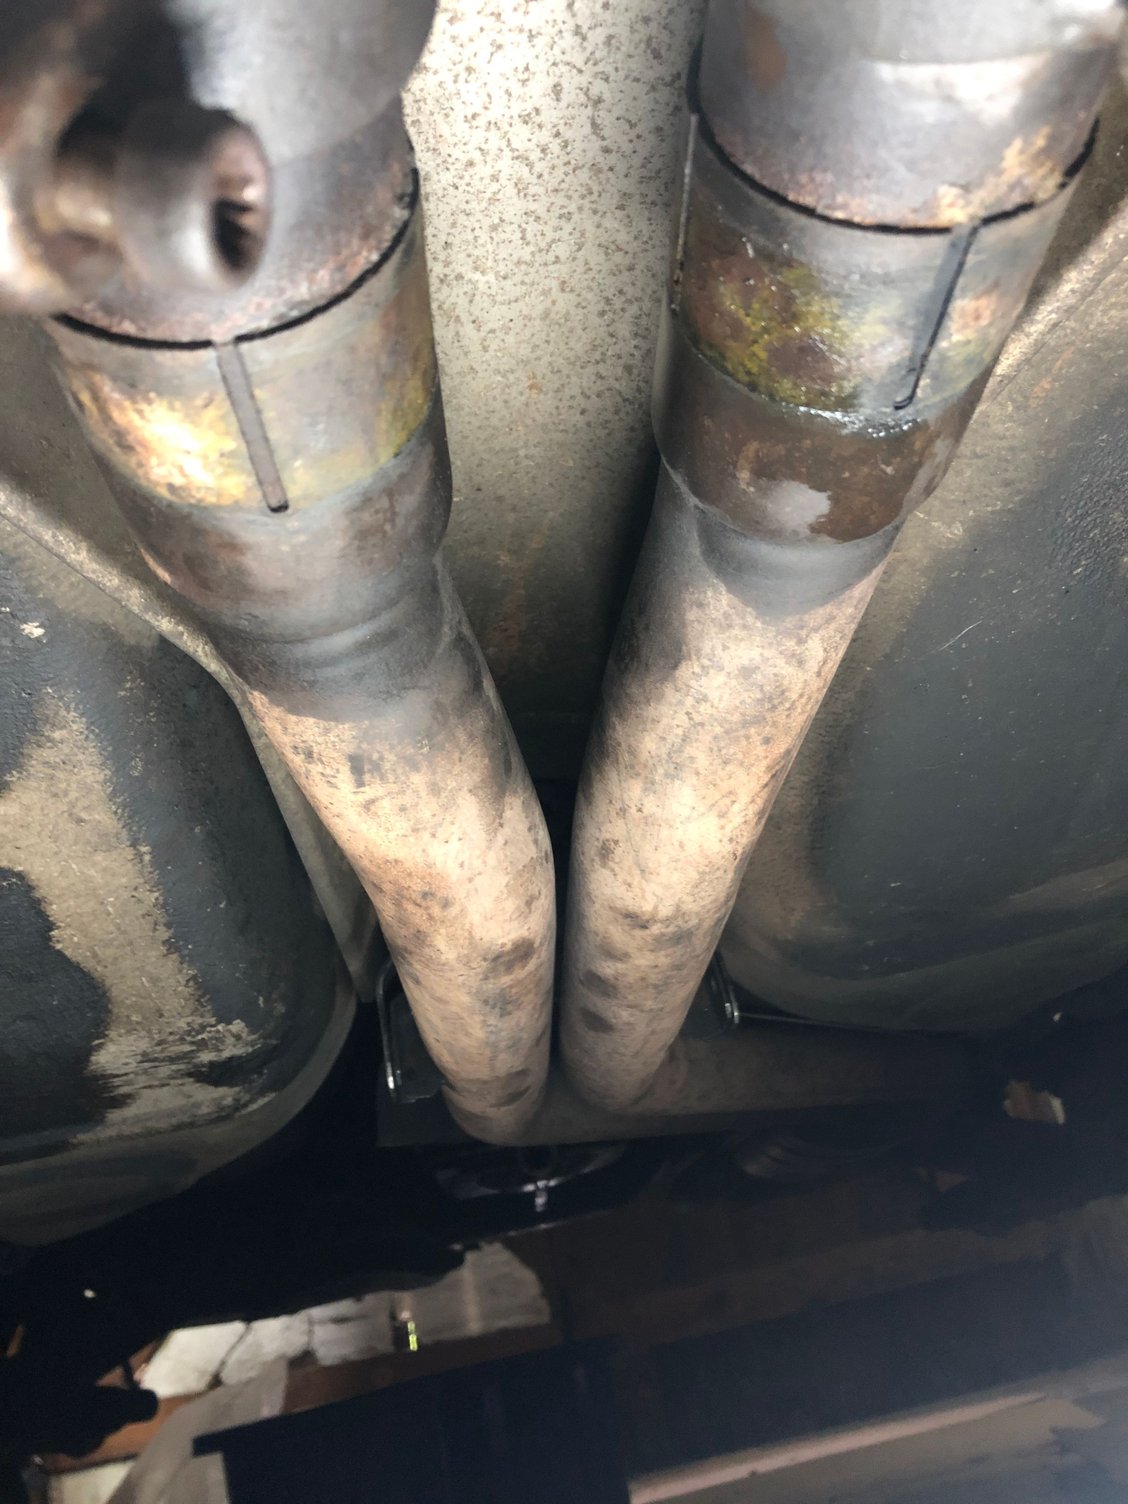
I start from the back - remove the muffler, (or just the connections to the muffler if possible), then the tubes that connect from the headpipes to the muffler can be 'twisted' in order to break up the corrosion between the pipes at the joint you show. Might spray some penetrating oil into that junction as well and let set overnight before twisting those pipes and pulling them to the rear for removal. Always worked on all 7 928's I've owned in the past 25 years!
Gary
Hi all...sorry I seem to be bouncing from one area to another but when I get stalled at one end for part I jump to another area I can work on.
Yesterday the back plate from the machine shop arrived all ready to go, the fill plug was according to them no easy job thanks toFeinMechanik Teltow GmbH for all you did!
I did not use any gasket sealer with the paper gasket. when I removed it it was not there and the area was a tight seal. hope I do not regret it.
Right now I am working on the fuel tank so I left the rear end work for now until that is done.
as an update I have the following done with thanks to your support:
Timing belt and water pump installed
Camshaft gears were worn replaced
Oil pump rebuildt and Alloy gear replaced
Timing belt tensioner rebuilt
All O-rings and seals replace for Cams & Crankshaft
New Radiator to correct the Terry Gilliam abomination.
New OEM oil lines replaced for the above Monty Python reference
Motor Mounts installed & Mount brackets painted in Po5 15
New Oil pan gasket....went old school and its cork!
All new acsessory Belts....(probably should have revamped the AC to R134 but there seems to be R12 still in the system )
Injectors removed and rebuilt with all new seals.
All old fuel rail Hoses inspected and replaced in engine compartment.
the usual tune up Plugs, wires, and airfilters replaced
New 20w-50 and coolant added
Twin distributor Belt change and new O-ring
To do Next:
Remove Fuel tank and refurb entire area
Replace Drivers side halfshaft differential seal
Replace Shift coupling & dust cover
Change brake and Clutch fluid
Replace Alternator hose
Reinstall original rims and Tires
Photos will follow... hope this is it on the power train end, Lots tmore o do on the eletrics and interior....but having a car i can move will make life easier.
Well when I have a narrow garage and park 2 cars lengthwise. This is how I got at the *** end to drop the tank from the back door of the garage. Nice until it rains then my legs get very wet�..
you did not mention howeve ttwisting was to be an hour wrestling match with the B**ch.... my bones hurt and I am not eager to do that on my back again ...not in my 20s anymore.
Muffler is off! now i can get at the Axel and change out the leaking drivers side Axel seal. got at the seal no problem and pulled it... think I drove the new oe in tooo fat and it is not flush but recesed 1-2mm. Also noted the Cork gasket was missing on the axel. that was probably thei issue not the seal!
Unfortunately, the 2 piece plastic shields ahead of the front tire on the left side fender well needs to be removed to get access to the other end of this hose. You may need to postpone replacing it until after the car can be moved and the screws that hold that panel in place can be accessed (most easily done with the tire/wheel off, of course!.
I managed to Squeeze myself between the wall and the wheel well from under the Car: The before shot...including frayed oil lines in the backround. the rotten piece of Snuffelupigus Snout (happy to get its soot blowing schnoz of the way of my face) The after photo...no one will eversee it but at the cost of the OEM parts I needed the photo to hang on my wall! (or to show others how "a fool lets his money get soon Parted")
If blue you need temperature to loose it. Demounting the rear cover if the Torx doesn't help and use a gas torch!
As I think I mentioed I hate Allen sockets from working on My Alfa, any time I thake one off I always put in a new oue our of fear of striping in the future.
Confirned A Gorilla must have torked down the old ones as the new ones do not go nearly as far in as the one that needed to be filed out.
The Trebant was a high-tech product developed by the communists in former East Germany. With 600cc and 26 horsepower, it was considered very safe as it could not reach the incredibly high speeds of the vehicles produced in capitalist West Germany. The body was made of plastic, which was considered to provide sufficient protection for an accident where capitalist cars were not involved.
�ke
Last edited by Strosek Ultra; 09-22-2024 at 10:24 AM.


 08-26-2024, 04:27 PM