


32V adjustable cam sprockets/16V installed
Thread Starter
Inventor
Rennlist Member
Rennlist Member

Joined: Sep 2002
Posts: 10,218
Likes: 468
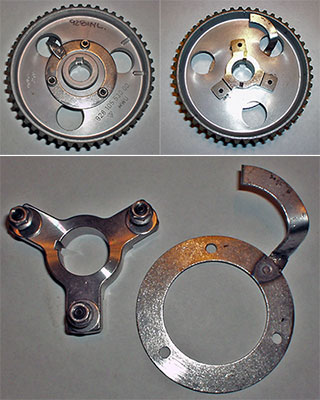
Flat teeth non-adjustable 16V gears to HTD 32V adjustable gearset:
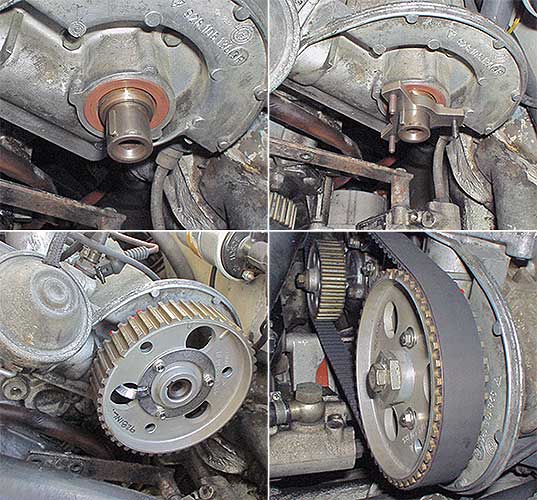
Machining required on 32V sprocket hubs:

Left: 32V stock = 12mm | Right: machined for 16V = 9mm
'Pointer' aligned with cam key to allow set up:
(Qty) Part, part numbers:
(2) Sprocket Hubs, 928 105 459 00
(2) Sprockets, 928 105 530 00 (or 01)
(1) Oil pump sprocket, 928 107 107 13
(1) Crank sprocket, 928 105 125 12
The hard way using idler pulleys...
*Concept Thread*
*Update - Kits*
Machining required on 32V sprocket hubs:
Left: 32V stock = 12mm | Right: machined for 16V = 9mm
'Pointer' aligned with cam key to allow set up:
(Qty) Part, part numbers:
(2) Sprocket Hubs, 928 105 459 00
(2) Sprockets, 928 105 530 00 (or 01)
(1) Oil pump sprocket, 928 107 107 13
(1) Crank sprocket, 928 105 125 12
The hard way using idler pulleys...
*Concept Thread*
*Update - Kits*
Last edited by PorKen; Dec 27, 2004 at 10:23 PM.
Thread Starter
Inventor
Rennlist Member
Rennlist Member
Joined: Sep 2002
Posts: 10,218
Likes: 468
So quiet, so smooth!
At idle, with the quieter HTD belt and the idlers removed, all I hear is the injectors and the intake roar. If I was standing in front of the engine, revving it up to 6K by hand, covers off, there was a 100dB+ whine with the square tooth belt, now it's just the sound of the exhaust from the rear. The round tooth belt looks beefier than the square tooth it replaced.
I set it at 3 degrees advance statically, but after the belt settled in, it is now at ~1/2 degree advance, both sides even. I am going to leave it there a few days, so I can feel the advance effect again (and rest my back!).
The belt ended up just forward-of-center on the gears, just a smidge farther back than stock.
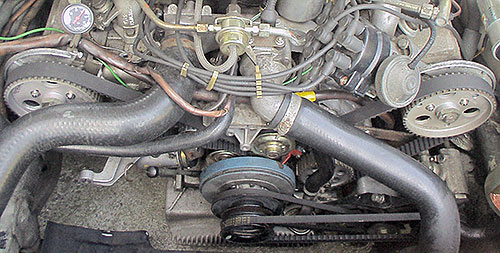
Looks empty without all the widgetry:
The easiest setup method seems to be to clamp the hub, gear, and pointer together at zero, install, let the belt settle, then adjust for advance/retard.
To advance, I rotated the engine forward until the cams were not under tension (so they don't move by themselves), loosened the bolt/nuts, then rotated the engine slightly to advance the gear only (not the hub and cam), then retightened. Then I rotated the engine until the cam pointers were at the cam housing marks to check against the crank mark. It takes a few tries to get it perfect. I was shooting for 6 degrees advance shown on the dampener (= 3 cam).
Crank set to 6 degrees advance, cam set to pointer:
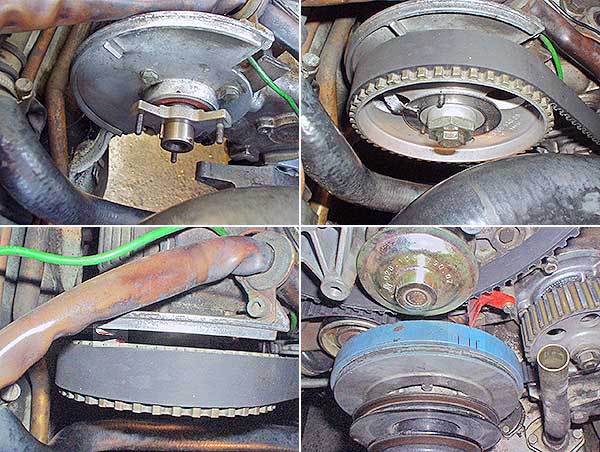
Note: in these pics, the engine had not been run, so the belt had not centered itself on the cam gear yet.
All told it took about 5 hours to R&R. One thing that really helped, that when I did the timing belt last year, I lubed the crank, crank gear, and dampener with 90W oil when installing, so they came off easily.
In theory it should rev faster, with the lighter aluminum (vs. early cast iron) oil pump gear, and no idlers.
At idle, with the quieter HTD belt and the idlers removed, all I hear is the injectors and the intake roar. If I was standing in front of the engine, revving it up to 6K by hand, covers off, there was a 100dB+ whine with the square tooth belt, now it's just the sound of the exhaust from the rear. The round tooth belt looks beefier than the square tooth it replaced.
I set it at 3 degrees advance statically, but after the belt settled in, it is now at ~1/2 degree advance, both sides even. I am going to leave it there a few days, so I can feel the advance effect again (and rest my back!).
The belt ended up just forward-of-center on the gears, just a smidge farther back than stock.
Looks empty without all the widgetry:
The easiest setup method seems to be to clamp the hub, gear, and pointer together at zero, install, let the belt settle, then adjust for advance/retard.
To advance, I rotated the engine forward until the cams were not under tension (so they don't move by themselves), loosened the bolt/nuts, then rotated the engine slightly to advance the gear only (not the hub and cam), then retightened. Then I rotated the engine until the cam pointers were at the cam housing marks to check against the crank mark. It takes a few tries to get it perfect. I was shooting for 6 degrees advance shown on the dampener (= 3 cam).
Crank set to 6 degrees advance, cam set to pointer:
Note: in these pics, the engine had not been run, so the belt had not centered itself on the cam gear yet.
All told it took about 5 hours to R&R. One thing that really helped, that when I did the timing belt last year, I lubed the crank, crank gear, and dampener with 90W oil when installing, so they came off easily.
In theory it should rev faster, with the lighter aluminum (vs. early cast iron) oil pump gear, and no idlers.
Last edited by PorKen; May 4, 2004 at 02:49 PM.
Rennlist Member
Joined: Jan 2004
Posts: 12,620
Likes: 8
From: Boulder Creek, CA
Wow, very nice! Was the pointer something you made up or is that a Porsche part? Is it centered on the cam keyway when installed, or lined up with the edge of it? hard to tell in that pic.
BTW, going to SITP?
BTW, going to SITP?
Rennlist Member
Joined: Dec 2002
Posts: 5,283
Likes: 52
From: Australia
Well Done! very nice. It occurred to me that with the hubs behind the cam wheels, if you can reach an arm of the hub, you could move the cam WRT to the wheel to change timing (- ie an open end wrench that fitted the hub arm) once the lock nuts are loosened, and the big central bolt. Do you have a view from behind the cam wheel showing the hub?
Is there any way to know what timing you start with? Is the zero point the centre of the adjustment range necessarily? Some cars verify timing via a measured valve opening or peak, eg Exhaust peak lift is used in some cases. Can we detect valve lift through the spark plug hole?
jp 83 Euro S AT 47k, planning something like this at next belt change....
Thread Starter
Inventor
Rennlist Member
Rennlist Member
Joined: Sep 2002
Posts: 10,218
Likes: 468
I finally went for cruise down the highway.
Much smoother, quieter, it seems to rev effortlessly; the car feels lighter somehow. And this is still only at ~1/2 degree advance.
I bet those idlers were stealing some HP.
...
Sharkskin,
The pointer is my design, and is centered in the keyway. Good eye, I had not filed it when I took the pic (I had just finished spot welding it together). It was a proof-of-concept part, but worked. If I make more, I'll need a jig to set it up.
No driving to Kal-ee-four-nya, for me, I have to 'finish the house'; ie. my girlfriend wants the 'home improvement' to continue without interruption.")
...
gbyron,
My machine shop is what you'd might describe as 'third-world'.
I took it to an engine rebuilder shop, and the reciept says only: 'LATHE'. They did a nice job, close tolerances between all four pieces I had done, although with this particular part is not critical to have exact dimensions.
...
jpitman2,
Thanks!
If you look in the lower left pic above, you can see that there is not much room between the gear and the housing. The open end wrench is a good idea, something like a spring adjuster?
There was no way that I could find or think of to measure the valve lift externally on the 16V head.
There is a mark on the back of the gear, in the same spot as the 16V gear, so if the hub and gear are bolted together with the key slot in line with this mark, it is at 0 advance. But as you've probably noticed, when the belt is off, the cams will spring out of position easily, and with the belt on with the adjustable gear, when the gear is loosened, sproing, there goes the adjustment.
Perhaps instead of wrench to move the hub, a device to lock the hub to the housing at 0...
Much smoother, quieter, it seems to rev effortlessly; the car feels lighter somehow. And this is still only at ~1/2 degree advance.
I bet those idlers were stealing some HP.
...
Sharkskin,
The pointer is my design, and is centered in the keyway. Good eye, I had not filed it when I took the pic (I had just finished spot welding it together). It was a proof-of-concept part, but worked. If I make more, I'll need a jig to set it up.
No driving to Kal-ee-four-nya, for me, I have to 'finish the house'; ie. my girlfriend wants the 'home improvement' to continue without interruption.
...
gbyron,
My machine shop is what you'd might describe as 'third-world'.
I took it to an engine rebuilder shop, and the reciept says only: 'LATHE'. They did a nice job, close tolerances between all four pieces I had done, although with this particular part is not critical to have exact dimensions.
...
jpitman2,
Thanks!
If you look in the lower left pic above, you can see that there is not much room between the gear and the housing. The open end wrench is a good idea, something like a spring adjuster?
There was no way that I could find or think of to measure the valve lift externally on the 16V head.
There is a mark on the back of the gear, in the same spot as the 16V gear, so if the hub and gear are bolted together with the key slot in line with this mark, it is at 0 advance. But as you've probably noticed, when the belt is off, the cams will spring out of position easily, and with the belt on with the adjustable gear, when the gear is loosened, sproing, there goes the adjustment.
Perhaps instead of wrench to move the hub, a device to lock the hub to the housing at 0...
Trending Topics
Rennlist Member
Joined: Dec 2002
Posts: 5,283
Likes: 52
From: Australia
Porken, One of my ealier cars was Rover 2000 - 4 cyl 2l SOHC, with cam driven by 2 stage duplex chain at the front, all encased in block and head, not separate covers (keep the oil inside). When a head job was needed, there was an L shaped piece of 1/4 square steel bolted into a slot on the front cam bearing bridge that engaged in the cam wheel to lock it at TDC #1 position. Also there was a peg that pinned the flywheel at TDC#1. Once the cam wheel was locked, you could detach the chain wheel from it, locate the chain wheel on a bracket that kept the chain timed, and lift the cam assembly off the head, then lift the head off the block, leaving the chain and wheel on its bracket, no loss of timing set up. If you could find a way to peg the belt wheel to the head before slackening off the bolts, and then move the cam WRT the wheel in a controlled fashion?
I was never aware before that there was a noise problem with the early belt???
jp 83 Euro S AT 47k
I was never aware before that there was a noise problem with the early belt???
jp 83 Euro S AT 47k
Rennlist Stories
The Best Porsche Posts for Porsche Enthusiasts

Porsche's Top 5 Most Questionable Naming Decisions
Verdad Gallardo
Pogea Racing's 964 Porsche 911 Reimagination Stands Out in a Crowded Field
Verdad Gallardo
6 Convertible Top MYTHS Most People Don't Understand!
Michael S. Palmer
2026 Porsche 911 Club Coupe is Spectacular, And Everything Wrong with the Porsche Market
Joe Kucinski
Talos Takes Your 991 Porsche 911 GT3 to the Next Level for a Cool $1.13 Million
Verdad Gallardo
9 Vehicles Porsche Helped Engineer that Aren't Porsches
Verdad Gallardo
9 Features and Characteristics That Only Porsche People Understand
Verdad Gallardo
I've Written 500 Rennlist Articles: Here's How Porsche Has Changed Along the Way
Joe Kucinski
10 Most Unnecessary Porsches Ever Built (And Why We Love Them)
Verdad GallardoRennlist Member
Joined: Jan 2004
Posts: 12,620
Likes: 8
From: Boulder Creek, CA
Ken,
I understand.... my gf is pretty antsy about all the time I've been spending on the car... ah well.
For a wrench that can get to those hubs, you might try one of these.
You might have to bend a jog into it to reach that hub, which could get interesting. These are very tough tools! If that hub is an even mm dimension on the flat where you want to engage the wrench, you're home free.... if not, should be easy enough to grind to fit.
Thread Starter
Inventor
Rennlist Member
Rennlist Member
Joined: Sep 2002
Posts: 10,218
Likes: 468
Ok, I'm starting to understand the wrench idea, y'all.
A 15mm fits nicely, just have to find a flat narrow one. A regular Craftsman Pro wrench just fits behind the gear, but cannot be angled, so a thinner, narrow wrench with one bend might do the trick.
...
I readjusted the cam gears to 3 degrees. I did have to back off the ignition timing, because I heard pinging for the first time ever on this engine. (I always use Chevron plus)
Adjusting the left bank (5-8) was easy; loosened the cam bolt and rotated the engine slightly, then retightened (not to full torque). Then I turned the engine over to recheck and retightened the bolt to spec.
The right (1-4) was trickier, because I had to rotate the engine CW until the pointer was straight up, then I could loosen the bolt and move the gear, without the cam springing CCW.
It took 4 or 5 full rotations to get both cams right on ~6 degrees crankshaft.
One way to verify the amount of advance/retard, for the left cam only, is to check the ignition timing before and after, that shows the exact amount of movement (divided by two for cam number).
...
It's luverly! I catch myself going 5-10 miles faster than I sense, because it is smoother, and doesn't feel like I'm going that speed.
The best sensation is the shift between 2nd and 3rd at full throttle. When it hits third it slams me back into the seat and seems to claw at the pavement!
I'm relearning the way to go fast is the mash the accelerator to the floor. Sound's funny, but previously it felt faster to gradually open the throttle, as going to the floor didn't do anything for a fraction of a second, and made it feel like it was bogging.
Pro
Joined: Jan 2004
Posts: 513
Likes: 0
From: SOCAL
VERY nice work! as a note, those triangular sprocket hubs have broken, and trashed a motor or two...they are a cast piece, and apparently are capable of cracking - on a non interference motor not as bad as on a 32V, but still something worth replacing or at least checking closely WYIT...
Thread Starter
Inventor
Rennlist Member
Rennlist Member
Joined: Sep 2002
Posts: 10,218
Likes: 468
rob rossitto,
Thanks, and thanks for the heads-up.
Ideally, I'd like to have custom pieces made, possibly from round stock. Then I could incorporate a fixed pointer and possibly a means to rotate the cam as well.
Thanks, and thanks for the heads-up.
Ideally, I'd like to have custom pieces made, possibly from round stock. Then I could incorporate a fixed pointer and possibly a means to rotate the cam as well.
Last edited by PorKen; May 12, 2004 at 01:25 AM.
Thread Starter
Inventor
Rennlist Member
Rennlist Member
Joined: Sep 2002
Posts: 10,218
Likes: 468
It feels bloody marvelous to drive, so smooth. In fact it felt really good set up at 0 with the new setup, but I felt compelled to set it to 3 degrees to compare.
But the dyno gives virtually the same curves as when I advanced the cams to 5+ degrees. Power and torque down by 10-15 compared to the best comparable runs.
It could be that the 32V setup I've done, is calibrated slightly differently than the 16V gears and is advanced by 2 degrees.
Really, I need to dyno it at 0, and 2 or 3 retard too.
I'm going to set it to 2 retard (couldn't do that with the idlers), and drive around for a while, and see what it's like.
Every time I think I'm done with the dyno...
Rennlist Member
Joined: Dec 2002
Posts: 5,283
Likes: 52
From: Australia
Ken, Whats the line up of the 3 bolts on the hub WRT the keyway? In your pic 1 it looks like one bolt might be in line with the key? Are the bolts equally spaced out ? ie at 120degrees. If so it should be easy to make a disc plate out of mild, drill and cut keyway, drill and tap for bolts? If it was big enough to see the edge through a lightening hole, you could mark it for calibrating adjustment? I must get a set of used S4 gears before the demand ramps up.....
jp 83 Euro S AT 47k
jp 83 Euro S AT 47k