When you click on links to various merchants on this site and make a purchase, this can result in this site earning a commission. Affiliate programs and affiliations include, but are not limited to, the eBay Partner Network.
Jerry as long as Porsche still has them for $25 why would you make them?
Good question, Mark! You should have noticed before now that the factory item is designed to fail at one or two points, frequently, with very little impact. So that insures them continued sale at 25 to 36 bucks each for adinfinitem. My design is going to cure the inherent failure of the factory items and should be forever. That is why.
I am going to call my items shown as "Grill Bar Stanchions." I found that the Stanchions are mounted to the cross member below the radiator and to the bottom of the front bumper bar. When the bumper bar has a slight impact that does not compress it all the way, it rebounds. When it does that it breaks the top of all three stanchions, so they must be replaced. My design is going to make the the stanchions so that they will articulate with slight impacts and not break. Simple as that.
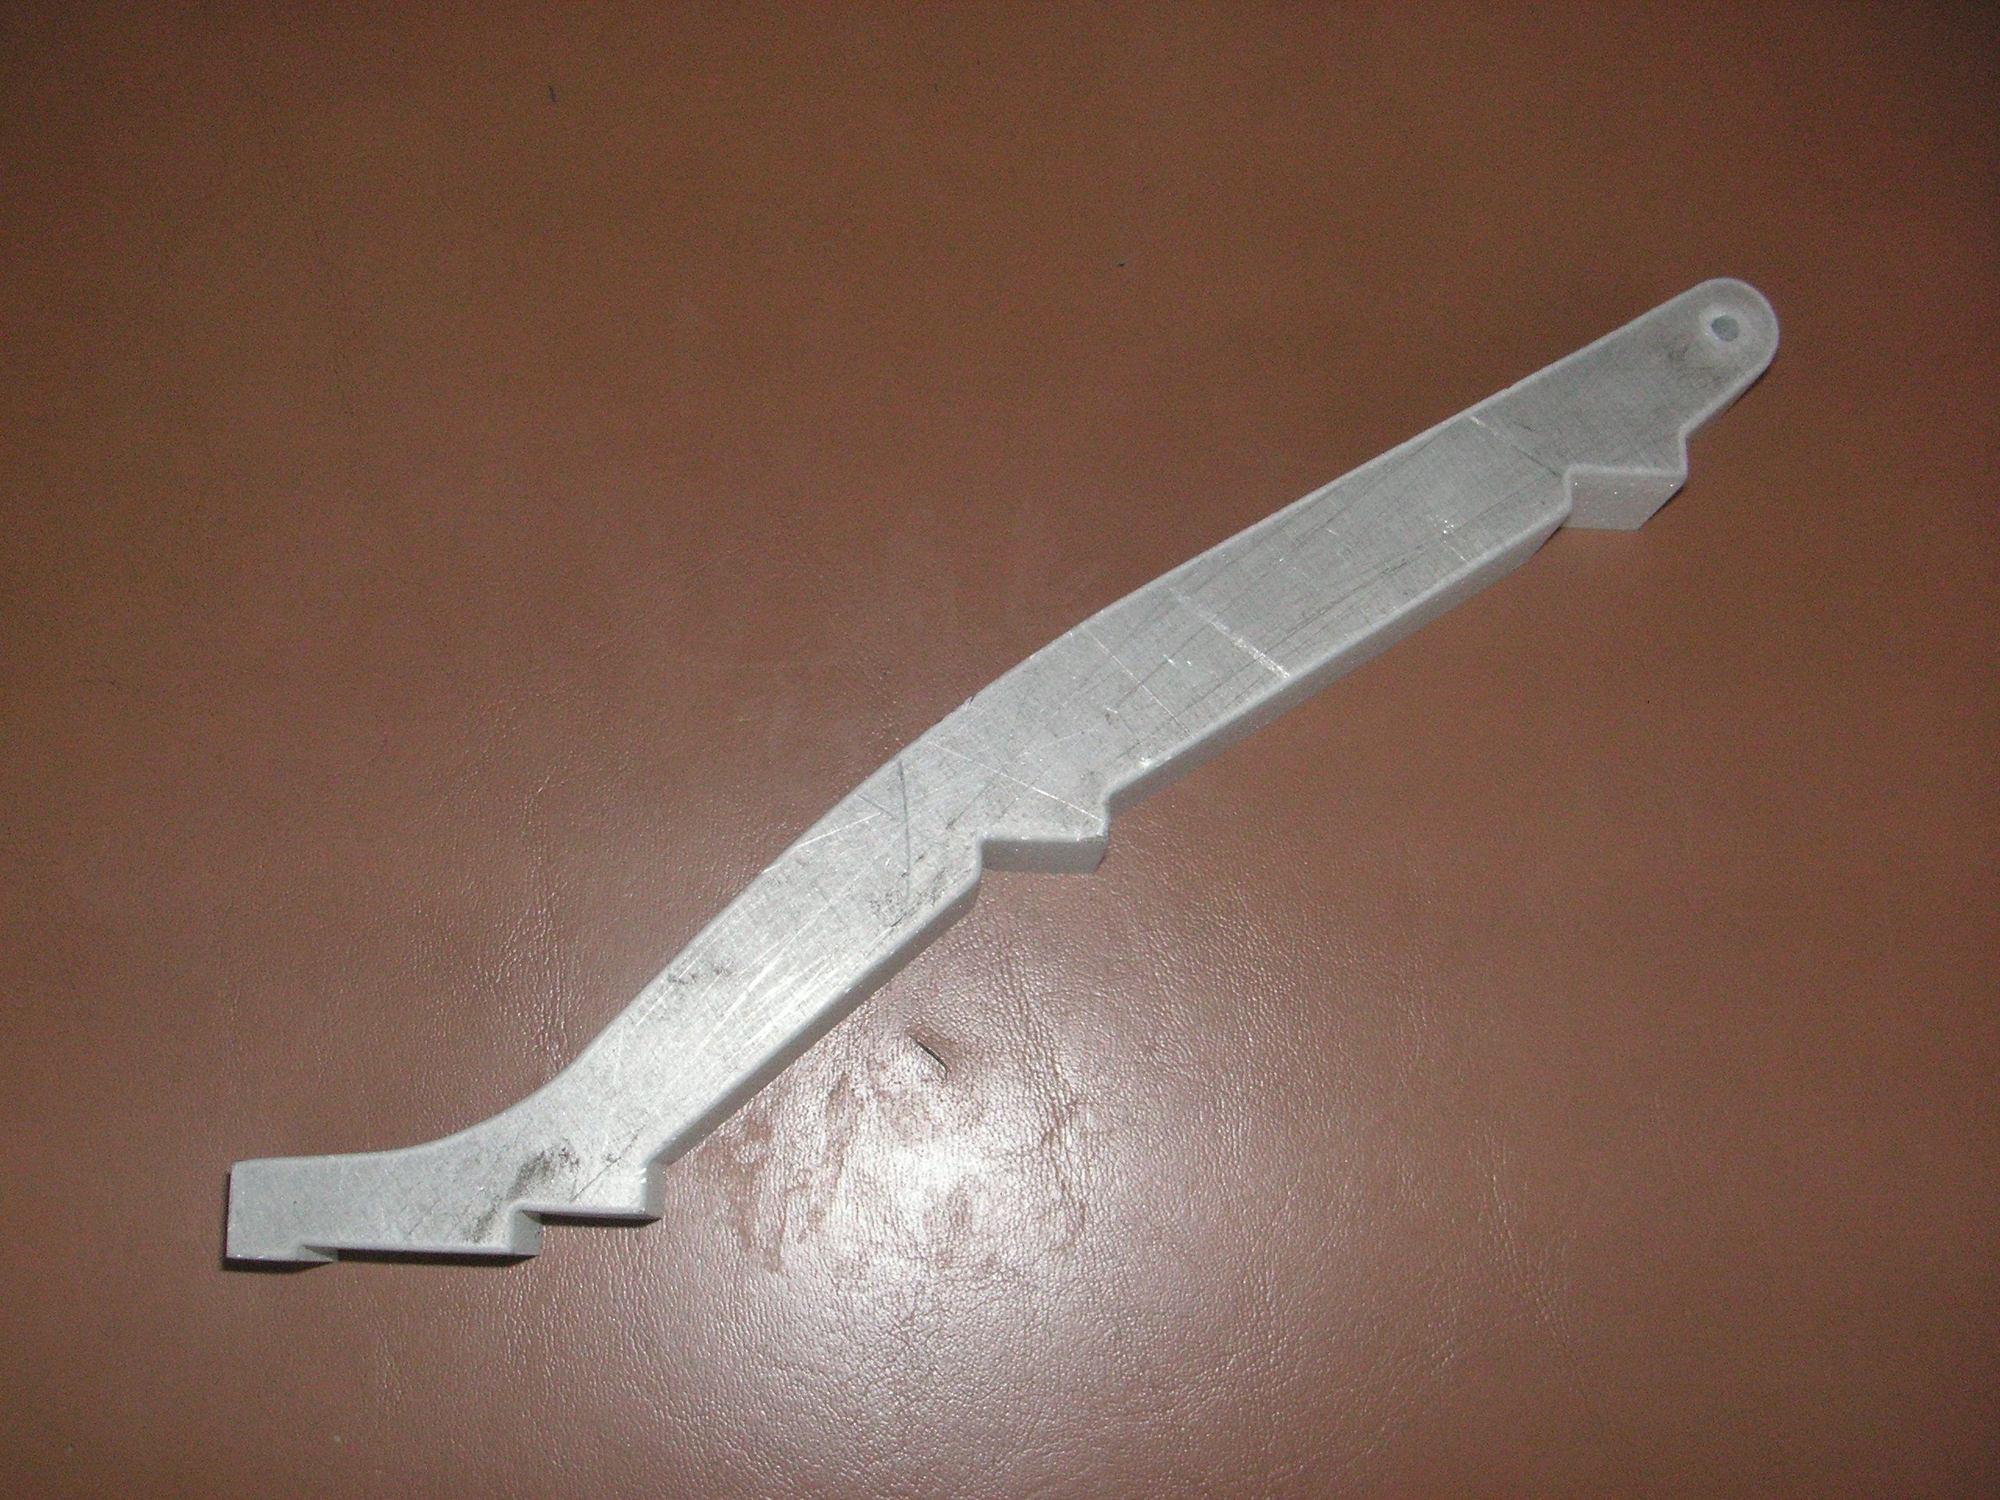
The item pictured above is the basic central component for the Stanchions which I found was common to the central and outer plastic ones from the factory (or aftermarket). My item can be machined to work in either position. The bottom end will be cut off some and the upper piece, not shown, will be a little bit different to match the curvature of the bumper bar. The little upper piece, (that is designed to break off of the originals), will be hinged at both ends and spring loaded at the connection with the central piece shown. I had these pieces cut out of 3/4 inch thick aluminum plate whereas the originals are only about 5/8 inch thick or wide. I plan to round the front edges of these pieces, and maybe the upper small pieces, to have a little better presentation to the flow of air, for what little that might add or help, but they will look better. I put a lot of thought into the redesign of these central pieces, but the upper pieces are still in a state of flux in my mind. I first have to test my ability to wind the springs necessary for the springloaded joint.
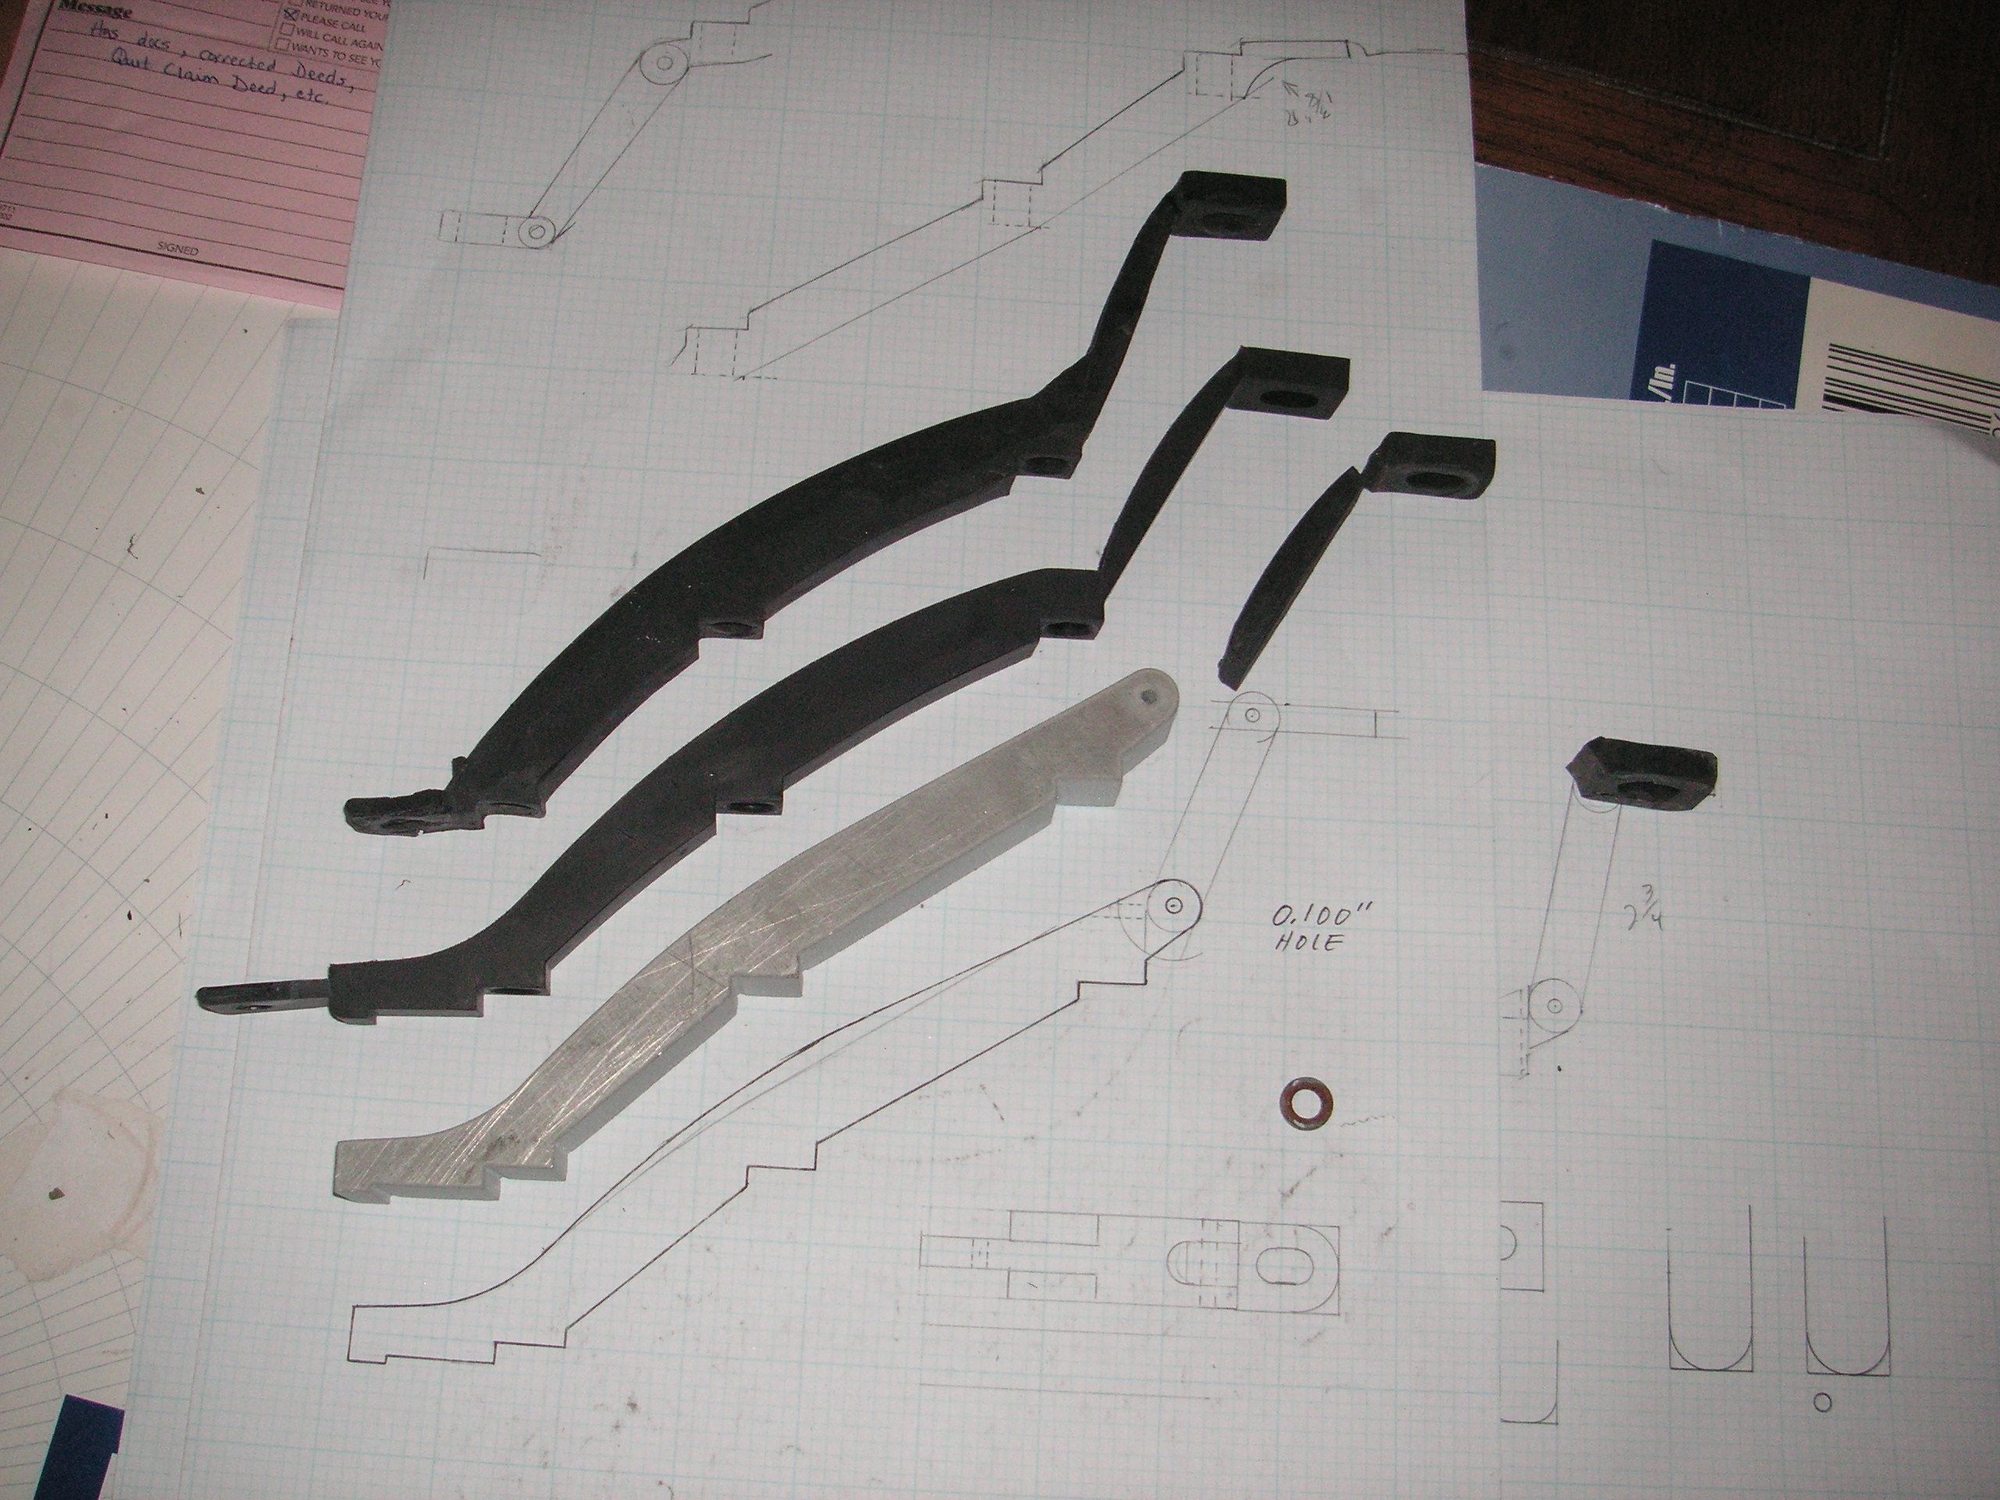
Here is a picture of my water jet cut piece together with an aftermarket new central bracket, a glued back together outer bracket, some pieces and all on top of one of my original drawings of the new design.
FWIW the usual fail point seems to be the lower section thats damaged by hitting the spoiler, this snaps off the lower tips.
What really needs to happen is make 5 small adapter plates that can fit between the 3 lower attachment points of the stanchions,
and the lower radiator support.
and the 2 side PU supports that also capture the spoiler to the radiator support.
NOTE this will strengthen the 3 center supports and also increase the strength of the upper edge of the spoiler.
NOTE if the top anchor points of the stanchions are broken,
then that means the bumper shocks have also been damaged,
IE pushed in and thus rendered scrap.
NOTE the PU cover should be removed and new /used (70MM spaced bumper shocks fitted)
If you get a shock thats less than that,
then the fog lamps will have a pushed back look when the front bumper PU is installed.
Jerry If you really want to do something,
figure out a way to easily reconfigure the bumper shocks,
this will involve some way to open them to release the locks that hold the shock so they be moved back into position
I have 6 of them here and they are all scrap.
One time use.
Maybe fill them with grease with a zerk fitting so they can be pumped back into position.
(NOTE thats how they tension the front roller wheels on bulldozers,
they have a cylinder that they pump grease into and it keeps constant pressure on a cylinder,
this keeps the wheel in position.)
Thanks Stan. As usual you have some very astute thoughts about these kind of things. However, I think, on my very limited experience with these early front grills, your analysis is kind of off.
My first involvement with these early grills and brackets came about a while back when I bought a very nice 85 in Iris Blue Metallic in California and brought it home. I had noticed that the lights in the front bumper cover appeared to be much more recessed than I thought they ought to be. Upon digging into that issue further I found that the lights are actually mounted in the aluminum bumper bar and not the PU bumper cover and that in my case the bumper bar had been fully impacted causing the shocks to have collapsed fully and stuck there. I also found that the grill was pretty much loose as a result and that the brackets, (now stanchions), were all broken. However, contrary to your suggestions, they too (as with my 82) were all broken at the top mounting point and still fully intact at the bottom mounting points.
I just went over to the other shop and looked at the brackets (I found two of the original broken ones) and see that they are broken at the top only. I also took notice that the grill in the 85 does not have any connection to the S spoiler on that car. My 82 does not have a front spoiler; and the grills are the same in both cars. I think I am still stuck with my suggestion that the grill brackets are designed to fail at the top and not at the bottom.
My next thoughts about this are also kind of related to the bumper shocks. I had an alternator failure a few month ago and had my friend with the roll back bring my car home. When we unloaded it we had to push it down the sloped shoulder of my street onto the outer garage driveway pad, but when we did I neglected to control that with the hand brake and the 82 bumped slightly into the back of one of the Eldorados in my other collection. No big deal because there was no visual evidence of any kind of damage, and the bump was pretty slight.
However, a day or two later I think as I walked past the front of the 82 I noticed two strange pieces of black plastic about 2 1/2 inches long laying on the concrete under the front of the 82. I picked them up and puzzled about what they were for a while. Later, upon further investigation and much though, I investigated the front grill area of the 82 and found that the grill was barely hanging on held only by the three lower mounting points, the ones screwed to what I am calling the front cross member and that you have referred to as the radiator support.
Now I have taken the grill out of the 82 and have worked myself up to the point of this thread.
As to the bumper shocks, I think I have learned something about them that I suspect many of us do not even know. In the case of my 82, as I mentioned, it is obvious that what broke the three grill stanchions at their top is a bit of travel of the from bumper bar upon the impact with the Eldorado. However, the bumper bar is still in its original intended position. What that tells me is that the shocks will absorb some amount to shock, and collapse enough to break the grill stanchions, but then the bumper bar will rebound to its original intended position. Therefore I don't know just how much shock it should take to fully collapse the shocks so that they are stuck collapsed. It must be about 5 mph or more which I suspect is what they are supposed to be designed for.
In summary, Stan, I still think that the common place for the grill stanchions to break is at one or both of the weak points at the top and not at the bottom. As to the shocks I think they will rebound from some slight impacts even though they will move enough to break the grill stanchions.
As to the idea about pumping the shocks full of grease my thought is that grease is a liquid and a liquid cannot be compressed. That is obvious on the bulldozer you describe, So my thought is why not just pull the shocks back out and weld them in their extended position, or simply replace them with some other solid mounts. Or, maybe I'm missing something about your suggestion.
Anyway, Stan, I appreciate your input because it has really stimulated my thought processes, and I actually kind of needed that right now.
Last edited by Jerry Feather; 09-26-2021 at 10:39 AM.
A single aluminum piece that replaces a plastic piece is not always the answer. Breaking the vertical plastic piece is preferable to breaking the slat attachment points.
If I were designing such a part in aluminum I would make it in three pieces and have the pieces assembled with plastic screws.
That way the impact separates the compound aluminum part, the horizontal slats are not broken and the vertical aluminum sandwich can be restored with new plastic screws.
Thanks Kevin. However you seem to have missed something in some of my too brief description above. If you look at the aluminum piece I have had cut out you will notice that it is much shorter than the original plastic parts shown. It is also about the same shape as the part of the original plastic pieces that is just about never broken. I had pointed out that at the top of the original pieces there are two weak points, one just behind where the screw is placed and the other just below that where the plastic part is very thin and weak. Those are the two designed failure points in the originals.
My intent is to put two joints at the top of the aluminum piece shown, and the bottom one of them will be spring loaded. There is no need for two springs, so the top joint will just be a hinged joint. So when the bumper bar is impacted and moved back the top section of my new stanchions will simply hinge with the bumper bar causing or allowing the grill in fact to lean slightly forward for a short time until the bumper bar is either replaced or replaces itself. No need for replacement of anything, including plastic screws, because my design will allow for complete collapse of the bumper shocks. When that happens and until the shocks are replaced the only effect is that the grill will likely still be where it is supposed to be with the stanchions articulated at the top to the new position of the bumper bar.
I see no reason to design any kind of more simple failure mode into these stanchions.
Last edited by Jerry Feather; 09-25-2021 at 01:51 PM.
Kevin's thoughts about the difference between aluminum and plastic bring back for me some previous thoughts about doing just what I am planning to do but in plastic plate and rod rather than aluminum. Actually I think that would be a perfectly good way to go, but I'm not sure there would be any advantage, such as less cost. I suspect the cost of material would be about the same, but I think there might be some saving in the time involved in waterjet cutting since I suspect the plastic, probably acetal, will cut much faster, and that cutting is time based at about $4.35 a minute. It cost me $560 to have 25 of my basic pieces cut out, including roughly $165 for the aluminum plate and close to $400 for the cutting.
Other thoughts I have had include injection molding, 3D printing, and perhaps some kind of compression forming. I'm still going to go the way I seem to be headed even if I end up with only the 8 sets that I have the pieces cut for now. I think I might have as many as 8 OBs, so it might be that they all end up with a more permanent smile.
Thanks Hacker. That is a random thought, and I actually had it too for a while, but mine was not quite as lonesome. When I thought further about mine I concluded that my permanent fix was not shifting the stress to somewhere else. A kind of goofy analogy came to mind in thinking about your random thought: Suppose that you built a new home and mounted the front door in its frame so that it was loose on three sides, but on the back side it was firmly fixed to the frame. Every time you wanted to open the door you had to break the door out of the frame at the back side where it was designed kind of weak for that purpose, but every time you did it you had to replace the door and frame with a new one. Then as you kind of randomly thought about it you decided that the best thing to do was to beef up the joint between the door back side and the frame. Then you found that now to open the door you have to break out a big chunk of the wall next to it because the door and frame are indestructible. Then your thoughtful neighbor comes by and suggests that if you put hinges along the back side of the door it will still kind of "break" when you open it but in a very indestructible way. Every time you open it it breaks but does not damage anything and it does not shift any potential damage to the wall or anywhere else. That is what my design is intended to do, allow the stanchions to break at their original break points, but to not fail the stanchion when they do.
Last edited by Jerry Feather; 09-26-2021 at 10:47 AM.
Further thought about Hacker's random thought has caused me to see another approach to these stanchions. That thought is that instead of hinging the break points why not just make the whole stanchions out of hard rubber. To do that I would first beef up the two designed break points some on original parts and then mock one (actually two) up and from those two I would make molds to inject a hard two part rubber compound. The final stanchion would probably be stiff enough to hold the grill bars like they are supposed to be, but would be flexible enough to keep from breaking when the bumper bar is smacked, even all the way back. I think one could even include some stiffeners in the rubber in the molding process to help keep the central part of the stanchions stiff with the bars in the correct positions. I wish I had thought of that first.
This idea also fits my goofy front door analogy. If Hacker made his front door out of hard rubber it would probably be flexible enough to open wide enough for ingress and egress with no damage to the door or frame or the wall next to it. It would still be indestructible without shifting the destruction potential to something else.
Last edited by Jerry Feather; 09-25-2021 at 06:25 PM.


 09-24-2021, 05:09 PM