When you click on links to various merchants on this site and make a purchase, this can result in this site earning a commission. Affiliate programs and affiliations include, but are not limited to, the eBay Partner Network.
Looking through the receipts, I noticed that only the serpentine belts were Conti that were replaced. Apparently, for TB, the previous owner used OEM Porsche part. Hopefully, that makes the case *slightly* better and less worrisome!
I wish that invoice actually meant your assumption was automatically true.
Accessory belts can be described with their sizes, not with the Porsche part number.
Timing belts can only be described by the Porsche part number....so almost everyone uses the same description for the timing belt. (The Porsche part number.)
What you need to do, to protect your investment, is simple.
Remove the right timing belt cover and inspect the belt/timing gears.
The belt may still be soft and the gears in great condition. And after 3,000 miles, the brand name should be simple to read, when you turn the engine over and find the painted identification marks.
If everything looks good, check the tension, make sure the tensioner is full of oil, put it back together, and forget it.
Thanks! As far as I read, to get to the right cover, I still need to drain the coolant, remove hoses, etc. To get to the tensioner, for check,
I would almost need to do everything else, right? The tensioner light is not on, so that's good. Could I read the identification mark through the
breather hole?
Actually, you do not need to drain the coolant to remove that cover. There is a way, it just isn't that easy. You'll need to squeeze that upper rad hose, and pull the others out of the way as much as possible. You may need to loosen the coil bracket and push the coil forward some too. Make sure you unplug the coil. Make sure you remove the battery ground strap before doing the job.
Thanks! As far as I read, to get to the right cover, I still need to drain the coolant, remove hoses, etc. To get to the tensioner, for check,
I would almost need to do everything else, right? The tensioner light is not on, so that's good. Could I read the identification mark through the
breather hole?
Perhaps you can look through that hole and see who made the belt, but you can't check the condition....and check the tension....and make sure that the belt light is actually hooked up and functional.
We never remove the hoses or drain any coolant.
It's simple to do. Take you a couple of hours, tops.
How much effort does it take to spin a Porsche pump?
There is a low mileage Porsche pump on this 89 I am working on. It takes some torque to spin it and it will not keep spinning. Minimal play. No roughness in bearing.
How much effort does it take to spin a Porsche pump?
There is a low mileage Porsche pump on this 89 I am working on. It takes some torque to spin it and it will not keep spinning. Minimal play. No roughness in bearing.
Ken,
That is a somewhat intangible question or so I would think. Are you taking about a pump held in your hand or one mounted and flooded with coolant but no timing belt mounted?
Held in one's hand there should be little resistance to rotation- if you try to spin the rotor by hand it will not spin very fast and will come to rest in a couple of seconds tops- the resistance coming from the seal.
Mounted but block has been drained. Had Conti belt with stock tensioner. Porsche coolant? Tension was a bit high, just outside of the Kempf window.
I don't want to but I will take off the pump and examine it further. Supercharger makes replacement difficult so I will probably replace it.
If the tensioner is taught to spec then logically there will be a lot of resistance to motion as the drive has to support the connected load of the pump which when spinning at 6k rpms is going to be several HP's worth of energy.
I am puzzled as to how you are perceiving this resistance -apologies if I am missing something here
OK with you now- I read your post as though the belt was still installed and tensioned which makes no sense [of course]. For whatever it may be worth when trying to get a feel for the condition of the pump bearing I rotate the assembly holding the outer radius of the belt pulley.
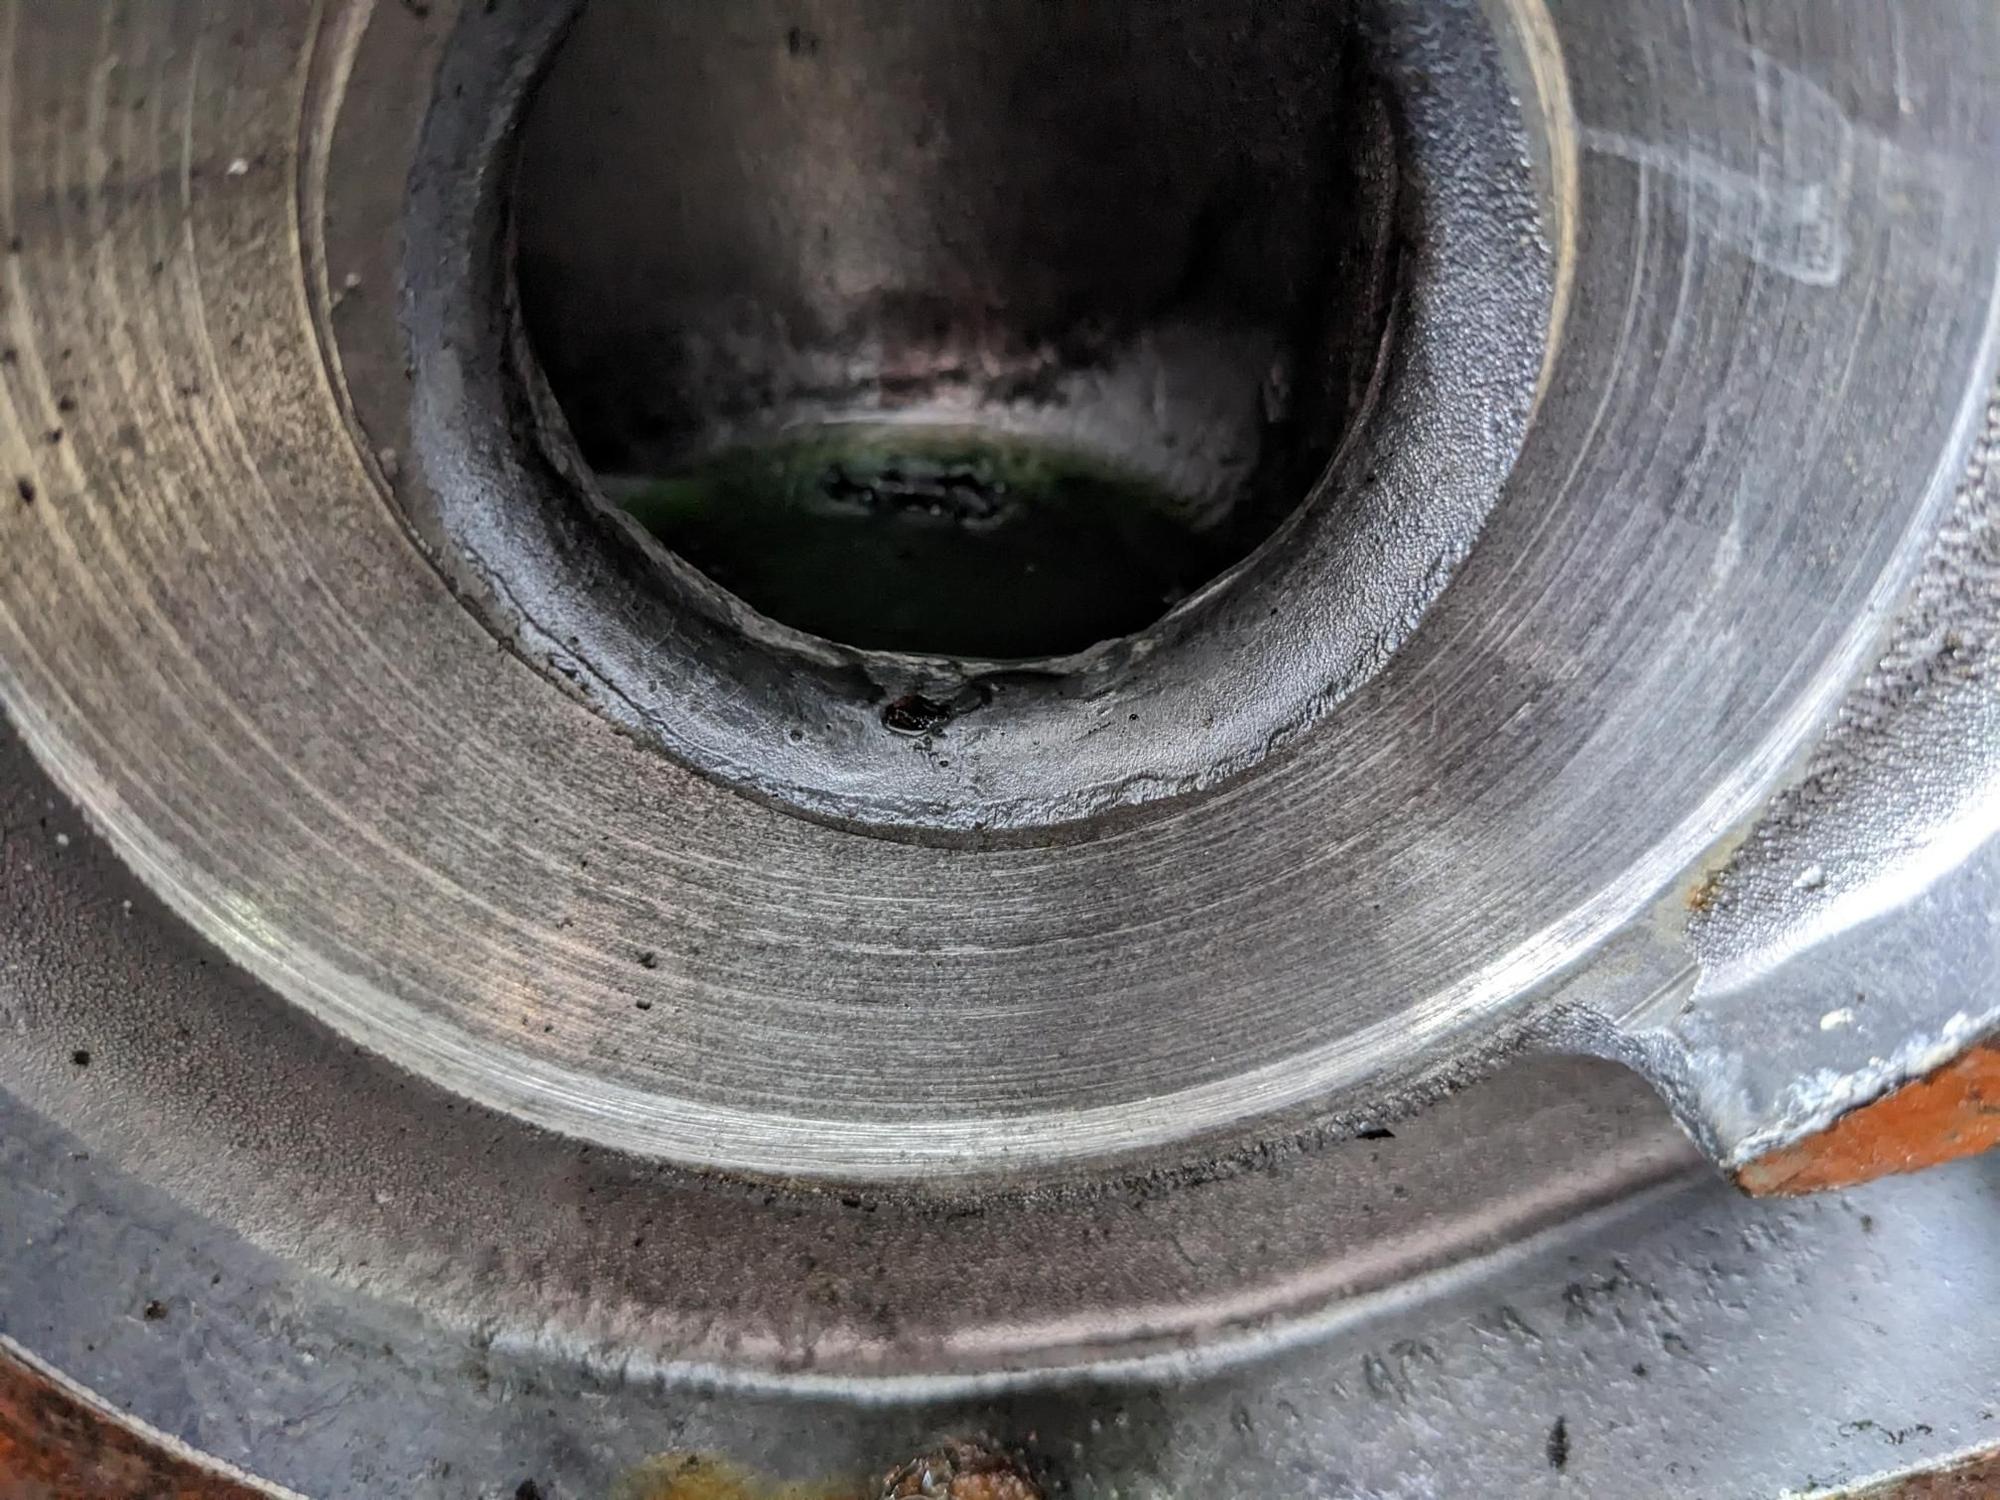
Well, I removed the two bolts holding on the R side cover of the TB to get a sneak peek. The belt looks OK-ish, but obviously extremely hard to tell from seeing only this much. Brand name I could not see and would likely need to wind the 6 ft long belt all around to do so. The fibers seems to be red/orange-ish, if that helps in identifying anything. Belt is riding slightly to the edge of the gear. I did not want to remove the distributor or the coolant hose. Any comments just based on this (other than we can't tell you anything based on this)?
Video (the flashlight tuned off in the middle, as the phone started overheating):
Umm Merope what exactly are you wanting find out?
One possible consequence of this could be damage to the cap and rotor,
it depends where the rotor is pointing,
it could scratch or break an electrode inside the cap or the center contact.
If your gonna do a belt inspection,
remove the cap,
then move the wires that are infront of the cover,
push the hoses out of the way and work the cover off.
if you have a removable upper fan shroud remove it.
use a 27 MM deep six point socket to turn the crank to TDC.
As an alternative you can use the # 14 pin in the 14 connector to spin the engine,
but a by hand turn is the best
Belt tension is checked at TDC and the engine cold .
for 32V engine on a kempf tool be at the top of the window=more tension
for 16V at the bottom= less tension
Thanks for the response, MrMerlin! I am trying to find out the condition of the belt and the brand. I know it has been
on there for 12 years, but it only has 3000 mi on it. At the time of change, the car got new accessory belts, which were
continental. I would like to know whether the TB is also Conti or possibly OEM. That will change my thinking as to
when to change the TB.
Thanks for the warning on the distributor. I didn't appreciate that the rotor is bolted to the cam gear! I just looked
at some photos. And then the cap is secured to the cam cover. Not really a well thought out design, to be honest.
The engine driving should not depend on the plastic cam cover holding up.
The last part not mentioned in descriptions is that there is a plastic tie-down on the cam cover securing what I
guess to be the tension sensor's wire. I don't wish to break it.
So a Laso steel impeller pump just cut into this block pretty bad. The pump had definitely been recently installed on this 70K mile 91 S4, but I question if it was a new pump since it just looked unusually dirty compared to the remainder of the engine. I can also say that the coolant in this engine was horrible and the cylinder head gaskets were almost totally eaten away (luckily the block and head surfaces are fine).
Regardless, I need to repair this block and all of the posts related to the cutter approach or the epoxy approach seem to be from 2009. I went to the websites of those companies, and I don't see those options offered. Am I missing something? Is someone offering a repair for this issue?
If not, I am considering doing a 3D scan of a good water pump casting (I do have a spare good shortblock), and then 3D printing a mold that I can use to make a high quality epoxy repair. From what I can tell, there are some high-temp epoxy solutions that should hold up well in this type of situation.
Had anyone tried this before? If not, I wonder if there is a market for these 3D printed molds sold with a release agent for a block repair epoxy. Perhaps offer this as a kit for a few hundred dollars. Thoughts?
Laso have not made a metal impeller pump for years.
GB has a tool to fix your issue. So did Carl @ 928MS but GB may be your best bet.
__________________
Does it have the "Do It Yourself" manual transmission, or the superior "Fully Equipped by Porsche" Automatic Transmission? George Layton March 2014
928 Owners are ".....a secret sect of quietly assured Porsche pragmatists who in near anonymity appreciate the prodigious, easy going prowess of the 928."

 07-16-2021, 05:21 PM


 George Layton March 2014