When you click on links to various merchants on this site and make a purchase, this can result in this site earning a commission. Affiliate programs and affiliations include, but are not limited to, the eBay Partner Network.
I’m making my way through some items that were in need of repair on my new to me car. So far everything has gone to plan. New rack mount bushings, rebuilt rear axle Cv’s and boots. Up next is replacing the rear shocks. It has Koni Red’s. When I bought the car I did notice a bit of a rough ride but didn’t think much of it. One morning while pulling it out of the garage I noticed oil on the floor. Long store short, there’s no more oil on the floor.
I’m planning on replacing them with the same shocks. My question is do I need to replace anything else that might be a wear item? Looks like a lot washers and whatnot. Trying to navigate the PET just confuses me. If someone could put a short list of the parts I might need would be much appreciated. Or would it be better to contact the Big 3 and talk to them. If anyone has a good place to go shock shopping I’m all ears. Thanks in advance, Mike
Needless to say, use this as a template to choose what YOU want to replace, and adjust part numbers as necessary for your model year. My list is pretty exhaustive and involves the entire suspension refresh, bushings and all. I created it in part by cross correlating with every part the workshop manual says to replace. Speaking of that, get yourself a copy of the workshop manual and use it. BTW you need to learn how to navigate PET if you're doing your own work on any 928, you'll figure it out if you spend a little time with it.
While you're doing those shocks, consider replacing your bushings too. If they're original, it's time. And whatever you refresh on the rear, do all the same on the front.
And call Roger at 928sRUs, who will talk you through everything. There's no other parts supplier for our cars who is as friendly and knowledgeable and who will gladly lead you through what you need.
Wow! What an amazing thread you have put together. Spent and hour or so reading through it. Great many thanks for the info. I’m going to take your advice and give Roger a call. Enjoy that car! Mike
Thanks Mike, much appreciated!! Good luck on yours and keep us updated. Take your time and enjoy the process. Working on these cars isn’t as hard as it sometimes seems at first and is really rewarding!!
Cheers,
Rick
PS I forgot to post a link to the online shop manuals: http://www.ligeti.com/928/
Roger, I believe, may have sets available.
Good luck. It's not particularly hard. Make sure you have (or rent) a pair of spring compressors. I'm oing this same job right now on an '81 Euro S I recently bought. Check the front upper A-arms too, specifically the ball joint. If they're shot (like mine are), you can either buy a rebuild kit or refurbished arms.
I bought a good used set of Boges from a parts car, took them apart and refurbished them with new snubbers and paint.
I've now moved onto hydraulics and have all that apart currently - going back together today. New clutch master, brake booster, brake master, clutch slave, and stainless brake lines.
If interested, you can follow along in my "Added an '81 Euro" thread.
if your replacing the shocks you will need,
the 4 shock bumpers, 2 front and 2 rear,
the 4 white plastic discs (these come with new Boges)
if your going Boge you will need to make sure the threaded collars are free,
use loctite to secure the threaded rings onto the shock body a drop of green is good.
use anti seize on the threads and on the perches/ collars.
Look at the front shock dust covers see if they are cracked if so get new ones.
NOTE if you get Bilstiens then they come with new lower perches and threaded adjuster rings.
Get an Ohlins collar wrench
Isn't there something special needed to fit Bilsteins if they weren't originally installed?
I did all four of mine a couple years ago. Some of this repeats stuff above, but that's what you get.
The bump stops are the rubber things on top of the shocks. Get new ones. Roger has them for like $20 each. The dust cover is the plastic cap that goes over the bump stops. Mine were fine, but some folks find they are cracked.
Getting the 'big pin' at the bottom out can be a challenge. If it's rusted in place, it can be a big pain. There's a bunch of threads on different techiques. Search is helpful on this. Personally, I got really lucky and my car has never seen salt. Everything came apart nice and easy.
The spacers & washers and stuff that the pin goes through can be confusing. Make sure to keep them in order.
If you've never taken coil overs apart, it can be intimidating. The energy in the compressed spring can be very dangerous. Like 'kill you' dangerous. I would advise against the 'hooks and threaded rod' spring compressors. I used a 'shop quality' wall mounted unit. A friend owns a shop and I can do stuff like that when I need to. It's a 10 minute job to take each one apart (going slowly). After using the good one and seeing someone else use the cheap one, I'd pay a shop to take them apart and put the new ones together rather than risk the cheap one.
Other folks have had safe and successful results with the cheaper ones. Your job, your choice.
Getting the adjustment collars off the shocks can be challenging. A shop press is really useful for this. The collars are aluminum and trying to get them off with a hammer and punch doesn't work very well.
When putting the coil overs back in, the tops are not symmetrical. They look like it at first glance, but the three studs are not placed 'evenly' all the way around. They only go into the body of the car one way. If you look closely you can see it. But you have to know to look.
The bottom of the shock is tilted. It's supposed to go one way. Pete's 2nd pic shows that very well. My research indicated that you can get the big pin installed if the shock is backwards...
But you won't get it out again.
Make sure you get the washers, spacers and stuff back in the right order when you put it back together. If the stuff gets mixed up, the diagram in the PET is very helpful.
The big curved washers will not want to stay in place. A dab of grease on them will hold them (Stan's suggestion - it works great).
It's recommended to use new nuts on the ends of the big pin (4 total).
That's what I'm remembering off the top of my head.
My method for the bottom pin was to install a jam nut up against the outer one. Then you turn the inner one of that pair while holding the nut at the opposite end of the rod, which unscrews that end. I happened to have a nut of the correct size and thread pitch to do this.
Once I had the inside nut removed, I then clamped my vise grips onto this spare outside nut I was using for the jam nut and hit the side of the vice grips with a dead blow hammer to drive the pin out of the bottom of the shock.
Thanks everyone for the great responses. Everything up front looks really good. The car has Koni red shocks front and rear. Looks like TireRack has about the best prices for the rear replacements.
I’ve decided to have a local shop I did business with while owning a CLK 550 I had. Their specialty is euro suspensions. They have an awesome Hunter alignment machine.
I’m planning on an alignment once the new shocks are installed since I got the rack bushings replaced a few weeks back up front. Huge difference with those replaced. The car drives and tracks incredibly straight and tight. Not withstanding the bad rear driver side shock. This should finish up my kind of big rock items I wanted to get done before our good weather here in the Midwest gets started. Thanks again, Mike
I did all four of mine a couple years ago. Some of this repeats stuff above, but that's what you get.
The bump stops are the rubber things on top of the shocks. Get new ones. Roger has them for like $20 each. The dust cover is the plastic cap that goes over the bump stops. Mine were fine, but some folks find they are cracked.
Getting the 'big pin' at the bottom out can be a challenge. If it's rusted in place, it can be a big pain. There's a bunch of threads on different techiques. Search is helpful on this. Personally, I got really lucky and my car has never seen salt. Everything came apart nice and easy.
The spacers & washers and stuff that the pin goes through can be confusing. Make sure to keep them in order.
If you've never taken coil overs apart, it can be intimidating. The energy in the compressed spring can be very dangerous. Like 'kill you' dangerous. I would advise against the 'hooks and threaded rod' spring compressors. I used a 'shop quality' wall mounted unit. A friend owns a shop and I can do stuff like that when I need to. It's a 10 minute job to take each one apart (going slowly). After using the good one and seeing someone else use the cheap one, I'd pay a shop to take them apart and put the new ones together rather than risk the cheap one.
Other folks have had safe and successful results with the cheaper ones. Your job, your choice.
Getting the adjustment collars off the shocks can be challenging. A shop press is really useful for this. The collars are aluminum and trying to get them off with a hammer and punch doesn't work very well.
When putting the coil overs back in, the tops are not symmetrical. They look like it at first glance, but the three studs are not placed 'evenly' all the way around. They only go into the body of the car one way. If you look closely you can see it. But you have to know to look.
The bottom of the shock is tilted. It's supposed to go one way. Pete's 2nd pic shows that very well. My research indicated that you can get the big pin installed if the shock is backwards...
But you won't get it out again.
Make sure you get the washers, spacers and stuff back in the right order when you put it back together. If the stuff gets mixed up, the diagram in the PET is very helpful.
The big curved washers will not want to stay in place. A dab of grease on them will hold them (Stan's suggestion - it works great).
It's recommended to use new nuts on the ends of the big pin (4 total).
That's what I'm remembering off the top of my head.
I'll likely remember more later.
Thanks for the info. I’m take all of you advice. Mike
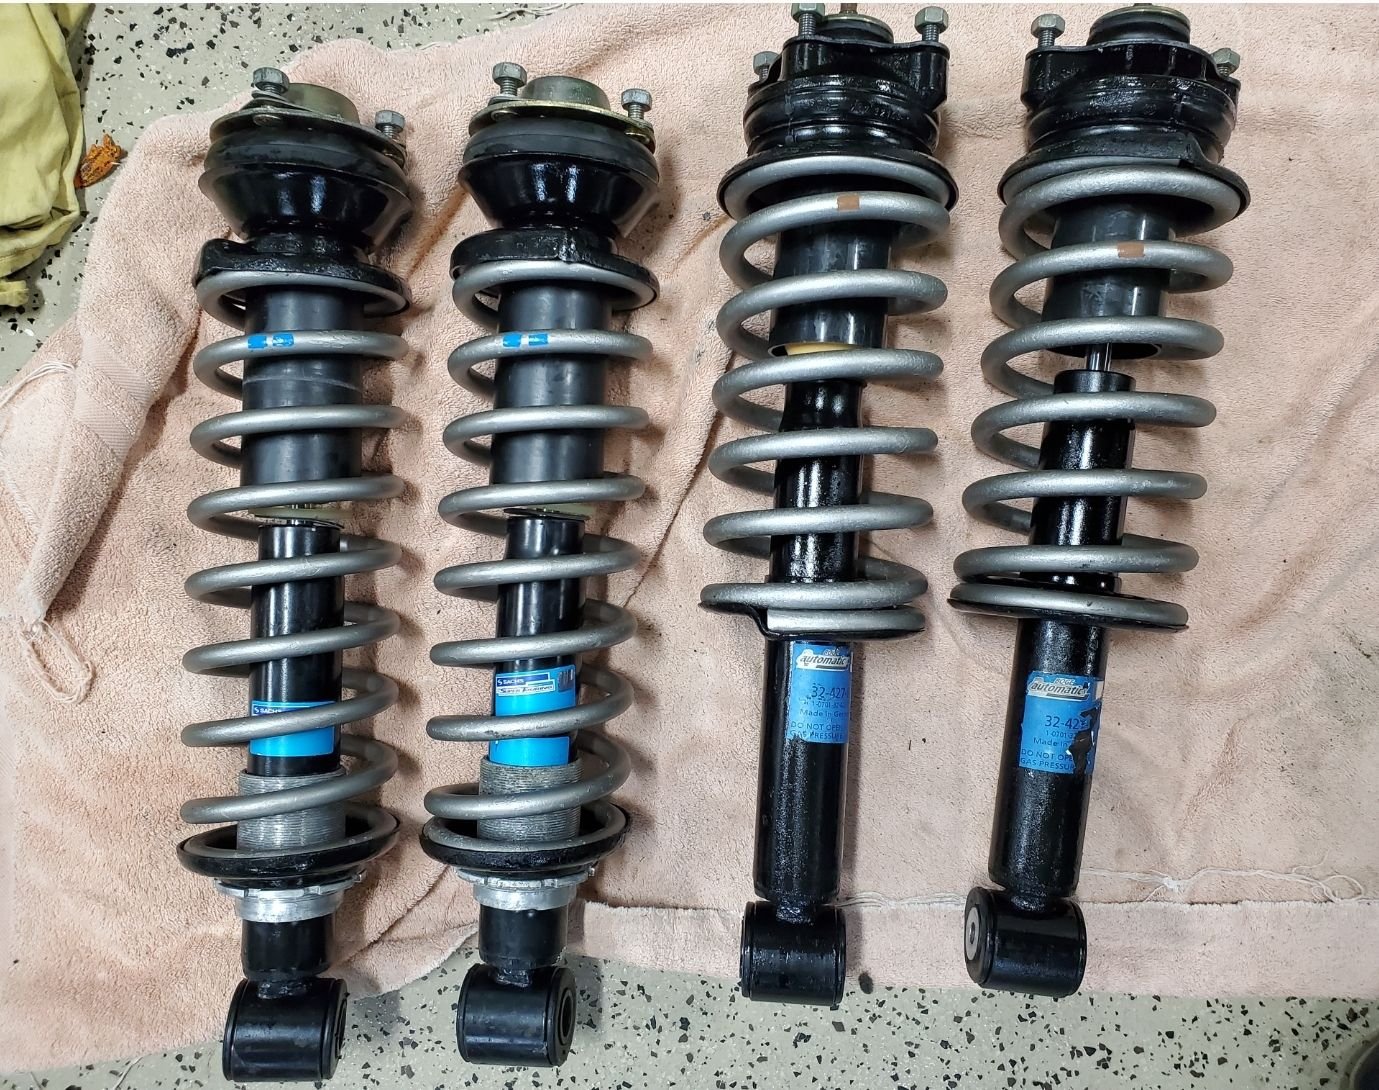
Talked with Roger who ran the VIN for the build sheet and found out the shocks on my car are considered rather rare. An option through the Porsche factory. Not the Koni’s I thought they were. Stay tuned.
Talked with Roger who ran the VIN for the build sheet and found out the shocks on my car are considered rather rare. An option through the Porsche factory. Not the Koni’s I thought they were. Stay tuned.
Probably Bilsteins with adjustable front perches. Springs might have two blue dots on them too signifying the sport spring.... or I might have become completely lost in trying to make heads or tails of all the spring / shock combinations.
Probably Bilsteins with adjustable front perches. Springs might have two blue dots on them too signifying the sport spring.... or I might have become completely lost in trying to make heads or tails of all the spring / shock combinations.
According to Roger they are Boge Red sport shocks. He’s checking his stock for me right now. Awaiting his call back.

 03-05-2021, 10:35 PM