When you click on links to various merchants on this site and make a purchase, this can result in this site earning a commission. Affiliate programs and affiliations include, but are not limited to, the eBay Partner Network.
Not very much new, here, from when this injection system and camshafts were in Andy's car in Kansas.
If you don't recall, this engine made over 400ft.lbs. from 3,000 to 7,000.
And over 450 ft.lbs. from 3700 to 7,000.
And over 500 ft.lbs. from 5300 to 6300.
Peak horsepower was over 600 from 6300 to 7000....and the horsepower had not fallen off.....the dyno operator did not want to go any higher on a brand new engine.
Andy's engine was tuned on 93 octane.
All of these numbers were from a certified DTS engine dyno.
Since Andy's car was an automatic and this car is a five speed, I decided to move the entire power range up a bit, to make the manual transmission "happier."
So I reduced the stroke a bit, made the connecting rods a bit longer, raised the compression ratio a couple of points (or so), changed the cams around a bit, and dry sumped the engine.
This engine will be tuned on 100 octane.
Looking for 675-700 at 7500.
And would be thrilled to loose a bit of below 5,000 torque.
You'd think that the plumbing the oil and fuel system would be simple and straightforward.
It's not!
We're 3 days into doing this...Kyle spent 12 hours today doing 3 really tough hoses. Poor guy...he's "used up", but he's out there, right now, trying to finish a fourth hose! (While I'm sitting down for a couple of minutes to get caught up on the details of business......slacking!)
It sounds stupid, but with aerospace quality hose, you first have to figure out what angle hose ends are going to work, figure out how you are going to route the hose, figure out how close to the exhaust the hose runs to determine which type of hose to use, remove the fitting that you are going to use from whatever orifice it was threaded into, crimp the first end, re-install the hose, routing it exactly where it needs to go, measure the exact length of the hose you need to get to the next fitting, remove the hose, cut the length you need, reinstall the hose and route it again, install the hose onto the second fitting, mark the clocking, remove the hose again, install heat protection (if needed), crimp the second end, install heat shrink on the ends if it got heat protection, clean the hose, and finally install it, and tighten.
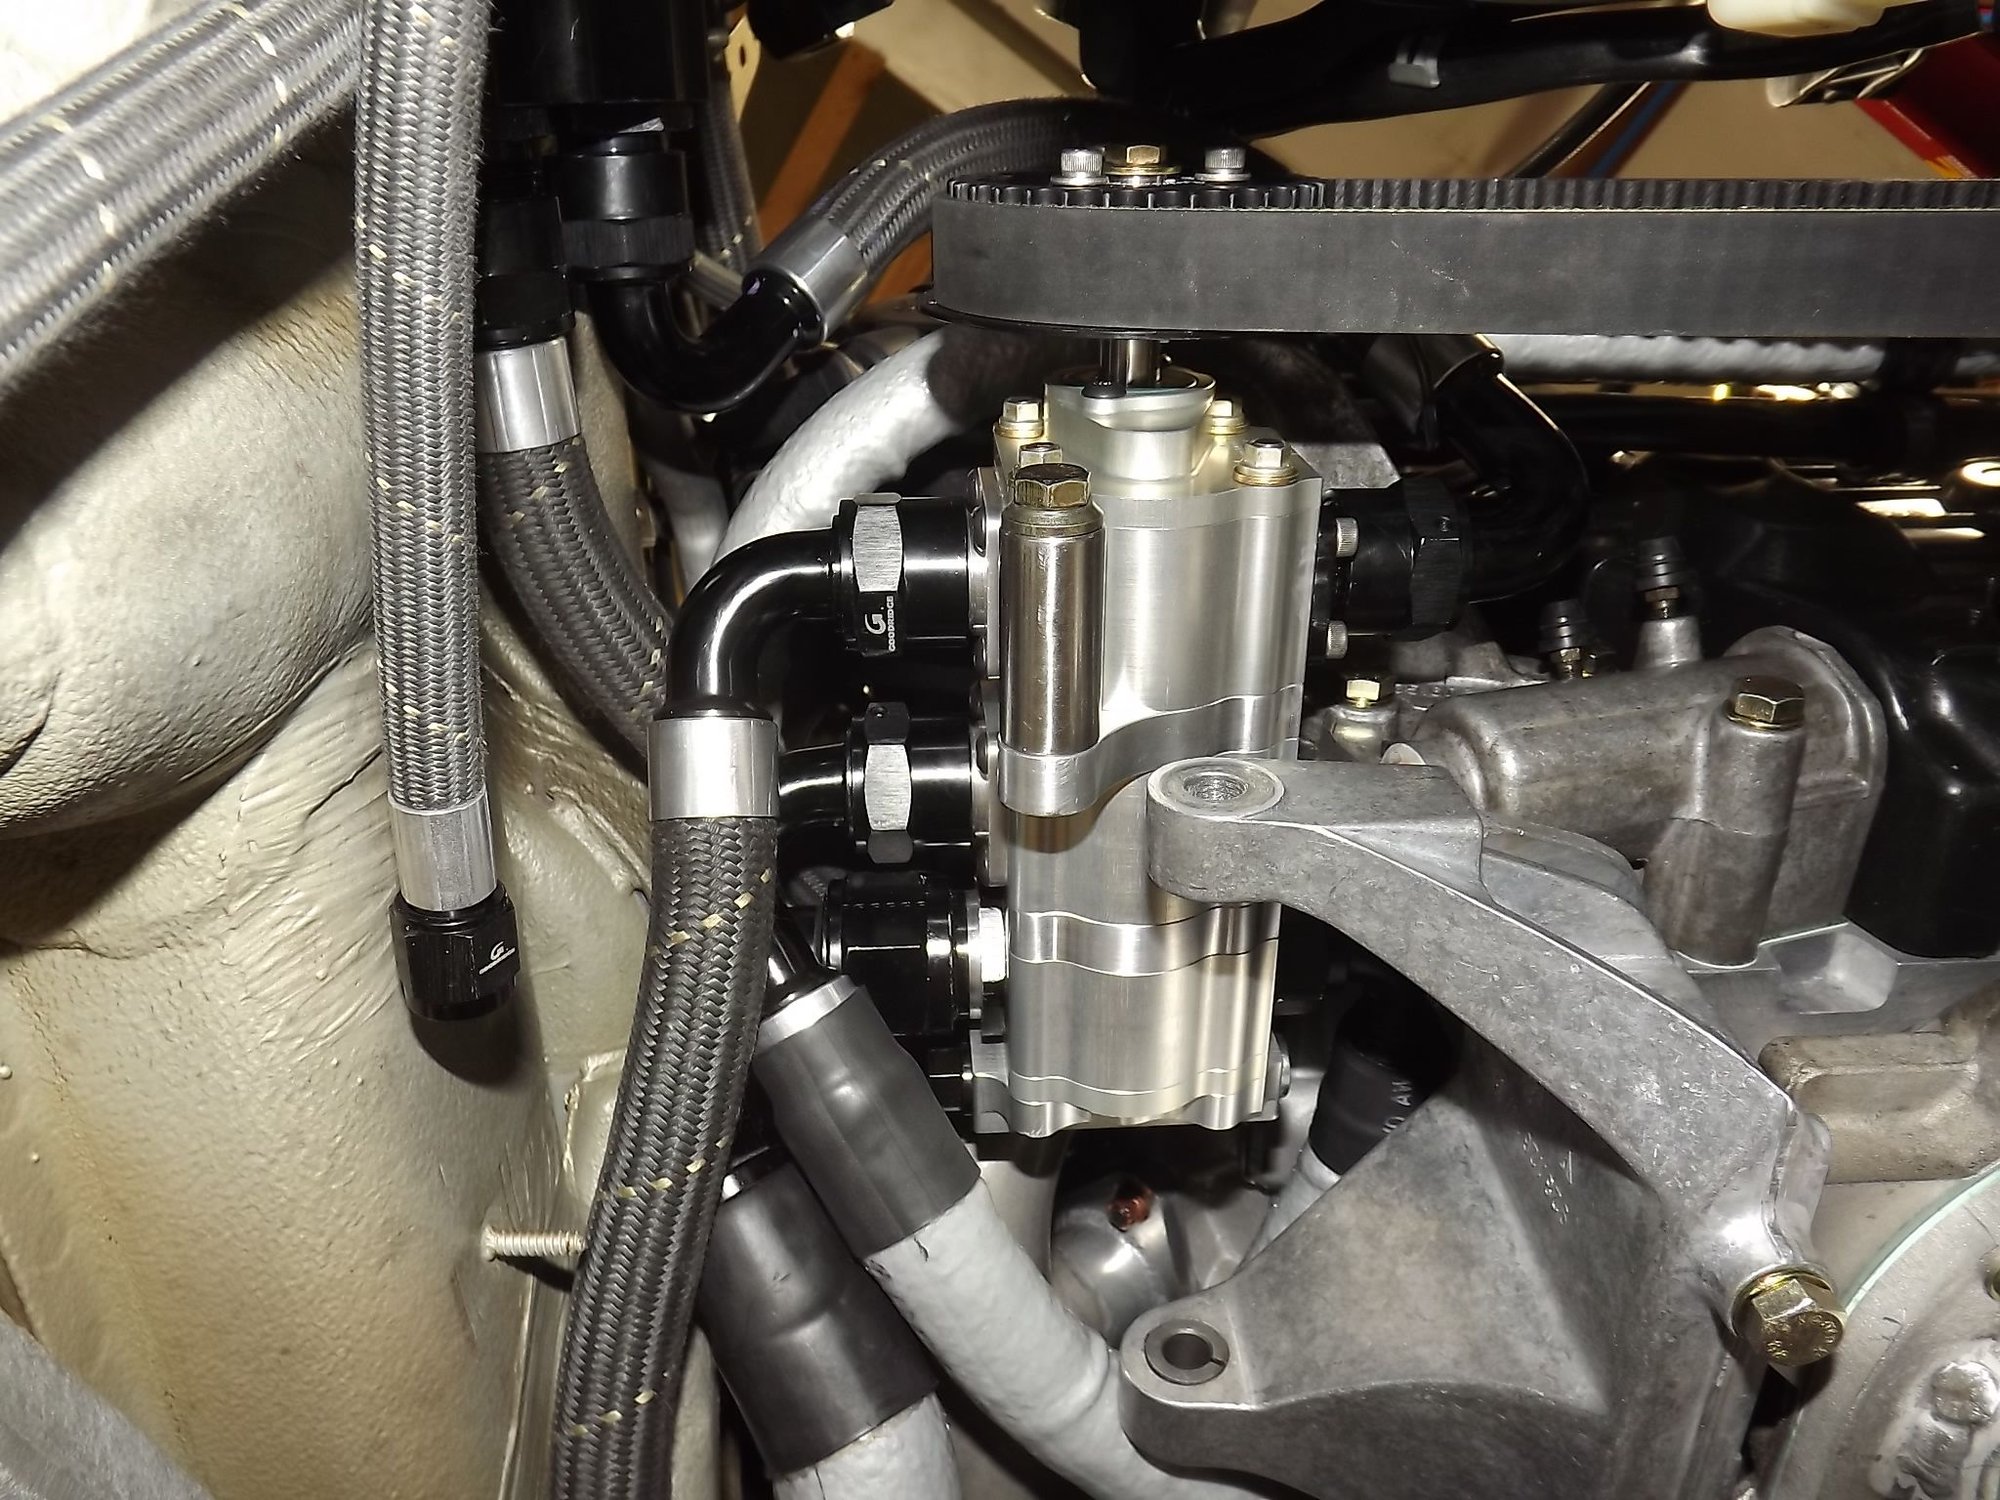
And then hope the next hose doesn't conflict with the one you just made! (There's 21 separate oil hoses, on this engine.) Pressure/oil pan scavenge pump above the A/C compressor (compressor removed.) The greyish/black hose with the gold stripe is Goodridge 911 series (Kevlar with Teflon liner.) This hose is very light and virtually indestructible (we use this hose to make a some of custom 928 fuel hoses.) This hose is rated to 375 degrees. The hoses with the silver heat sheathing are Goodridge 810 series. The 810 series is good for 500 degrees, so we use this hose, covered with heat protection, anywhere a hose runs close to a header pipe.
You'd think that the plumbing the oil and fuel system would be simple and straightforward.
It's not!
We're 3 days into doing this...Kyle spent 12 hours today doing 3 really tough hoses. Poor guy...he's "used up", but he's out there, right now, trying to finish a fourth hose! (While I'm sitting down for a couple of minutes to get caught up on the details of business......slacking!)
It sounds stupid, but with aerospace quality hose, you first have to figure out what angle hose ends are going to work, figure out how you are going to route the hose, figure out how close to the exhaust the hose runs to determine which type of hose to use, remove the fitting that you are going to use from whatever orifice it was threaded into, crimp the first end, re-install the hose, routing it exactly where it needs to go, measure the exact length of the hose you need to get to the next fitting, remove the hose, cut the length you need, reinstall the hose and route it again, install the hose onto the second fitting, mark the clocking, remove the hose again, install heat protection (if needed), crimp the second end, install heat shrink on the ends if it got heat protection, clean the hose, and finally install it, and tighten.
And then hope the next hose doesn't conflict with the one you just made! (There's 21 separate oil hoses, on this engine.) Pressure/oil pan scavenge pump above the A/C compressor (compressor removed.) The greyish/black hose with the gold stripe is Goodridge 911 series (Kevlar with Teflon liner.) This hose is very light and virtually indestructible (we use this hose to make a some of custom 928 fuel hoses.) This hose is rated to 375 degrees. The hoses with the silver heat sheathing are Goodridge 810 series. The 810 series is good for 500 degrees, so we use this hose, covered with heat protection, anywhere a hose runs close to a header pipe.
Awsome work being able to keep the aircon and to fit a multi stage scavenge pump instead of the smog pump...
Normally I would say that this is the most complicated cubic foot on this car, but the plumbing work is other-level in many corners of this build. Kyle is killing it here.
Normally I would say that this is the most complicated cubic foot on this car, but the plumbing work is other-level in many corners of this build. Kyle is killing it here.
Well, another change in plans:
Inspection of the old intake plenum showed severe cracking of the welds, multiple repairs, glue, bondo, etc.
Andy had covered the plenum in some gold heat resistant foil material, which I thought was just for heat.
However, it also served the purpose of covering up some gross irregularities of the plenum.
The old plenum was made from .080" wall 6061.
We stepped up the thickness of the new plenum to .125" wall and used a less brittle grade of aluminum.
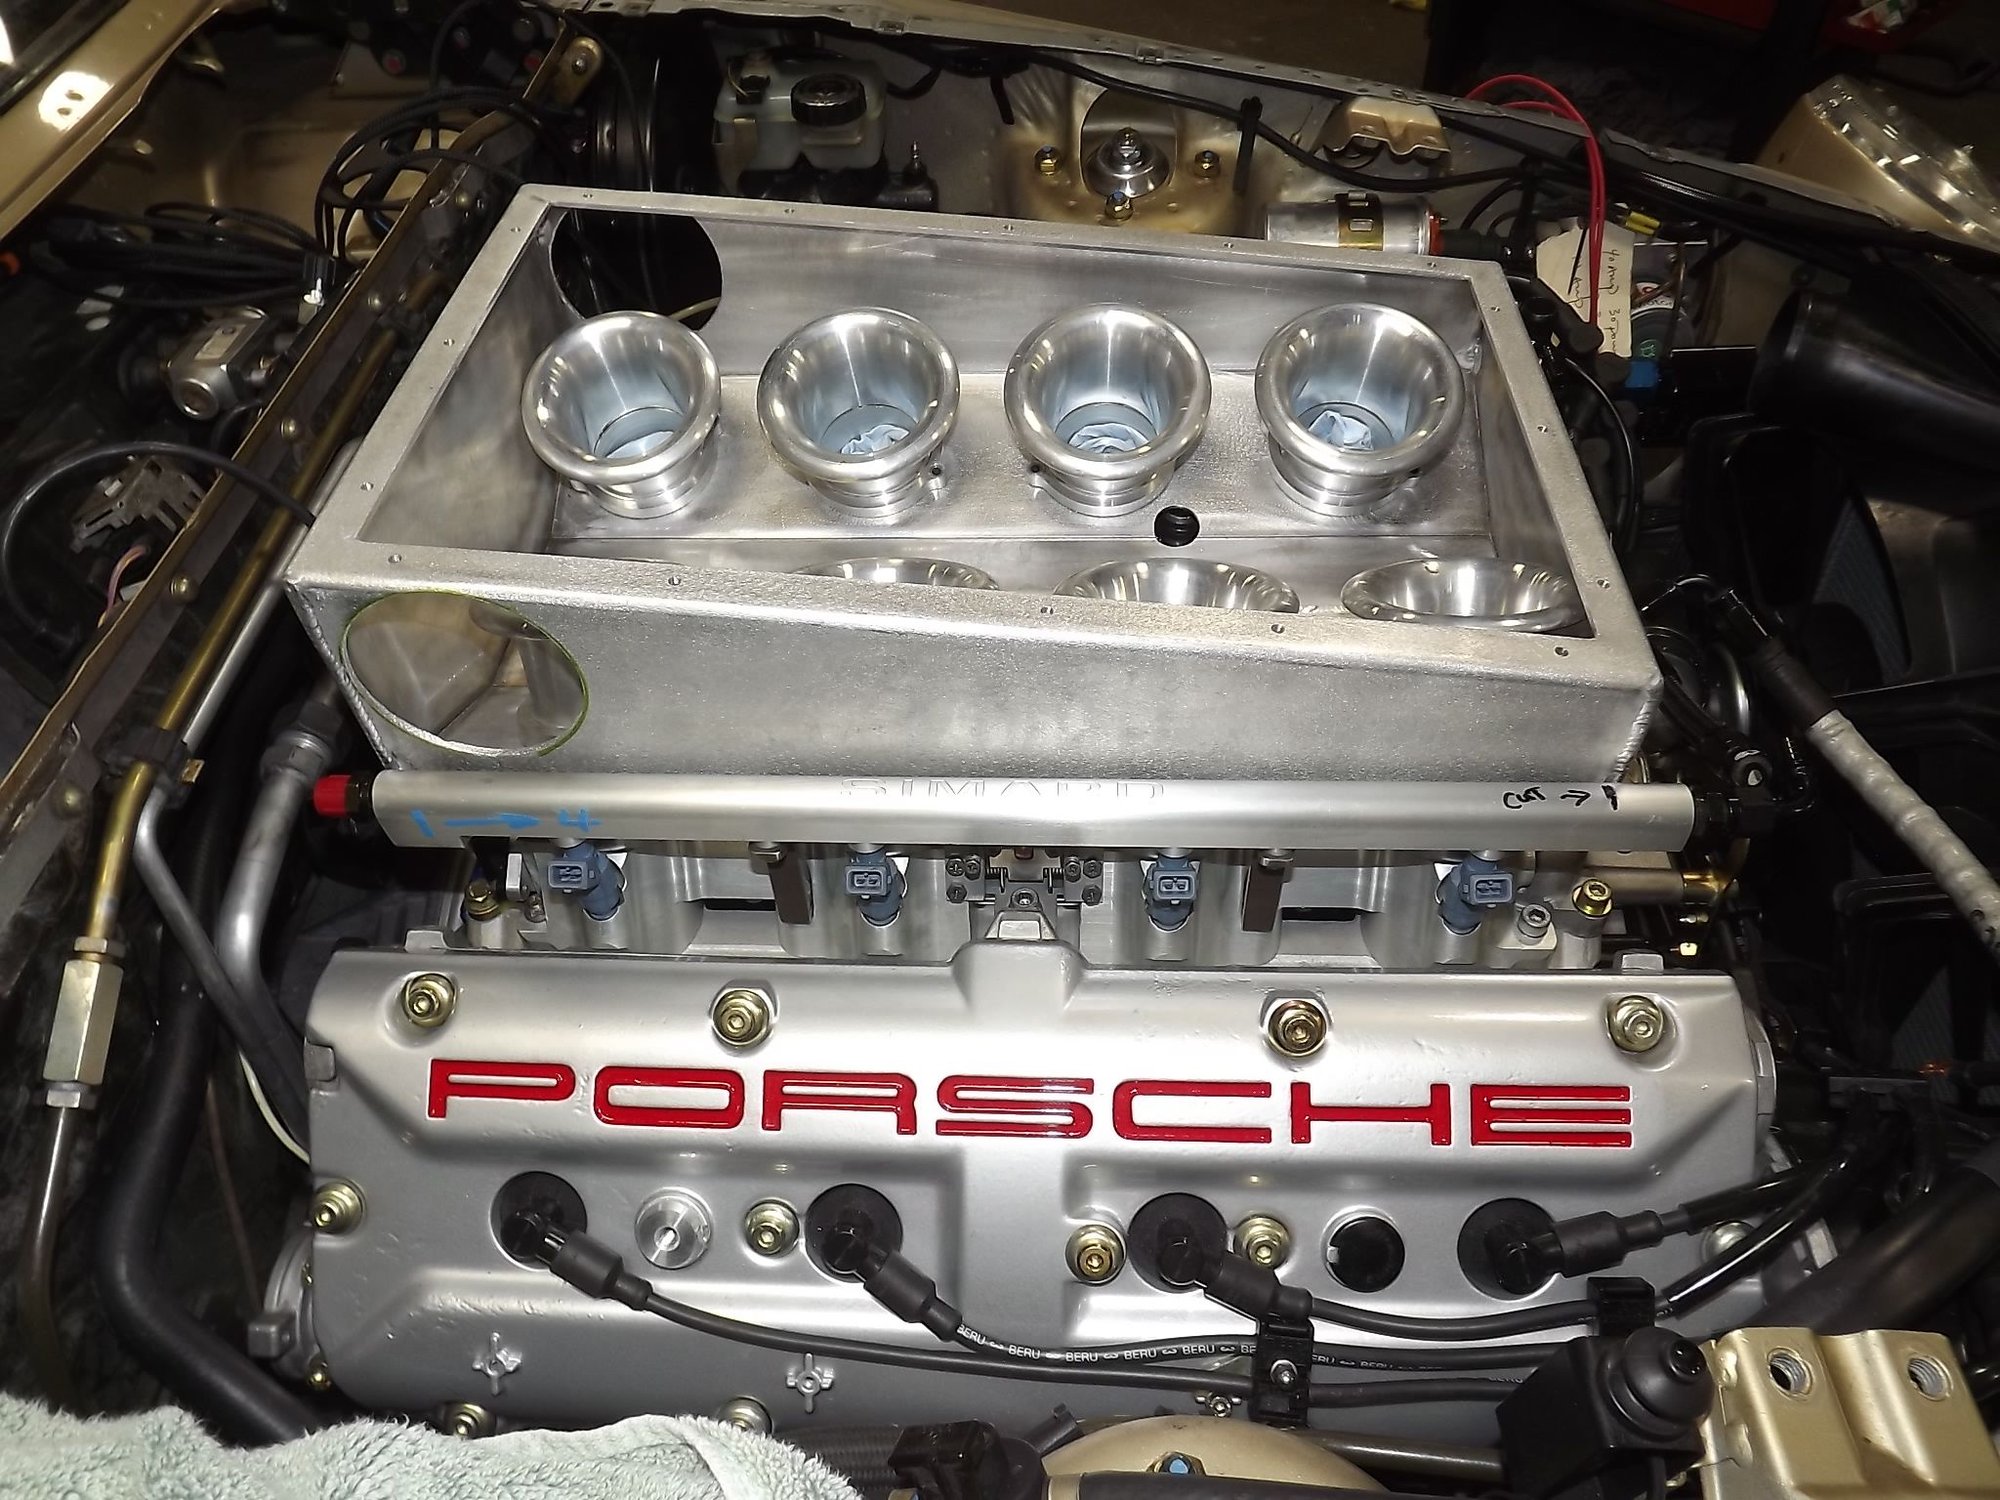
The old plenum had two filtered intake ducts, which entered in the back of the "box" and I always wondered if this was enough air to feed this monster of an engine.
And I was always concerned if the front cylinders were getting enough air.
The severe amount of deterioration of the old plenum told me that there was quite a bit of "flexing" under high intake "draw" conditions (WOT)...a sure sign of inadequate air inlet flow.
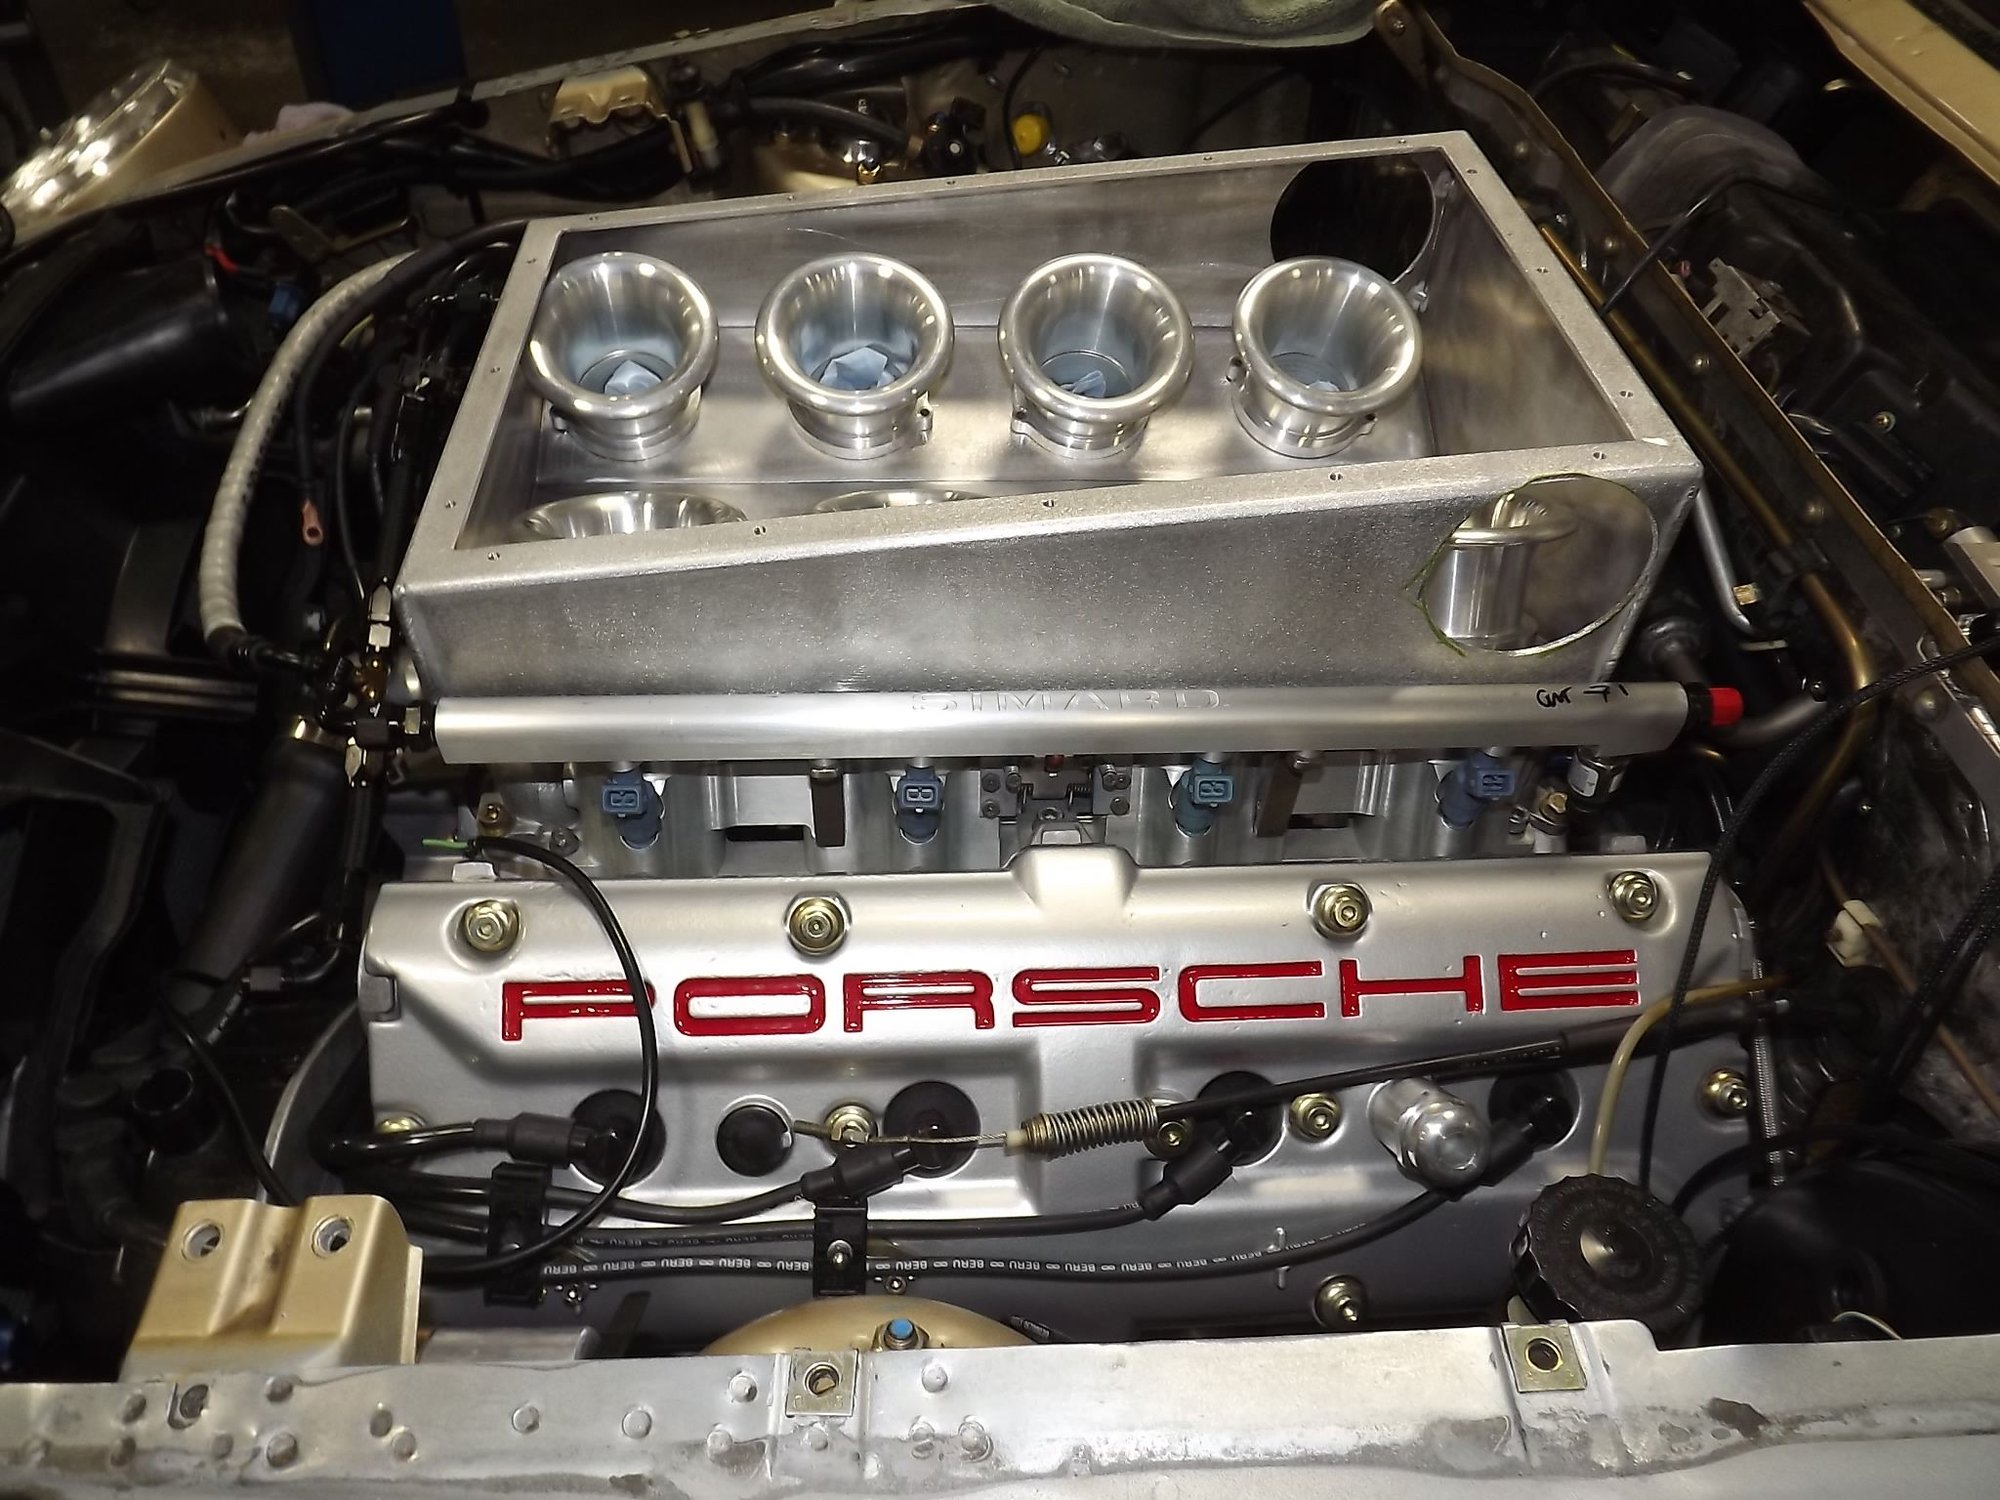
So, we built the new plenum (pictured in post #121.)
And decided to add a front air inlet.
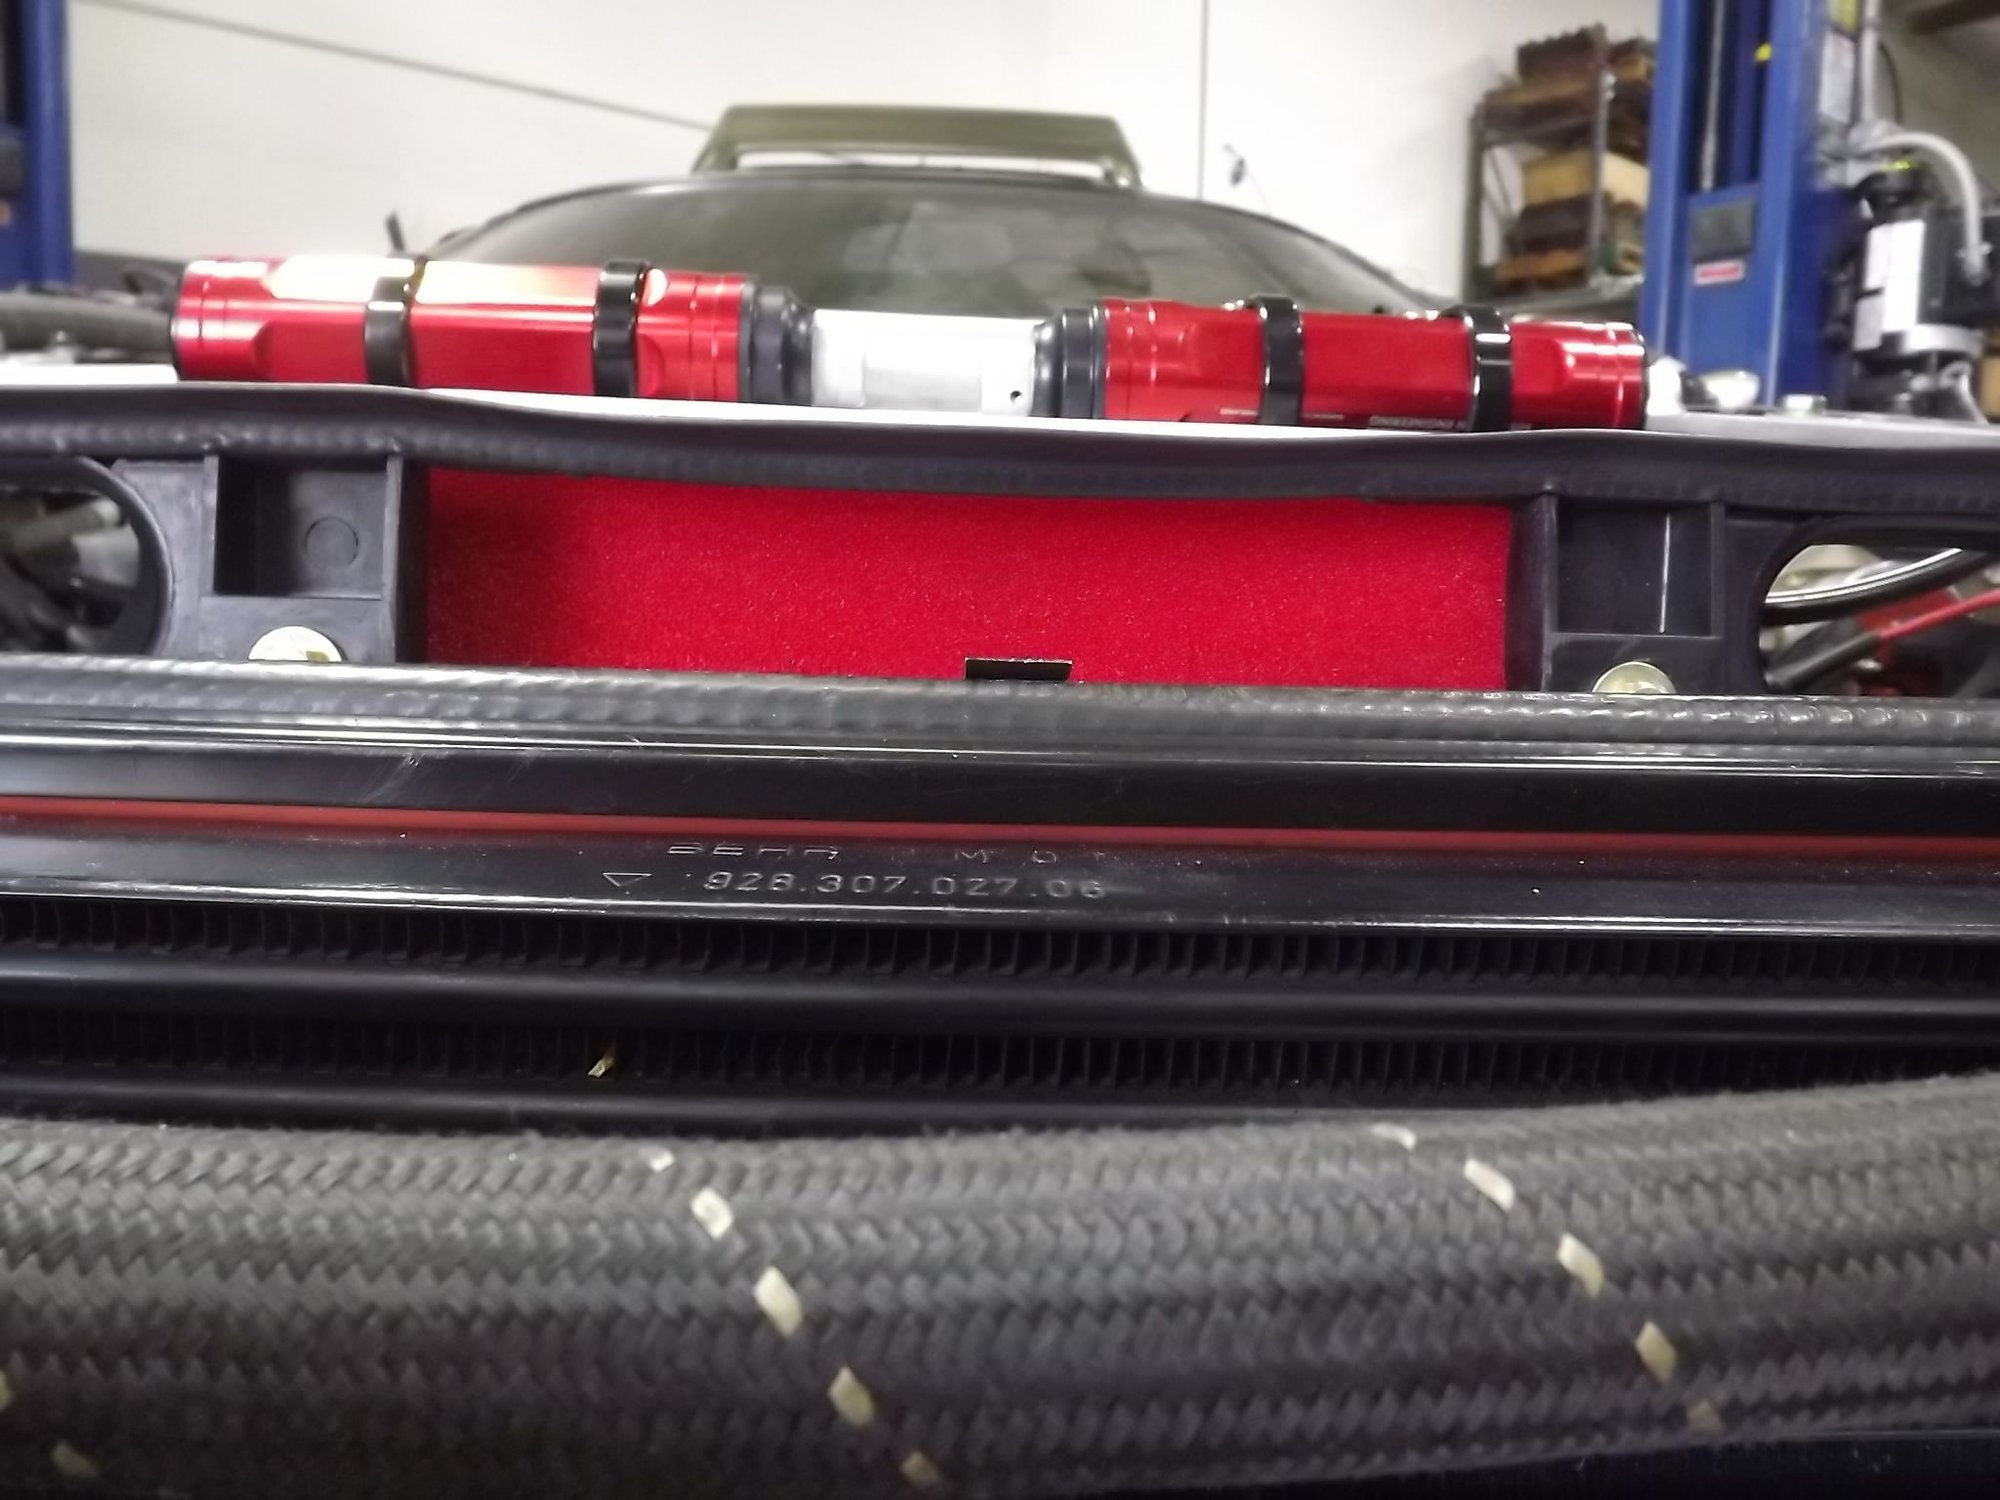
Of course, this also meant that the front chassis stiffening bar also had to be remade...along with 3 or 4 other changes.
The good news is that the new front brace gave me a fantastic spot to mount the front shock canisters, with some really nice clamps.
It's a work in progress....
Intake plenum/chassis support. Front plenum air inlet.
Just Wow. So much to see there. Does the front intake replace the two rears, or add to it? I am guessing the latter...
Correct Jim, adds to.
It was a long way to those front cylinders, with multiple cylinders "robbing" air, with the original plenum.
Hopefully, this is better, with air from both ends?
If anything it should add a minor ram air effect, but seeing as that engine has a massive displacement and is going to operate at high RPMs that should be moot.
That engine is going to have such a wicked top end!


 02-16-2022 | 11:51 PM


 .
.