

Front/aft Wheel Well pics
 03-09-2004, 03:20 AM
#1
Addict
Lifetime Rennlist
Member
Lifetime Rennlist
Member
Thread Starter
Just snapped some pics of the front wheel well behind the cover (pax side).
Doing some RnR.
Im not sure what the supercharged cars are using for I/C coolant tanks but...if its the washer tank, i hope you flushed and cleand them out first! I wouldnt want the crap i saw in my tank running through my intercooler
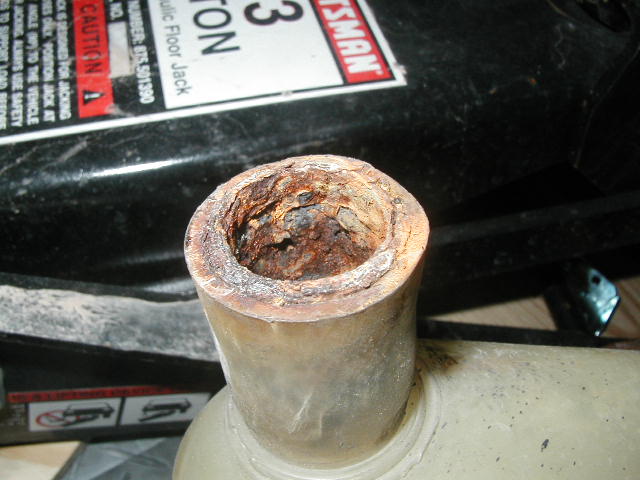
This is the intlet to the washer tank.
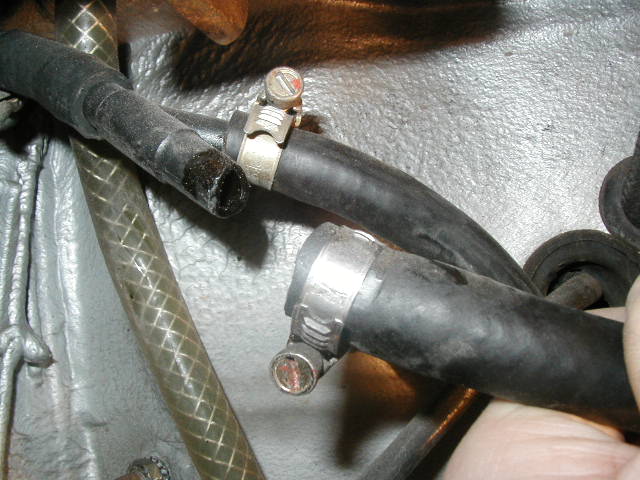
The famous "Y" connector, in its most often found state. Can you smell gas??
This is how the rub strips are attached...no 3m sticky tape here.

Top is the windshiled washer motor...bottom is headlight. The flash ruined the image i wanted to capture, ill try again later. I had the tank back lit to show the crud a debris inside.

They used just about very inch of space in this car. Amazing.

Doing some RnR.
Im not sure what the supercharged cars are using for I/C coolant tanks but...if its the washer tank, i hope you flushed and cleand them out first! I wouldnt want the crap i saw in my tank running through my intercooler
This is the intlet to the washer tank.
The famous "Y" connector, in its most often found state. Can you smell gas??
This is how the rub strips are attached...no 3m sticky tape here.
Top is the windshiled washer motor...bottom is headlight. The flash ruined the image i wanted to capture, ill try again later. I had the tank back lit to show the crud a debris inside.
They used just about very inch of space in this car. Amazing.
 03-09-2004, 10:08 AM
#2
Rennlist Member

Join Date: Dec 2002
Location: Southern New England
Posts: 1,975
Likes: 0
Received 0 Likes
on
0 Posts
Tony,
In the "rub strips" photo, notice the sunroof drain tube. Good time to clear it!
I had similar rust and crud, and used a die grinder to remove the sleeve from the tank and fill nozzle. Reassembled with silicone RTV and gentle hose clamping. The IC plumbing ties into this, so skip the RTV until you do the install.
Last edited by Old & New; 03-10-2004 at 02:02 AM.
03-09-2004, 02:15 PM
#5
Addict
Rennlist Member
Rennlist Member
Tony,
Mine looked like that also. I cleaned it out.

I guess Porsche thought that it was all right to put iron sleeves in the
window washer system. The one at the filler neck was worst. It was
corroded and had cracked the neck.

I had to got a "new" used one from an 83. There was a slight
difference, but not enough to stop it from working.
Mine looked like that also. I cleaned it out.
I guess Porsche thought that it was all right to put iron sleeves in the
window washer system. The one at the filler neck was worst. It was
corroded and had cracked the neck.
I had to got a "new" used one from an 83. There was a slight
difference, but not enough to stop it from working.
03-09-2004, 03:03 PM
#7
Range Master
Pepsie Lite
Lifetime Rennlist
Member
Pepsie Lite
Lifetime Rennlist
Member

Originally posted by Marc Schwager
Good photos! I dread heading into the wheel well project.
I wonder what ever happened to the discussion about fabricating stainless Y connectors?
Good photos! I dread heading into the wheel well project.
I wonder what ever happened to the discussion about fabricating stainless Y connectors?
I would not "dread" the job at all, it is actually quite simple.
Below shows my Y connector repair, as well as some mods for the SC intercooler install.
Last edited by Gretch; 03-15-2004 at 05:40 PM.
Trending Topics
03-09-2004, 03:44 PM
#9
Range Master
Pepsie Lite
Lifetime Rennlist
Member
Pepsie Lite
Lifetime Rennlist
Member
Originally posted by jorj7
Marc,
My stainless steel Y was still in good shape after four years:

Marc,
My stainless steel Y was still in good shape after four years:
03-09-2004, 06:16 PM
#10
Addict
Rennlist Member
Rennlist Member
Hello Tony,
I have pulled the rusted sleeve from 2 of my 928's.
I found that the easiest and less time consuming procedure was to use a reciprocating saw (saws-all). Just use a 4-5 inch metal blade and insert it into the neck.
Cut on both sides and then use a needle nose pliers to pull out the two halves.
There is not much danger of puncturing the reservoir with the saw. You can get both cuts entirely through the metal sleeve and only cut the inside plastic rim of the reservoir leaving the outside of the neck intact.
Cheers,
Mike
03-09-2004, 07:34 PM
#11
Addict
Rennlist Member
Rennlist Member
Tony
did you get any pics of the connections to the charcoal canister ? I puzzled for ages figurin out which pipes went on which connection to the canister ?
How did you manage to takes pics of my washer reservoir - Iam sure that was my rusty inlet pipe - now removed !
On a similar vein - I replaced all the in the bonnet (hood ) plumbing as original layout but in silicon hose (I plan on keeping this car a long time) but went for just two non return valves at the connection points to the hood. Now I got washer Jets !
Cheers
Jon
Black SE
03-09-2004, 07:46 PM
#12
Chronic Tool Dropper
Lifetime Rennlist
Member
Lifetime Rennlist
Member

Somebody somewhere (might have been on the Ford trucks list...) recommended using Drano to get rid of all the black/brown crust that seems to form in the coolant and washer bottle over time. Since Drano is a fancy way to buy Lye/caustic soda, you do want to do that only after all the delicate parts like the pumps and switches have been removed. And that steel sleeve... Seems to me that a little more stainless work is needed to get that part fixed for good.
-----------
For those interested in the stainless Y-connectors, Dave Chamberlain was the force behind that program. They are permanent! But it's also worth noting that the replacements from Porsche are mere dollars last time I looked. If you support the hoses around the plastic Y-connector it should last fine.
I have a photo-essay instruction on my y-connector replacement if somebody wants to put it up on their website.
Cheers!
03-09-2004, 08:13 PM
#13
Pro

Join Date: Nov 2001
Location: Walnut Creek, California
Posts: 623
Likes: 0
Received 0 Likes
on
0 Posts
dr bob,
I have just ordered a new connector and a few other things from 928 International. I am in the process of putting up my website, if you would let me post your write-up on this (including images), I would be more than happy to host it.
rob
I have just ordered a new connector and a few other things from 928 International. I am in the process of putting up my website, if you would let me post your write-up on this (including images), I would be more than happy to host it.
rob
03-14-2004, 08:57 PM
#14
Drifting
Join Date: Dec 2003
Location: an unnatural suburban habitat
Posts: 2,902
Likes: 0
Received 0 Likes
on
0 Posts
After looking at this thread, I ventured into the pass. side wheel well and found the broken y-connector. I found a T connector and some other related stuff at a hardware store and re-connected everything. It's not as nice as the stainless y piece, but it works. Now the windshield jets and headlight washer jets work!!!! I was pretty excited.
This 928 web forum is daily reading for me, and priceless. (I am a member now.)
ALL you guys are the best. Thanks.
This 928 web forum is daily reading for me, and priceless. (I am a member now.)
ALL you guys are the best. Thanks.
03-14-2004, 10:19 PM
#15
Addict
Rennlist Member
Rennlist Member
I just changed my y connector today. It was broken off into all three hoses. Removal was fun, but using a tap set to cut threads in the remaining pieces of plastic in the hoses made pulling the pieces out easy. No more gas smell !
Thanks for the pictures Tony, and your site is quite helpfull.
Jim
Thanks for the pictures Tony, and your site is quite helpfull.
Jim