When you click on links to various merchants on this site and make a purchase, this can result in this site earning a commission. Affiliate programs and affiliations include, but are not limited to, the eBay Partner Network.
Hi All,
Going to start on a timing belt & tensioner replacement job on my 1991 S4 in the next couple weeks.
I'm going over the various threads and write-ups on the procedure, paying extra attention to keeping the timing right.
So far, I'm confused over how to get the timing in the right spot.
Dwayne's procedure says to first set 0 T (TDC) and check both cam gear notches, then rotate the engine clockwise 1 and 3/4 turns to get to 4 5.
Another write up says says first set 0 T (TDC), check notches, then to 4 5 (1/4 turn CW), then 2 more CW turns to 4 5.
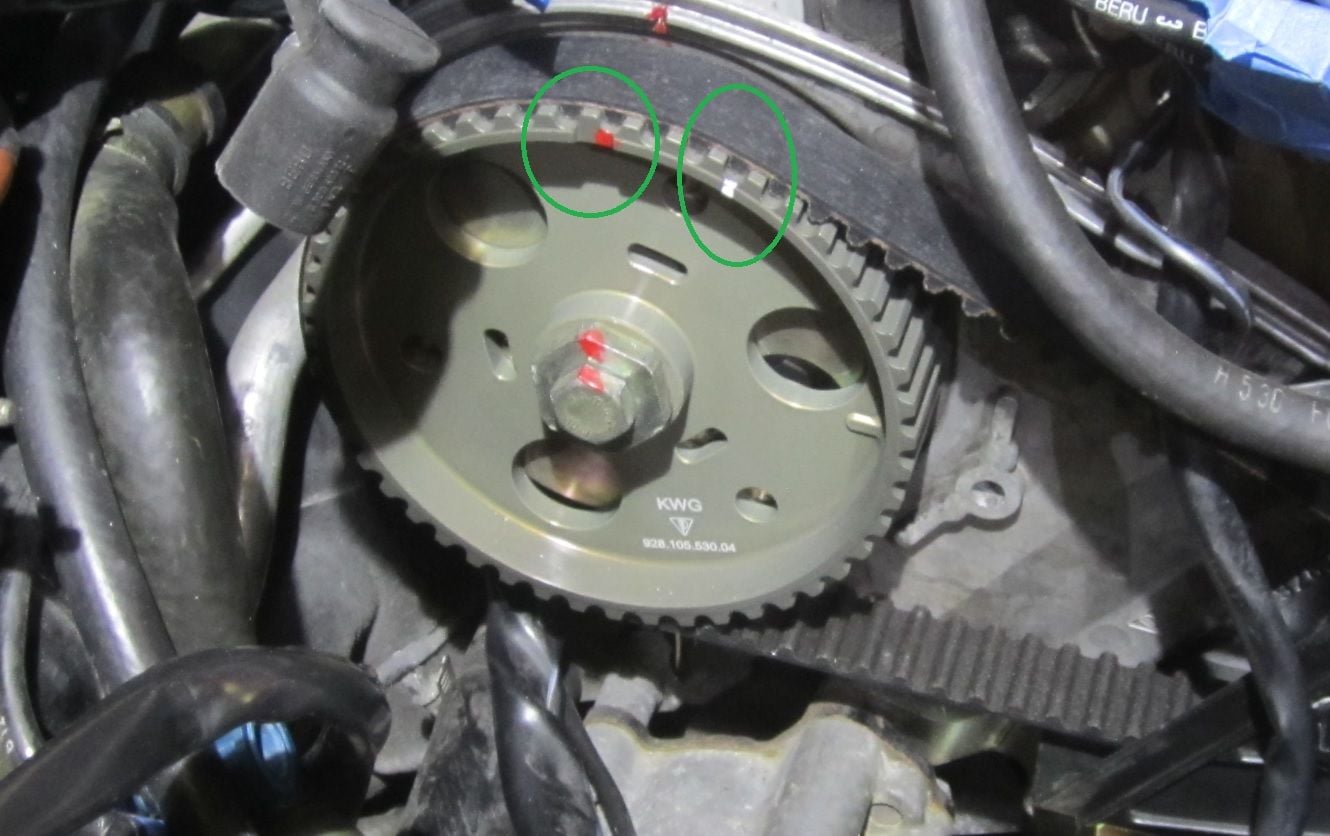
The red marks in this picture are TDC and the white are 45. Note that the TDC red marks are in the "groove" on the gear. So rotate the engine clockwise (only!) until both grooves/red marks line up with the V cutout. This will be TDC. If both grooves/marks aren't lined up, rotate the engine clockwise one more time 'til they line up. For 45, you'll know when you're at 45 because your grooves/red marks in the gear will be 3 teeth to the left on both gears. If not, rotate the engine clockwise one more time.
As you've probably read in your research, your gears may advances on you while you have the belt off. That's normal and okay as long as your engine is chocked at 45.
There isn't a 45 degree mark on the pulley 1/4 turn CW from TDC....the 45 degree mark is 1/8 of a turn CCV from TDC.....and Porsche says to not turn the engine CCV.
And just a reminder....we redo 2X as many belt jobs as we initially do. And the last 4 we have had to redo were done by "professionals". There are an incredible amount of ways to mess this job up....some with catastrophic results. Make sure your skill set is up to this level of work.
When you start the job [having removed the fan shroud first], remove the distributor cap and move the engine forwards until both rotor arms are pointing to the 3 O'clock direction and the timing mark is at the TDC point. This will ensure that No 1 cylinder is on its firing stroke. I use a 27mm long reach socket to crank to motor manually and as stated already when the belt is strung only crank the motor in the clockwise direction as viewed from the front of the motor.
At this position the reference marks on the cam sprocket should align with the notch on the casing back plate. As shown by Mr No Vector, it is a good idea to mark the sprocket indent with tippex or whatever. The cam sprocket has 48 teeth, divide that into 360 and you will see that each cam sprocket tooth represents a travel of 7.5 cam degrees or 15 crank degrees. Put another mark on each cam sprocket three teeth [45 crank degrees] clockwise relative to the TDC mark. These additional marks will tell you where the sprocket should be when you re-string the belt with the crank locked at 45 degrees BTDC.
Once the crank is locked at 45 BTDC and the belt is removed it is very common for the cam to change position unilaterally due to valve spring reaction. Nothing to worry about- you simply reposition the sprocket back to where it should be using a 32mm socket or whatever on the large washer- do not turn the cams by using the smaller cam mounting nut. With the belt removed the cams can be turned in either direction as needs be to get to the correct position. When stringing the belt, start at the crank sprocket and work your way round to the 5/8 sprocket. When trying to fit the cam belt over the 1/4 sprocket, put anti-clockwise tension on the large washer of the 5/8 sprocket- this is where an extra pair of hands [that I have never had!] comes in handy.
The only other point of note is that when re-tensioning the new belt you must do so with the crank at TDC on No1 cylinder or you will most likely have a false tension.
I strongly recommend you get hold of or acquire a 32VR cam timing tool and the PK Bumpstick [go to liftbars.com]. With this kit you can easily check cam timing [before and after the belt job] and modify such if needs be. This is essential when you eventually have to change out the cam sprockets- that or you have to pull the cam covers and use dial gauges to time the cams. Cam timing must be done with a stretched belt- with the 32VR kit it can be done with a new belt with an appropriate correction that anticipates the stretch that will have taken after place after 1k miles of running.
Thanks Guys!
Got it per Dwayne's procedure being the right way. I'd like to think that following his write-up exactly, step-by-step, should be a path for success.
FYI I'm going to install the PKtensioner; my understanding is that this device doesn't require tension adjustments other than checking the tensioner extension to make sure its within spec.
@Greg - what are some of the more common screw-ups you've seen with this job?
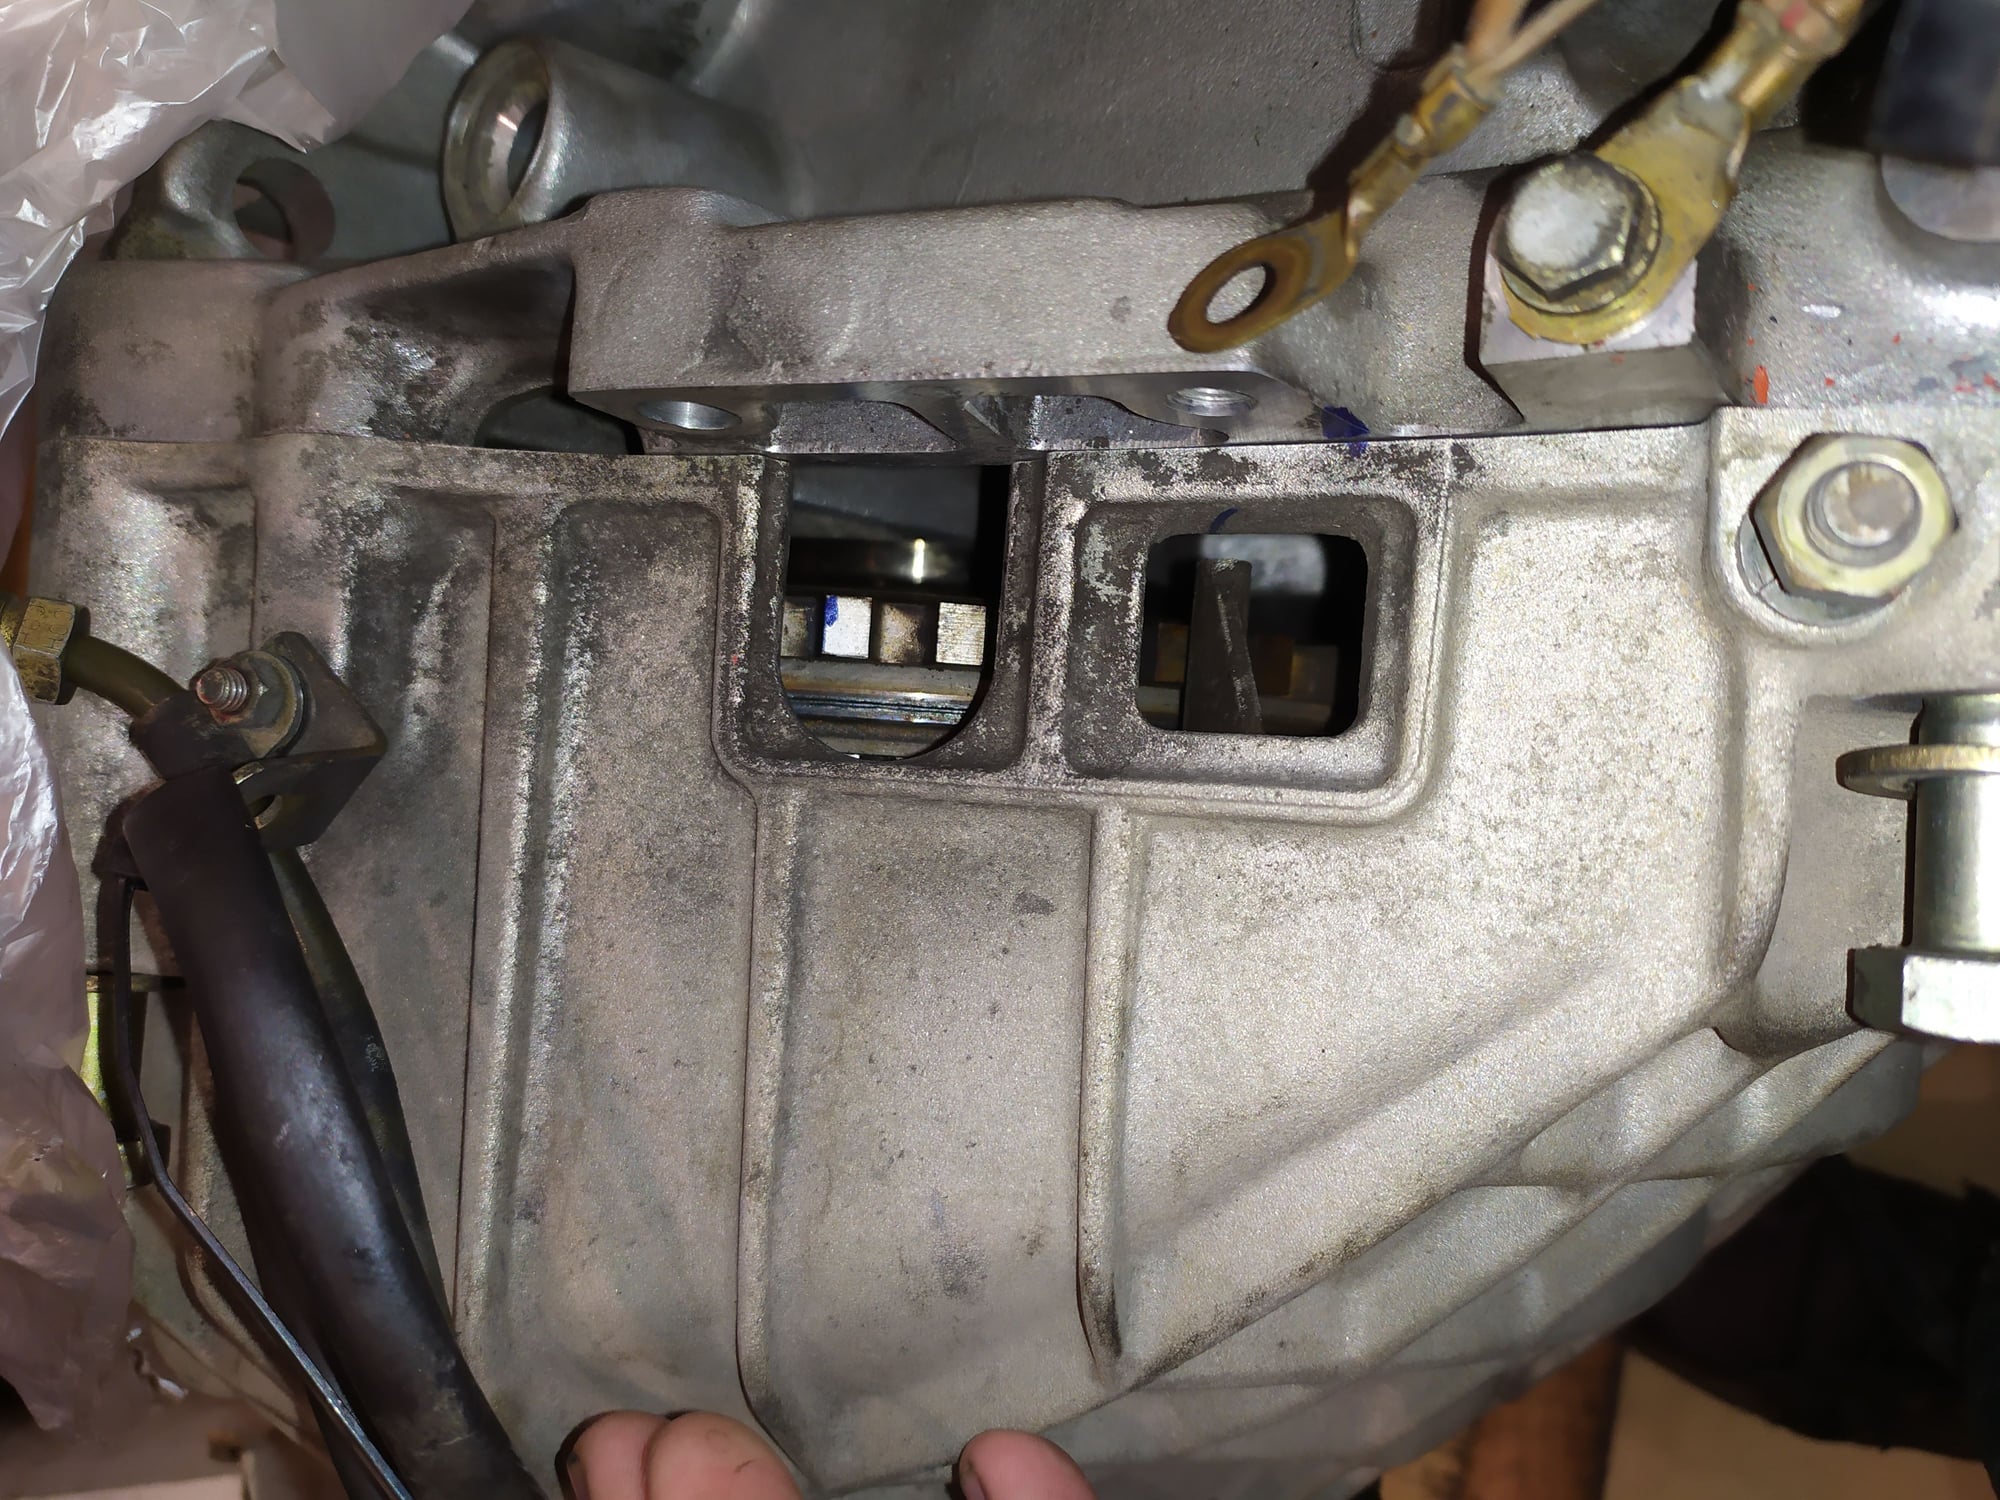
Hello experts, I am doing timing of 1992 Porsche 968.. from the manual I know that at 0.39 of tappet lift at cyl 1 intake, it should be at tdc(flywheel OTC mark)... Now I have set it at 0.39 for tdc & the cam sprocket rotated( without rotating camshaft) with crank rotated to tdc mark , but while I rotate crank for next round the cam sprocket notch mark is not matching with cover plate mark...if I match the cam sprocket mark with cover plate mark, I can not see flywheel OTC mark at correct position it goes 3 tooth further away( attached pic).
i have special tool for pressurising variocam & I am able to pressurise to 3bar & it is leaking, than I put check valve o-ring & it is not leaking air much( photo attached).
Please let me know what might be going wrong.
You've been messing where you shouldn't be a messing.....
90% of the 968's I used to see had the cam timing set completely wrong.
The factory procedure for setting cam timing works pretty well when the tensioner is brand new. Once there is wear, too much air leaks past the piston and the intake cam will not be stable enough to use this procedure.
Thanks for the reply, what option I have than so that I don't do any major damage...
Hi All,
Going to start on a timing belt & tensioner replacement job on my 1991 S4 in the next couple weeks.
I'm going over the various threads and write-ups on the procedure, paying extra attention to keeping the timing right.
So far, I'm confused over how to get the timing in the right spot.
Dwayne's procedure says to first set 0 T (TDC) and check both cam gear notches, then rotate the engine clockwise 1 and 3/4 turns to get to 4 5.
Another write up says says first set 0 T (TDC), check notches, then to 4 5 (1/4 turn CW), then 2 more CW turns to 4 5.
What is the right way to do it?
Thanks,
Mike
Let's make it simple
If you are in the way of just replace your timing belt, you have no need of turn the crank shaft @ 45�. Just set the CS @0� and check the cam gear is OK, then block the CS, get the tensionner out and replace the TB. I let you know that � 0 TDC, the left cam wil not rotate by itself but the right one will. So when you get the new TB on, be sure your TB set correctly the CS and the left cam, after that done, then set the right correctly then you are able to let PKtensionner working. What you have to do is cheking that you have CS and cam gear set correctly after several turn.
If you are in the way of adjust the cam timing precisely you will have to set the CS � 45�, but it is another job.
What Dwayne says is as the workshop manual says. But it is useless.
The red marks in this picture are TDC and the white are 45. Note that the TDC red marks are in the "groove" on the gear. So rotate the engine clockwise (only!) until both grooves/red marks line up with the V cutout. This will be TDC. If both grooves/marks aren't lined up, rotate the engine clockwise one more time 'til they line up. For 45, you'll know when you're at 45 because your grooves/red marks in the gear will be 3 teeth to the left on both gears. If not, rotate the engine clockwise one more time.
As you've probably read in your research, your gears may advances on you while you have the belt off. That's normal and okay as long as your engine is chocked at 45.
pretty sure to get 45 degrees and there are 48 teeth it will be 6 teeth. 3 teeth like the photo make the marks at 22.5 degrees BTDC so which one is correct please as I�m about to do this
pretty sure to get 45 degrees and there are 48 teeth it will be 6 teeth. 3 teeth like the photo make the marks at 22.5 degrees BTDC so which one is correct please as I�m about to do this
Paul,
You appear to be confusing cam degrees and crank degrees. Each tooth on the cam sprocket is 7.5 cam degrees and 15 crank degrees.


 05-23-2018, 09:21 PM