When you click on links to various merchants on this site and make a purchase, this can result in this site earning a commission. Affiliate programs and affiliations include, but are not limited to, the eBay Partner Network.
I can adjust the bar up/down/left/right, but this isn't my problem.
The pass side light is not aligned ON the bar, the same.
It is I think, 5-8deg too low...it doesn't rotate up as far as the right side. At its extension when on, it is about 1/2" away from the stop, defining the upper limit of the whole assembly.
The split pins are what seems to align the hardware to the bar, they are there, I can feel them inside the tube. I cannot imagine the body shop has them misaligned that way, the pins would no longer fit and be there.
The motor is fully extended, it cant go up more..its the right side that is, hardware wise, not straight with the left side somehow.
Check out my post on adjusting the headlight regulator. Check your motor mounting and the two adjustment points on the fenders.
also check the quick release function. make sure they engage and release by pulling forward on the headlights and pushing them back in.
Hm..
I can pull the light UP, and force the roller out of its detent position and bring the assembly all the way up, but the spring roller and such are all working correctly.
WHAT was lose and fell on you that you fixed? #3? What are you calling the regulator?
The regulator is the assembly that starts at the headlight motor, it includes the lift arms, the main bar and the parts the headlights are attached to. irs the whole assembly.
The regulator is the assembly that starts at the headlight motor, it includes the lift arms, the main bar and the parts the headlights are attached to. irs the whole assembly.
Well, that looks right. Left side goes up and down to normal points. Nothing rubs.
Right side is not aligned..not coming up all the way..
Can you post a picture or a video showing the variance between the two?
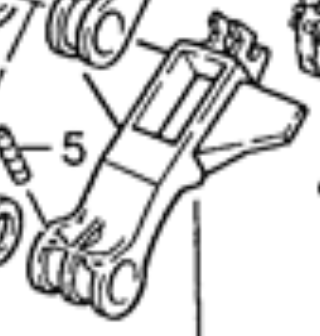
The headlights mount the lift bar in such a way that does not allow independent movement between the two.
Each headlight assembly is mounted the the lift bar via two piece system, a lift plate and the headlight assembly. The lift plate is "pinned" to the lift bar to ensure proper alignment left to right. The lift plate has the quick release to the headlight assembly.
The system does not allow independent adjustment or movement of headlight assemblies short of aiming the bulbs.
So if your assemblies are not aligned then one of the following must be wrong:
1. One of the quick release units (Item 9+10) must not be fully engaging. Check for an obstruction between. Ensure locking feature functions the same left to right. A functional check can be done from outside the car, but a visual inspection should be done with the wheel + wheel covers off.
2. check to make sure the base trim plate (Item 1) is in the full up position. 1/4" gap to the fender all the way around. This will tell you if problem lies with the sense mount assembly or the lower assembly.
3. If the base trim plates are in the correct position, Check to make sure the headlight sense assemblies mounted correctly on the U-shaped bracket, or for bent U-brackets.
4. If the base trim plates are uneven, then inspect the two piece brackets from below. Focus on the side that is lower. Start with the upper "stop" (Item 37). make sure both are in the same position. One could have come out of adjustment and is causing the light to stop lower. You can measure the distance from the stop to the top of the fender.
5. Inspect the mounting pin (Item 5) for the lift plate. These can be bent or sheered if the headlight assembly gets stuck.
6. If all this checks out, check the main lift bar for evidence of twisting. It's unlikely but I guess it could happen. this can be done easily as part of your initial inspection. Use a known straight edge like a level against the mounting tabs for the headlight assembly (Item 18-20 -remove the bolts) That should give you enough late surface to compare the alignment left to right.
One other option is item #3 which is adjustable needs to be adjusted so that when the shaft rotates the light to the up position the entire rod on that side is moved up to contact that upper stop.
That plastic guide adjusts the up / down of the head light rod once it is inserted into the main tube.
One other option is item #3 which is adjustable needs to be adjusted so that when the shaft rotates the light to the up position the entire rod on that side is moved up to contact that upper stop.
That plastic guide adjusts the up / down of the head light rod once it is inserted into the main tube.
Agreed, but that adjusts the vertical height and for/aft position. It does not adjust the rotation of the light. From the OP's comments it sounds like one light is not rotating up as much as the other.
I can not comment on this adjustment as its been covered here
However I've seen the Headlight buckets come loose, even fly off down the road when the three little screws (#33) come out. If you over tighten them you risk damaging the plastic backing of the Headlight covers, so here is a tip that also works on other plastic trim
Coat the screws with a small amount of black RTV, snug them up and they won't come loose
Dave K
I used slightly larger screws with larger heads to prevent this. I noticed the OEM screw heads were small enough to work through the shoulders in the mounting holes. Hopefully every 928 owner has a collection of various sized screws and nuts and bolts to deal with years of hardware store replacement. ;-)
I used a slightly larger and longer screw 4.2mm x 16mm. Longer aided me in getting them in the holes and not dropping them and larger heads seated better in the hood holes.
there was slight differences between the two arms on each side, where the roll pins are driven thru the bar. the body shop that had painted the car had flipped them, causing that difference left to right. reversing them solved the issue.
there was slight differences between the two arms on each side, where the roll pins are driven thru the bar. the body shop that had painted the car had flipped them, causing that difference left to right. reversing them solved the issue.
Yup, and note, there _is_ no R and L, everything is same parts both sides. It took a year of dicking with this, that..the other...before we gave up and tore it all out, and went to the parts car, tore all of _it_ out to compare. Figure 12hrs over a couple weekends all in.
The solution we fell on..just happened to put it together "wrong" and..it was fixed. Confirmed back the other way...bad.
figure that between both 'flippers' from the crossbar, was three degrees...and that works out to the .6" problem.
This part:
The holes for the drift pins in it, are NOT accurately drilled, they are different..and goes to matching and pairing when assembled ggiven they were all hand drilled, and CANT be "fixed" as they would then not be secure to the bar..so you went with what you could pair up. With enough human error, it all works out.


 10-16-2017, 01:45 AM