When you click on links to various merchants on this site and make a purchase, this can result in this site earning a commission. Affiliate programs and affiliations include, but are not limited to, the eBay Partner Network.
Ok so I Finally got around to installing the MS II I built over the summer but with a different twist..
1986 NA 944 2.5L
So the write up came from a homework Technical Writing assignment for school.
Parts needed: What I used:
ECU MegaSquirt II ECU I assembled
Crank angle Sensor Ford V8 2004-2010 BWD Part # CSS718
Trigger Wheel 36 -1 teeth 6� fwd. crank mounted
Fuel Injectors Bosch 0280155868 flows 375 cc @ 3 bar, or 36 lbs. a hr. at 43.5 psi.
Inlet Air temp Sensor (IAT) 944 Stock IAT in Bosch Air Flow Meter
Coolant Temp Sensor (CLT) 944 Stock CLT
Throttle Position Sensor (TPS) 944 Stock Air Flow Meter (AFM)
Manifold Air Pressure Sensor (MAP) GM 3 Bar MAP Sensor and Connector
Wide Band O2 Sensor Controller Spartan 2 OEM from 14Point7 http://www.14point7.com
Wide Band O2 Sensor Bosch LSU 4.2 Wideband O2 Sensor
Connector from ECU to Stock Harness p/n 825213-1 35 POS TAB HOUSING http://www.te.com
Wire Automotive grade Multi strand wire in colors of your choice
Aluminum Plate 1/8� aircraft grade non heat treated bends easier without
Hard ware 2 M8 x 45 bolts, 1 M5 x 16 bolt and nut and washers,
2 self- tapping screws, Solder, Heat shrink, rivets
Tools:
Soldering Iron, Basic hand tools, Rivet Gun jack and jack stands. Cut off wheel, drill and drill bits
Manual:
944 Shop manual MS II Manual and Knowledge and insight gain from some of you guys in this forum
Steps:
Step 1: Installing Crank Angle Sensor and O2 Sensor
Make vehicle safe for maintenance: parking brake set and chocked, windows down battery disconnected.
With parking brake set and wheels chocked raise front on vehicle and support with jack stands.
1.1.
Remove OEM O2 sensor and install new Bosch LSU 4.2 Wideband O2 Sensor route connector to engine compartment. �Refer to shop manual�
1.2.
Remove cooling fans and shroud. �Refer to shop manual�
1.3.
A. Set engine to Top Dead Center. �Refer to shop manual� make reference marks on Alternator pull and engine cover.
B. Remove Alternator and power steering Belts. �Refer to shop manual�
C. Remove power steering Pulley from front of engine �Refer to shop manual�
D. Remove 2 M8 bolts from Alt pulley and balance shaft pulley do not remove balance shaft pulley from engine also make sure bolt remove oppose each other. Temp install trigger wheel to Alt pulley using 2 M8 x 45 bolts and temp install Alt belt. Using Crank angle Sensor as a guide figure out best position for sensor taking in account clearance of Alt belt, scribe a line corresponding to the lower part of sensor mounting tab on plastic engine cover when satisfied with placement remove trigger wheel belt.
E. Remove Plastic engine cover. Inspect the inside of cover to line scribed on the outside that there is enough clearance between it and belt and pulleys on the inside of cover. When satisfied using cut off wheel make a slit in cover measuring 1� long.
E.1. Using the 1/8� aircraft grade non heat treated aluminum plate create a L shaped bracket for the crank angle sensor it must protrude through the plastic cover at least 2� and be 1� wide the part inside the cover can be as wide as you want taking into account clearance of any parts behind it. When satisfied with your design test fit to engine reinstalling cover trigger wheel and belt. If everything lines up remove cover. Making sure everything lines up it is now time to secure the bracket to the cover, using a drill and bit that corresponds to the size rivets you have drill 5 or 6 evenly spaced holes through the bracket and the cover, remove the bracket from the cover and remove and dirt or grime from the inside of the cover deburr the holes using your choice of adhesive coat the mating surface of the bracket fasten bracket to cover with the rivets the shank should be on the inside of the cover. Reinstall modified engine cover.
D. Making sure the engine is still at TDC and reference marks still line up it is time to install the trigger wheel. Using the reference mark you made on the pulley install trigger wheel the missing tooth is just past your TDC mark as the engine rotates about 6 to 9 teeth, install 2 M8 x 45 bolts to 45 in lbs. with Loctite on the treads reinstall power steering pulley using Loctite to specified torque reinstall belts �Refer to shop manual�
E. Installing crank angle sensor position sensor on bracket so sensor sits square over trigger wheel and mark the hole on the mounting tab of the sensor to the bracket. Remove sensor and drill mounting hole making it a little oversized to the 1 M5 x 16 bolt reinstall sensor with 1 M5 x 16 bolt and nut and washers I suggest using a split washer on the bracket side making sure sensor is centered over trigger wheel.
F. Reinstall cooling fans and shroud. At this time you can lower the vehicle.
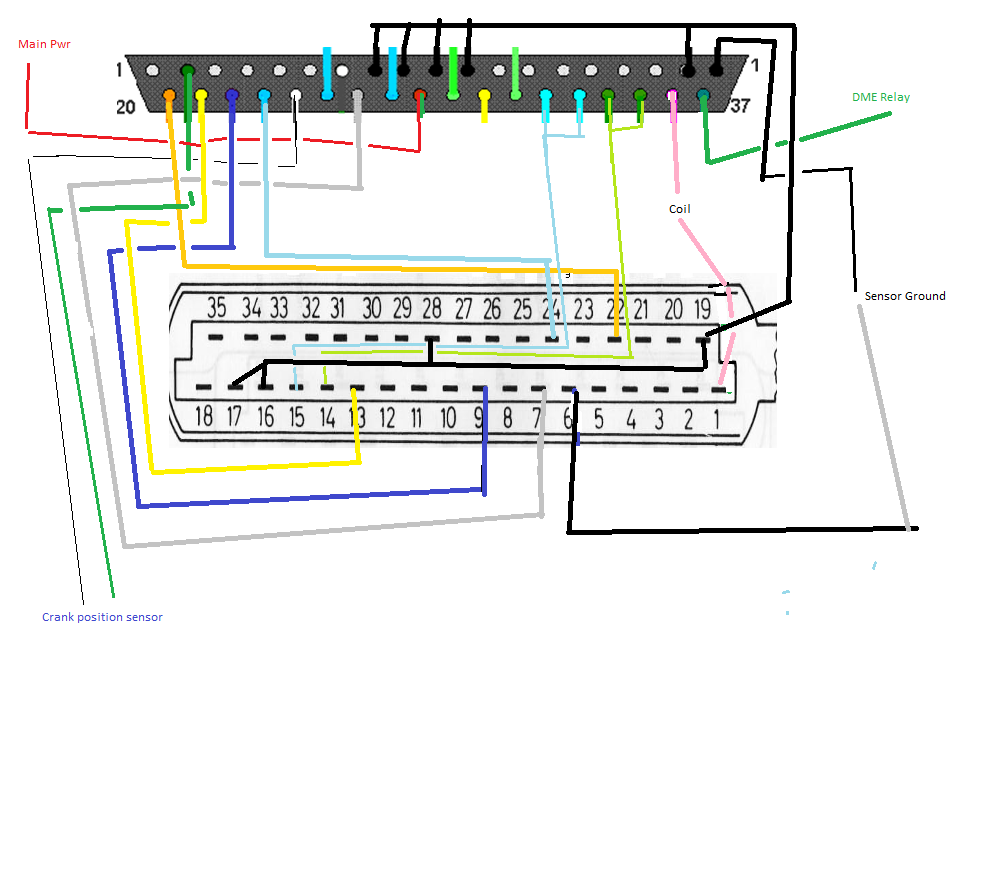
2. Creating Wiring harness.
Since we will be using most of the stock wiring we will only have to make a short harness from ECU to stock Harness connector taking into account where you will be mounting ECU. But you will still have to make a harness for the new crank position sensor the external Map sensor and the Wide Band Controller board. Be sure to leave your self-extra to make repairs or modifications later.
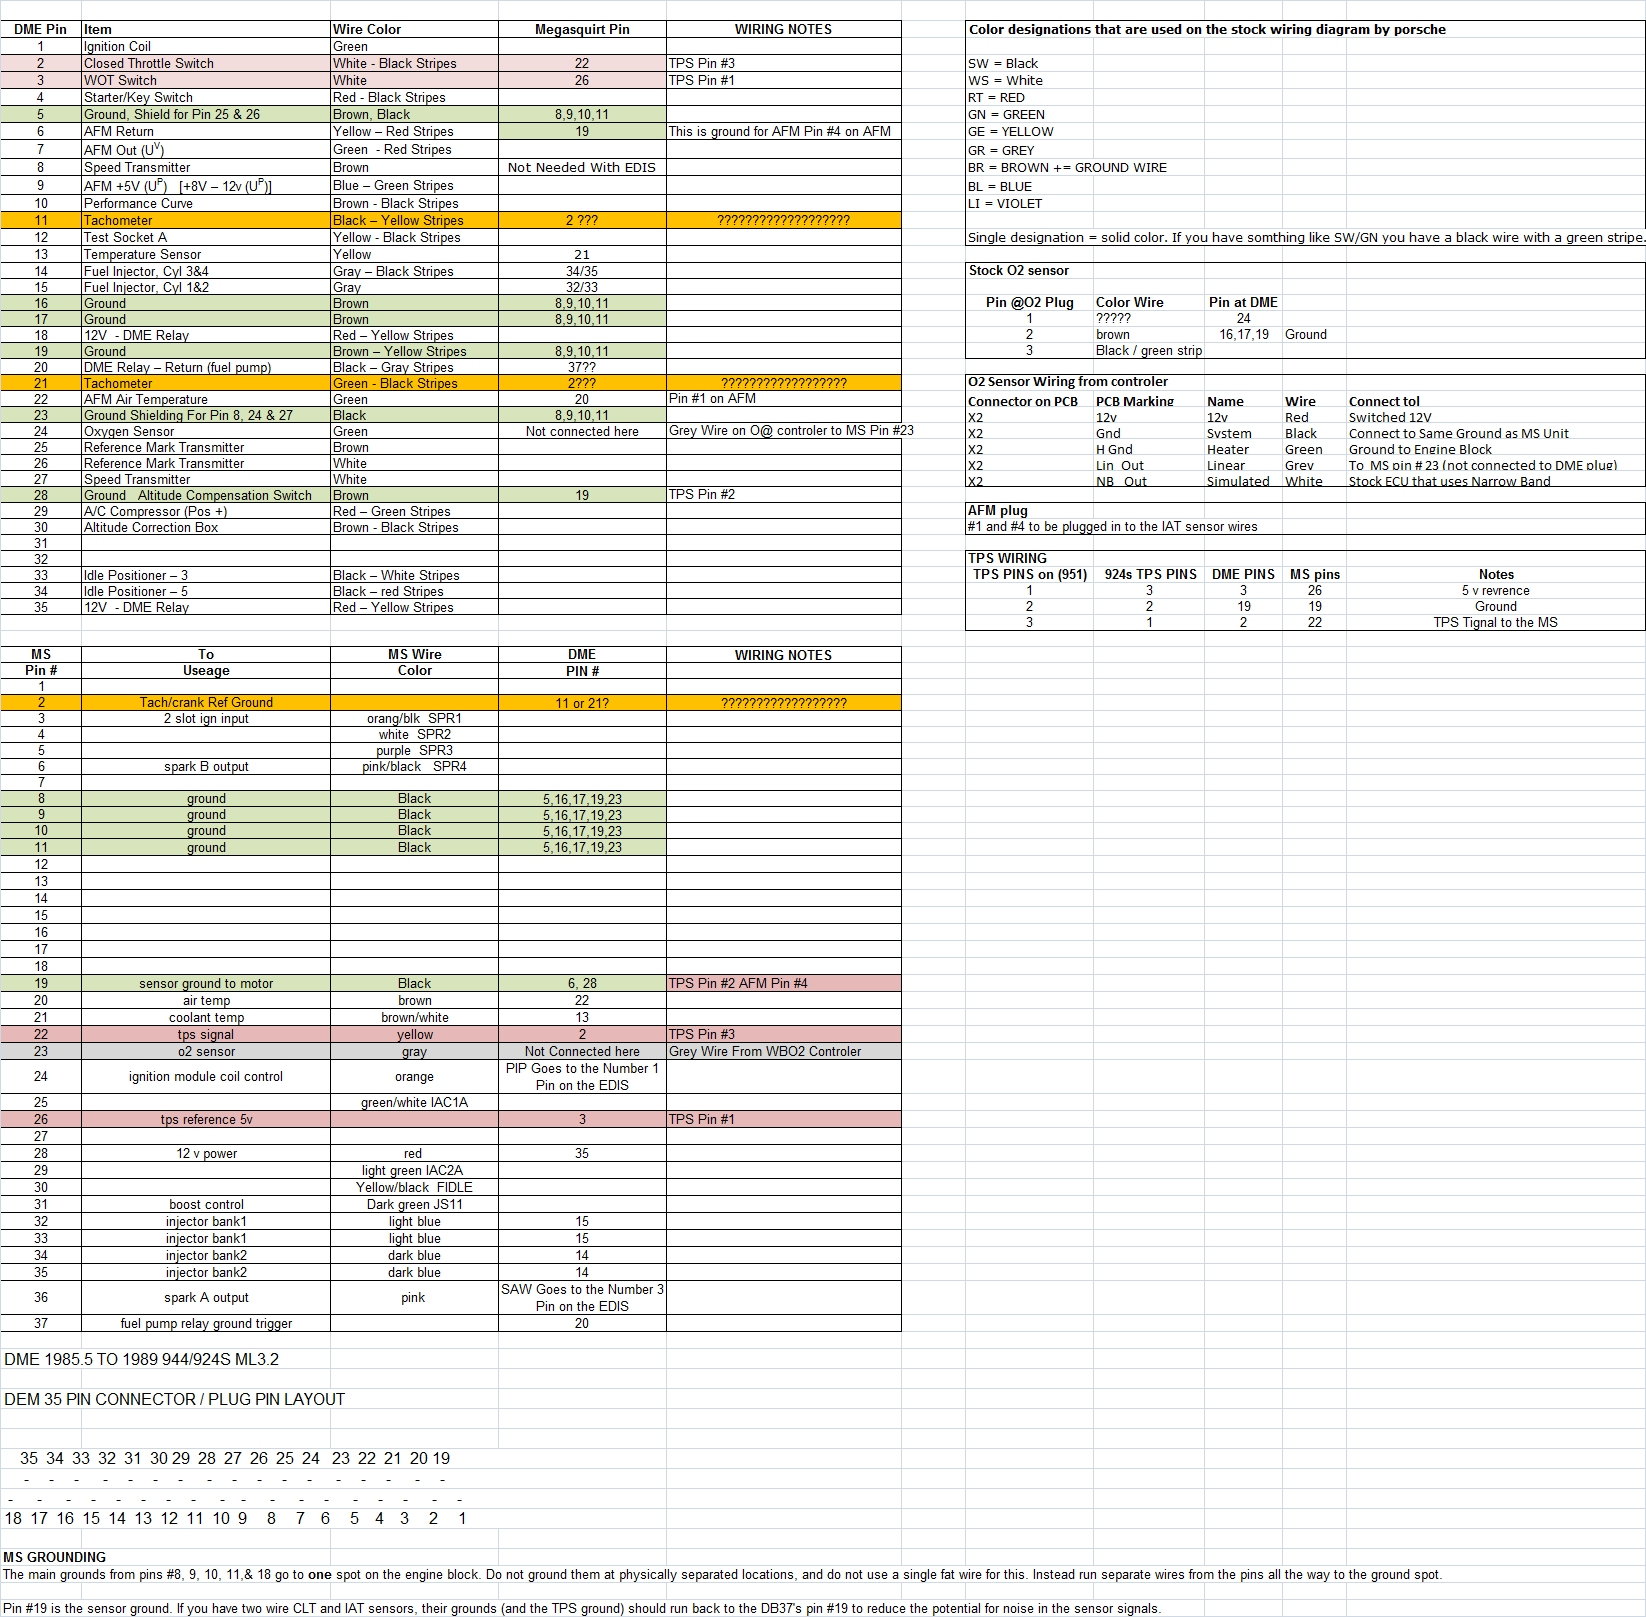
2.1 Crank angle sensor (CAS) measure the distance from CAS to ECU mounting location making sure to route it away from the ignition wires or any sources of electrical noise. Pin 1 on CAS goes to pin 25 on ECU pin 2 goes to pin 2 on ECU.
2.2 External MAP sensor measure the distance from MAP to ECU mounting location. You will need 5v reference, sensor ground and connect it to whatever pin you configured as added sensor input.
2.3 Wide band O2 controller board will need switched power that only comes on when engine is running not key on engine off. I wired mine to the stock power of the OEM O2 sensor it also needs to be grounded to the ECU pin 19 and O2 sensor input pin 24.
2.4 Throttle position sensor my TPS is the stock AFM whereas most use and external sensor mounted to throttle body it is wired using the pin that correspond to the TPS 5v reference, sensor ground and sensor return also the IAT sensor is contained in this unit.
2.5 External Power during testing you need a way to power ECU when it�s not plugged into harness so I added a 2 wire pigtail to Pins 29 and 19. Best to test that CAS is working before removing stock DME.
2.6 Stock Harness �Refer to shop manual� and the following diagrams and charts.
3. Testing harness.
Before removing stock DME you need to test that harness works follow in Megasquirt II documentation power on ECU and connect it to Computer or handheld device open tuner studio once devices are connected start vehicle using stock DME and verify CAS readings match stock DME/TACH RPMs if they do shut down engine and remove DME from harness after disconnecting external power to ECU plug it into stock wiring harness when hooked up turn ignition to key on engine off and verify sensor reading IAT should be close to outside air temp, CLT should be the same or close to what the temp gage on dash is reading. Remove J-boot from AFM and manipulate flap and verify position change on TPS position on Tuner Studio. If it all checks out next step is tuning if it doesn�t recheck your wiring. After tuning it�s time to make your installation permanent by clamping and securing you harness and ECU.
I posted the write up in doc for anybody interested
Thanks to the guys who posted their maps on the forum the car started up and I actually drove it with in 20 min of doing the install. now to pulled the intake and replace the stock ICV with a 2 wire PWM out of a Volvo also future mods include installation of throttle body from a mustang along with the TPS, the opening is about the size of the inner diameter of the o-ring on the stock throttle body but there some modifications involve have to drill new holes to mount it plus install vacuum stand offs also maybe tap and drill to make idle air by pass screw operational. then remove AFM and install 3" duct from air box to J-boot.
also thinking of redoing plastic cover in carbon fiber or fiberglass and making braket an integral part of the cover.
Looking forward to you comments and questions..
On a side note big props to Joe Baumbach at Focus 9 Technology, LLC
after frying my DME trying to hook up the wide band O2 sensor " the DME does not like having 5v applied to a 1v input. He built me and New DME I was torn between leaving it in place and finishing the MS II not sure If I am going to leave the MS II in after I'm done the car runs so sweet with it in there I figure leave the wide band and Moded throttle body and install either a war chip or Rouge MAF kit and a offset key and reinstall DME. Or if I leave the MS II convert the AirBox to Ram Air by making a airbox behind the front valance like the 931/ 944 turbo had and porting it to the airbox..
Couldn't have done it with out your help I watched your videos and read your posts over and over plus the maps you up loaded is what got the car started.
once I got a good crank signal and figured out the cranking rotation deal it fired right up...
I live in Tooele. Currently work out at DPG on MAAF at Site Alpha with Shadow for Textron Systems. How often are you here? If you're here and want to tinker, I have to put the engine back in my 951S.
What is the estimated cost for going Megasquirt? I have a Miller Maf kit and Lindsey Paper weight Maf Kit, don't ask, that I am not to impressed with.
Depends on how much you add to the system. If you replace the DME and use the stock harness to use existing sensors (except AFM), $700-1000. If you add things like wasted spark, new injectors, a new harness, new sensors etc, it can be $900-1200. My build ended up at around $1200-1300 because I went with the latter and had to buy tools like a timing light, quality crimp tool, and a few others. Still worth it.
I live in Tooele. Currently work out at DPG on MAAF at Site Alpha with Shadow for Textron Systems. How often are you here? If you're here and want to tinker, I have to put the engine back in my 951S.
I'm out at MAAF too I work for Hunter in Quality.. Our hangar is right across from you I'm out at site Bravo most of the time...
So ran into small set back.....
I fried the MS2 CPU is it worth upgrading to MS3 CPU/Daughter board or just get a new MS2 CPU/Daughter board???
long story short got tired off pulling harness out of car to make changes and trouble shoot MS2 starting to get cold in UT, and miscounted pins when I tried to hook up power in the house no MS2 doesn't power up...
Problem Fixed
I shorted out the 5v Regulator so a trip to a trip to Radio Shack and $1.99 n it's fixed. component id U5 on Ver3 board

 11-12-2016 | 03:19 PM

 the car runs so sweet with it in there I figure leave the wide band and Moded throttle body and install either a war chip or Rouge MAF kit and a offset key and reinstall DME. Or if I leave the MS II convert the AirBox to Ram Air by making a airbox behind the front valance like the 931/ 944 turbo had and porting it to the airbox..


