When you click on links to various merchants on this site and make a purchase, this can result in this site earning a commission. Affiliate programs and affiliations include, but are not limited to, the eBay Partner Network.
Okay back for an update;
I have successfully removed the cruise control cabling, connectors, lever and drive mechanism out of the car. Most the interior is now stripped as well with a few minor padding areas to clean up.
A kirkey seat is now in with a customer steel bracket I had made for the chassis, welded and with the 944 sliders bolted on. Just ordered the other day a Type D35 Momo Steering wheel with a MOMO Hub adapter and a QR. My 944 early does not have the wheel lock engaged so that good.
I did actually order a AC Delete bracket from Ian a couple days ago so hopefully thats here soon!
I think I am going to tackle this in two parts. Remove heater then AC systems. Im just a little nervous as to causing a systemic malfunction. Do someone mind chimming in with some good steps for complete removal of the heating system. Iam pouring over diagrams as well. Im sure a few folks have done this to outline an appropriate procedure.
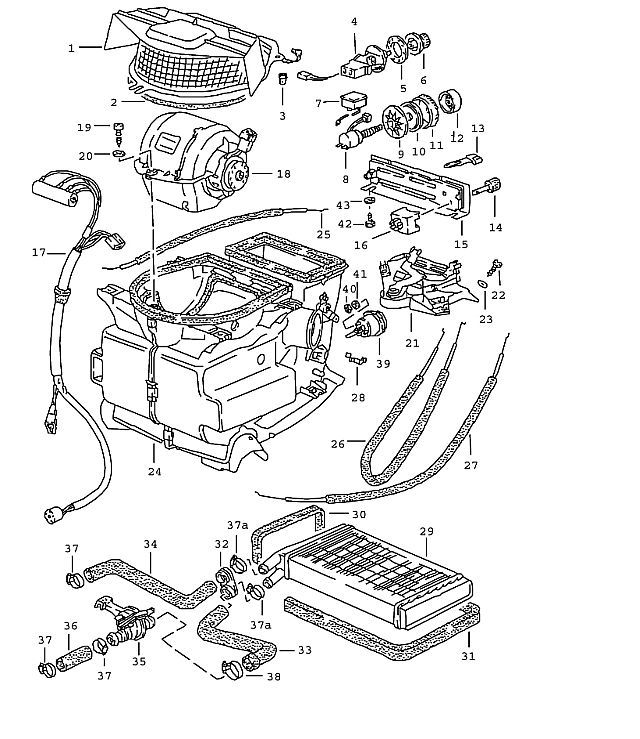
Id imagine a good start would be removing the blower cover (#1) and blower (#18) along with the flap control box (#24) and inline current resistor (#17). Then we could probably remove the cabin mixing chambers (#2/3/4) and associated ducting. Should the corresponding heater control valves/vacuum units (#39) Bowden cables. Also can someone explain how #29 heat exchanger is mounted and removal?
If the unit still hast R12 in -----you should have it removed at an authorized Freon recovery shop.
If the unit has R134a--it is less harmful to the environment, but still damaging, make a gut choice.
Blower cover not removed.
Remove the passenger kick panel and glove box.
Take pictures of the unit before you start---JIK you want to replace. Take pictures of how the wires and hoses are fastened and where. Take a lot of pictures.
Now just begin to disconnect all wires and the 2 main AC lines in the front.
The entire unit is held to the underside of the dash by only a couple of nuts/bolts and will drop down.
You can access the heater core and hose connections with the AC case removed.
#29 is inside #24. The small rectangular opening on the left side of #24 is where the inlet/outlet hose connections come through. #32 is the firewall grommet for the heater hoses, so everything to the left of that is between the engine and firewall.
The only other thing not in the passenger compartment is #1.
Im about to be at the garage here in the next hlaf hour to start. My ac bracket arrived today from Ian's 944.
**UPDATE. Found the R12 safety precautions area in my 944 shop manual, reading up
**UPDATE. Found @ section of 944 SM Page# 87-38 si the evacuation protocol but it describes it using a specialized setup,I suppose I could disconnect the line and accidentally turn my head while it evaporates and be known the wiser... or get a proper legal thingy..
Okay to start then I will remove the glove box and the lower kick panel on the passenger side. This will give me access I am presuming to #24. and remove by disconnecting any wiring (everything from #21 controls is already removed when I stripped the inside for the paint) then the blower/housing and resistor harness wires.
Next removed #29 the heater core and associated venting with the above #24 removed to give access.
Where do hose lines #33/34 go? Should they be plugged when removed?
After these two phases are done Ill move more into the engine bay to access the compressor area and do the delete bracket. Ill keep checking this while im down there and before I move onto the ac delete bracket so thanks everyone.
Last edited by HalloFiElectron; 08-15-2016 at 07:21 PM.
29 is the heater core.
33/34 are the heater core hoses. They stick out in the engine compartment by the firewall at the rear of the engine.
Probably best to make a hose connection in the engine compartment or find a piece of copper tube and connect/clamp the heater hoses in the engine compartment if you still have coolant installed.
Take it easy with the blower cover if it's an early car..They break pretty easy and are not too cheap for a good one. After you undo the three bolts on the cowling around the blower inlet, the unit will drop down about 1/4 inch. Be sure that the center dash console is out as well, so you can remove the entire rig. Good luck..It will take some doing..Thanks.
The entire Heater system has been removed and 75% of the AC! Heres what I encountered and learned.
The heater is by far the easiest to remove. After removing the glove box and passenger kick panels I was able to access the AC unit area. I removed all of this assembly for the air conditioner and evaporator. I have not yet installed the ac delete bracket for the compressor as of now.
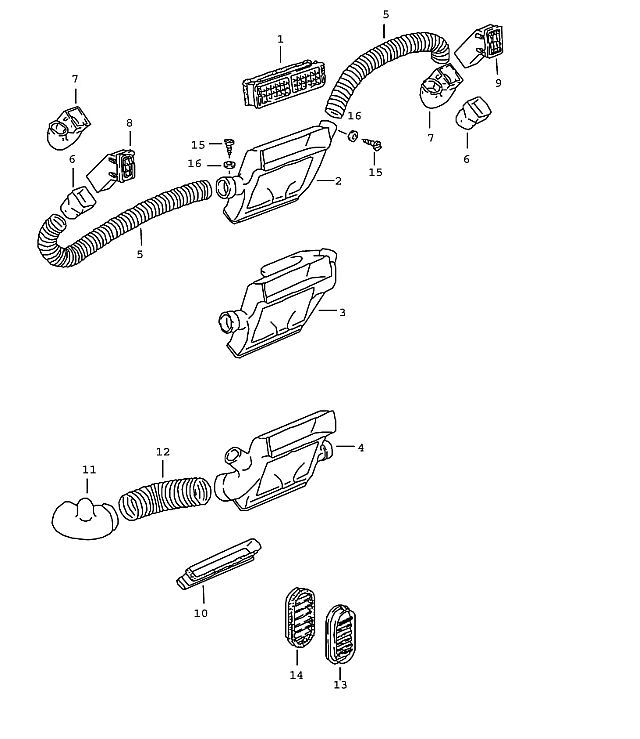
Once this was removed I undid all of the plastic vent lines for the passenger, front and driver side outlets.
Once that was out and I undid the refrigerant lines I went to the engine and removed the blower assembly and cover. Then disconnected the wire harnesses and undid all of the metal clips holding the flap assembly together. Once the clips are removed the flap assembly will split into two parts with the heater core inside the lower partitions. After undoing the water pump hose and engine block hose to the core (WATCH OUT FOR COOLANT!!) I removed the core then the two halves of the flap control assembly.
That left me with a completely empty area almost under the dash, finish removing particle and dampening material as well. Note you now have a huge *** hole from the blow that needs a aluminum plate and either caulk or casket this. Next I removed the core return line to the water pump and added a hose bypass cap at the water pump outlet. Then I removed the core return line to the temperate valve to the engine block and again added a hose bypass cap to close it off. (WATCH OUT FOR COOLANT!!)
Two questions though.
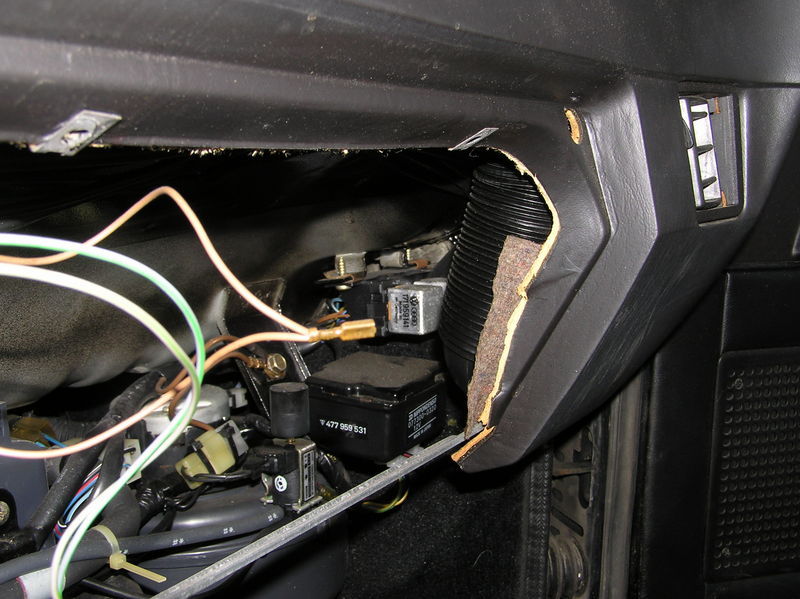
When I removed the air conditioner assembly under the passenger kick panel, near the outside panel underneath the glove box were two relays, are those for the HVAC? some of the wires for them were disconnected during removal of the AC but until I was sure i left them in place, can these go, what are they for?
***UPDATE: Yes, these two relays are for the Air Conditioner Relay and Fresh Air Interlock, which I think then I can now remove these from the system?
Also two relays were also mounted on the plastic flap control housing under the center console. What are these for and do they remain?
Picture of AC/interlock relays I found on Pelican forum;
Last edited by HalloFiElectron; 08-18-2016 at 10:34 AM.
You'll have to retain all the heater stuff, including the heater core and the hoses. the A/C stuff will have to go including the compressor and the associated hoses going through the engine bay, along with the receiver dryer unit under the left front headlight. You'll also need an A/C compressor delete kit, so the belts will be the same as before, prior to removing the compressor. Don't forget to remove the condenser in front of the radiator as well..Not a quick job. Just sayin...
Everything in the engine bay has already been done including cutting the A/c lines at the firewall. My dash is removed. I just need to figure out what stuff inside the cabin can be removed. Guess I�ll just have to dig in

 08-14-2016, 11:31 AM