When you click on links to various merchants on this site and make a purchase, this can result in this site earning a commission. Affiliate programs and affiliations include, but are not limited to, the eBay Partner Network.
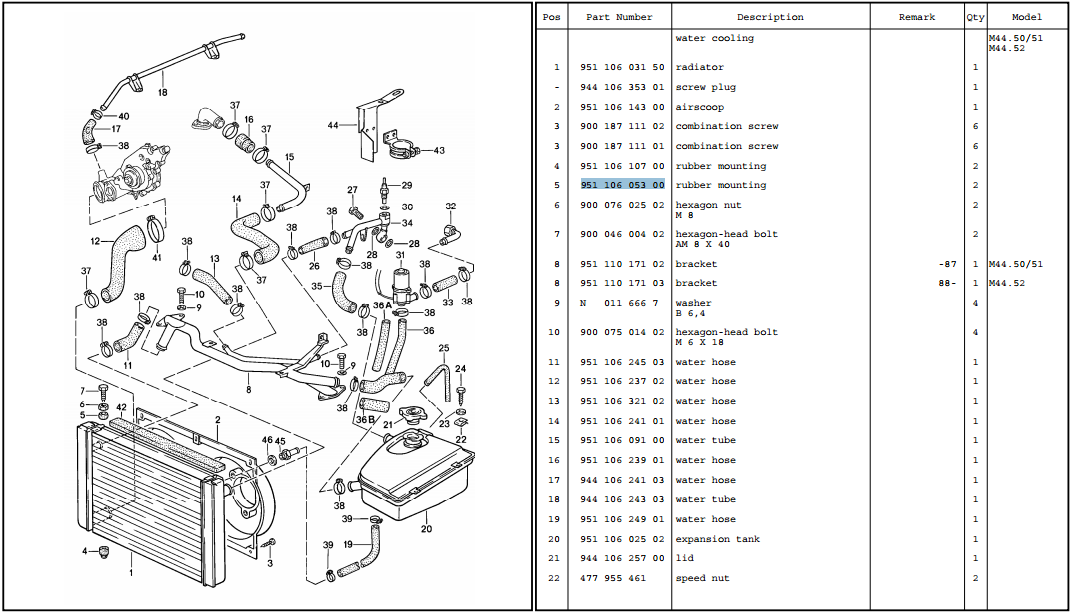
My radiator has never really sat correctly and recently one of my cooling fans dug into my lower radiator hose... turns out the upper mounts are pretty dodgy. An entrepreneur PO used an assortment of washers and what looks like some grommets for the upper mounts, which wasn't really holding the radiator still, hence the issue. The PET shows a hex bolt, nut, and a rubber mount (numbers 5, 6, 7):
Is that all that's needed?
When I look into the area where that's all supposed to be, I can't see anything on the radiator to accept it. There's just a ledge, which would keep the radiator from moving toward the engine if the mount was installed. Is that all there is? I thought the mount would seat inside a recess or something on the radiator.
Below are the parts I'm about to order if this is the case:
Ian has a kit for the upper and lower bushings but not the set pins.
The radiator plastic end caps have a recess to hold the foot of the rubber bush, top and bottom(4). You need to adjust the pins to hold the radiator firm but not compress the plastic end caps.
Ian has a kit for the upper and lower bushings but not the set pins.
The radiator plastic end caps have a recess to hold the foot of the rubber bush, top and bottom(4). You need to adjust the pins to hold the radiator firm but not compress the plastic end caps.
A must with a new radiator.
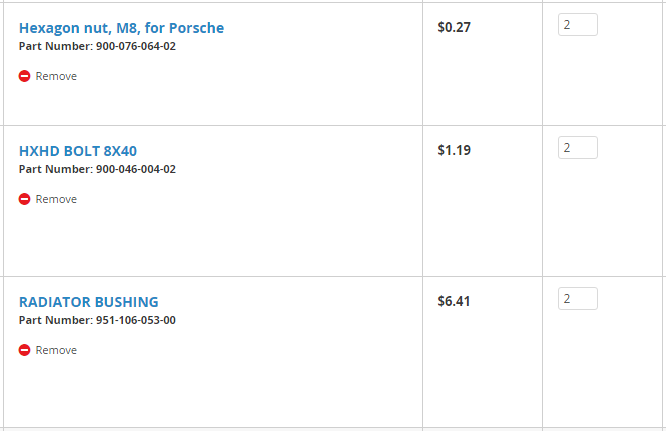
Forgive me if this is a dumb question but when you say the pins, are you referring to the nut/bolt assembly? (parts 6 and 7 in the screenshot). Is the mount threaded so it can be adjusted with respect to the bolt, or is the nut used to set the position of the mount on the bolt?
Dear S/H: You may have an older radiator that is all brass, like mine. I looked at mine and couldn't figure out how it totally mounts either. I have the 4 mount kit also, but haven't rally looked it over very well, but I will today and get back to you. Seemed that there was only room for the two lower mounts but not the uppers , since I thought they went on top of the radiator. Now that I know they might mount on the side of the radiator, that's something else I can check out. I didn't know about any pins...
Mine is definitely the normal one, which is aluminum and plastic. The part where the upper mounts contact is black plastic on mine, anyway.
I also haven't laid eyes on the driver side upper mount, although the PET says qty. 2 for all the aforementioned upper mount parts, I'm just going to order what I posted in the first post.
Clarification time...
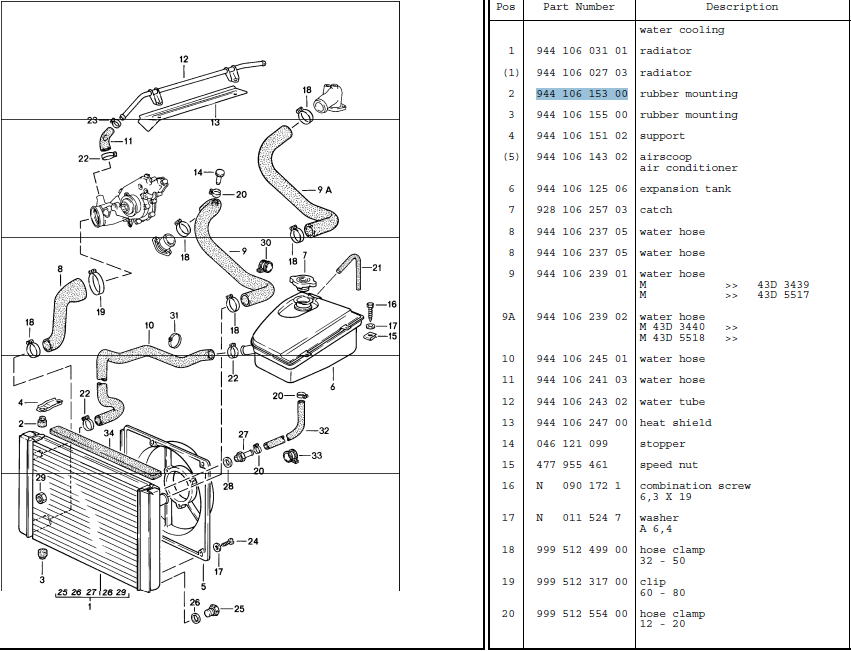
Early cars have a little "Z" shaped bracket that bolts to the radiator frame (body)...to this is attached a rubber snubber that engages the spot on the top of the radiator.
To remove the radiator, you loosen the nut on the bracket, remove the bracket (or just swing it out of the way), and you are good to go.
On the late cars, the upper "snubber" is held in place directly by an adjustable height bolt/nut that goes through the radiator frame - no bracket...this is items 5,6,7 in the diagram.
Yes, substitute bolts and locking nuts for the word pins. The tip on part 7 is shaped to fit the metal washer inside the rubber bushing, so I used the word 'pin'.
Our cars are obviously different.
I set the bushings on the top of the radiator then set the cross brace down so the bolts hit the center of the washers in the rubber feet. After everything is engaged, I slide the cross brace forward to its final position hoping nothing pops out.
You don't want the radiator to vibrate itself to death. The mega-dollar all brass radiator in the rover failed because I used a sawzal on the seized fog lamp mounts. They don't like high frequencies.
Since my car didn't have a radiator in it when I got it..I picked one up. I am contemplating purchasing two of the 6 balded fans for cooling. I know that they will not fit an early car fan shroud with out modification. However, will a later model fan shroud fit the early cars? If so, what mods must I make?
Dear Modonnell: I check my radiator out a bit more today, and it is not brass, like I had earlier thought, but plastic and aluminum. I was looking at it closely, and both the top and bottom are similar. I can see where the lower mounts were placed onto the radiator, but not so much the top. I wish I had a good pic of the Z clip that V2 is talking about. I don't think I had one of those either. Thanks.
Be sure to use fill the gaps between the condenser and the radiator as well as the fan assy to the radiator. Airflow is the key factor in cooling thru these items and they need to be sealed up well to each other to allow that to happen.
Dear Modonnell: I check my radiator out a bit more today, and it is not brass, like I had earlier thought, but plastic and aluminum. I was looking at it closely, and both the top and bottom are similar. I can see where the lower mounts were placed onto the radiator, but not so much the top. I wish I had a good pic of the Z clip that V2 is talking about. I don't think I had one of those either. Thanks.
Rich, took some pics of the brackets today as well as the creative PO solution. New parts should be here any day.
This is the one on the driver side. Already removed the nut from the upright stud on the frame/body.
This is from the passenger side. Not even sure what was going on here.
Originally Posted by Humboldtgrin
Be sure to use fill the gaps between the condenser and the radiator as well as the fan assy to the radiator. Airflow is the key factor in cooling thru these items and they need to be sealed up well to each other to allow that to happen.
I don't have a condenser but thanks for the input!

 10-26-2015, 10:14 AM


 but thanks for the input!