When you click on links to various merchants on this site and make a purchase, this can result in this site earning a commission. Affiliate programs and affiliations include, but are not limited to, the eBay Partner Network.
Ok, this is in response to the huge number of people who have been contacting me about megasquirt. I'm always more than happy to share what I know privately, but I thought the community might also benefit from a stand alone thread about what exactly it takes to set up and get megasquirt running on a 944. This guide will be in the form of multiple posts, and I will do my best to be as clear as possible and provide pictures when sensible.
wiring up the megasquirt
This is a somewhat lengthy process, but taking care here to ensure good wiring and grounding practices will keep you from chasing your tail later. This article will be more geared toward the use of a microsquirt, which is essentially a surface mounted version of the Megasquirt 2 hardware. It is tiny, completely waterproof, low cost, and perfectly suited to running a wide range of features such as launch contol, full sequential fuel and spark, electronic boost control, ect on a 4 cylinder engine. In addition, it is capable of running a v8 engine in wasted spark mode.
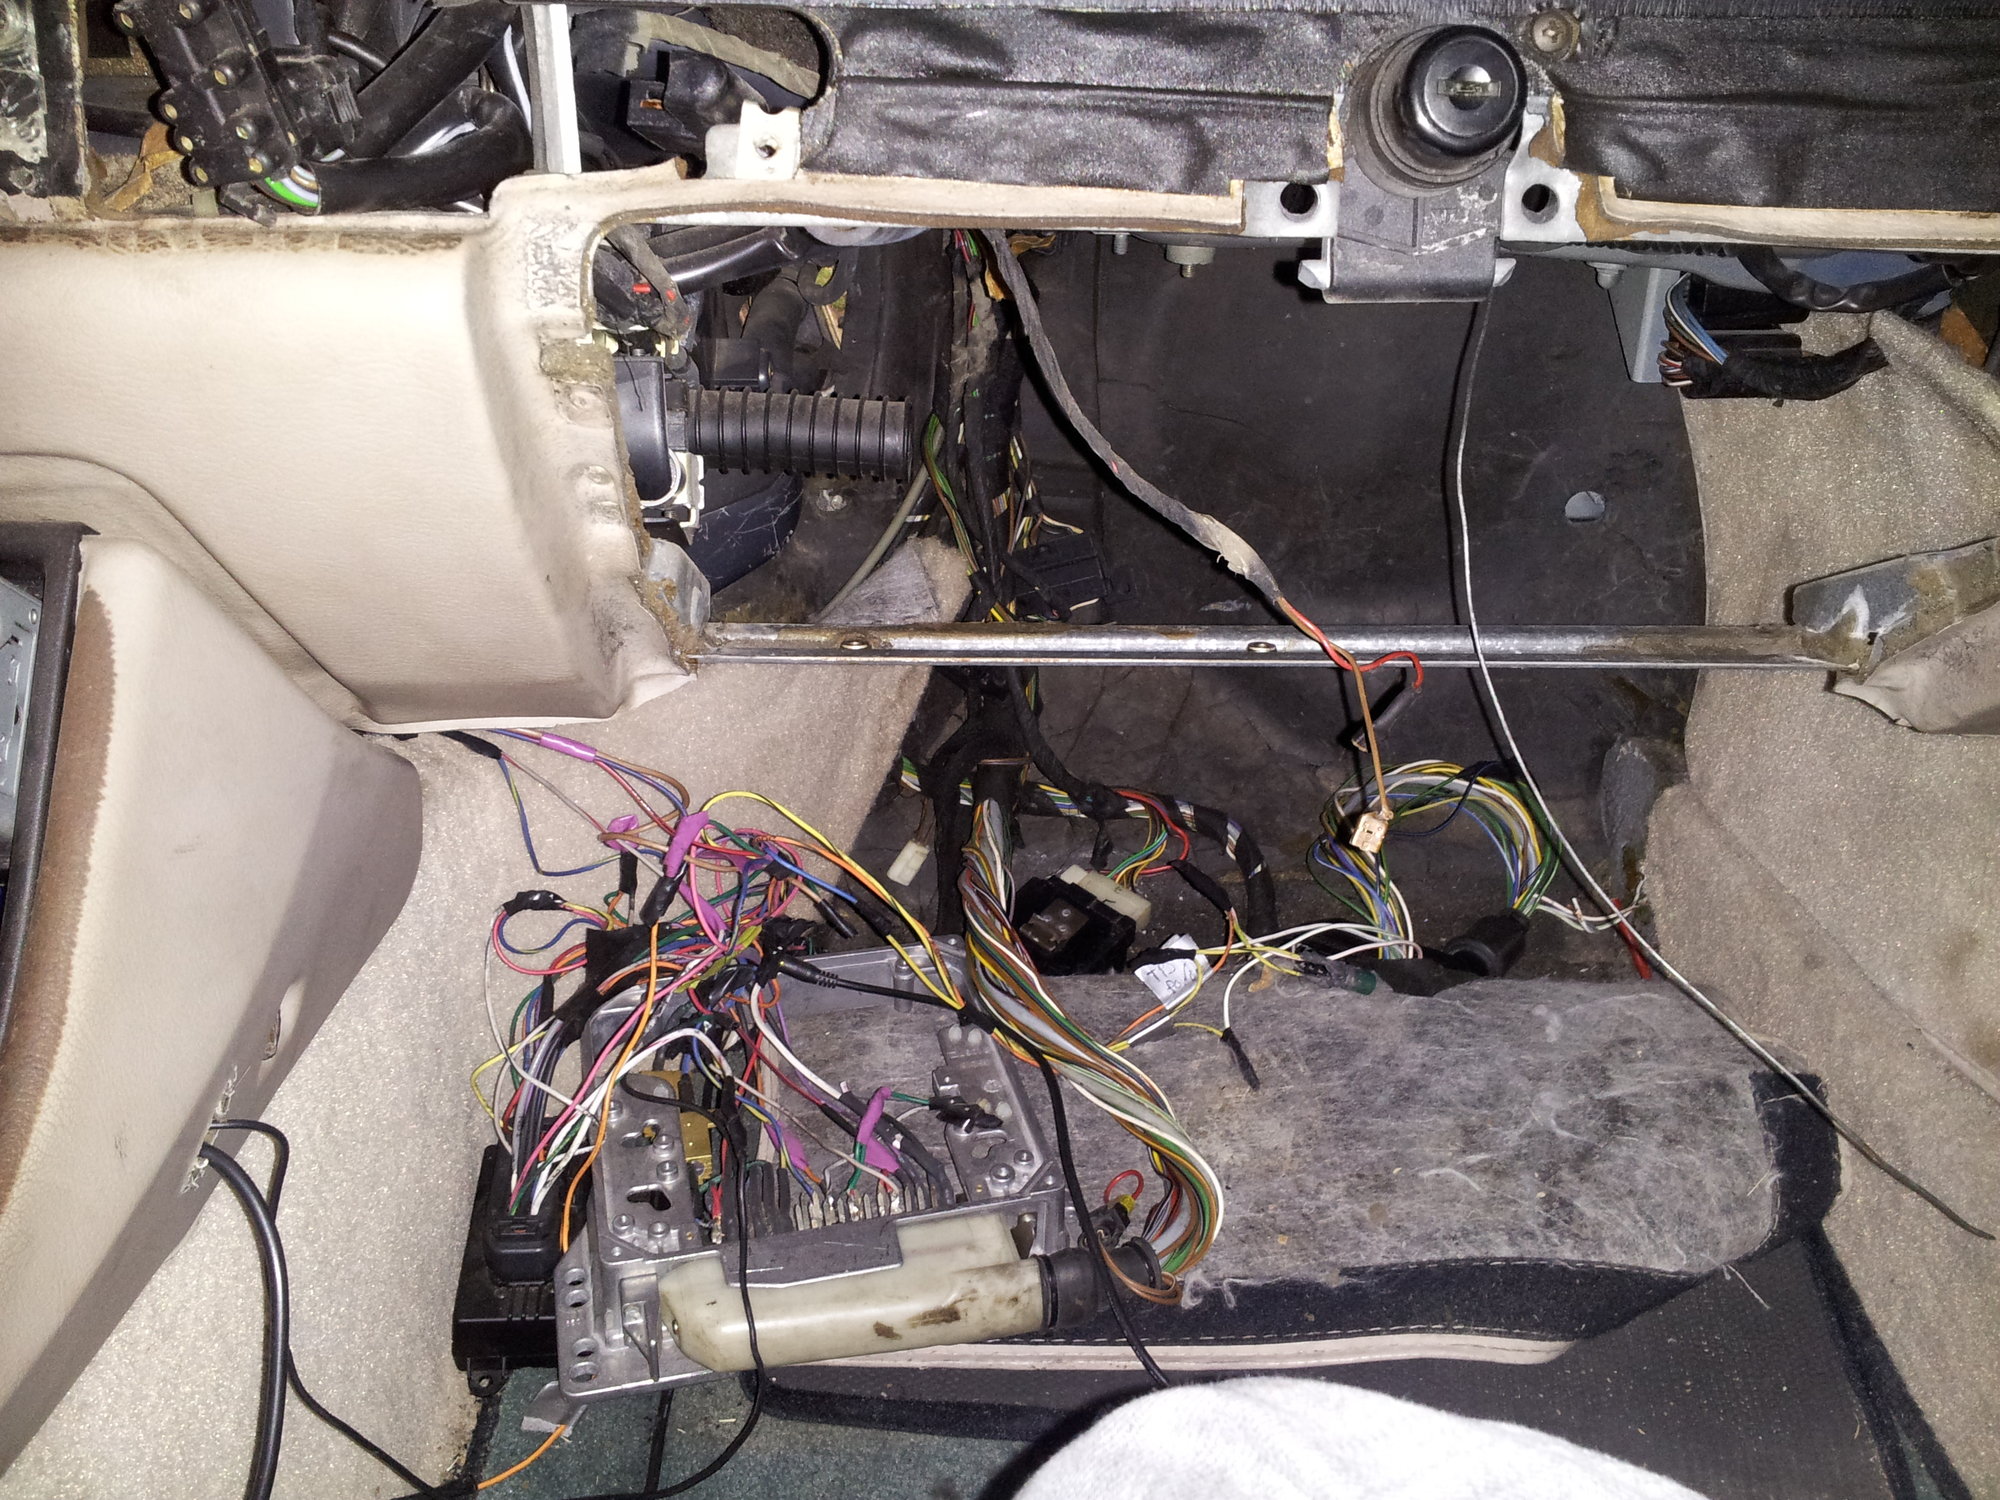
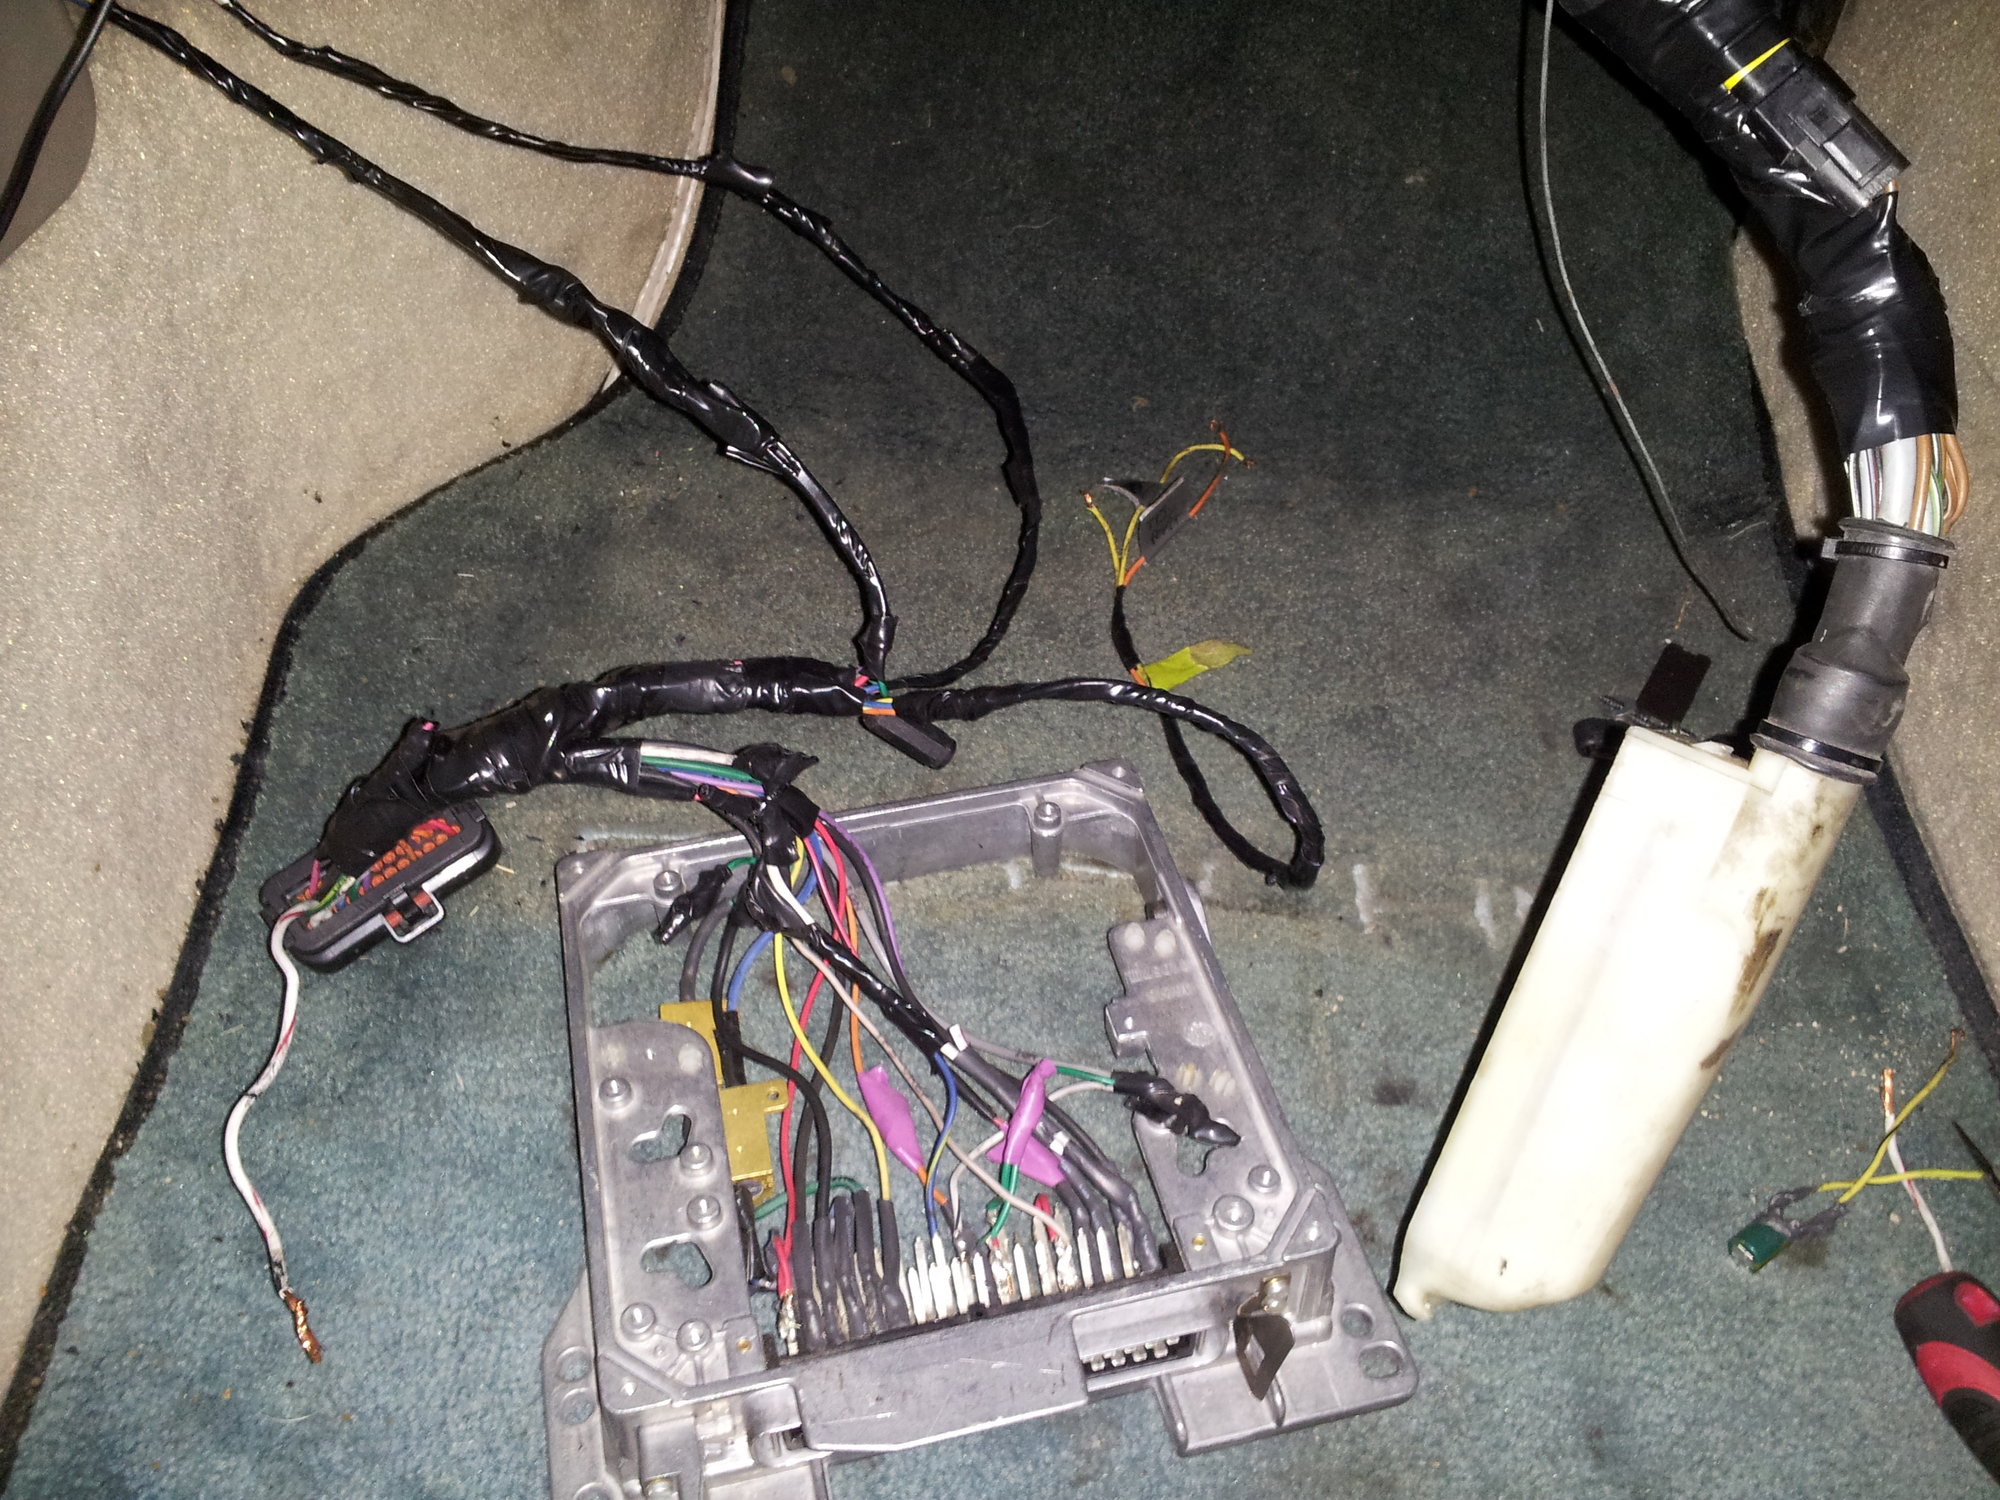
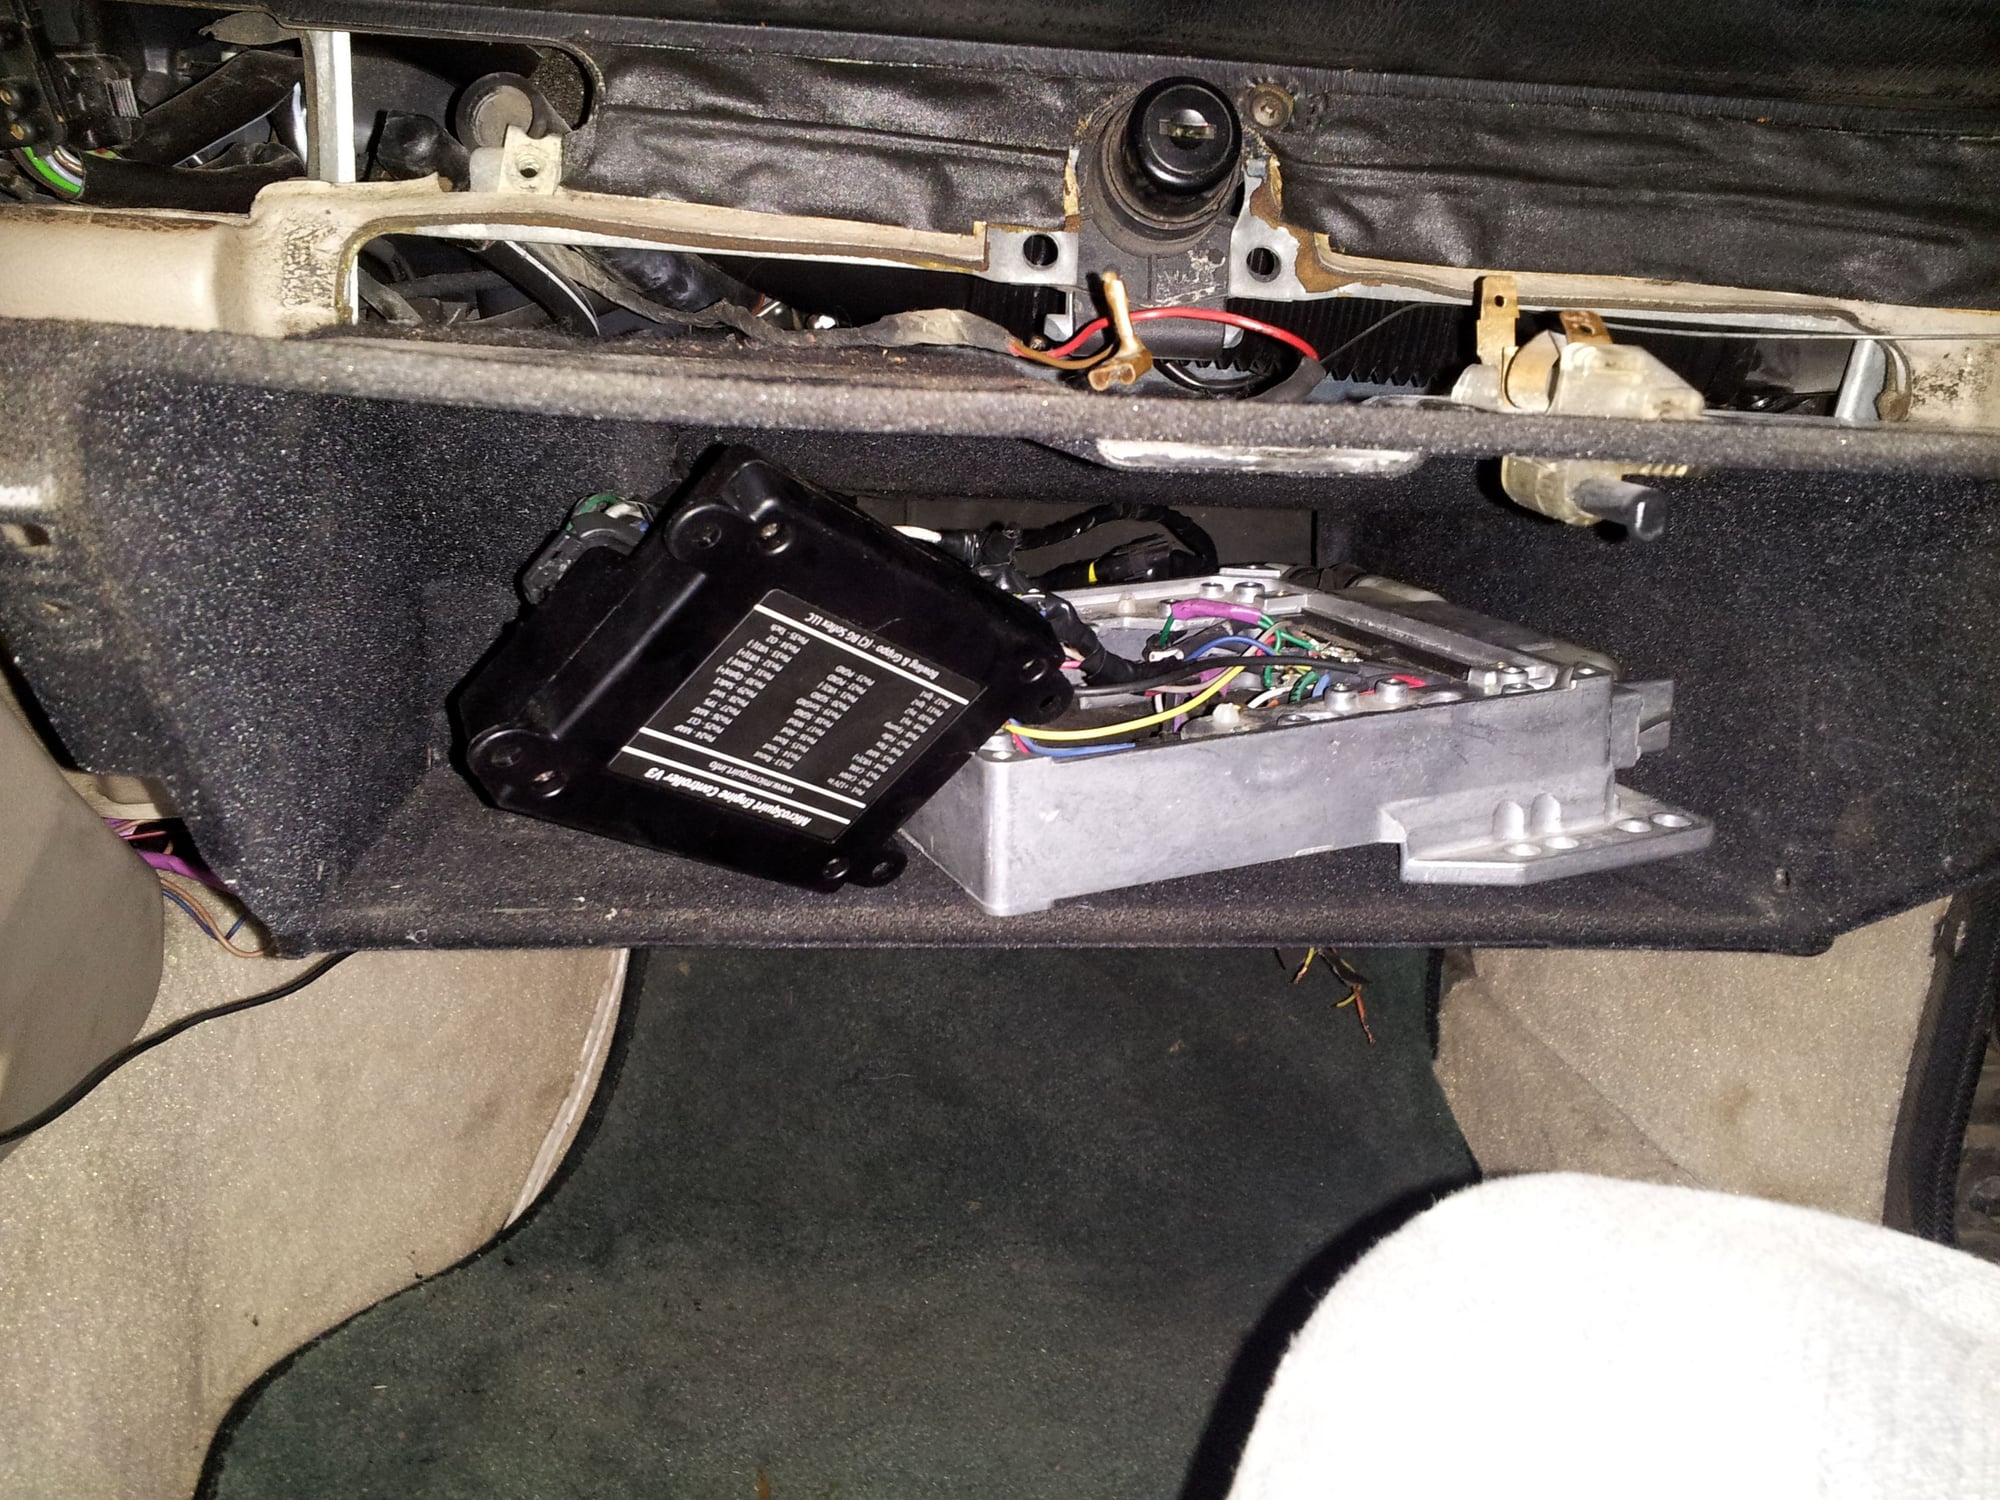
The easiest way to wire in a microsquirt is to use a gutted DME case as a sort of "adapter", rather than chopping up the car's harness. What this basically means is you will be reusing 90% of the car's original engine harness and redirecting them into the MS. You will reuse all the car's factory ground points, the use of the DME relay to power the MS and the fuel pump, the car's stock coolant temp sender and wiring, the stock speed and reference sensor wiring, and also the car's fuel injector and ignition in/out wiring.
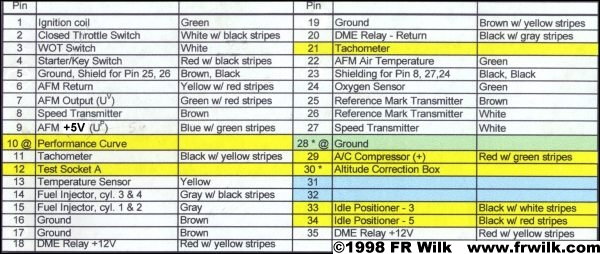
Here is a pinout of the DME:
The basics are, you will run the two injector channels from the MS out to the engine via the stock wiring, pairing together the two cylinders which fire together just like stock (1&2 and 3&4). The ignition can be tricky depending on if you want to use the distributor, or go to coil on plug. To use the distributor, you need to wire up an "ignition box" because the stock ignition coil does not have its own ignitor. You must then use a separate BIP373 transistor in order to charge and then fire the coil. Prefabricated ignition driver boxes that can control from 1 to 8 individual "dumb" coils, should you decide to use those for whatever reason, are available. It's a lot easier to use wasted spark, the ones that make sense to use are "smart" coils which have their own built in logic level drivers. These can be directly fired from the MS and do not require any additional hardware or circuitry. You power the coils using the stock coil power wire which takes its 12v from the ignition switch, and run a 12v ground for the coils directly to the battery. Then, you just run the logic signals from the MS's two ignition channels to the coils in 2 pairs of 2, again wiring 1&4 and 2&3 together. By pairing the cylinders together that fire together, both coils on each of the two ignition channels will fire twice per crank revolution, once when each piston is on its power stroke, and once on the exhaust stroke. This is the "waste" spark. Pin 35 from the megasquirt is an output and used to drive the factory tach. It would drive a V8 tach as well. Do not for any reason cross any of the ignition output pins with the tach output pin, this will drive one or more ignition coils with no dwell control and could cause a melt down of the coil.
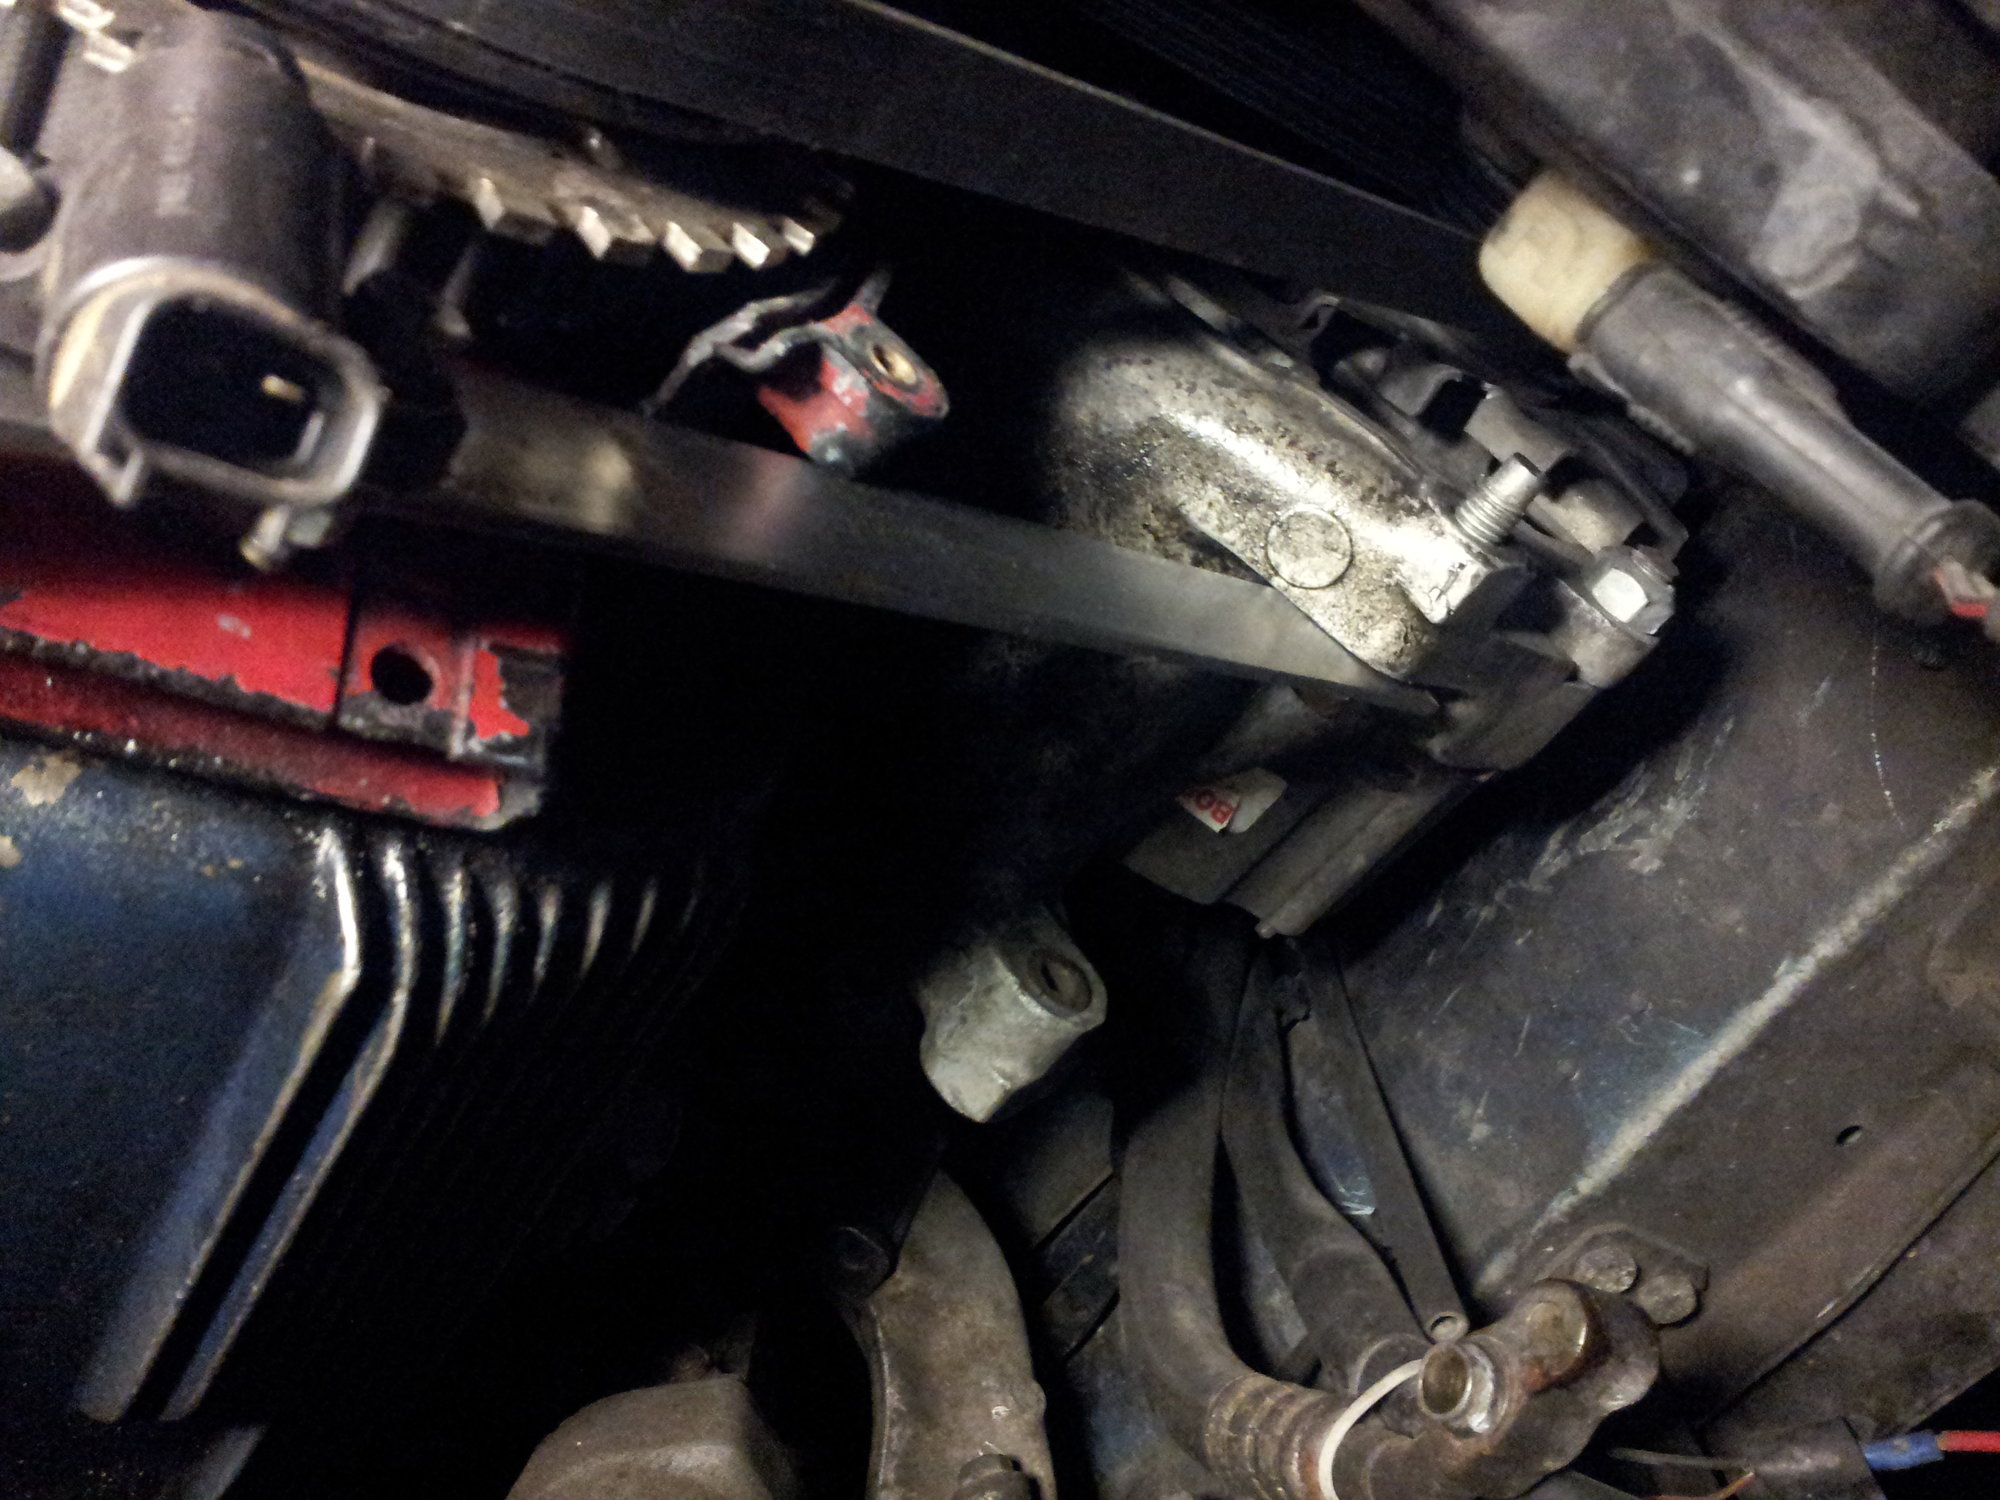
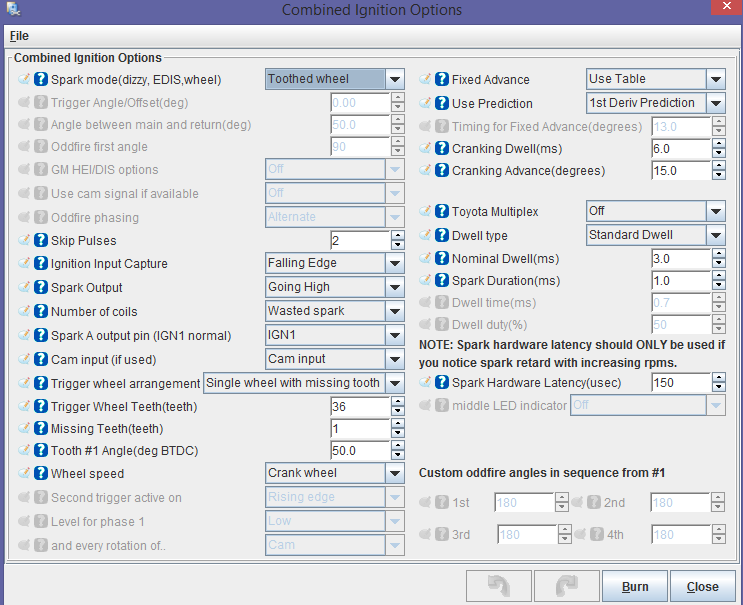
For the actual ignition inputs, you have several options but the only one that should really be considered is using a 36-1 reluctor wheel. The noise with the stock speed and reference sensors is reeeeeally bad and there just isnt a good way to make the stock triggers work. A 36-1 reluctor is a steel toothed wheel which has 35 regularly spaced, 10* teeth and one 10* wide blank spot, or missing tooth. The place to source one for a 944 is goingsuperfast.com. You will want to use the 6" wheel. It is a direct bolt on for the 2.5 liter engines and possibly the 3.0 as well, mounting to the front of the crank using 4 bolts. You will also need a VR sensor, I got mine from a 1.8 liter ford escort, but you could really use any sensor that has a sensing element with a diameter roughly similar to the size of the teeth on the trigger wheel. Mounting the sensor is the real trick, there are several designs out there, I know Chris White makes a very good bracket and there is also a very nice one available from clewett engineering here >>>>http://www.clewett.com/index.php?mai...products_id=30. You can also buy a bolt on cam synch for full sequential fuel and spark from clewett here >>>>>http://www.clewett.com/index.php?mai...roducts_id=306
I choose to design my own bracket, but the important thing is that you get the sensor perfectly aligned with the teeth, it cant be off to one side or anything crazy. The bracket has to be stiff and mounted directly to the motor so the sensor cant move, since it will be less than 1mm away from the spinning crankshaft. It also must (should, I guess) be adjustable, since you will need to gap the sensor just like you would the stock speed and reference sensors. You will no longer be using either of the two stock speed sensors, but you WILL use the wiring harness to easily route your new crank sensor signal into the megasquirt.
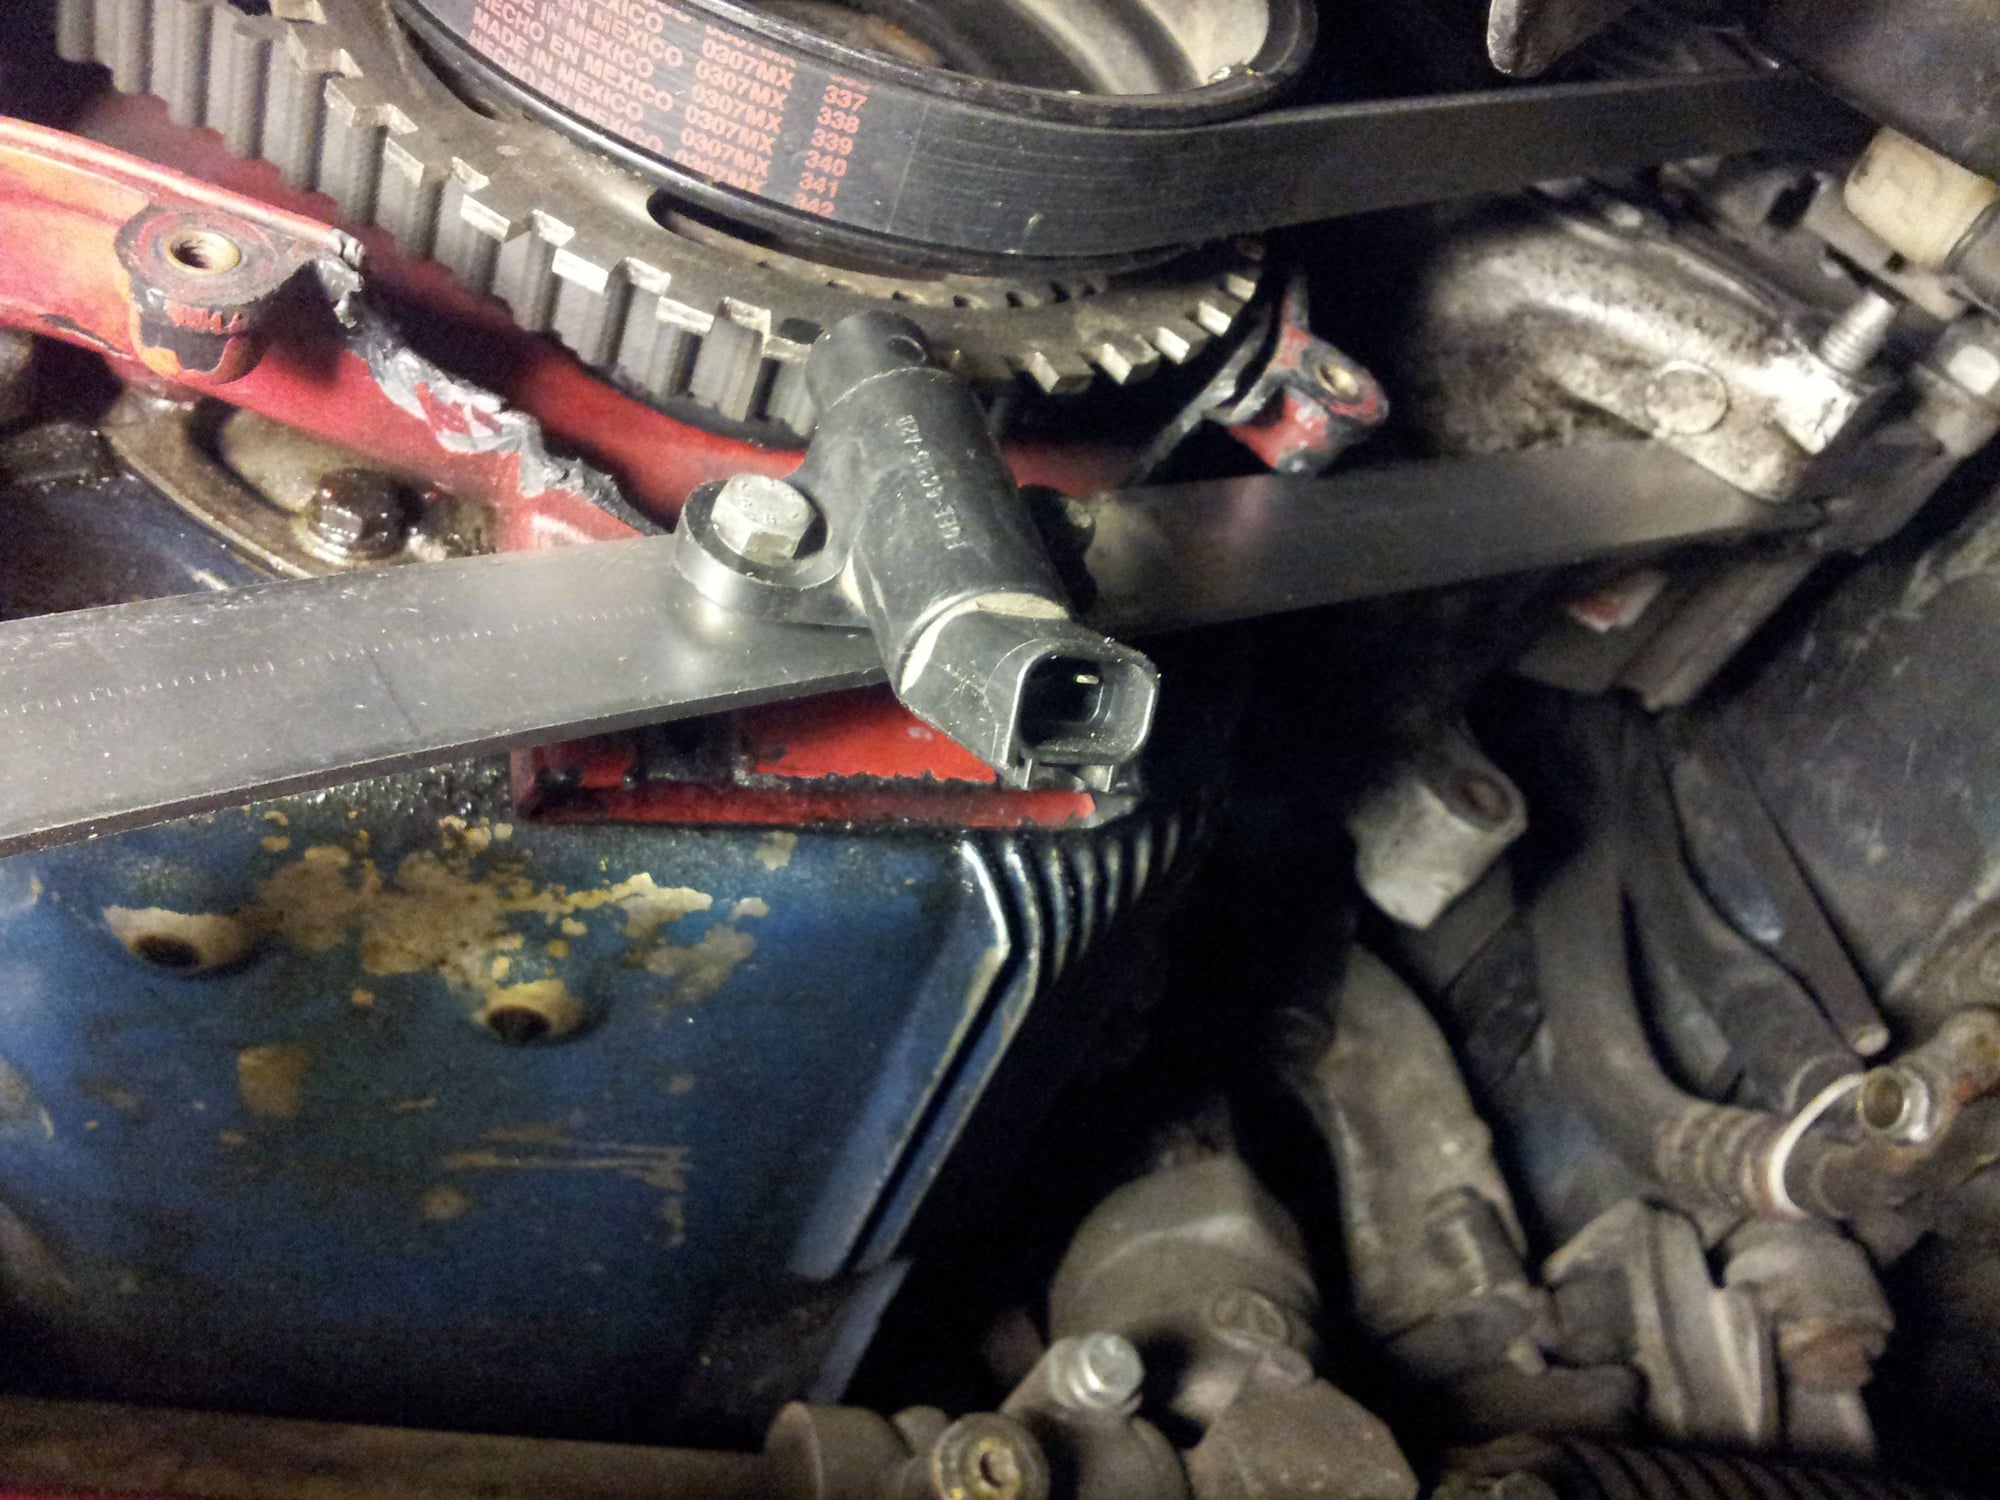
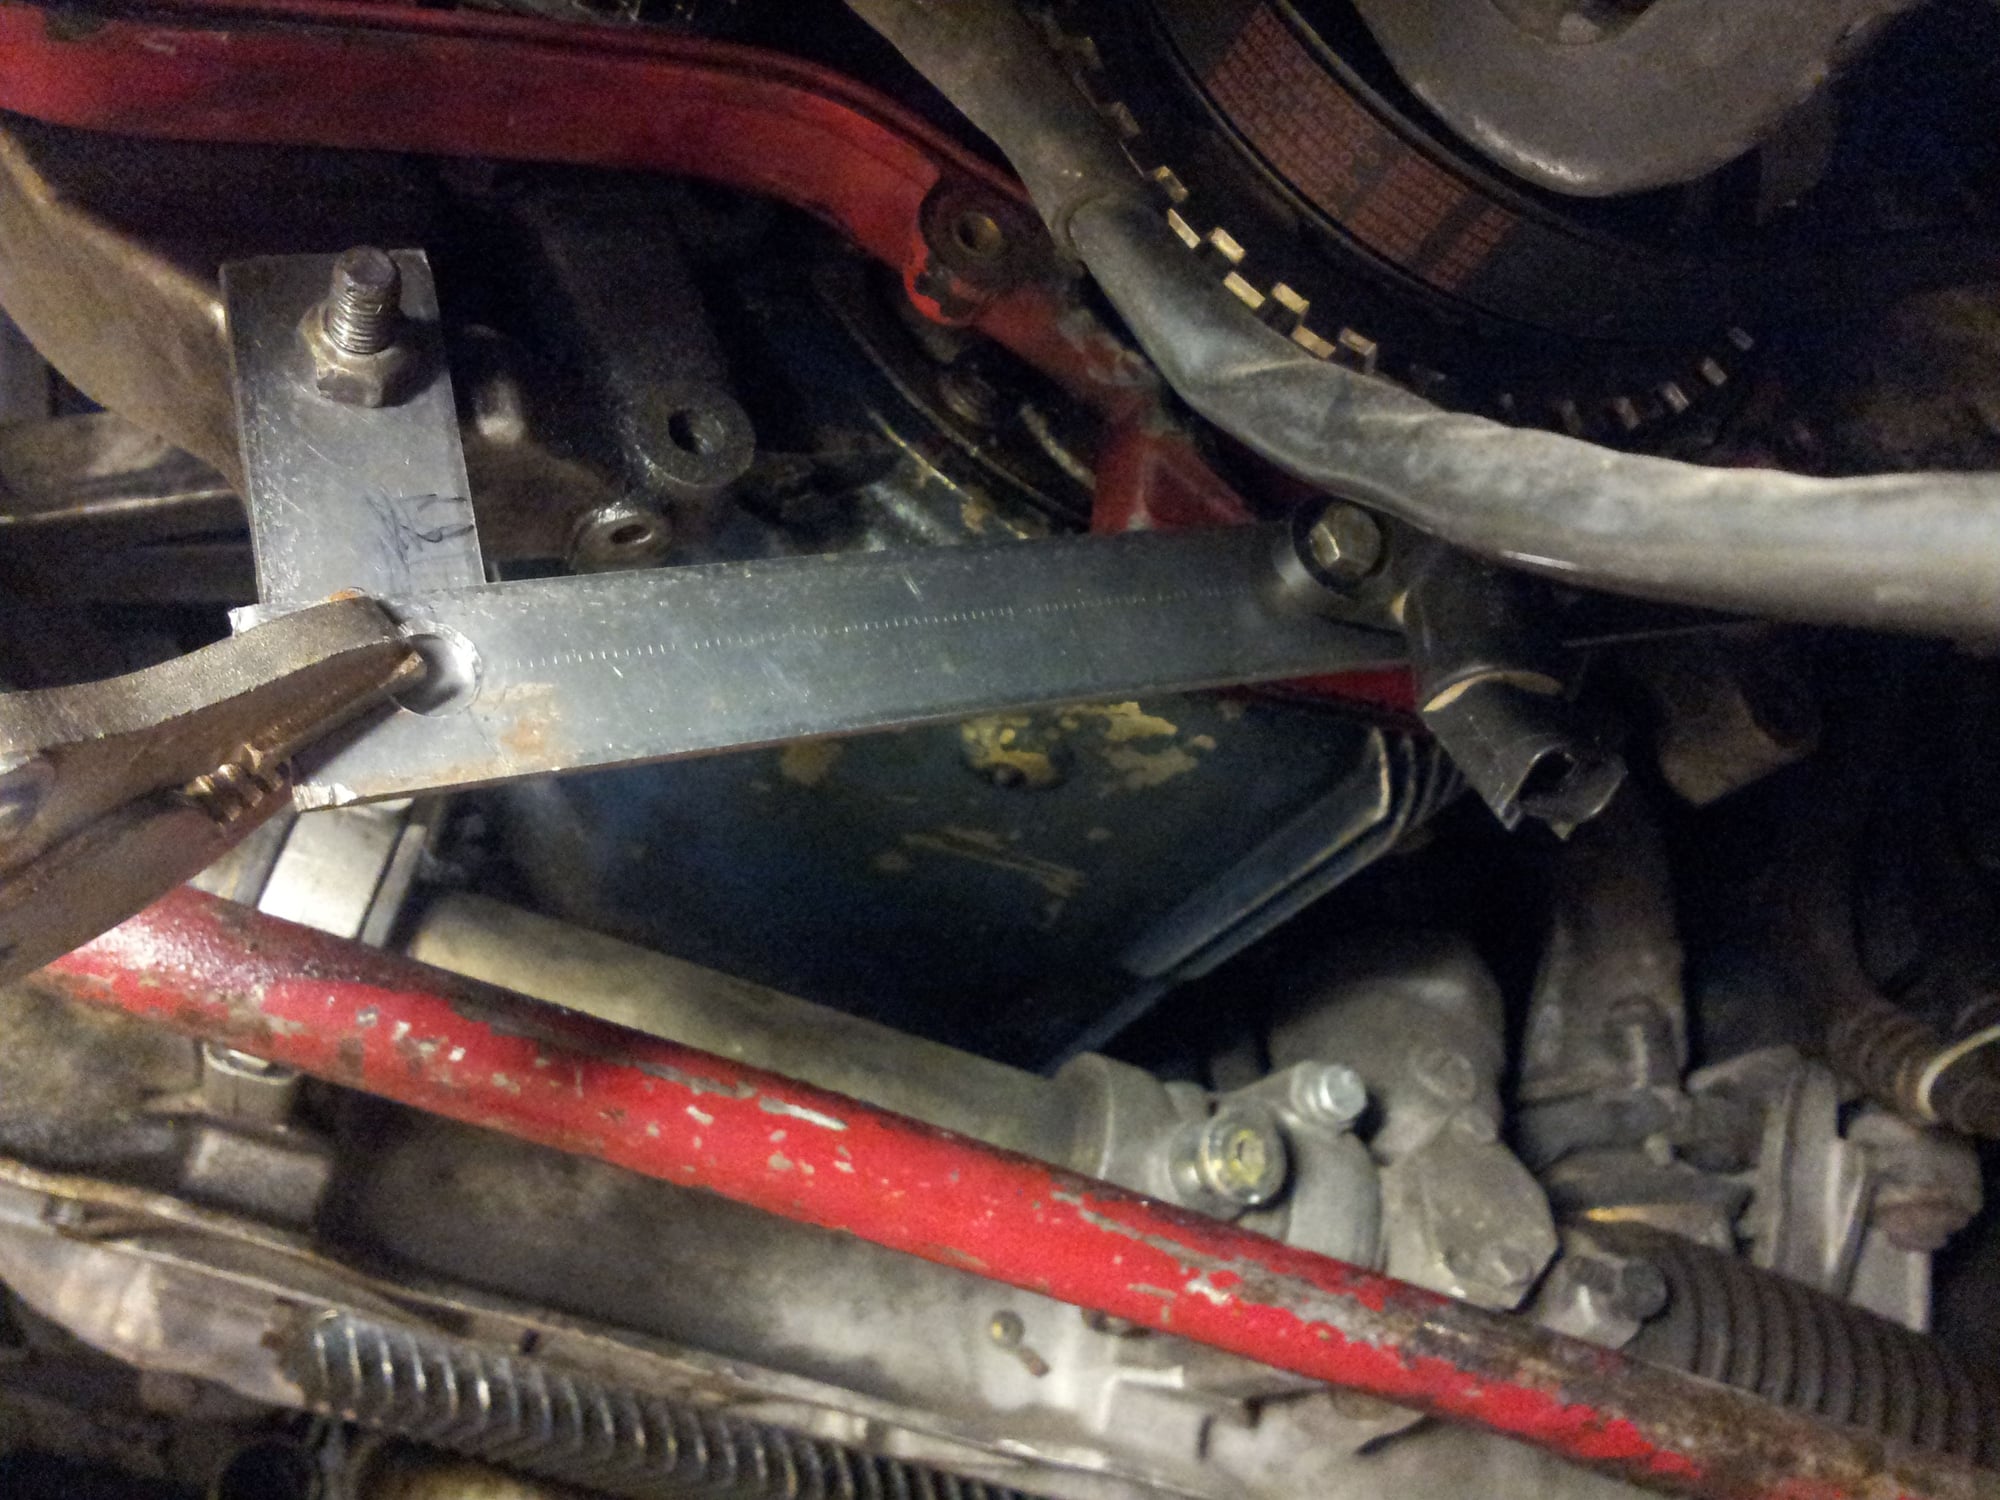
Here is how I did my bracket:
Grounding is really an important issue with any stand alone, but more so with a microsquirt because its very small form factor makes it more likely to encounter noise coupling issues. Basically my tips for ensuring low noise are to run all the sensor wires well away from anything electrically noisy, and to use good quality, braided pair wiring with an integral shield. The shield should be terminated as close as possible to the noise source, for pretty much all your sensors that means leaving the shield floating at the MS end and grounding it as close to the sensor as possible. In addition, it is VERY important that you understand the difference between a true high power ground, and a lower power "sensor common" which is also usually referred to as ground, but is distinctly difference from a "normal" ground. The high power grounds will ground out large currents, things like the MS its self, the fuel pump, the injectors, and the ignition system will all ground out through high power factory grounds. The sensors however, all run off 5v and use hardly any current. Their "grounds" are actually just a common return point back to the megasquirt, and for this reason all lower power grounds have to be kept separate from power grounds to avoid noise injection.
In addition to the VR inputs and stock coolant temp and TPS (The TPS can be tricky, in the 951 it is tapped out of the KLR harness but I choose to simply run a whole new 3 wire harness from the sensor back to the MS) you will also need to run wiring for a MAP sensor and an intake temp sensor.
In addition to the factory sensors already present on the motor, you will need to gather a few additional ones to make everything work. First off and foremost, the TPS sensor used MUST be of the variable potentiometer type. The stock 951 unit fits the bill, the stock S2 unit may or may not, but neither of the N/A 2.5 liter TPS units will work as they are basically just contact switches and not potentiometers. If you are trying to squirt a car without a 951 TPS, you will have to adapt the 951 piece and make the appropriate wiring changes.
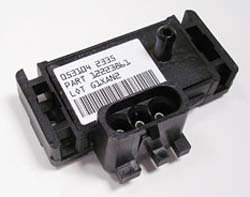
You will also need a manifold pressure sensor. The one to use is the standard 3 wire GM type like this. To keep response times fast, you will want the vacuum line to the sensor to be as short as possible and to come directly from the intake manifold.
You should use a 1 bar unit for a naturally aspirated engine, it will give you the best resolution. For most boosted applications, the one you want is the 3 bar.
You will need a fast acting open element temp sensor, again GM is the best way to go. This needs to be placed as close as possible to the throttle body.
Finally you'll need a wide band. Most of the 951 folks will hopefully already have this, but even an N/A setup will need one for tuning. There are tons available, I personally picked a kit that uses the latest 4.9 LSU sensor but you can use any kit you like.
Once you get everything installed and wired up, you'll need to calibrate the sensors. This needs to be done with the engine off. The TPS should be done first, basically you just need to let MS know where closed throttle and WOT is. It's obvious once you are in the sensor calibration section, just calibrate the closed throttle, and then go WOT and calibrate the WOT cell. If you follow this guide and use a GM MAP sensor, MS has built in calibrations curves for most of the common GM sensors as well as a few others, so this is also easy. The WBo2 needs to be calibrated using the manufactures provided lambda vs voltage curve as well if you are planning on feeding the MS a wideband signal (this is not required, my car is tuned 100% open loop just like a factory ROW car) The trickier part is calibrating the thermistors. To calibrate the stock coolant temp sensor, I used this info from clarks----http://www.clarks-garage.com/shop-manual/elect-19.htm#coolant
The calibration curve for the GM open element AIT sensor is freely available online here----http://www.diyautotune.com/catalog/gm-open-element-iat-sensor-with-pigtail-p-62.html
The standard GM TPS is the best one to use, a cheap and well made adapter plate exists to bolt it on to the stock 944 throttle body. It can be purchased here >>>http://www.ebay.com/itm/Porsche-944-...3D321589116629
A note on fuel injectors: Microsquirt has two injector channels built into it, the problem with using stock 944 injectors though is that they are low impedance, and MS can only drive 1 low Z injector per channel. It can, however, drive up to 4 high Z injectors per channel for a total of 8. On my 951, I am running siemens 80 lb/hr injectors to give myself headroom with E85. These are what I would recommend on any forced induction setup, they run about 200/set. For an NA build that doesnt need as much fuel, cheaper options exist. Pretty much any injector that can provide at least 26 lb/hr of fuel at 3 BAR pressure will be more than any N/A car will ever need. The only thing is to make sure they have at least 10 ohms resistance and use an EV1 style electrical connector. Good ones that can be had cheap are ls1/ls2/ls3/ls6 injectors and injectors from either a GM or ford supercharged V6 motor. These are available all over the internet for under 100 bucks a set.
So now you have a megasquirt installed in your car. Great, you're hopefully done with the easy part! You're still a long way off from even turning the key, so lets set up some basic parameters so that the motor wont explode the first time you try to start it.
You are going to need a handful of things. A laptop is required. Any decent laptop capable of running windows XP or 7 should work just fine, but it needs to have at least a decent few hours of battery life, since in the coming weeks after installation you will basically want to have it in the car at all times. You will also need a USB to RS232 serial adapter cable. Many dont work that well, the one I use does though. I got it here >>> http://www.monoprice.com/Product?seq...VsIaAhwN8P8HAQ
You'll also need to download a driver so that your laptop will recognize the cable. As far as software is concerned, you'll need the most up to date copy of Tunerstudio MS (megatune will not work) and Megalogviewer. Do yourself a favor and buy the full version of at least tunerstudio, you'll never get the car sorted without some of the tools only available in the paid version. Its 60 dollars well spent.
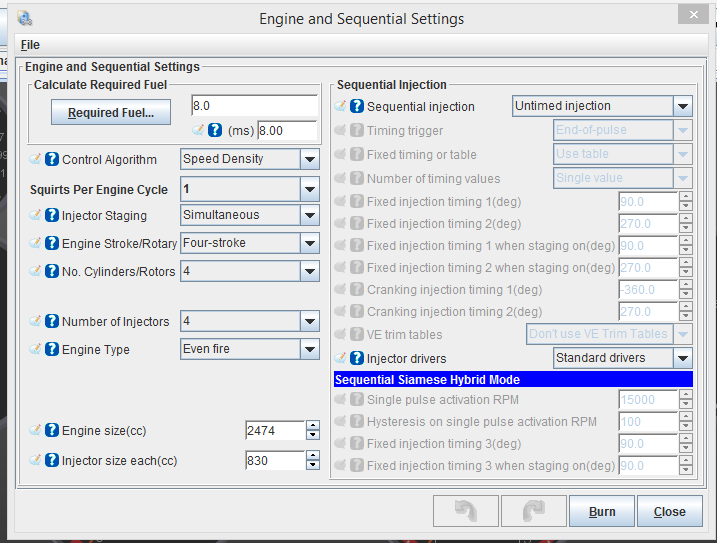
Your megasquirt probably did not come preloaded with anything usable, so you'll want to immediately update to the newest version of the MSextra code. Flashing the firmware is beyond the scope of this section of the guide, but I will eleborate more on that later. After that, open up Tunerstudio (TS) and try to get the laptop to connect to the MS. Don't make the mistake of trying to create a new tune from scratch, thats how bad things happen. If you do this, TS will populate all of the massive number of inputs with garbage, and you will have to go through and set up absolutely everything to make sure they are set to safe and sane values. The correct way to start building a tune is to load up one of MS's prebuilt tunes and then start modifying it. once you set up the basic engine parameters like displacement, injector info, ignition type, ect, you're almost ready for the first start.
Before you crank it though, you'll need to verify TDC and static engine timing since you are no longer using the ignition offset provided by Porsche. In other words, you need to tell MS where within the 360* rotation of the engine the crank sensor is located at. This is so when the motor thinks its at TDC, its actually at TDC. This is so spark timing is correct. Basically, when using a crank mounted trigger wheel, you would set the motor to TDC and then count how many teeth the "missing tooth" is offset. So if you have to rotate the engine 6 teeth (60*) past TDC to get the missing tooth aligned with the sensor, than the actual static timing of the engine is 60* BTDC. You will input this into MS under the "tooth #1 angle" tab and get it somewhat close, then set base timing in the idle cells to something sane like 10* and then get ready for the first start, where you will use a timing light to verify or tweak the timing so its dead on. The ignition input capture is a polarity setting, it depends on how you wired up your VR trigger but if the car doesnt start, try swapping the polarity since there isnt an easy way without using an O-scope to know if you got the right setting other than the car starting. Spark output will need to be set to "going high", the car will run either way but having it set to "going low" will overheat and damage the ignition coil(s).
Cranking pulse, afterstart enrichment, and warm up enrichment
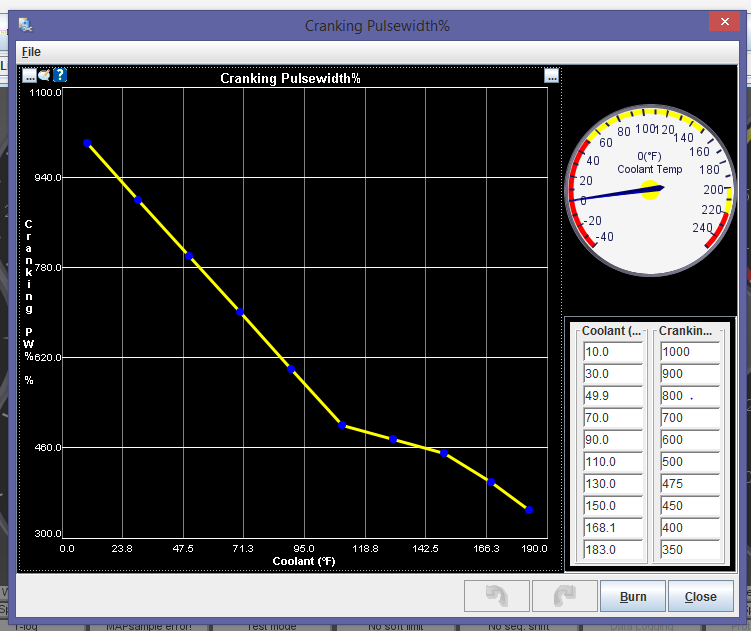
When a car is being cranking over, the charge must be very rich in order for the motor to fire at very low speeds. Cranking pulse is a percentage of base fuel pulsewidth injected at cranking speeds, typically under 300 rpm. The curve that will come preloaded in MS will be way off, you'll need to adjust it to get reliable, quick starts at all operating temperatures. This curve is a percentage of the base fuel pulse width, so will depend on your injectors mainly. Since req fuel can be freely changed to scale your VE table independent of injector sizing, this curve will only work if your base req fuel is the same as mine.
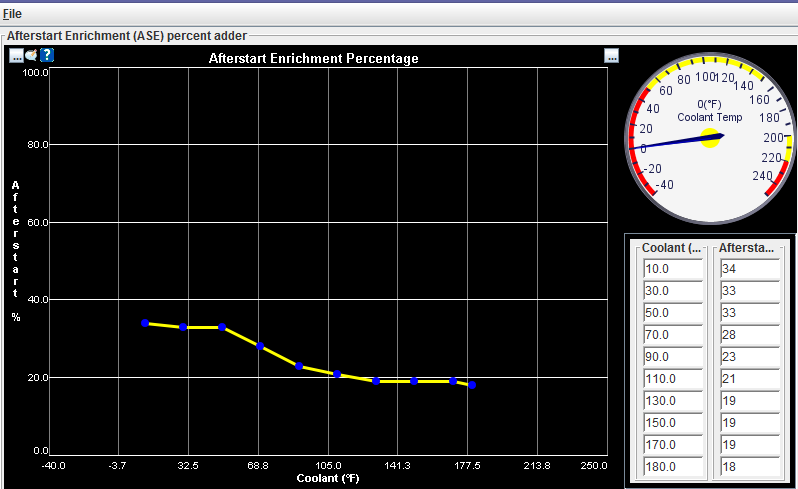
Similar to the cranking pulse, an engine needs to be richened up for a short period of time immediately after starting to prevent stalling. This is the afterstart enrichment curve. It is a percentage of additional fuel on top of the base fuel pulse width to be injected. This curve will also not be correct, and again my curve will only work if your req fuel is the same as mine. This is actually a time-dependent function, the afterstart enrichment curve references a second table which is a timer function, basically the idea is that the colder the coolant is, the longer the MS will run the afterstart function. The curve is adjustable but the stock settings are fine.
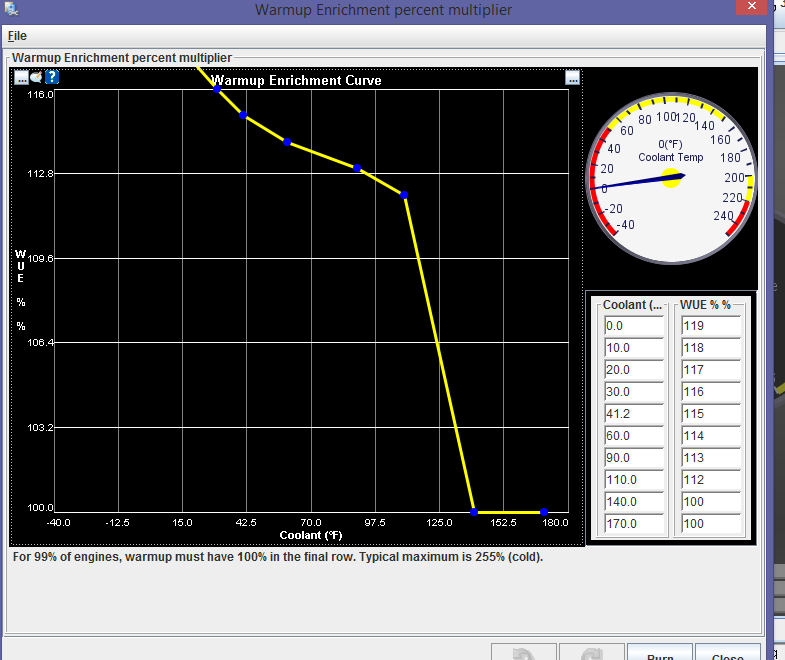
An engine that is cold does not atomize fuel as well as a warm engine which makes it run lean; so unless you live in a volcano, the charge much be richened up to prevent stalling and bucking until some heat gets into the head. The curve is a percentage of the base fuel pulse width. Again, the stock curve will be way off, and mine probably wont work for you. The warmup enrichment curve tapers off with respect to coolant temp, as the motor warms up it will gradually pull fuel out till. The final row in the table must be 100%, IE the MS must NOT be requesting additional warmup fuel once the engine is up to temp, or strange things will happen.
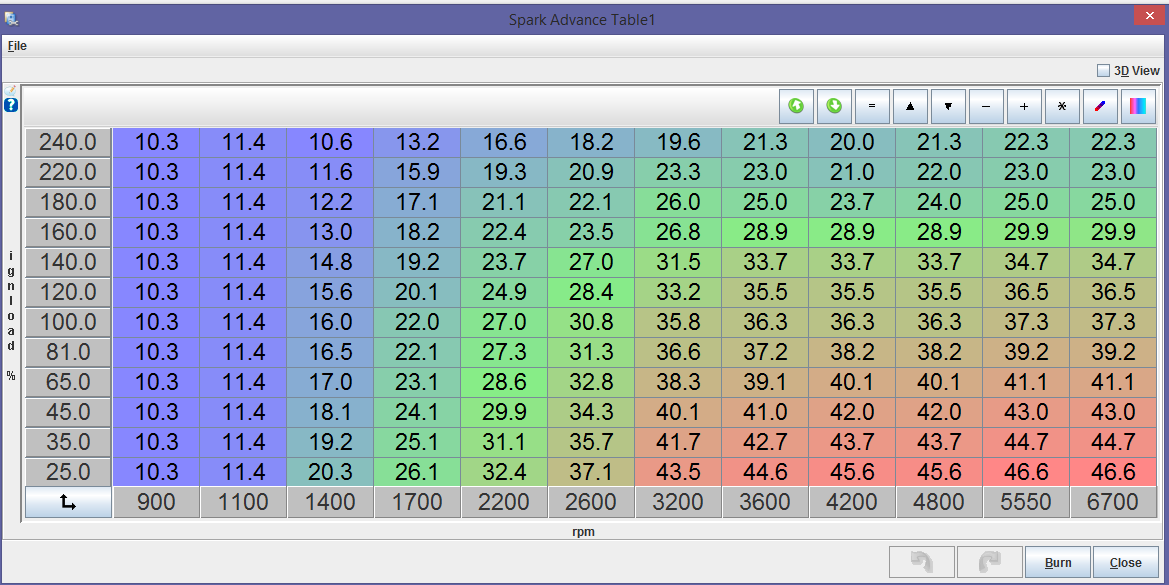
Start the car up now, but first enable VE analyze live in tunerstudio. You will almost certainly need to keep your foot on the gas for the first few minutes of the first start, just keep the motor running and get some heat into it. After the motor comes up the temp, VEAL will start to adjust fuel cells up and down to bring the idle into line. I personally find my (highly modified) 951 motor idles best when ran a bit rich. Don't shoot for any numbers, just tune the idle based on MAP numbers and try to get the idle MAP value as low as possible. This is will be the strongest, most stable idle and will probably not be anywhere near 14.7:1. My car idles best ~13:1. Once the car is warmed up and idling decently on its own, its time to verify ignition timing. Get out your adjustable timing light and set it to 0 advance. Shine it down into the bellhousing and illuminate the timing mark. The timing should already be close, no more than a few degrees off in either direction. What you want to do is match what the timing light sees to whats input in MS. If the MS trigger angle is set to 60 degrees, you want to make sure when the timing mark is static and centered on the bellhousing mark, that the timing light also reads 60*. If it doesnt, adjust the value 1 degree at a time in TS until both match up. That's it, with the car idling on its own and timing verified, you can take the car on its first drive and do some datalogging to make changes to the fuel table. Your timing map should already be set before your first drive, you need to understand what a decent timing map looks like and basically just set it and forget it. You can play with timing on a dyno to fine tune, but now is not the time to be tinkering with it. For reference, here is a very conservative ignition map I ran on E85. I could have pushed a lot more, but this is basically what I used to start the car and do a basic tune on. It would work well for a dialed in pump gas car. The Y axis is manifold pressure in Kpa.
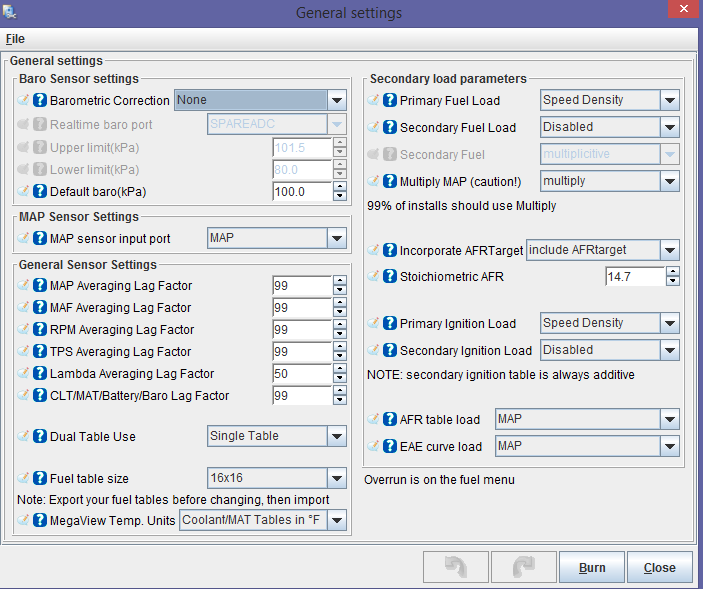
Unless you are running some insane ITB setup, the way to tune a 944 that makes the most sense is speed density, be it N/A or boosted. In a nutshell, this is a tuning algorithm that does not use a MAF or an AFM, but instead relies on input from the TPS, intake temp, and manifold pressure sensors to derive load and deliver the correct amount of fuel with high precision, based on a 16x16 array.
This map is what I ran alongside the previously posted ignition map.
This VE table is a multiplier, the numbers in the cells represent a percentage of a base fuel pulse width. This depends on the motor, and more so on the injectors used. I tuned my map for very high maximum values past peak tq in order to give myself maximum resolution between idle and peak power. The result of this is that the map looks overinflated.
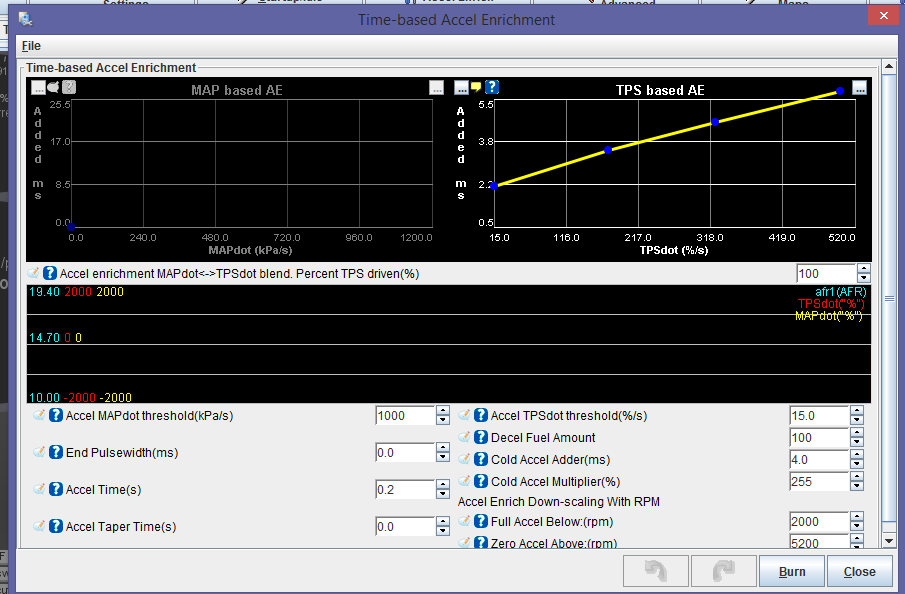
Before the first drive, make sure acceleration enrichment is turned off in megasquirt. You dont want it triggering and affecting your baseline tune as you try to get a rough running tune nailed down. set it to some lofty trigger point like 1000 and take the car for a spin with VEAL on. Datalog the drive, or have a buddy be the keyboard monkey and adjust as you drive. Watch the wideband readout, if the car is bucking like crazy its probably really lean, if it feels sluggish you need to pull some fuel out. VEAL does an ok job of getting a car drivable but it wont get you a perfect fuel map everywhere. To properly use VEALS, just drive the car around a log while letting VEALS modify the fuel maps, stay in particular load and rpm areas for a while and let the MS gather data, start with gentle throttle and very slowly bring it up through the rev range. Repeat until it smooths out, then do it again with a bit more throttle. Keep doing this till it pulls well. Turn VEALS off now, because its time to manually tweak the map.
Drive around some more using the same technique of slowing going through the rev range with very low throttle, and repeating over and over with increasing throttle till you are going WOT. Have the friend in the car adjust as you go to fine tune it, or else you'll have to stop, review and interpret the data, and adjust yourself. The goal here is to get the car to feel like it pulls well, and A/F ratio plays a huge role in that. At low loads cruising around, you can probably get away with running the car a little lean. At low loads puttering around town, I'm running as lean as 15:1. At higher speed low loads, you can run even a bit leaner because of the better fuel mixing at higher engine speeds, maybe 16:1 on the highway. As soon as you demand any load on the engine, it needs to immediately richen to something like 12.5:1-13:1. For boosted engines, you'll want to run a touch lean on spool up (again, 12.5ish is good) with a touch of extra ignition advance to help make midrange torque and light the turbo off. After that, you'll pretty much shoot for a nice mid to upper 11 AFR throughout the pull. Something like 11.8:1 is nice and safe and doesnt give up too much power. You could probably gain some torque by leaning it out, but you would need to monitor for knock to make sure you didnt bring it too lean. By now though, you should have a pretty well dialed in fuel map, but there is still going to be an obvious issue with the way the car runs and shifts. You MS needs to enrich the fuel charge to compensate for the throttle being rapidly opening to counteract the large transient influx of air. Right now with the threshhold set to 1000, the car is going to jerk on up and downshifts and buck when the throttle is snapped open. In the next section that will be fixed.
Acceleration enrichment is important, it compensates for large influxes of air that occur when the throttle is snapped open. This can be tricky to pin down, but its probably the one setting that most effects driveability. It activates as an additional pulsewidth injected on top of the normally calculated pulsewidth for the current load, with the pulse width being calculated based on TPSdot, or in other words the derivative of the TPS value (how rapidly the throttle was opened or closed. Opening the throttle from 0-100% in 1 second is equal to a TPSdot of 100. Stabbing the throttle hard could be ~1000. Taking off gently from a stop is ~50).
Setting this involves more driving and logging, but is MUCH easier done in real time with a partner. The acceleration enrichments can NOT be tuned by blipping the throttle, don't do this. Instead you need to be driving at a steady state and make a step change, or a single smooth movement up to a steady state, higher load position. The step changes should be slow at first, and gradually do it faster and faster till you are snapping the throttle wide open quickly from a cruise. Dont hunt for A/F numbers here, you tune this one by the seat of your pants. Bucking under acceleration means it too lean, but it can also mean way too much fuel if its causing a misfire. Thats why its best to start with really low values so you know you arnt adding in way too much fuel. By now the throttle response at all input speeds should be smooth and responsive. At this point you should have a pleasant to drive, smooth, reliable daily driveable car.
So the car starts up now with a simple twist of the key, idles pretty good, runs pretty good. Neat huh? You did it all by yourself. Lets dig a little deeper now and take a look at the ignition table, this is where most of the power gain vs most DME chips is made, but its also the most dangerous table to play with and where motors get destroyed since unlike fuel, if you are not monitoring knock there will be no warning before something bad happens, and the line between "awesome, this thing is really pulling hard now!" and a blown motor can be pretty thin. I posted a timing table up previously, but lets discuss how I came up with that.
For starters, lets talk about base ignition timing. I'm going to somewhat gloss over the finer details, but the 3 main factors that effect how much timing you can run are the bore of the motor, the combustion chamber shape/quench zone, and the octane of the fuel. Engine speed and load are actually even more important, but I will cover that a bit later. Basically, larger bore motors have a slower burn rate, so they need more advance to allow proper time for a complete burn. Larger bore motors also require more quench than a smaller bore motor. The chamber shape of a 944 8v motor is less than perfect to say the least, which reduces the knock threshold and basically means that; given the same compression ratio, you wouldnt be able to run as much advance on the 8v head as the 16v head. Finally, obviously octane plays a huge role, higher octane fuel is less prone to detonation, which means you can run more timing safely. There is a catch though, timing isnt always a case of "more is better" and even if you had fuel that was say, 120 octane, you'd reach a point where power would start to drop off before you actually ran into detonation.
In any internal combustion engine, generally peak power is made when maximum cylinder pressure is reached at 14* ATDC. Since the spark timing required to do this changes with rpm, the basic idea is to add more advance as engine speed increases to keep cylinder pressure as high as possible. This is almost never possible though in a 951 motor, detonation with almost always be an issue well before you achieve an "ideal" spark map. However, the timing curve that achieves this ideal "location of peak pressure" is different for every motor. In reality, we tune for the most aggressive ignition curve we can get away with without detonating.
Now, as far as base timing is concerned, 10 degrees is about right for a 951. You'll want to sweep the curve up as engine speed increases, and you'll want the timing "all in" by about 3400 rpm, so after that spark advance shouldnt vary much within a given load row. You can get away with quite a bit of advance in high rpm, low vacuum cells, I'm running probably more than most guys and considerably more than stock, I'm getting about 44* advance above 5.5k rpm if I let off the throttle in gear.
Probably the most important concept to have pinned down when tuning the spark map is boost retard. As load increases, you'll want to pull timing out. 1* retard for every PSI is really conservative and safe, but you'll be giving up power on boost. I like to do a progressive retard; when boost is low like say below 7 psi, I'll maybe pull 1* for every 3 psi. As load increases, I'll increase the rate at which I retard so that by the time I'm over 18 psi, I'm pulling ~1* of timing per psi. I also like to tune in additional safety, so I do a little bit of extra retard at peak tq, since this is where cylinder pressure peaks and where an engine is most likely to knock. I begin to bring ignition back in after peak tq passes, and within a given load row, timing past 5k rpm will look similar to timing around 3200-3400 rpm when you first brought the timing "all in".
The important thing to remember is to not get greedy with timing, get a nice conservative table done and then if you want to play with it, do it on the dyno. Advance it 1* at a time till you start getting knock, then back it down 2*. Also note that ignition timing has a direct effect on EGT's, having the timing too retarded with not only make the car sluggish, but will cause EGT's to soar. Having the ignition advanced as much as is safely possible will keep temps in check, and that's the way you should strive to tune your motor.
They need 5 confirmed orders to make another batch. They have 3 confirmed orders right now(including myself). Is anyone else interested in buying one of these? We need two more people(or more).
If I was going to do this again on a street car that I wanted to maintain a very clean, neat appearance I would go wit the clewitt kit. It's just too pricey for what it is for my taste, and since my 951 is just a hoonmobile that doesnt see much mileage and only in nice weather, I'm totally ok with my 5 dollar bracket and hacked up belt rear belt cover/missing front cover. Seriously though guys, MS rocks and that clewitt kit is quality, I'd like to see a group buy get going if it meant more people went stand alone. By the way, Chris white also makes a really nice sensor bracket that I believe is a good bit cheaper than the clewitt kit. Maybe he'll chime in.
Although there are many ways to skin a cat, you have covered most of the detail of a typical 944 MS install.
Sure it will be an inspiration and great help to others, especially those who do not wish to put in much effort or time researching and reading the manuals and MS forums. Particularly as MS is constantly evolving with various hardware and software updates it is a very steep learning curve, absolutely overwhelming for many novices.
One point however that sticks out like a sore thumb to an experienced MS`er is your VE table. While "theoretically" it is essentially a percentage table and should max out cell values at near 100, the maximum cell value is 255. Your upper MAP/ RMP cells of 255 are maxed out. Particularly if that is an autotuned (VE analyze) value, you may be running lean in those critical cells.
It is caused by an incorrect Req Fuel value, about half what it should be. Perhaps you changed from 4 squirts/ cycle to 2 without recalculating Req Fuel? Suggest you go back to "basic setup" / "engine constants" in TunerStudio and run the required fuel calculator entering your current engine & injector parameters. It will be necessary to proportionally scale the VE table and mildly retune the table, especially those bins at 255.
Also it`s easy to rescale the X & Y axis of those ancillary bin tables, like cranking PW that is off the chart. Simply click on the little square icon in the upper left corner (below file), select from the drop down menu and enter the desired figures.
I`m not criticizing your install or write up at all. Just that I`ve been playing with MS and various updates & mods for years, have learned many things the long, hard way and have a collection of melted pistons to show for it.
Thanks for the tips RC but like i stated, the stretching of the table is intentional to give me better resolution. The car is not lean and runs great, but not something someone who doesnt know that they are doing should do.
 08-28-2014, 01:49 AM