oil pump sleeve (crankshaft) install
 09-18-2011, 03:17 PM
#1
Drifting
Thread Starter
Yahoo! I finally got the crank damper bolt out using a 6' pipe as a breaker bar extender. What a beast! Does the oil pump sleeve "O" Ring behind the crankshaft gear assembly neet to be lubed as well as the main seal? I pulled out the old one and it disentegrated as it came out. I wondered if it isn't supposed to be oiled.
Last edited by mytrplseven; 10-16-2011 at 02:41 PM.
 09-18-2011, 05:10 PM
#2
Pro
http://m.wonderhowto.com/how-to-repl...44-s2-0127818/
scroll to the bottom and he has the step by step for the whole thing I used the video and that as a reference when i did mine
scroll to the bottom and he has the step by step for the whole thing
I used the video and that as a reference when i did mine
 09-19-2011, 03:11 AM
#5
None on my car, or any other 8v car I've ever worked on. Also didn't get an extra o-ring in the re-seal kit from Paragon. Also on my 3L (the block is S2 based) there is no o-ring. No leaks, and the engine was professionally built, so I'm pretty confident that it is proper.
09-19-2011, 06:52 AM
#6
Addict
Rennlist Member
Rennlist Member
The oil pump (driving gear) sleeve fits first on the front of the crank. There is a bevel in the front of this, into which fits an o-ring, followed by a "support washer" which compresses the o-ring into the bevel and creates the seal. The timing belt drive gear, etc. all fit in front of the o-ring. It's a 28 x 2.5 mm ring, p/n 999 707 283 40, and it is in the factory's seal kits. Without this ring you're relying on the the tolerance between the crank snout and the oil pump sleeve to seal from within the oil pump out.
09-19-2011, 10:05 AM
#7
Proprietoristicly Refined
Rennlist Member
Rennlist Member
+1
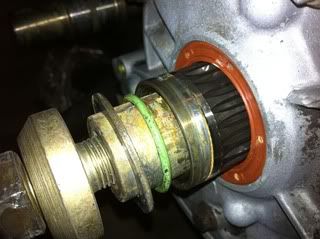
Yes, the crankshaft seal also has to be below the bevel just like the RMS and be installed to the bottom "shelf"
I do not have a picture of the front crank but here is a picture of the RMS bevel (circled)and shelf (with arrows).
Without the ribs of the outter seal full inserted there is a possibility of a seal blowout as mentioned in this link:
https://rennlist.com/forums/924-931-...and-and-u.html
The DIY front crank seal press is nothing more than a piece of 1-1/4"id PVC, a big washer and use the crank bolt to press in. A picture in my other posts.
John
Last edited by John_AZ; 09-19-2011 at 11:57 AM.
Trending Topics
09-19-2011, 10:09 AM
#8
Drifting
Thread Starter
Once the crank bolt was removed it all went pretty smooth. The oil sleeve didn't have any wear groove in it but the little O ring had hardened and it came out easily in pieces with a box cutter blade tip. Main crankshaft seal came out easily after threading a sheet rock screw into it. Reinstallation was fun, trying to get the balance shafts in sync, the 87 auto tensioner installed and the belts routed through it. That was the hardest part. Great learning curve here for future front end work.
09-19-2011, 10:20 AM
#9
Nordschleife Master
None on my car, or any other 8v car I've ever worked on. Also didn't get an extra o-ring in the re-seal kit from Paragon. Also on my 3L (the block is S2 based) there is no o-ring. No leaks, and the engine was professionally built, so I'm pretty confident that it is proper.
Yes there is an oring on all these motors..
09-19-2011, 11:36 PM
#10
Addict
Lifetime Rennlist
Member
Lifetime Rennlist
Member
None on my car, or any other 8v car I've ever worked on. Also didn't get an extra o-ring in the re-seal kit from Paragon. Also on my 3L (the block is S2 based) there is no o-ring. No leaks, and the engine was professionally built, so I'm pretty confident that it is proper.
 09-19-2011, 11:56 PM
#11
Thanks for straightening me out! I already pulled my car apart and re-assembled in the proper order!
09-19-2011, 11:58 PM
#12
http://m.wonderhowto.com/how-to-repl...44-s2-0127818/
scroll to the bottom and he has the step by step for the whole thing I used the video and that as a reference when i did mine
scroll to the bottom and he has the step by step for the whole thing
I used the video and that as a reference when i did mine8 years!?