Anyone Care to Share Splitter Install Pics?


 11-10-2009, 02:46 PM
#17
Nordschleife Master
no need to drill a pilot hole, the splitter material is less tough than the bumper cover, so once the screws are engauged in the bumper it will pull the splitter to the bumper and hold tight...
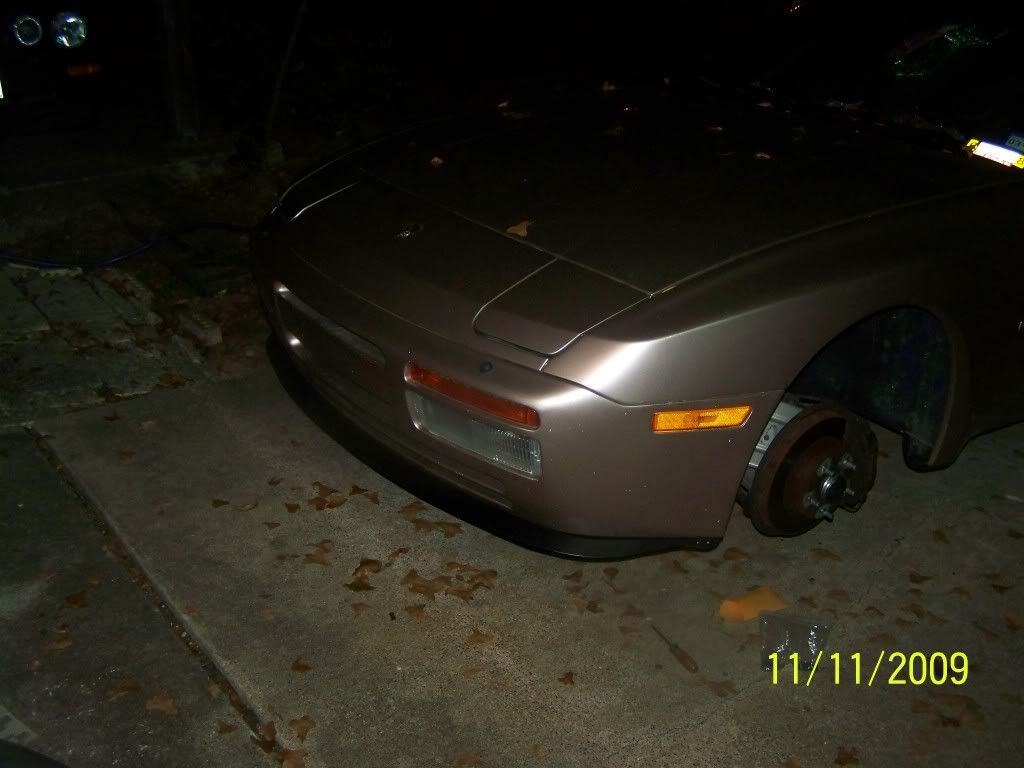
I'll take / post pics of what I did later... OK..I took cell pics..let me know ifyou want beter or higher res pics I can take them when I get home...
From the front

Drivers side

Driver inside the fender

drivers underside

driver underside in the front

passenger side

passenger inside the fender

passenger underneath

passenger under the front

Last edited by JohnKoaWood; 11-10-2009 at 03:19 PM.
11-10-2009, 02:48 PM
#18
I actually used 2 of the larger screws that came out of my batwing on each end of my CPR V-1.. it holds nice and snug to the bumper... I also trimmed out the inside of the wheel well so teh splitter is flush with the well liner..
no need to drill a pilot hole, the splitter material is les tough than the bumper vcover, so once the scres are engauged int eh bumper it will pull the splitter to the bumper and hold tight...
I'll take / post pics of what I did later... I'm at work right now...
no need to drill a pilot hole, the splitter material is les tough than the bumper vcover, so once the scres are engauged int eh bumper it will pull the splitter to the bumper and hold tight...
I'll take / post pics of what I did later... I'm at work right now...

 11-12-2009, 12:12 AM
#23
Race Director
You will use 9 of the pre-drilled holes. The center and then the 4 to the right and the four to the left.
REMOVAL:
-Remove old "Batwing"
-Remove old "speednuts/clips"
INSTALLATION (laying on your side, YOU DO NOT NEED TO JACK THE CAR UP):
TOOLS: right angle drill (or you can buy a right angle attachment for any drill from Home Depot-$15) OR a short Phillips head
-Push on new speednuts on the OEM mounting tabs
-Put washers on #8 SS screws and starting w/ centerhole screw in place. REPEAT @ left and right pre-drilled locations
-Use self tapping screws, gently push or pull (typically +/- 1/8") to align fender edge @ wheel well to edge of splitter. Screw together.
We abndoned pre-drilling holes in the last step after noticing that almost no 2 cars were exactly the same dimension. Whether it be to warping from sun, cold, general fitment...or whatever, with the flexible nature of the OEM plastic noses it made more sense to include self tapping hardware and let the owners align these to fit their car perfectly THEN screw into place.
And for reference....the novice time of 30 minutes (27 min. actually) was my wife. I helped push on two speedclips, but after that is was all her. And this from a woman who won't carry groceries as she is afraid to break a nail
So if you can't install it in less than 30 minutes...well...jus sayin', if it walks like a duck, and it quacks like a duck.....
Now Go drink a beer and pat yourself on the back...that was a hard 15 minutes of work!
And remember: SEARCH IS YOUR FRIEND
11-12-2009, 12:17 AM
#24
Three Wheelin'
Thread Starter
haha - nice CPR. The hardest part for me honestly was getting the old one off...the screws on the inside edges were hard to reach and rusted out as were a couple others that I had to hit with some PB Blaster and give it a few minutes to work in. The mounting tabs can be a bit of a PITA, but after doing one of them I could easily get one off and on in less than 30 minutes.
I don't see how you take the old batwing off without jacking the car up...unless laying down you are only 2" thick (and I'm not). I have a nice set of drive up ramps that come in very handy for stuff like this.
I don't see how you take the old batwing off without jacking the car up...unless laying down you are only 2" thick (and I'm not). I have a nice set of drive up ramps that come in very handy for stuff like this.
11-12-2009, 12:45 AM
#25
Nordschleife Master
haha - nice CPR. The hardest part for me honestly was getting the old one off...the screws on the inside edges were hard to reach and rusted out as were a couple others that I had to hit with some PB Blaster and give it a few minutes to work in. The mounting tabs can be a bit of a PITA, but after doing one of them I could easily get one off and on in less than 30 minutes.
I don't see how you take the old batwing off without jacking the car up...unless laying down you are only 2" thick (and I'm not). I have a nice set of drive up ramps that come in very handy for stuff like this.
I don't see how you take the old batwing off without jacking the car up...unless laying down you are only 2" thick (and I'm not). I have a nice set of drive up ramps that come in very handy for stuff like this.
I found fitment was AWESOME when I mounted the splitter, and I took my time (20 minutes) but I am limited to using a floor jack and jack stands... and my floor jack only fits on the center lifting point on the sides now...
11-12-2009, 01:46 AM
#27
Three Wheelin'
Thread Starter
Some of the best money I've spent...did my fuel pump/filter a few weeks ago...just backed it up on these guys and went to work...did my Tial with them, of course oil and gear lube changes, made it easy getting the front of the engine up when I was bleeding the cooling system, etc... When I'm in the engine bay I almost always use them as get they get the front up to a nice height so that I'm not bending over working in there all the time.
These were awesome for this job...gets the front up enough where you can get under there comfortably and they are some kind of new age material that weighs next to nothing...very easy to move around...and I think they get the car up higher than you can with a jack and you have the peace of mind knowing there's pretty much nothing that's going to get the car off of them. I just wish I would have bought the two piece ones...makes it super easy to get in behind the wheel...
http://www.raceramps.com/67racerampsxt.html
11-12-2009, 01:58 AM
#28
Yes
Hey CPR, great splitter. Looks great! I decided to a make brackets and use a bolt for the final attachment point, but that was just how I wanted to do it. Drove it tonight and after getting on the highway and doing 80 it passed the test! (Test being did I install it right!)
Hey CPR, great splitter. Looks great! I decided to a make brackets and use a bolt for the final attachment point, but that was just how I wanted to do it. Drove it tonight and after getting on the highway and doing 80 it passed the test! (Test being did I install it right!)
11-12-2009, 02:30 AM
#29
Three Wheelin'
Thread Starter
yeah, it's way more sturdy that I thought it was going to be as well...there's still a place where I want to get a couple more bolts to get it to hold tighter against the front plastic wind 'thing'. I've got two bolts in there now but I can hear it rattling a bit at idle. Worth nothing that the CPR splitter doesn't attach at every point that the stock one does so you may have to get a little creative with tightening things down underneath, should you need it.
You have to be VERY careful with this thing installed with speed bumps and coming down or up steep gradients from a level road. I took a turn into a parking lot today that didn't look that bad to the eye but I heard the big scrape...no visible damage though. I've even bumped it into concrete curbs when parking a few times...the noise sounded awful but it held up perfectly.
You have to be VERY careful with this thing installed with speed bumps and coming down or up steep gradients from a level road. I took a turn into a parking lot today that didn't look that bad to the eye but I heard the big scrape...no visible damage though. I've even bumped it into concrete curbs when parking a few times...the noise sounded awful but it held up perfectly.
11-12-2009, 09:08 AM
#30
Team Owner
Join Date: Oct 2009
Location: one thousand, five hundred miles north of Ft. Lauderdale for the summer.
Posts: 28,705
Received 212 Likes
on
153 Posts
i am of the opinion that changing a filter every 20 k might increase the lifespan of the fuel pump. Anyone got an opinion on that ?