When you click on links to various merchants on this site and make a purchase, this can result in this site earning a commission. Affiliate programs and affiliations include, but are not limited to, the eBay Partner Network.
I knew this was going to be a nightmare but man it sucks. Broke my reverse lever trying to install new door handle gaskets and fiddeling forever trying to get the lever back on the ball joint inside the door. New parts in the mail.
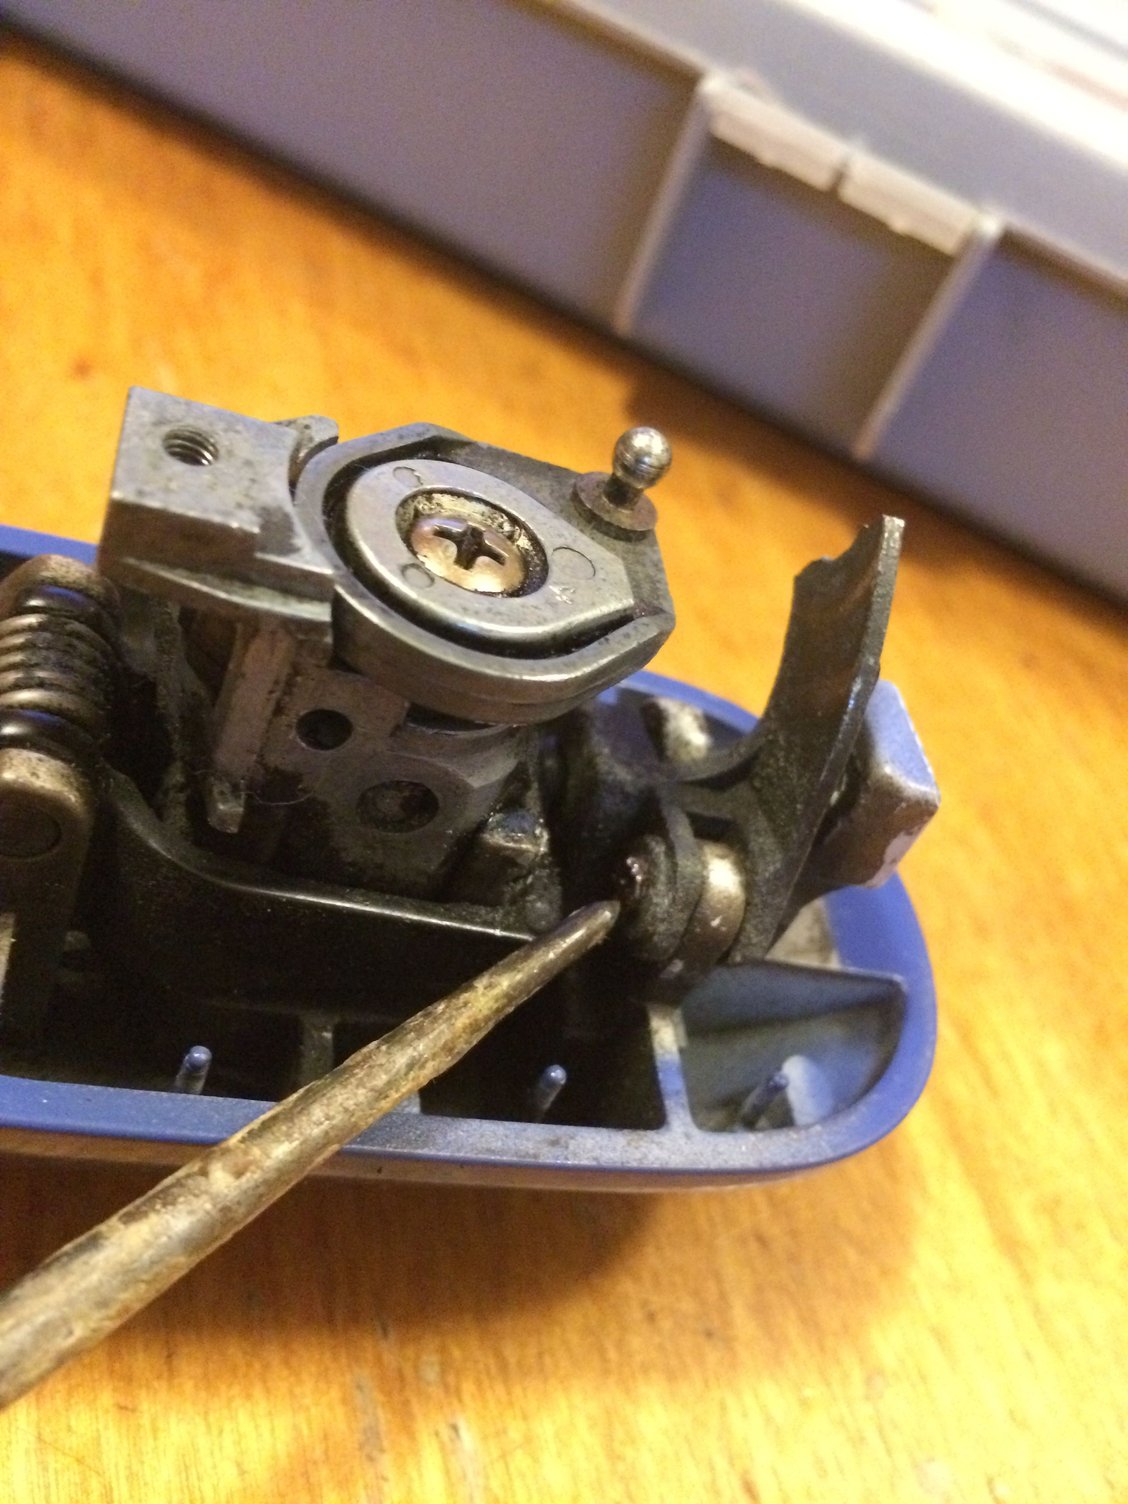
Now for for my dumb diy question. I am trying to punch drive the roll pin out of the reverse lever pivot but it is in there really good and I don�t want to further damage the handle. Do I just need to apply more blunt force or drill out? Is the new roll pin easy to hammer in?
Mine is apart in my kitchen right now! That pin is different at the two ends. The outside end is fat and the inside end that you are pointing to is skinny and has been peened. I drilled-off the fat end on mine, and it still won't come off. The end that you are pointing to needs to be removed and a drill won't easily reach it. I think that using a cutoff wheel on a dremel to remove the end that you're pointing to is the best way to go. I'll probably do this today. Once removed, your next problem will be that the "roll pin" that porsche sells to replace it is actually a true roll-pin and doesn't have a fat end and a skinny end like the original part. I'm debating whether to use the roll pin (which will give a sloppy fit on the big end), or if I should turn a new pin on the lathe to match the original. BTW porsche sells the replacement lever for less money at the dealership than they sell for on ebay/amazon. I've noticed this more and more often that people are marking UP dealer parts and selling them online.
So real advise here so things don�t get broken, pull the window glass and pull the track that covers all of that. Its easy, and will prevent this sort of thing. When you have the track out you have easy access to everything! pull the lock mech/door release and clean/lube it while you have it apart. Your releases will work amazingly when you are done.
I really need to finish my tech post i've been working on about the handles.
olaugh,
just got my pin out. The advice that I gave you above is good and works.
Arominus,
finish your tech post now. Right now. My driver's door is apart to fix the door handle, replace a cracked nylon window roller and swap the door speaker. My passenger door is half-apart to replace a blown speaker (cone disintegrated and disappeared), and to replace ill-fitting aftermarket glass that howls at speed (some ****ball smashed my window to steal the $10 radio).
So real advise here so things don�t get broken, pull the window glass and pull the track that covers all of that. Its easy, and will prevent this sort of thing. When you have the track out you have easy access to everything! pull the lock mech/door release and clean/lube it while you have it apart. Your releases will work amazingly when you are done.
I really need to finish my tech post i've been working on about the handles.
I'd really like to think I'm all done with door handles for awhile, but if you could finish and post your tech note I'd just read it for fun and maybe to figure out why I spent so much time on this...
I knew this was going to be a nightmare but man it sucks. Broke my reverse lever trying to install new door handle gaskets
I know it is a little late for this and not the solution for everyone but one way to address the replacement of the door handle gaskets without getting into this mess is to actually cut the rear gasket. This really works well here for a few reasons:
1) The front gasket has full access so you can replace that without issue.
2) For the rear gasket it is held on by pins that come off the handle as well as a raised edge around the perimeter of the handle. Both of these keep the gasket in place.
3) Using a brand new razor blade, cut the gasket on the bottom, in the middle between the two pin sets, to allow it to be installed around the connection mechanism without taking it apart.
4) Make sure all the pins are in place and the raised edge of the gasket is seated around the handle.
5) Place the handle back on the door while ensuring the gaskets stay seated.
You will be hard pressed to see the cut in the gasket once installed and you would have avoided taking this complicated mechanism apart.
Thanks all for the great feedback. I can�t believe I didn�t try to just slip the gasket over the handle as Jon and Thomas recommended. In all my research on this topic I never saw any post recommending this so it just didn�t occur to me to try it. I will definitely try this approach on my other door and hopefully post my success.
I finally got the reverse lever on after removing the door panel, loosening the window track and sliding the whole latch mechanism down to the door vent where I could snap it onto the ball joint. I just couldn�t get enough leverage and space to snap it onto the ball any other way. I don�t recommend this approach to anyone. Slip the gasket over or cut it! Before I close the door up and reset the reverse lever pin in the handle, is there any maintence procedures I should do on the handle or latch mechanism? Grease? Any good DIY posts, I can�t find any? Thanks again all.
Clean and lube the latch, i used an ultrasonic cleaner filled with Gunk citrus cleaner to do mine, it works realllllly well. Relube with Napa Sil-Glyde. I'm posting my video to youtube about the latches now, i'll pop the link in shortly.
Clean and lube the latch, i used an ultrasonic cleaner filled with Gunk citrus cleaner to do mine, it works realllllly well. Relube with Napa Sil-Glyde. I'm posting my video to youtube about the latches now, i'll pop the link in shortly.
Ok, got my initial video up, i plan to do another when i get a chance to replace the latch in my drivers door. One thing i forgot to mention in the video.. You CAN adjust the bellend off the handle to take up some play, this is about 1000x times easier with the track out. Thats really the big thing, pull it! You may be able to get that track out with the glass in IF you lower the glass, pull the upper 8mm bolt at the top of the track, then put the window back up and pull the bottom bolt. I'm going to experiment with my other door to see if this is feasible. I'm not covering everything i wanted to about the subject yet, which is what i get for starting the job and then going "i should film this".
i believe I just slipped the large end gasket over the small end of the handle.
I can confirm this method works fine on an S2, perhaps earlier designs. It works very well on an '89 S2. No difficulty. There are other difficulties, but this isn't one .

 02-19-2018, 10:23 PM