When you click on links to various merchants on this site and make a purchase, this can result in this site earning a commission. Affiliate programs and affiliations include, but are not limited to, the eBay Partner Network.
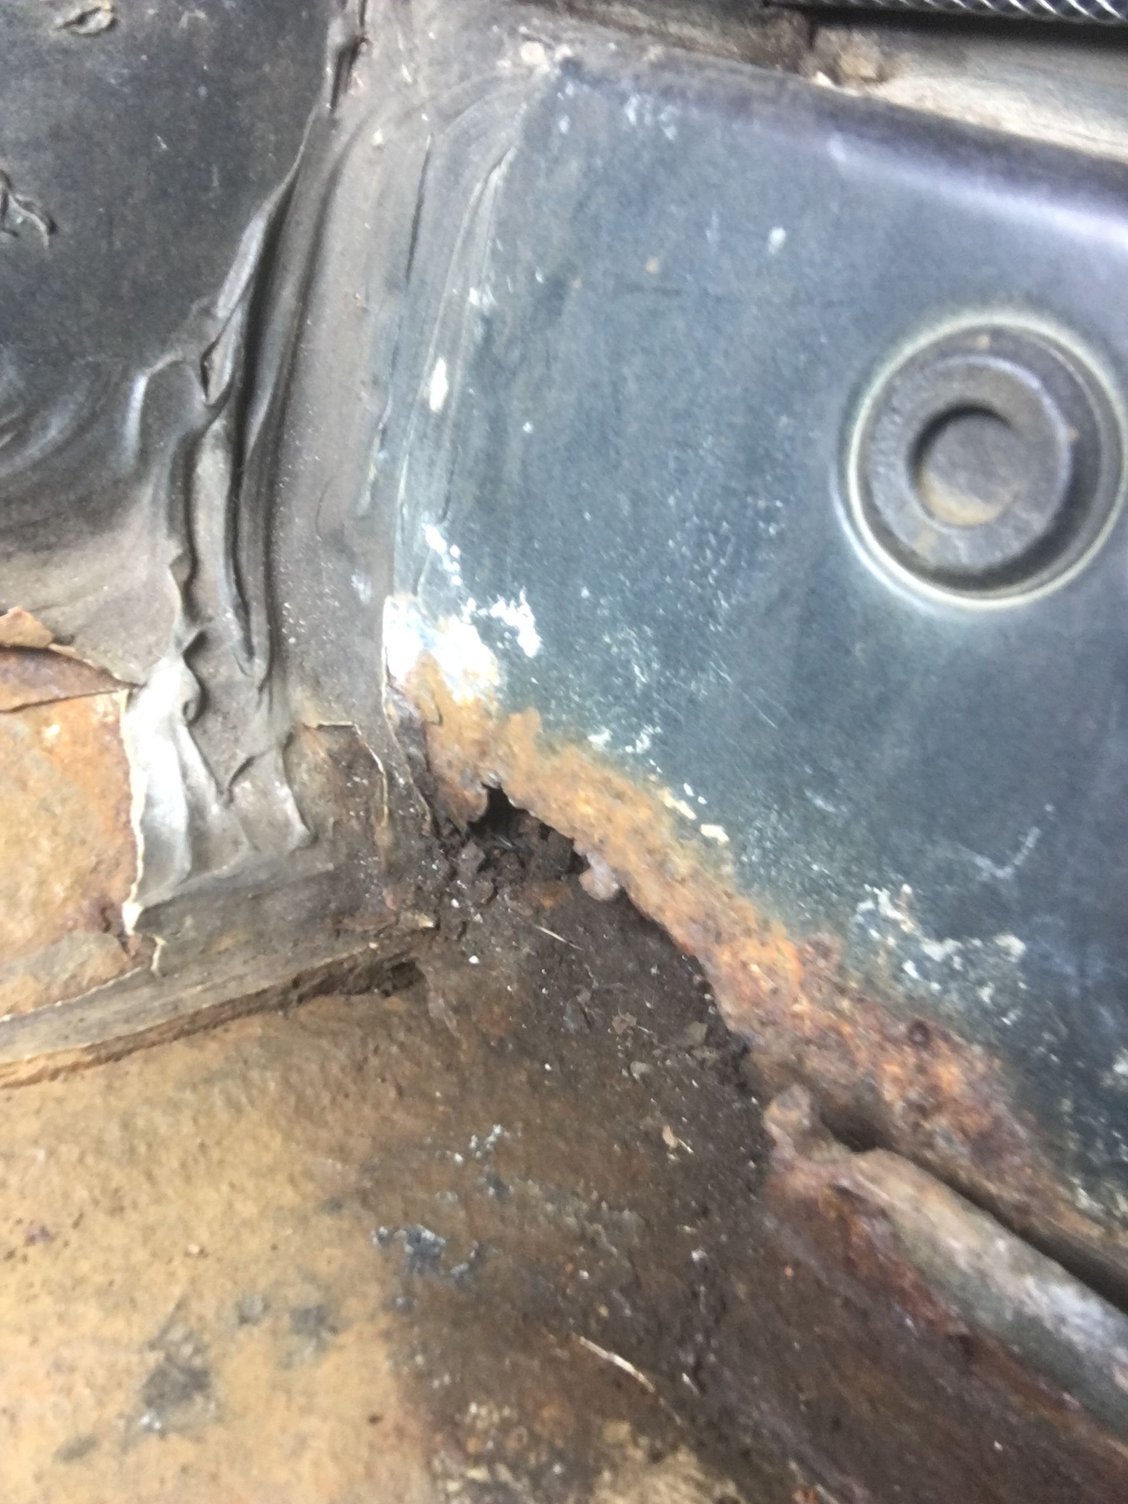
I have been tracking down a leak that makes my passenger-side carpet wet every time it rains. One thing that I did find was this hole after I removed the battery. In this picture, it's like you are sitting in the passenger seat and looking forward, so the hole is actually against the fender behind the front of the battery.
I am going to grind away of much of the rust as possible, but what do I do about this hole? If I simply patch it up I am concerned that there's moisture or dirt that I am sealing into the fender� And I checked from the wheel well and it is not accessible from there. I vacuumed out as much as I could, but I'm afraid I could be causing myself a bigger problem in the long run. Anyone have any suggestions? Thanks
This is a very common problem with 944's. The battery trays are almost always rusty due to clogged drains and old battery acids. Most people fiberglass over the tray, I did. Concerning the moisture, maybe you can stick a torch in there and heat it up to dry it out? That's tough.
Also use plenty of surface rust neutralizer/encapsulator even after grinding/cutting away the bad portions of metal. It will get the little rust remaining and help stop it from coming back. Lots of brands to choose from, and lots of debates about which is best.
Also, are you sure that area in the picture is not the factory drain for the battery box? It looks suspiciously similar to the drain port with rust edges. Last thing you'd want to do is seal up the drain...
Also, are you sure that area in the picture is not the factory drain for the battery box? It looks suspiciously similar to the drain port with rust edges. Last thing you'd want to do is seal up the drain...[/QUOTE]
Hi Tom and thanks for the reply. I have been reading conflicting information about this, so I am wondering if the drains were changed in later models... (just a guess).... but from what I could see in my '84, the location of the rust hole (#2 in the pic) is in the corner by the front of the battery... and the drain (that I think is the only one?) is #1 in the pic... so I think that the rust hole is just that - a hole and not the remains of a drain.
Yes, you are correct. There should only be metal where your rust hole is. Only drain is the #1 you pointed out that drains into the engine bay.
I'm not sure this is true. Edit to correct: #2 is forward of drain to the fender area.
It would be wise to confirm this before closing off something you wouldn't want to. Should be very easy to have a helper pour water in the questionable locations and see where it ends up.
Last edited by Scott at Team Harco; 08-03-2017 at 03:28 PM.
I'm not sure this is true. #2 looks like the drain to the fender area.
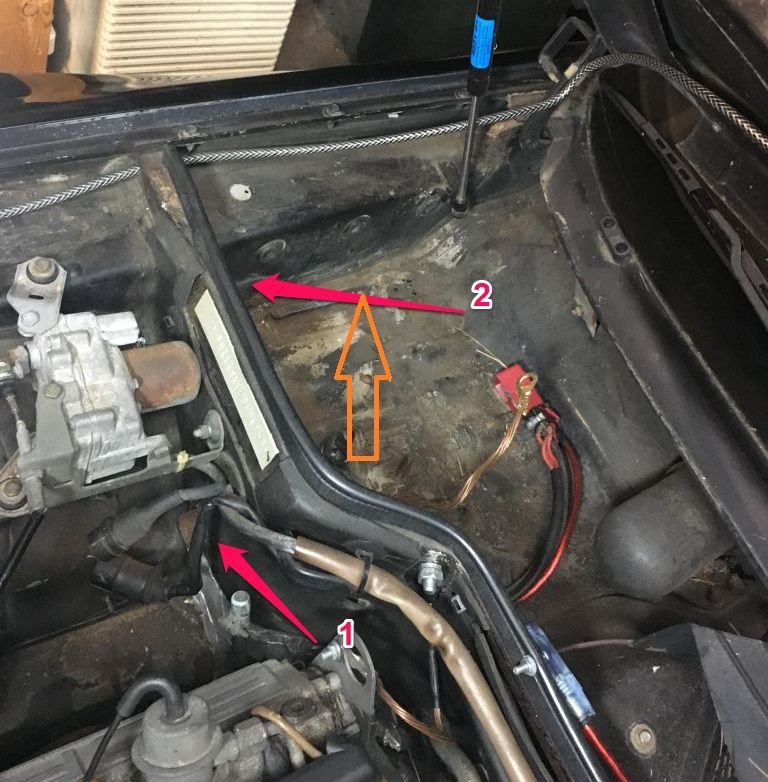
Hi Scott and thanks... I found this pic online and I am wondering if arrow #2 is the drain that you are referring to? (Arrow #1 is where the rust hole on my '84 is.) I am not near my car now, but this does look like my setup... thanks
Hi Scott and thanks... I found this pic online and I am wondering if arrow #2 is the drain that you are referring to? (Arrow #1 is where the rust hole on my '84 is.) I am not near my car now, but this does look like my setup... thanks
Yes - in your image, #2 is the intended drain. #1 is a problem.
Hi Scott and thanks... I found this pic online and I am wondering if arrow #2 is the drain that you are referring to? (Arrow #1 is where the rust hole on my '84 is.) I am not near my car now, but this does look like my setup... thanks
huh... Sorry for the misinformation. This threw me for a loop so bad I had to walk out of the office and pop my hood haha. I ground down/cleaned my whole battery tray before fiberglassing it and definitely never saw this drain. I wonder if it was there and I fiberglassed over it.
Scott, I think the battery tray must have gone through a revision at some point. Location #1 is where I have a drain on my car. It's a tube through that wall with a rubber flap on the end that drains into the engine bay. I'm almost positive there is no fender drain on my car.
Scott, I think the battery tray must have gone through a revision at some point. Location #1 is where I have a drain on my car. It's a tube through that wall with a rubber flap on the end that drains into the engine bay. I'm almost positive there is no fender drain on my car.

 08-02-2017 | 03:26 PM