

Banana arm bushings and wheel bearings - installation pics etc.
 11-04-2009, 08:22 PM
#1
RL Community Team
Rennlist Member
Rennlist Member
Thread Starter
I have spent the past while replacing an acid-damaged suspension pan (necessary) and painting the wheel wells (decidedly silly). However, now I am back to productive work. I aim to completely refresh the suspension and brakes over the course of the winter.
First up was the banana arms:
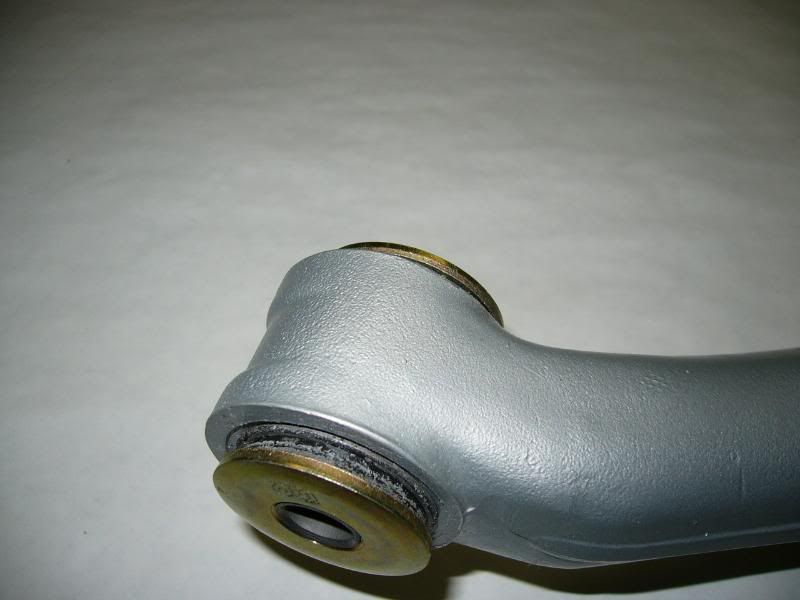
I purchased new bushing cartridges which simply press in after you have removed the old bushings. These particular bushings did not seem to be in bad shape, but I replaced them just to be sure.
The only difficulty pressing them in is that the outer sleeve and inner sleeve are seperated by rubber and thus, there is a lot of squish. Hence, you can't (I think) reliably press them in simultaneously.
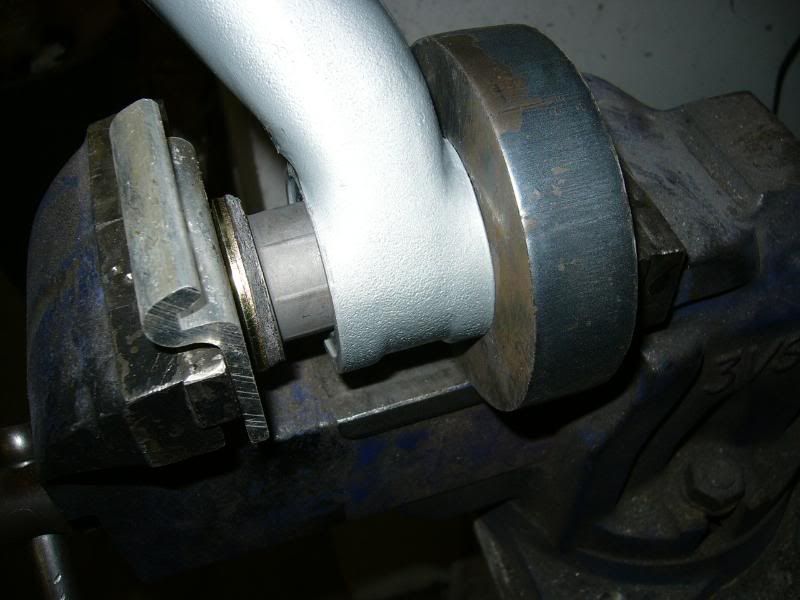
Pressing in the first one was a snap with a bench vise. Of course a press would be slicker, but this did the job.
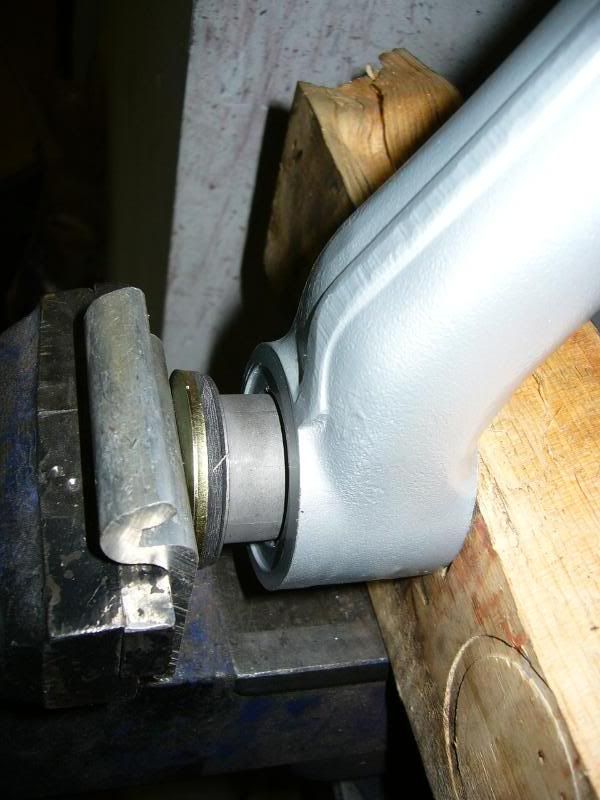
To do the other side, I found a nice steel ring with a hole in the center just slightly larger than the bushing OD:

A large socket would do the job as well.
By putting this around the first bushing, it was possible to press the second bushing in against a solid back stop:
Next was the new wheel bearings. These are a much tighter fit and are tricky. If you get them cockeyed, you will be in a world of hurt. The best tool kit to press these in with is the SIR kit (~$250 I think). ACME threads and piloted pieces that keep everything concentric make it very easy with that tool. I went the budget route and found some 3/4" threaded rod, purchased a couple of bucks worth of pipe flanges (1" and 3/4" shown) and some washers and nuts.

The larger pipe flange backed against the inboard side of the banana arm and I basically pressed the bearing in from the outside, with the 3/4" flange pressing against the outer face of the bearing. The key here is that the force must be exerted through the outer race (or outer and inner simultaneously) or you will destroy the bearing. The second key is that the bearing MUST be started in straight. If it is cockeyed it will not self-correct, well, at least not until things are well and truly FUBAR! This is where the fit-up of the SIR tool, which keeps everything very concentric is a big advantage. Using the budget approach requires much more careful fiddling to get everything centered. I found that LIGHTLY tapping the outer race of the bearing with a hammer to just start it up square really helped. The other thing I did was store the bearings in the freezer for a few days to ensure they were as compact as possible. I think some people heat the trailing arms as well, which would probably be even better.
Here it is half-way in. It went in quite nicely actually:

Near the very end, I added in the old bearing because I could not remember if the bearing would need to go past the flange of the banana arm to be fully seated. As it turns out, at least on Carreras, the bearing ends up pretty much flush when it is seated. This picture shows the old bearing with just the millimeter or so of the old bearing still to be pressed in:

Everything turned out quite well, I hope that this might help someone else some day. Thank you.
First up was the banana arms:
I purchased new bushing cartridges which simply press in after you have removed the old bushings. These particular bushings did not seem to be in bad shape, but I replaced them just to be sure.
The only difficulty pressing them in is that the outer sleeve and inner sleeve are seperated by rubber and thus, there is a lot of squish. Hence, you can't (I think) reliably press them in simultaneously.
Pressing in the first one was a snap with a bench vise. Of course a press would be slicker, but this did the job.
To do the other side, I found a nice steel ring with a hole in the center just slightly larger than the bushing OD:
A large socket would do the job as well.
By putting this around the first bushing, it was possible to press the second bushing in against a solid back stop:
Next was the new wheel bearings. These are a much tighter fit and are tricky. If you get them cockeyed, you will be in a world of hurt. The best tool kit to press these in with is the SIR kit (~$250 I think). ACME threads and piloted pieces that keep everything concentric make it very easy with that tool. I went the budget route and found some 3/4" threaded rod, purchased a couple of bucks worth of pipe flanges (1" and 3/4" shown) and some washers and nuts.
The larger pipe flange backed against the inboard side of the banana arm and I basically pressed the bearing in from the outside, with the 3/4" flange pressing against the outer face of the bearing. The key here is that the force must be exerted through the outer race (or outer and inner simultaneously) or you will destroy the bearing. The second key is that the bearing MUST be started in straight. If it is cockeyed it will not self-correct, well, at least not until things are well and truly FUBAR! This is where the fit-up of the SIR tool, which keeps everything very concentric is a big advantage. Using the budget approach requires much more careful fiddling to get everything centered. I found that LIGHTLY tapping the outer race of the bearing with a hammer to just start it up square really helped. The other thing I did was store the bearings in the freezer for a few days to ensure they were as compact as possible. I think some people heat the trailing arms as well, which would probably be even better.
Here it is half-way in. It went in quite nicely actually:
Near the very end, I added in the old bearing because I could not remember if the bearing would need to go past the flange of the banana arm to be fully seated. As it turns out, at least on Carreras, the bearing ends up pretty much flush when it is seated. This picture shows the old bearing with just the millimeter or so of the old bearing still to be pressed in:
Everything turned out quite well, I hope that this might help someone else some day. Thank you.
Last edited by 500; 11-05-2009 at 03:55 PM.
 11-04-2009, 09:54 PM
#3
I haddah Google dat
Rennlist Member
Rennlist Member
Very nice! I had a helluva time separating the hub from the outer bearing race. I used a puller I think, and a hydraulic press.
Freezing the bearings before pressing them it helps. Also heat the banna arms slightly (not too much).
Do not forget to tighten the rear axle nut. I think it's like 200-240 lbs, but I'll check the correct spec.
Freezing the bearings before pressing them it helps. Also heat the banna arms slightly (not too much).
Do not forget to tighten the rear axle nut. I think it's like 200-240 lbs, but I'll check the correct spec.
11-05-2009, 01:11 AM
#4
Advanced
Join Date: Oct 2008
Location: Fredericksburg, Texas
Posts: 75
Likes: 0
Received 0 Likes
on
0 Posts
When I installed new rotors, rebuilt my calipers, serviced the CV joints, I quit on the rear rear wheel bearings. If I remember right the rear bearings on the aluminum banana arms are tough to get to? You have to remove the stub axles? I can't remember, but it wasn't just knocking the bearings out of their races. Anyway I decided that I wasn't going to change them until the bearings started to talk to me.
11-05-2009, 10:09 AM
#5
Team Owner
...epic fail .......
you didn't make our fall run I know it was your target to come to the meet before the end of the year .. But looking at the great work you are doing I am sure we can forgive you . Those arms cleaned up really nice . You obviously prepped and painted them. what did you use ?
you didn't make our fall run
I know it was your target to come to the meet before the end of the year .. But looking at the great work you are doing I am sure we can forgive you . Those arms cleaned up really nice . You obviously prepped and painted them. what did you use ?
11-05-2009, 10:44 AM
#6
RL Community Team
Rennlist Member
Rennlist Member
Thread Starter
... If I remember right the rear bearings on the aluminum banana arms are tough to get to? You have to remove the stub axles? I can't remember, but it wasn't just knocking the bearings out of their races. Anyway I decided that I wasn't going to change them until the bearings started to talk to me.
To then get the rest of the bearing, which is sitting in the banana arm, out, you will need a lot of force. I used a 10 ton press at work in conjunction with a precisely-cut section of tubing with an inside diameter just greater than the OD of the bearing as a back stop on the outboard face of the banana arm. With such a stokin� press, the bearing popped out very easily� I did not dare try the press for putting the new bearing in, as the physical layout of the press (how close it was to the wall etc.) made it hard to fixture. Plus, if the bearing started cockeyed, the fast action of the press would ensure that it would be half way it before I could stop!!
But I think you were fundamentally sensible to leave the current bearings in� They seem to be very robust and would probably last a lot longer still.
Just for interest, here are a few shots of the arms. Eventually I will have to put the hub flange in, but before I do that a plethora of parking brake equipment needs to go on� and I first have to re-plate some of that.


...epic fail .......
you didn't make our fall run I know it was your target to come to the meet before the end of the year .. But looking at the great work you are doing I am sure we can forgive you . Those arms cleaned up really nice . You obviously prepped and painted them. what did you use ?
you didn't make our fall run
I know it was your target to come to the meet before the end of the year .. But looking at the great work you are doing I am sure we can forgive you . Those arms cleaned up really nice . You obviously prepped and painted them. what did you use ?Most of the suspension pieces (i.e. front control arms, strut housings etc) I will be having powder coated. For the banana arms though, I went an easier route since they are aluminum anyway. I cleaned them up with a brass wire wheel on a die grinder and then shot an etch primer and used a silver paint and non-activated urethane clear both made by Wurth.
11-05-2009, 10:51 AM
#7
Team Owner
VERY nice ...
BTW gettig the inner race off the hub flange ..... use a propane torch to heat it up , it expands and knocks off in about 10 seconds .. I buggered with this for an hour until i called my brother ( a mechanic ) ..then took about ten seconds ..
PS the sales girl at Wurths in Mississauga is smoking hot !!!!
Last edited by theiceman; 11-05-2009 at 07:12 PM. Reason: Brain fart..
Trending Topics
11-05-2009, 03:31 PM
#8
I haddah Google dat
Rennlist Member
Rennlist Member
I used every tool in the garage to try to get the stupid race off of the hub. I finally did exactly what amjf described (great description of the problem by the way...). I bought a bearing splitter to get under the race, then a puller, then a hydraulic press. When it moved far enough off the hub, I just pounded it out with a hammer. I tried heat also, but if it doesn't move, then the whole thing heats up and you have to wait until it cools off again.
I bought the Le Expensivo bearing puller kit from Pelican, which is made by a company called Sir Tools. It is a very elaborate bit of kit, weighs a ton, but makes the job of pulling out the old bearing and pressing in the new one a 5 minute job. The hard part is getting the hub out without destroying the old bearing. amjf is right, it is the inner race that comes out along with the hub.
I'd say to someone trying this job for the first time, order three rear bearings because chances are you will destroy one new bearing in the process before getting the hang of it.