






Alternator Fan Housing ...

Thread Starter
Rennlist Member

Joined: Nov 2004
Posts: 218
Likes: 41
From: ... Westminster, CO

Thanks for the offer "rusnak" ... I have my 993 back now and while it isn't exactly the same it does give me a good idea of how the new oem housing should fit on the 3.2
Lesson Learned ...take more pictures... I obviously didn't take enough ... or the right pictures when I did the disassembly.
I will be taking the parts, alt fan, housing, etc. into my mechanics shop tomorrow. He has experience with fitting the Vertex part and has offered to take a look. I have marked a few spots and I just want to make sure I dont go crazy with the machining.
I might not get to the reassembly until next week ... hopefully the next post will be my last one for this thread. :-)
Lesson Learned ...take more pictures... I obviously didn't take enough ... or the right pictures when I did the disassembly.
I will be taking the parts, alt fan, housing, etc. into my mechanics shop tomorrow. He has experience with fitting the Vertex part and has offered to take a look. I have marked a few spots and I just want to make sure I dont go crazy with the machining.
I might not get to the reassembly until next week ... hopefully the next post will be my last one for this thread. :-)
Thread Starter
Rennlist Member
Joined: Nov 2004
Posts: 218
Likes: 41
From: ... Westminster, CO
Closure...
Finally got back to the fan and housing ... quik recap ... old fan "fragmented" taking part of the housing with it. Could not find another at the usual dismantlers ... seems there is a waiting list. Went with the Vertex version, cast aluminum ... a little heavier and rougher. After a little work with the file to clean up some rough parts of the casting everything fits well. I still have to do something with the deck lid ... haven't decided what yet. The old housing, the "pimpled" deck lid, the after picture and comparison of the two housings. The car is running great ... thanks for all of the help and suggestions.

Intermediate
Joined: Nov 2007
Posts: 32
Likes: 0
From: Frederick, MD
Hi Kiwi, I have been around Rennlist but never posted until now. I have an 85 and also had to replace the Fan Housing. Anyway, I got the Vertex part and I also notice that it fits a bit to tight. It just doesn't fit right in like is supposed to. When you did yours, did your shop had to file it down a bit? Do you know? I want to get my Targa back on the road, but this is sort of holding me back a bit. Anyway, if you can share your info it would be appreciated! Thanks!
Intermediate
Joined: Nov 2007
Posts: 32
Likes: 0
From: Frederick, MD
Did you do any filing just to make sure the fitting was a bit more smooth? I see where my new Valeo alternator is a bit to tight, so I sanded the inside and it seems a bit more smooth going in. However, I will do a bit more sanding to make sure it goes like in the factory piece. I also going to smooth out some of the outside, since when I try fitting the housing in the engine, it seemed also to tight. I will sand down around and re fit it again and hopefully I will gain a better and smoother fit. The aftermarket part seem thicker than the original, I guess that is translating into the slight size difference. I guess after casting, they don't file them down to make sure they fit right in like they should. Oh well, I hope I can get this done by this weekend!
Racer
Joined: Dec 2008
Posts: 453
Likes: 0
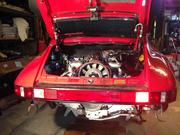
I still haven't completed my fan repair project, but unless i missed it, there is no positioning pin or anything similar that precisely and undoubtedly positions the fan housing, right?? So you do have to wiggle it around until its where it needs to be.
Race Car
Joined: Nov 2004
Posts: 3,993
Likes: 3
From: Blue Ridge Mountains NC.
What I have witnessed more often than not is: The fanbelt is installed with way to much tension. This stresses and cracks the alternator mounting at the rear of the housing allowing the entire alt/fan assembly to flex downward on the belt side where the fan will contact the housing. Sometimes they just rub a little and you catch it in time, other times they can let go.
Is there any indication what may have failed? I would love to know if it was the fan that took out the housing, or the other way around.
Is there any indication what may have failed? I would love to know if it was the fan that took out the housing, or the other way around.
Rennlist Stories
The Best Porsche Posts for Porsche Enthusiasts

Porsche's Top 5 Most Questionable Naming Decisions
Verdad Gallardo
Pogea Racing's 964 Porsche 911 Reimagination Stands Out in a Crowded Field
Verdad Gallardo
6 Convertible Top MYTHS Most People Don't Understand!
Michael S. Palmer
2026 Porsche 911 Club Coupe is Spectacular, And Everything Wrong with the Porsche Market
Joe Kucinski
Talos Takes Your 991 Porsche 911 GT3 to the Next Level for a Cool $1.13 Million
Verdad Gallardo
9 Vehicles Porsche Helped Engineer that Aren't Porsches
Verdad Gallardo
9 Features and Characteristics That Only Porsche People Understand
Verdad Gallardo
I've Written 500 Rennlist Articles: Here's How Porsche Has Changed Along the Way
Joe Kucinski
10 Most Unnecessary Porsches Ever Built (And Why We Love Them)
Verdad Gallardo
Rennlist Member
Joined: Jul 2002
Posts: 16,557
Likes: 94
From: Bend, OR
As whale points out, if the housing gets cracked, the fan can get cocked up.
Racer
Joined: Dec 2008
Posts: 453
Likes: 0
I didn't remove the alternator from the housing, but I did remove the housing from the engine. It might have been a good thing that I screwed up the fan pulley drive because I found a couple of the bolts on the alternator had backed out or weren't previously installed correctly. Alternator looks new, as it was very clean. As you know, these are fairly long bolts and could have touched off on the fan blades.
I did eventually get to install the belt once and the pulley seemed to be true, but the belt was so tight, I just removed it again and haven't had another go at it. Once I do get it on with the correct tension, I'll put a dial on it to measure run out.
One more thing, I read on the Pelican that at least two folks complained of the belt possibly not being the correct size even though it's stamped with the correct proper Porsche PN and size, 710 x 9.5, IIRC. Don't know if anyone else has experienced this?? When I bought the new outer pulley half, I also bought new shims, cup washers and a new Conti belt. I might have to juggle around some belts and compare the old with the 2 new ones.
I haddah Google dat
Rennlist Member
Rennlist Member
Joined: Nov 2008
Posts: 11,501
Likes: 5
From: Fresno, CA
Yes, always give the fan a test spin before and after installing the fan belt, each time.
Don't just fire up the engine without checking the fan clearance.
Tango, just push on the center of the belt with your thumb. You want 1/4" to 1/2" of belt deflection. I think 1/2" is too much, but it's usually written that way in the specs.
Don't just fire up the engine without checking the fan clearance.
Tango, just push on the center of the belt with your thumb. You want 1/4" to 1/2" of belt deflection. I think 1/2" is too much, but it's usually written that way in the specs.
Intermediate
Joined: Nov 2007
Posts: 32
Likes: 0
From: Frederick, MD

I haddah Google dat
Rennlist Member
Rennlist Member
Joined: Nov 2008
Posts: 11,501
Likes: 5
From: Fresno, CA
I just came across these while looking for my V1 pics.
A bit OT, but entertaining, and may add to the collective wisdom on the fan shroud failures.
Attempts to save it were....unsuccessful.
A bit OT, but entertaining, and may add to the collective wisdom on the fan shroud failures.
Attempts to save it were....unsuccessful.
Intermediate
Joined: Nov 2007
Posts: 32
Likes: 0
From: Frederick, MD
Wow that is really bad! I had one crack like the last pic but it was where the support leg meets to the outerside of the housing. I had another crack that was like the second pic, but it was still forming. The machine shop I took the housing to, which manufacture engine parts and work on all metals, they could not save mine. They stated the metal was too weak and brittle, I guess due to age or something. Anyway, I hope this replacement do the trick. It look really good on Kiwi's car so it should look good on mine as well!
Racer
Joined: Dec 2008
Posts: 453
Likes: 0
Actually Tango there is a small pin in the block just above the fly wheel. If you look at the housing there is a timing notch, and under the housing there is an open square where the ping is supposed to line up. However the Vertex housing, at least the one I got, is a bit off. So today I file a bit of that area and also around the whole housing. I also had to sand inside of the area where the alternator goes in. I finally got the housing to fit exactly where is supposed to. I just have to sand a bit more for the alternator to fit perfectly. I'm hoping to have the car running by tomorrow if not Sunday the latest! Good luck on your project.
Thanks for the tip. I got my belt on last night.
WARNING: at least in my case, there is a significant difference in belt diameter between the Porsche (goodyear) 710x9.5 and the Conti 710 x10. I'll post details over on Pelican (later tonight) since I bought both parts from them, but the Porsche belt diameter seems to be too small to fit properly. I had a hell of time installing it, screwed up my fan somewhat, but was able to weld repair it. Last night when I was installing the Conti, there was a night and day difference. So bottom line, I recommend getting the Conti. I hope Pelican can validate that there is an issue and maybe help get the parts correct.