

Battery-area surprise!
 06-08-2009, 08:29 PM
#16
Rennlist Member
Man, I love these kinda threads..living vicariously through others' work (much of which I may never see)....very educational,..relatively painless..
Good work,..and thanks for sharing.
Best,
Doyle
.
Good work,..and thanks for sharing.
Best,
Doyle
.
 06-15-2009, 12:12 PM
#17
RL Community Team
Rennlist Member
Rennlist Member
Thread Starter
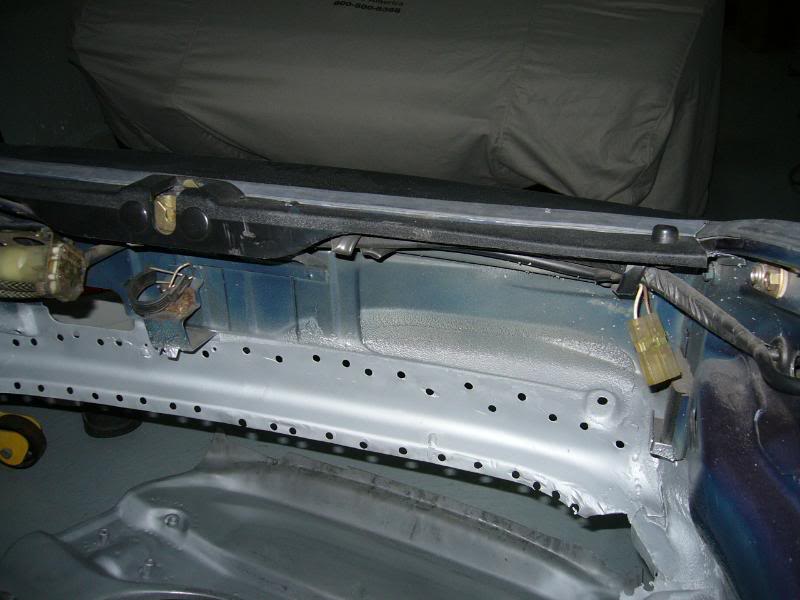
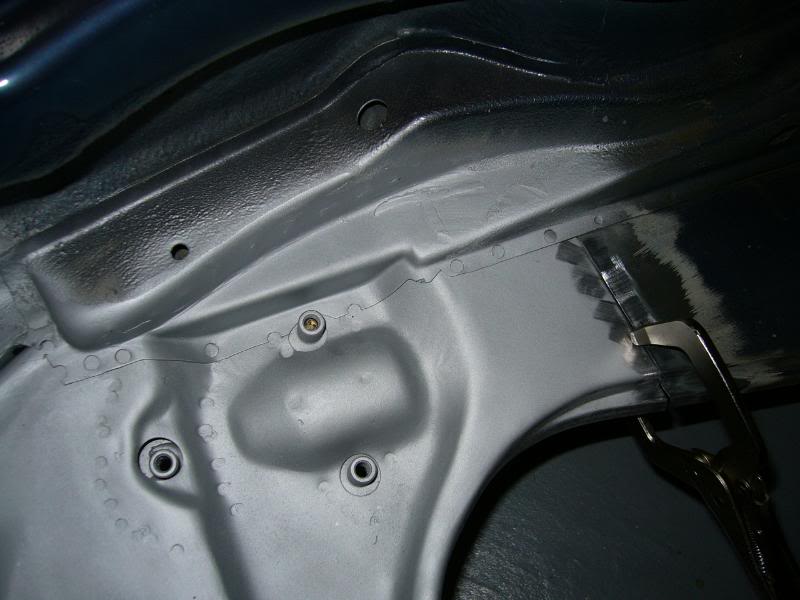
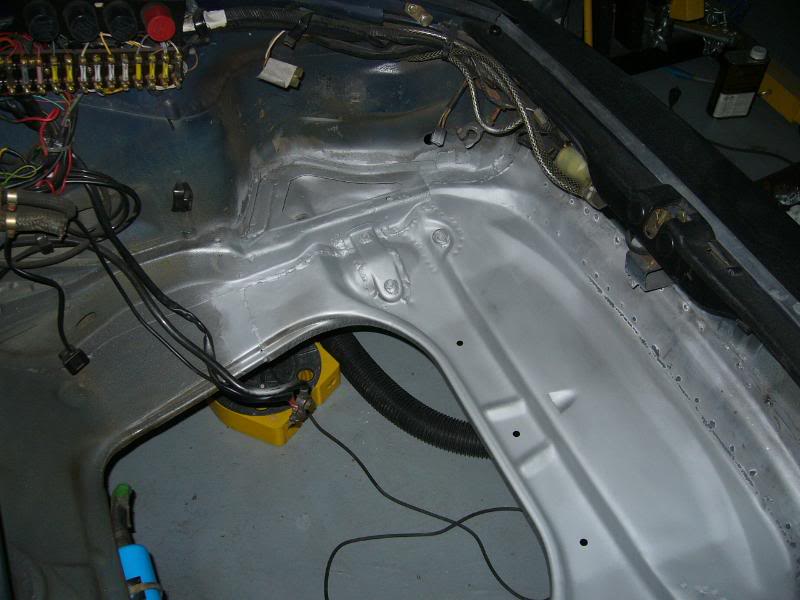
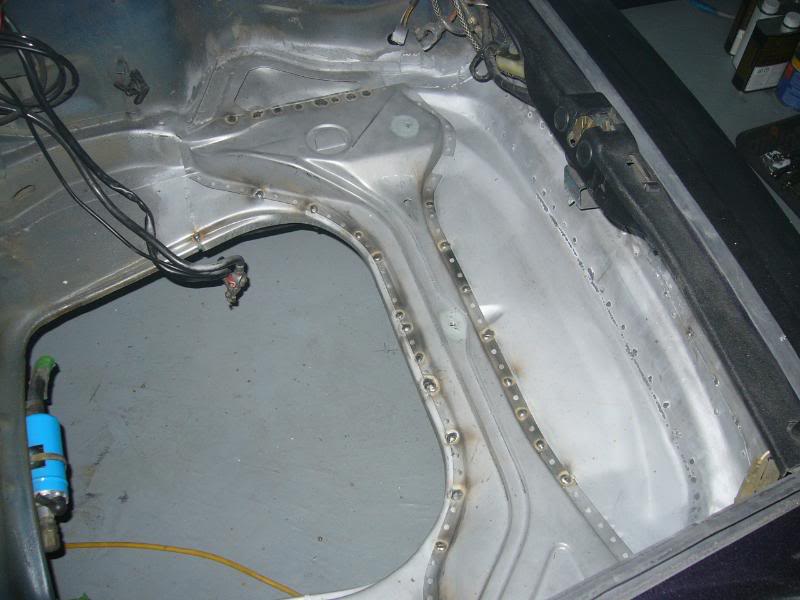
Over the course of the previous week, I gradually worked my way around the opening, using 80 grit cloth-backed strips to clean all the metal. It was a little bit boring, but necessary. Finally, I was ready to start welding in the pan yesterday. I first sprayed all the areas of exposed metal with a weld-through primer. Weld-through primer is a zinc rich primer that, well, you can weld through� It really is the only thing I can think of to put where two panels overlap each other and are welded. On its own, it is not a brilliant primer, so I will wire-wheel away all the exposed �excess� after welding and use activated automotive primers wherever possible � but that is a little bit down the way. Here is a last picture of the fully exposed opening:
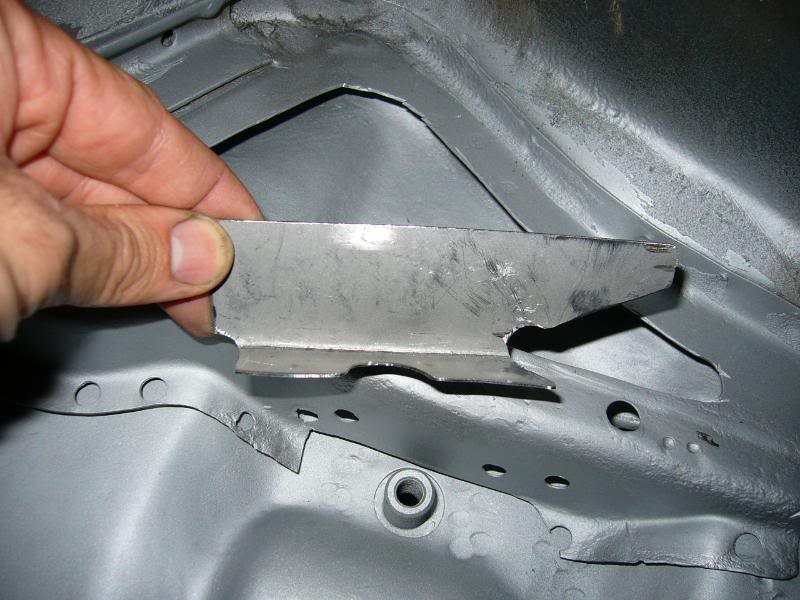
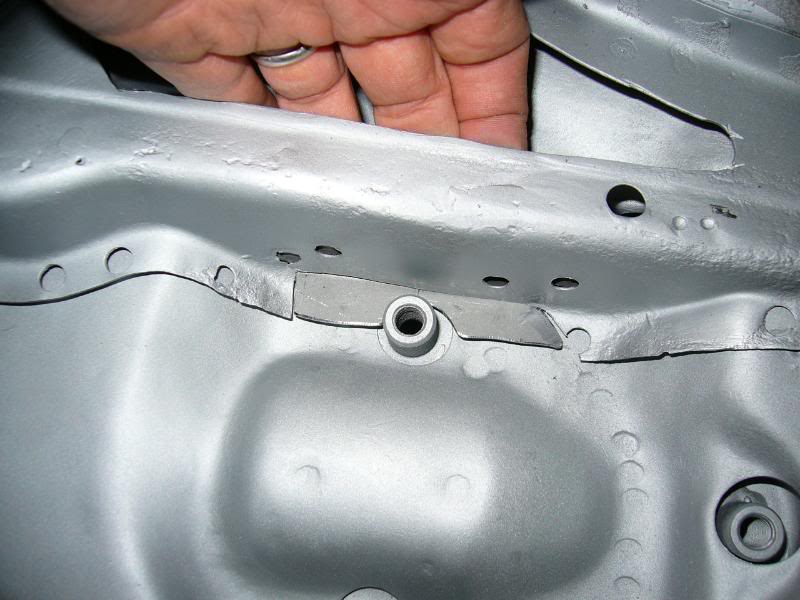
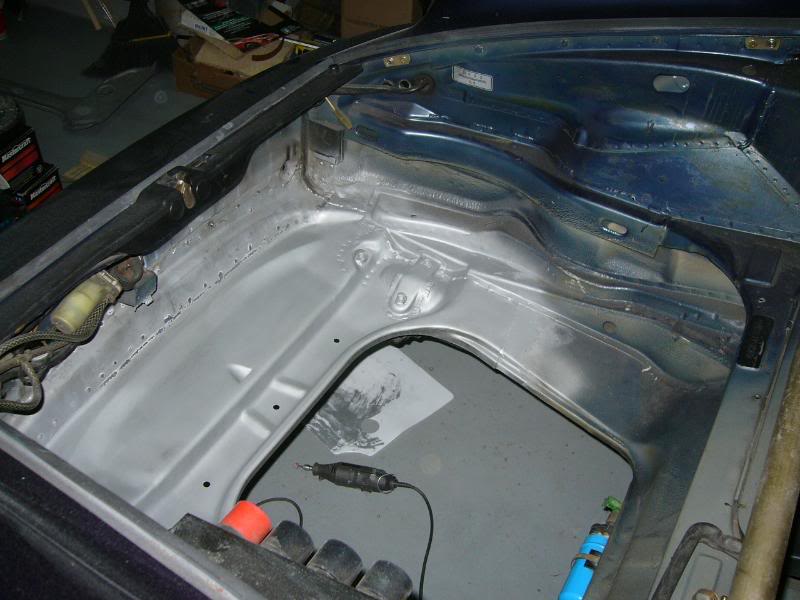
I needed to replace the lower flange on the driver�s side longitudinal as it was a little thin. I simply cut the flange out and fashioned this repair piece:
Next, I put the pan in for the final time. I spent time checking every dimension (again, there really wasn�t much wiggle room except for vertically). However, I took my time checking it all anyway. Once I start welding, it really is game-over as far as getting everything set up nicely. I also bolted the lower control arms in place to check that. However, I then needed to use a jack to press the pan up gently into position as the weight of the LCAs tending to pull the pan down.
Here is the driver�s side prior to tacking:
And the passenger�s side:
At this point, I was pretty confident that everything was right, based on how nicely it was fitting. Now it was time to weld. I practiced on a bit of scrap to obtain a current and wire feed setting that seemed to work OK and then decided to just start welding the thing up. First I welded the inside corners of where the new piece butted up onto the old, adjacent to the fuel tank opening:
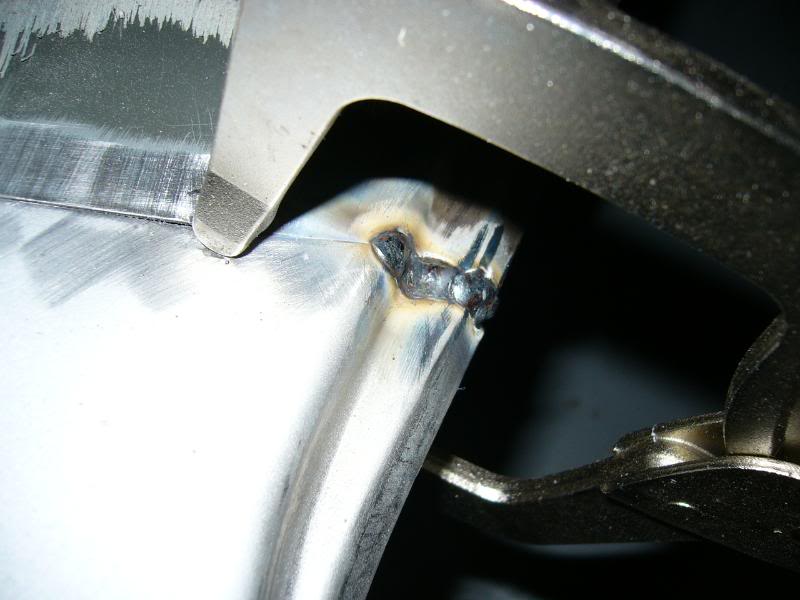
Next I plug welding a few spots where the longitudinals lapped onto the pan at the rearmost edge:
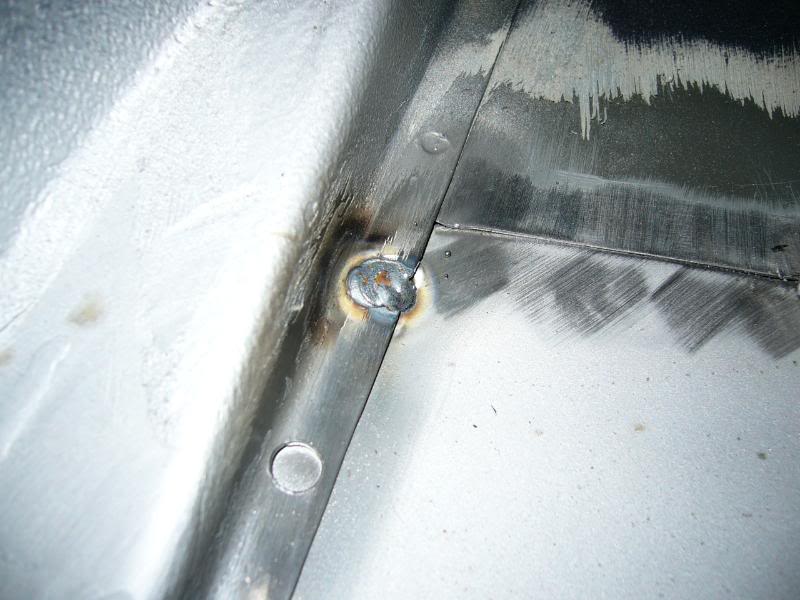
I used 5/16� diameter holes for the plug weld location. I started the weld at the center of the hole, basically putting all the metal into the panel on the backside. Then, I moved to the outside of the hole and worked around the perimeter of the hole in a counter-clockwise fashion, fusing the edge of the hole (i.e. the topside panel) to the weld pool. I found that I needed to trigger the gun in bursts to prevent too much heat from building up. I would let off on the gun and then watch the weld pool cool. Just before it stopped glowing, I would re-trigger. This seemed to work OK but is not necessarily the optimum method. I found as I did them, each one worked better and better, so after a bit more torch time, I may find that my technique has evolved.
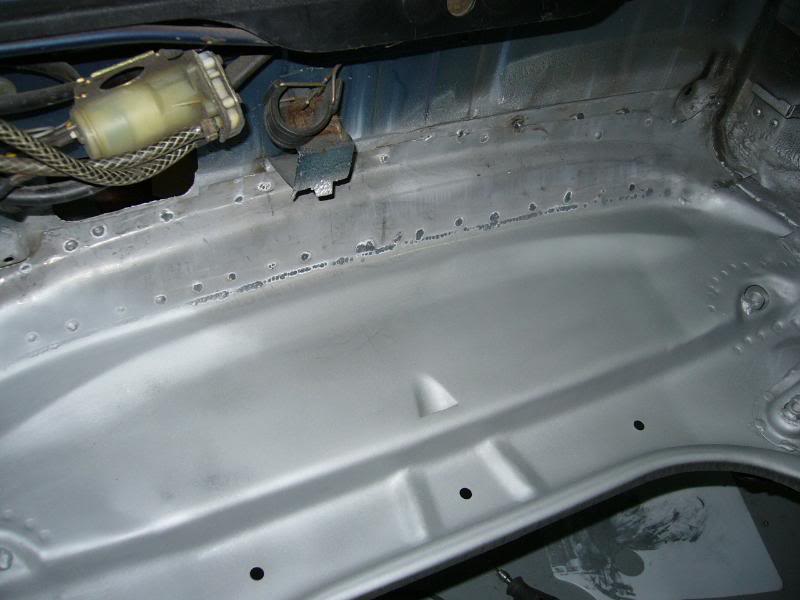
Next, I did a bunch of plug welds at the front bulkhead. The profile of the welds is slightly convex, whereas the original spot welds were slightly concave. I experimented with a grinder on the front bulkhead to somewhat reduce the convexity of the welds. By the time I prime and then apply stoneguard, I expect that the weld profile will not show through very strongly � which is what I�m aiming for� I would hope that someone that looks as this in the future would think it is a quality repair job. Probably I am over-doing it though�
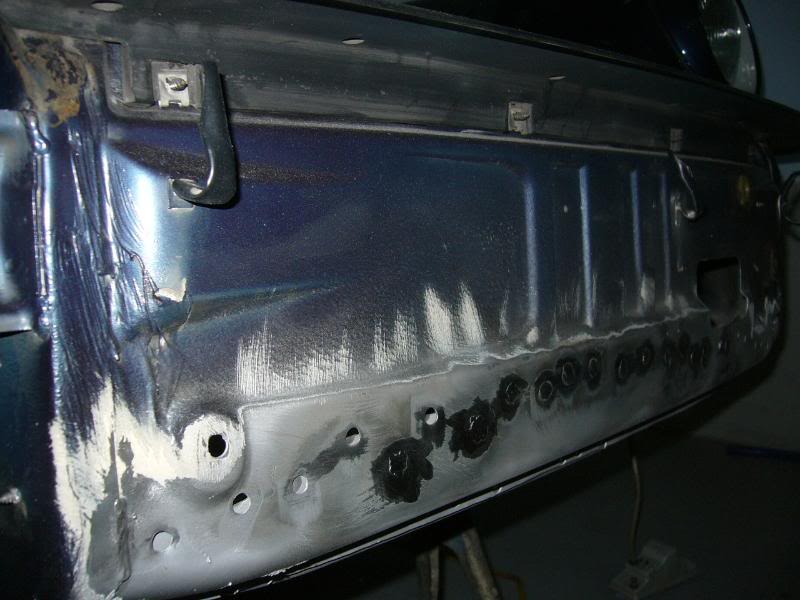
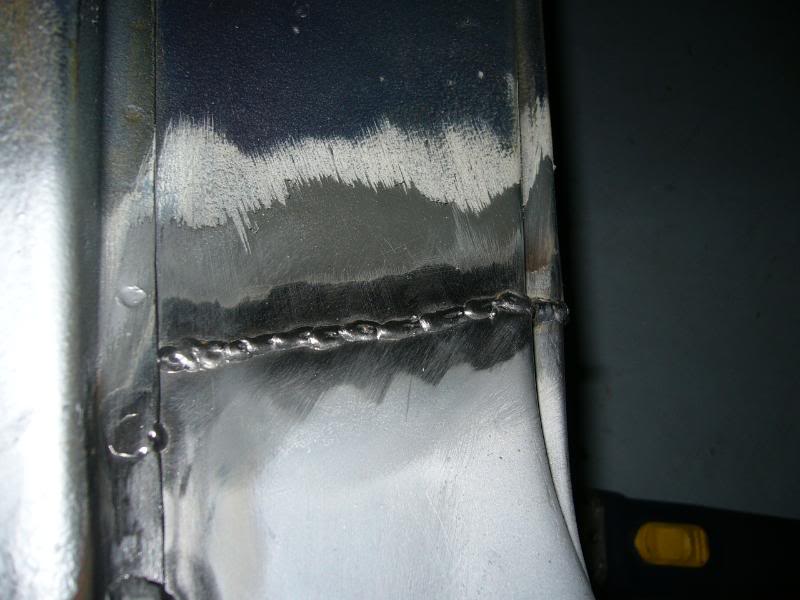
Next up, I completed the top side of the butt weld where the new pan is spliced in. As I didn�t want to badly warp the panel, I did this in small segments with a lot of cooling time in between. As such, it is not a very pretty weld, with lots of starts/stops, but it is solid with decent wetting into the substrate and no pitting etc. Eventually this will be ground close-to-flush anyway:
At this point I stopped for the day (my wife had a ton of other work waiting for me!). So far, I would say I have about a third of the welding done for the pan piece. I will gradually finish it up and then it will be time to move onto the next pieces.
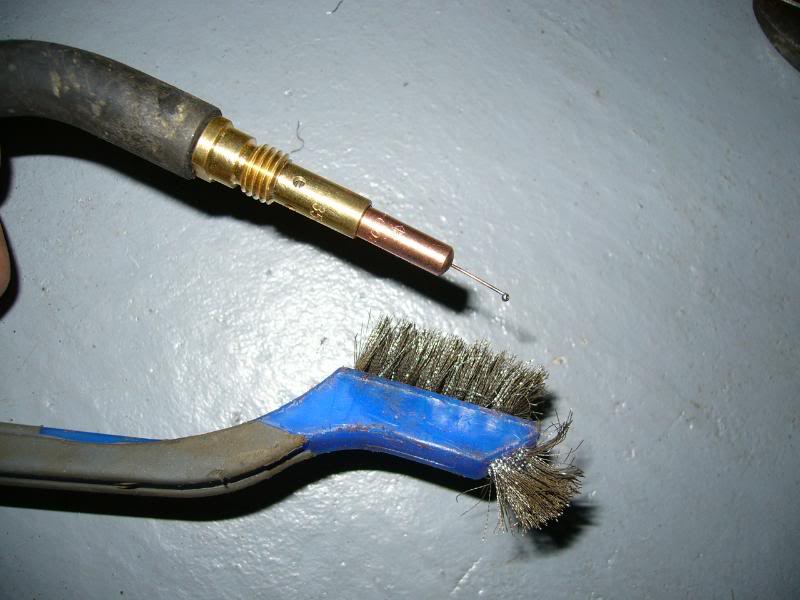
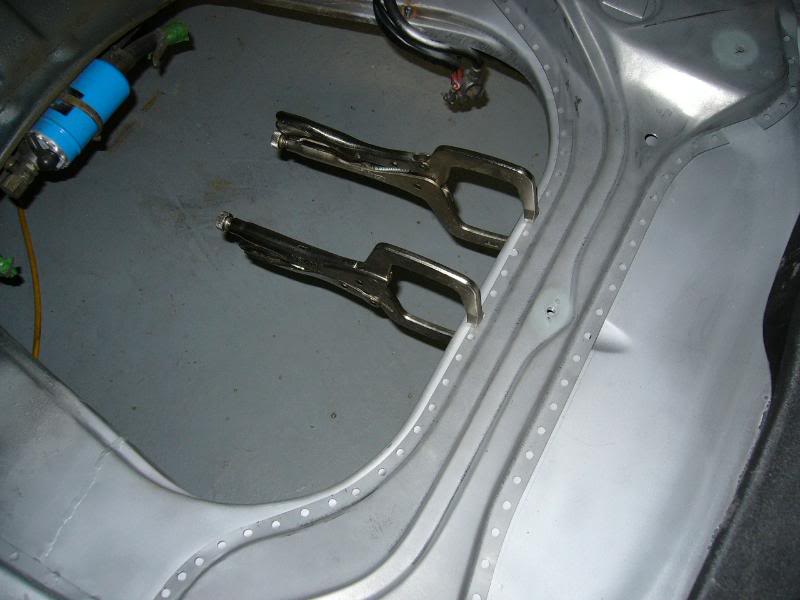
A couple of things worth mentioning: It is nice to have a small wire bush available to periodically clean the contact tip and gas cup:
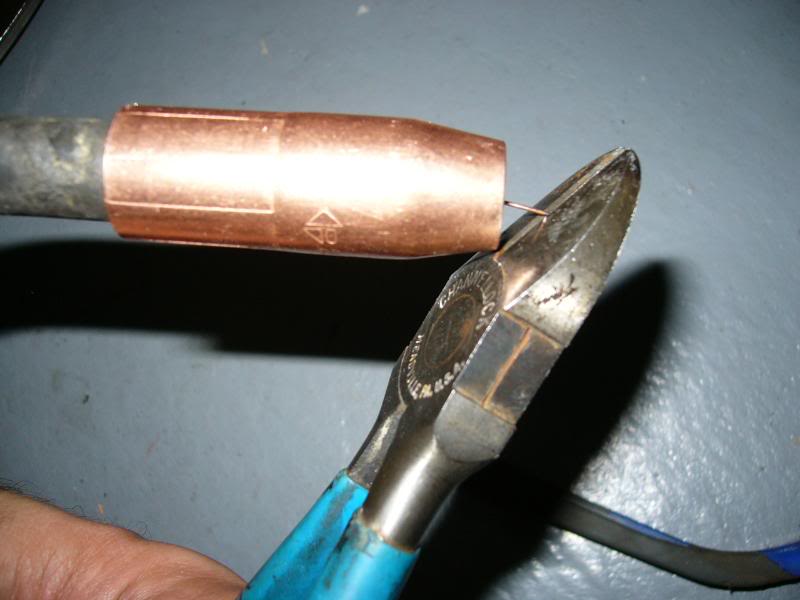
Before striking a weld, I use a pair of side cutters to trim the weld wire. Cut at an angle to make a bit of a point:
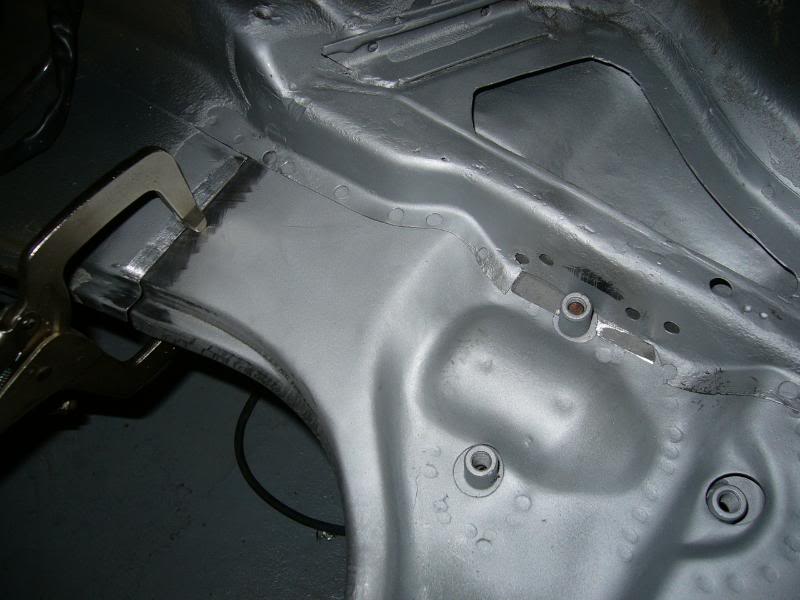
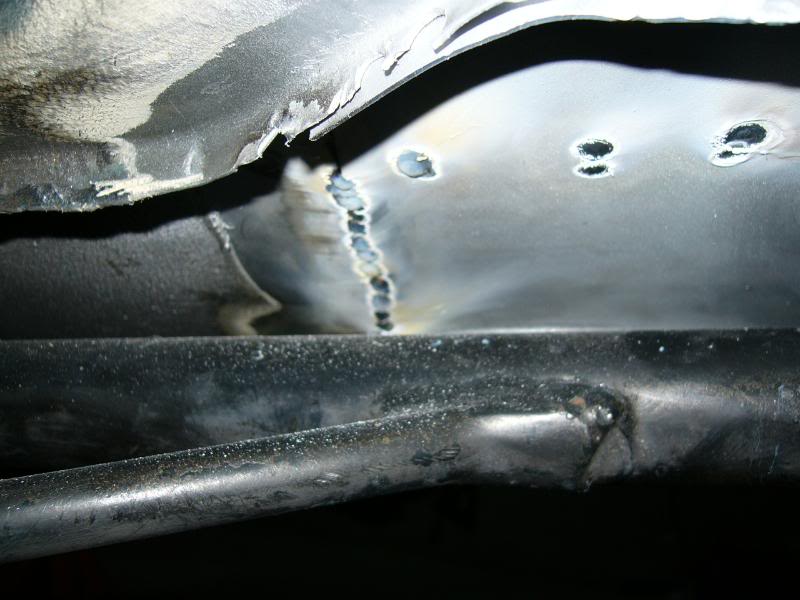
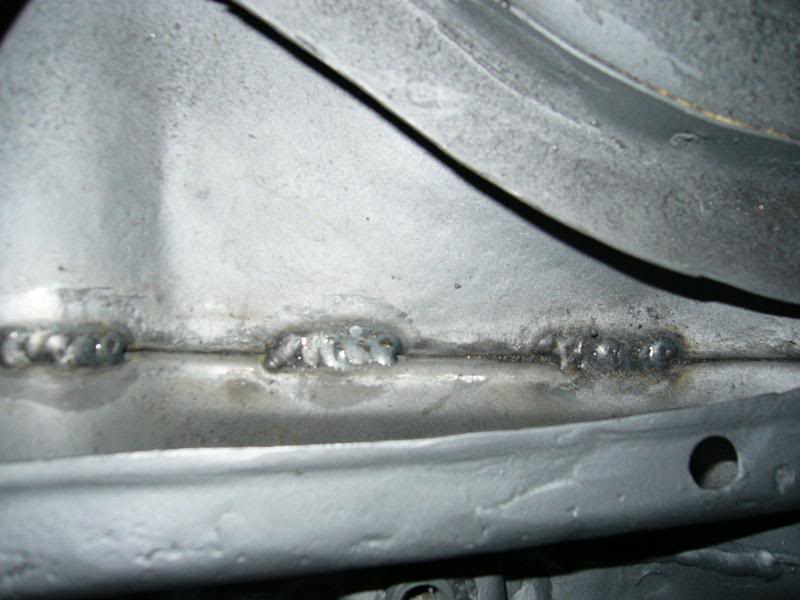
Back to the butt joint: There is a portion (underneath the longitudinal) that can only be welded from the bottom. I have not done that yet, but here is a picture of the joint from below. You can see evidence of good, consistent penetration.
I needed to replace the lower flange on the driver�s side longitudinal as it was a little thin. I simply cut the flange out and fashioned this repair piece:
Next, I put the pan in for the final time. I spent time checking every dimension (again, there really wasn�t much wiggle room except for vertically). However, I took my time checking it all anyway. Once I start welding, it really is game-over as far as getting everything set up nicely. I also bolted the lower control arms in place to check that. However, I then needed to use a jack to press the pan up gently into position as the weight of the LCAs tending to pull the pan down.
Here is the driver�s side prior to tacking:
And the passenger�s side:
At this point, I was pretty confident that everything was right, based on how nicely it was fitting. Now it was time to weld. I practiced on a bit of scrap to obtain a current and wire feed setting that seemed to work OK and then decided to just start welding the thing up. First I welded the inside corners of where the new piece butted up onto the old, adjacent to the fuel tank opening:
Next I plug welding a few spots where the longitudinals lapped onto the pan at the rearmost edge:
I used 5/16� diameter holes for the plug weld location. I started the weld at the center of the hole, basically putting all the metal into the panel on the backside. Then, I moved to the outside of the hole and worked around the perimeter of the hole in a counter-clockwise fashion, fusing the edge of the hole (i.e. the topside panel) to the weld pool. I found that I needed to trigger the gun in bursts to prevent too much heat from building up. I would let off on the gun and then watch the weld pool cool. Just before it stopped glowing, I would re-trigger. This seemed to work OK but is not necessarily the optimum method. I found as I did them, each one worked better and better, so after a bit more torch time, I may find that my technique has evolved.
Next, I did a bunch of plug welds at the front bulkhead. The profile of the welds is slightly convex, whereas the original spot welds were slightly concave. I experimented with a grinder on the front bulkhead to somewhat reduce the convexity of the welds. By the time I prime and then apply stoneguard, I expect that the weld profile will not show through very strongly � which is what I�m aiming for� I would hope that someone that looks as this in the future would think it is a quality repair job. Probably I am over-doing it though�
Next up, I completed the top side of the butt weld where the new pan is spliced in. As I didn�t want to badly warp the panel, I did this in small segments with a lot of cooling time in between. As such, it is not a very pretty weld, with lots of starts/stops, but it is solid with decent wetting into the substrate and no pitting etc. Eventually this will be ground close-to-flush anyway:
At this point I stopped for the day (my wife had a ton of other work waiting for me!). So far, I would say I have about a third of the welding done for the pan piece. I will gradually finish it up and then it will be time to move onto the next pieces.
A couple of things worth mentioning: It is nice to have a small wire bush available to periodically clean the contact tip and gas cup:
Before striking a weld, I use a pair of side cutters to trim the weld wire. Cut at an angle to make a bit of a point:
Back to the butt joint: There is a portion (underneath the longitudinal) that can only be welded from the bottom. I have not done that yet, but here is a picture of the joint from below. You can see evidence of good, consistent penetration.
07-07-2009, 11:16 AM
#18
RL Community Team
Rennlist Member
Rennlist Member
Thread Starter
It has been a while since the last update, and that is mostly because of work… work at work and work at home (for what little time I’m home these days).
Anyway, things are creeping along. The actual pan is now fully welded in, as well as the LCA reinforcements:
There’s really not too much to this part of the job, other than welding. All the welding is either plug welds or butt welds. I have over-welded things (pity anyone who ever has to remove THIS suspension pan…) Why? Well, no good reason, just to be certain I guess.
Looking at the backside, you can see were all the plug welds were made (which replicated the positioning of the original spot welds) but you can also see the traces of where I seam welded the front edge of the suspension pan-to-bulkhead joint.
Where I had cut the original access hold in the driver’s side longitudinal, I was able to add a bit of seam welding to augment the plug welds that would be on the pinch seam below.
I put a light skim of metal-reinforced filler on the front bulkhead to improve the cosmetics a bit. Pretty stupid actually as I will be covering this with 3M rock guard, primers and paint later…
The pinch seams are nicely closed-up now…

One of the big questions is how to protect the inner side of the panels? Well, prior to welding I am coating all the mating and hidden surfaces in zinc-based weld-through primer. This primer really does work as a weld through, BUT it is not as nice as welding onto plain (clean) steel. The arc strikes are not as consistent and the cosmetics are not as easy to manage. However, its benefits outweigh its weaknesses in these applications. However, this will only be the start. After the welding is finished (fuel tank support is next), I will be applying seam sealer to all the accessible seams (especially the pinch seams at the bottom) and then I will be coating the inner voids with thinned POR15 (or ZeroRust… not sure yet) sprayed through an undercoating gun with a 360-degree nozzle on a long flexible wand (I will leave access holes to allow this). Finally, I will coat those same voids with Fluid Film so rust should pretty much be out-of-the-question. The outer areas will be conventionally done with Glasurit etching primer, seam sealer, 3M rock guard, Glasurit HS primer, base and clear. However, I’m getting ahead of things, I will document that as it (eventually) happens
As is typical, I am doing a few other pointless things. All of the hardware for the front parts is being re-plated so all that will be sort of concours when it goes back together.
One think I am holding firm on is leaving the front suspension alone. On the one hand, I so badly want to restore it, but on the other hand, I am trying to keep some sort of budgetary discipline and leave THAT work until next winter.
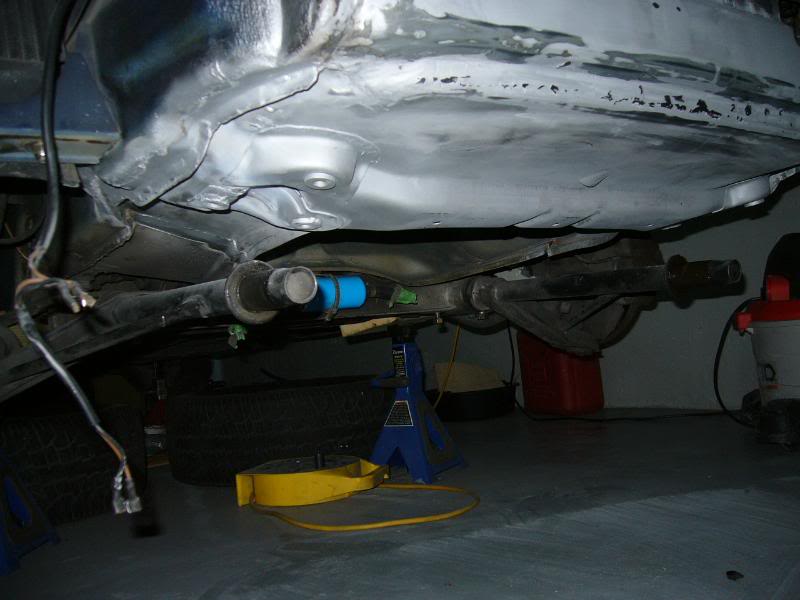
One item I do need to address now is the front bushings, which I found out to my surprise were “plastic” (likely Weltmeister polygraphites I guess…). Well, that explains the harshness and squeaks (which I thought were worn our original bushings – like the rear, which definitely are worn originals). I am OK with living for these until next winter when they will be replaced with Elephant Racing rubber bushings (along with new ball joints, tie rods, shocks and all those other details that should be done together). However, what I cant live with is the hack installation job that was done on these. First, the passenger side front bushing is incredibly tight. It was very hard to remove, but I have it off now and will now “size” the bushing as should have been done at the beginning. The driver side front bushing on the other hand seems to fit very well (can pivot it by hand). However, the bushing on the back side of the control arm is another matter… I should have known. When I first disassembled things, I noticed that the bolts for the front LCA mount were positioned at the extreme rear of the slot in the bushing carrier – I just shrugged it off as being one of those “semi-hand-built-tolerance” issues. Now, upon closer inspection, this is what I see:
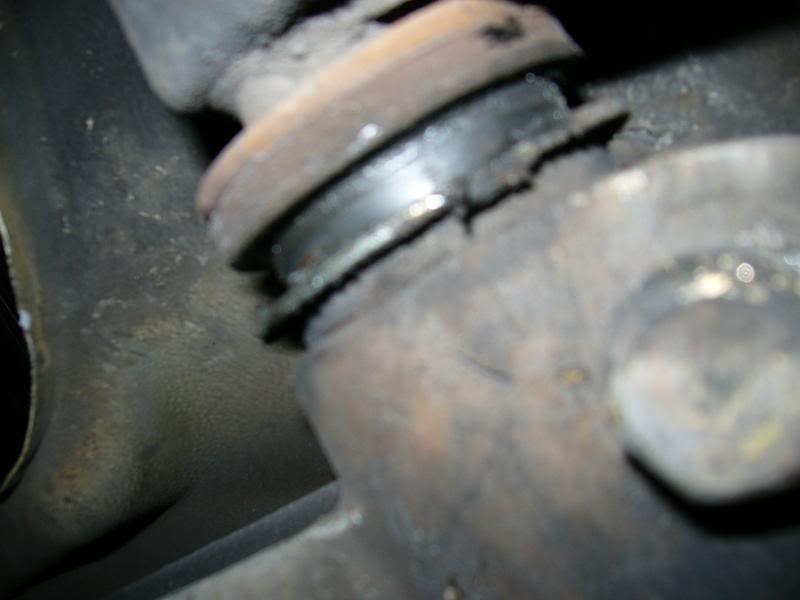
Yeah, that bushing is about �” from being fully seated! It seems tight as all-get-out, but I can’t believe someone would install a bushing that way! So this definitely needs to be re-sized too.
At least one of this car’s previous owners was a bit of a hack. Kudos for being into the car enough to replace bushings, but bad-bad-bad for doing such a poor job jamming them in - reminded me of the equally sad radio and aftermarket alarm/keyless install jobs. All since yanked out by yours truly…
Well, I’m getting there…
Anyway, things are creeping along. The actual pan is now fully welded in, as well as the LCA reinforcements:
There’s really not too much to this part of the job, other than welding. All the welding is either plug welds or butt welds. I have over-welded things (pity anyone who ever has to remove THIS suspension pan…) Why? Well, no good reason, just to be certain I guess.
Looking at the backside, you can see were all the plug welds were made (which replicated the positioning of the original spot welds) but you can also see the traces of where I seam welded the front edge of the suspension pan-to-bulkhead joint.
Where I had cut the original access hold in the driver’s side longitudinal, I was able to add a bit of seam welding to augment the plug welds that would be on the pinch seam below.
I put a light skim of metal-reinforced filler on the front bulkhead to improve the cosmetics a bit. Pretty stupid actually as I will be covering this with 3M rock guard, primers and paint later…
The pinch seams are nicely closed-up now…
One of the big questions is how to protect the inner side of the panels? Well, prior to welding I am coating all the mating and hidden surfaces in zinc-based weld-through primer. This primer really does work as a weld through, BUT it is not as nice as welding onto plain (clean) steel. The arc strikes are not as consistent and the cosmetics are not as easy to manage. However, its benefits outweigh its weaknesses in these applications. However, this will only be the start. After the welding is finished (fuel tank support is next), I will be applying seam sealer to all the accessible seams (especially the pinch seams at the bottom) and then I will be coating the inner voids with thinned POR15 (or ZeroRust… not sure yet) sprayed through an undercoating gun with a 360-degree nozzle on a long flexible wand (I will leave access holes to allow this). Finally, I will coat those same voids with Fluid Film so rust should pretty much be out-of-the-question. The outer areas will be conventionally done with Glasurit etching primer, seam sealer, 3M rock guard, Glasurit HS primer, base and clear. However, I’m getting ahead of things, I will document that as it (eventually) happens
As is typical, I am doing a few other pointless things. All of the hardware for the front parts is being re-plated so all that will be sort of concours when it goes back together.
One think I am holding firm on is leaving the front suspension alone. On the one hand, I so badly want to restore it, but on the other hand, I am trying to keep some sort of budgetary discipline and leave THAT work until next winter.
One item I do need to address now is the front bushings, which I found out to my surprise were “plastic” (likely Weltmeister polygraphites I guess…). Well, that explains the harshness and squeaks (which I thought were worn our original bushings – like the rear, which definitely are worn originals). I am OK with living for these until next winter when they will be replaced with Elephant Racing rubber bushings (along with new ball joints, tie rods, shocks and all those other details that should be done together). However, what I cant live with is the hack installation job that was done on these. First, the passenger side front bushing is incredibly tight. It was very hard to remove, but I have it off now and will now “size” the bushing as should have been done at the beginning. The driver side front bushing on the other hand seems to fit very well (can pivot it by hand). However, the bushing on the back side of the control arm is another matter… I should have known. When I first disassembled things, I noticed that the bolts for the front LCA mount were positioned at the extreme rear of the slot in the bushing carrier – I just shrugged it off as being one of those “semi-hand-built-tolerance” issues. Now, upon closer inspection, this is what I see:
Yeah, that bushing is about �” from being fully seated! It seems tight as all-get-out, but I can’t believe someone would install a bushing that way! So this definitely needs to be re-sized too.
At least one of this car’s previous owners was a bit of a hack. Kudos for being into the car enough to replace bushings, but bad-bad-bad for doing such a poor job jamming them in - reminded me of the equally sad radio and aftermarket alarm/keyless install jobs. All since yanked out by yours truly…
Well, I’m getting there…
Last edited by 500; 07-07-2009 at 02:35 PM.
07-07-2009, 02:26 PM
#19
I haddah Google dat
Rennlist Member
Rennlist Member
Nice job on the butt joints and alignment! I think a few of the earlier welds could have used a higher heat setting for better heat penetration.
I found some rust in my pan area due to a leaking windshield washer. I will be doing some sanding and primer too, but probably no welding since I caught it early.
You will really love the ER rubber bushings. If you have access to hydraulic press, I recommend that. I also recommend that once the bushings are installed, install the A-arms on the car immediately rather than wait as the instructions direct. Then leave the car up on stands, and let the soap dry with the parts on the car overnight. The reason is that the alignment of the suspension parts will not be exact, and you will have an easier time indexing them on the car with the soap still wet.
07-07-2009, 04:44 PM
#20
RL Community Team
Rennlist Member
Rennlist Member
Thread Starter
Hey Rus, thanks for the tip on the ER bushing install, I will file that one for reference.
I do look forward to my future suspension upgrade, but right now I think I will be happy just getting the current bushings in correctly!
I do look forward to my future suspension upgrade, but right now I think I will be happy just getting the current bushings in correctly!
07-09-2009, 12:49 AM
#23
I haddah Google dat
Rennlist Member
Rennlist Member
Amj,
You might want to check out the price on the ER rubber bushings. The only reason I say this is that you already know that you have Weltmeister bushings, one of which is bad, and it would be dare I say "easy" to replace the bushings now while the A-arms are off the car.
You might want to check out the price on the ER rubber bushings. The only reason I say this is that you already know that you have Weltmeister bushings, one of which is bad, and it would be dare I say "easy" to replace the bushings now while the A-arms are off the car.
07-09-2009, 06:21 PM
#25
RL Community Team
Rennlist Member
Rennlist Member
Thread Starter
Amj,
You might want to check out the price on the ER rubber bushings. The only reason I say this is that you already know that you have Weltmeister bushings, one of which is bad, and it would be dare I say "easy" to replace the bushings now while the A-arms are off the car.
You might want to check out the price on the ER rubber bushings. The only reason I say this is that you already know that you have Weltmeister bushings, one of which is bad, and it would be dare I say "easy" to replace the bushings now while the A-arms are off the car.
Actually, this week has been more productive than I expected. I have the fuel tank support in.
First step was to drill the holes for the plug welds. Not to be outdone by the Porsche factory guys (who were seemingly paid per spot weld…) I drilled 86 (!) holes around the perimeter of the support, then de-burred the holes and applied the weld through primer:

A much more efficient way to do this would be to use a sheet metal punch. I toyed with purchasing a hand punch for this operation, but decided it was not really needed. If I were doing an older 911 with a ton of rust repair work though, I might do it! As it was, I just used an aluminum oxide grinding bit in a dremel tool and was able to quickly de-burr the holes after drilling.
As noted on the photo, I added a �” diameter access hole which will be used for the undercoating wand to access the inner void. The hole will be fitted with a plug later.
This part fits in nicely:
I started with a few welds distributed around the perimeter to tie it down:
…and then welded the rest up:

This was pleasant welding in that the access is very good – plus, I am getting more used to the MIG process. It is pretty basic, but there are many little nuances that need to be learnt. I am very near done with the welding portion of this project. All that remains is to close up the access hole I had cut in the driver’s side longitudinal.
Many of you have probably noticed that I have not added in the cut-out and sheet metal shroud for the A/C condenser. I have deleted the A/C from the car, but did think long and hard about putting the shroud in anyway. However, I like the clean look without it and have decided to leave it out. I will keep the old sheet metal shroud anyway, should I ever want to weld it in the future (I highly doubt it). Adding it in later would be a bit of an invasive job, not THAT bad either.
One really needs to consider that question. (Also, I live in Canada and never use A/C on my daily car… just not necessary here – obviously not true for many…)
Last edited by 500; 07-10-2009 at 05:35 PM.
07-09-2009, 06:57 PM
#26
Race Car
Dude...That is a superb repair. I have done this on a couple of early cars where the rust was much worse and the "parent" metal had to be fabed. This is no slouch of a job and will add years to the car. I found that the spot welds are Porsche-specific. Interestingly a spot-weld drill bit is not the correct size. I found that Eastwood had the correct one. Now, I know it doesn't make a bit of differance and I would consider your job awesome, but it is interesting. A concours judge could easily reject all those beautifully restored 911s on that point and **** abunch of people off. Another interesting fact is that the location and spacing of the spot welds is very deliberate throughout the tub. They are designed to allow flex, where too many - too close would rip the metal appart with fatige. This is an argument against seam-welding which is popular with track/race cars and effectivly terminates the life of the chassis.
Great job man. Really great job and very helpful photos.
How about plugging the company you got the replacement panels from - not all of them fit well.
Great job man. Really great job and very helpful photos.
How about plugging the company you got the replacement panels from - not all of them fit well.
07-09-2009, 07:22 PM
#27
RL Community Team
Rennlist Member
Rennlist Member
Thread Starter
Hey, thanks for the comments. Interesting bit there on spot vs. seam welds. I *mostly* followed the original patterns and spacing but did deviate here and there and did a few (but not many) seams.
I purchased the sheet metal parts from Stoddards. This is a link to the page with the sheet metal parts:
http://www.stoddard.com/shop/shopdis...loor+Pan+Parts
Stoddards' pan and fuel tank support are made by Dansk [Edit: Maybe not after all...] (who bought the original tooling from Porsche) and are very nice. Fit was good and the workmanship where the LCA bosses etc. were added looks good (better than others I have seen in pictures). The small LCA reinforcements (also ordered from Stoddards) were still OEM from Porsche.
I found their customer service excellent and delivery was fast.
I had tried getting in touch with Restoration Design as well, but many phone calls with no answer and an email with no response lead me to look elsewhere. However, others have had good experience with them, so I might have just had bad timing. [Edit: RD has since changed ownership and may be a completely different outfit now...]
Oh yeah, and about the "concours" thing... I am dead in the water there, although I want my car eventually to be very nice cosmetically (and mechanically of course!!)
Last edited by 500; 10-25-2010 at 01:44 PM.
07-09-2009, 10:58 PM
#30
Instructor
This is whats left of my front pan. Just found that the sway bar where it attaches to the body on the rear is rotted as well... 
Overall, not a bad $1500 investment considering its all there (engine, fuchs, glass, etc).
Overall, not a bad $1500 investment considering its all there (engine, fuchs, glass, etc).
Last edited by levdeb; 04-25-2013 at 07:53 PM.