

Battery-area surprise!

Thread Starter
RL Community Team
Rennlist Member
Rennlist Member
Joined: May 2004
Posts: 3,500
Likes: 324
From: Toronto
I thought I would be installing my new bushings right now, but that job has got postponed to make way for a rude little shock…
Yeah, sometime in my 911’s earlier life, it fell victim to a battery acid leak. Unfortunate as this car’s body is exceptionally sound everywhere else. Rust is always a heartbreaker…
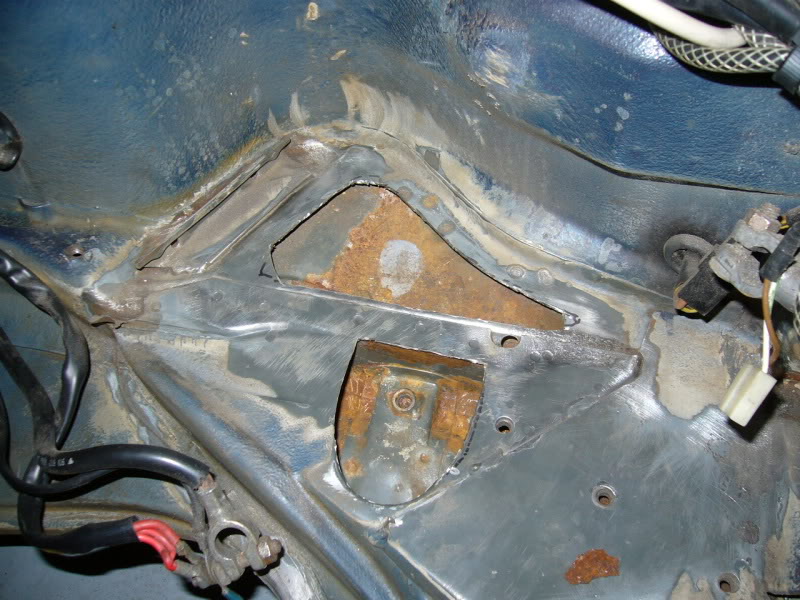
It actually looked like only a minor problem at first. Then, as I dug deeper, it got worse (as it pretty much always does with rust). I cut some sections from the battery tray to get a better look.
P1030258.jpg
The area on the outside (i.e. under the longitudinal) does have some rust but it is not bad, the vast majority of the metal remains intact. I will just weld in reinforcement to be sure. However, on the inner side (which opens into the cavity between the fuel tank support and suspension pan) the amount of metal loss is more significant. It has not rusted all the way through in any areas, but the metal on the bottom, close to the driver’s side lower control arm mount was noticeably thin (I could see it flex when I pushed on it). I debated doing some patches, but ultimately decided it would be best to just do it right.
A few days ago I ordered the sheet metal pieces I will need. I spent a lot of time searching. Restoration Design seems well-known, but their parts (at least the suspension pan) do not appear to be galvanized. I tried calling a bunch of times and then sent an email with my questions. I never got a reply so I tried Stoddard’s. Much better in my opinion. A friendly employee answered all my questions. The Stoddard pieces come from Dansk (who bought the original tooling from Porsche) and are galvanized [Edit: This point seems to be in dispute. I am almost 100% sure this is what the person from Stoddard's had told me over the phone, but either he may have been mistaken or I was hallucinating, as it seems that there is no other confirmation of this. So sorry, but I will say that the Stoddard's parts were good]. They cost more than the RD parts, but I decided to go with Stoddard as they fit my needs much better. Placed the order Wednesday and the parts showed up today (Monday) – and I am in Canada. [Edit: Since this started, RD is now under new ownership and you may get a completely different experience than I did.]
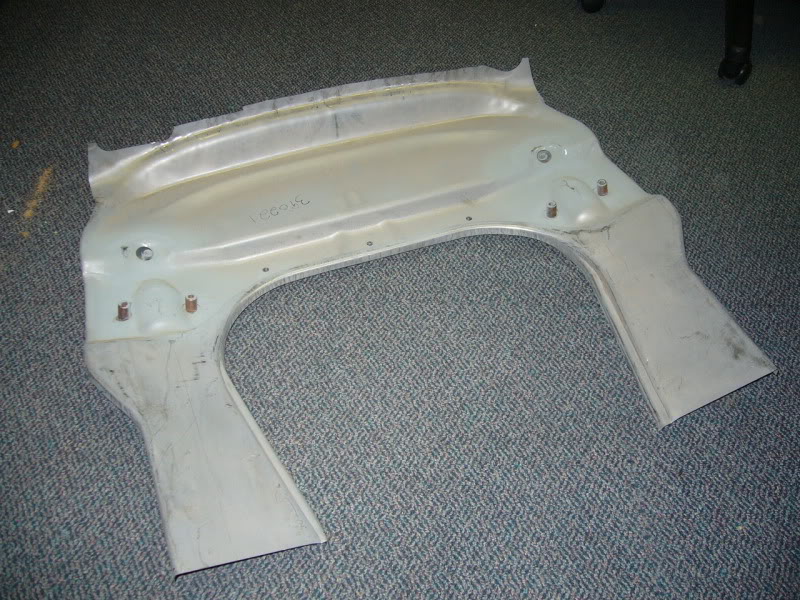
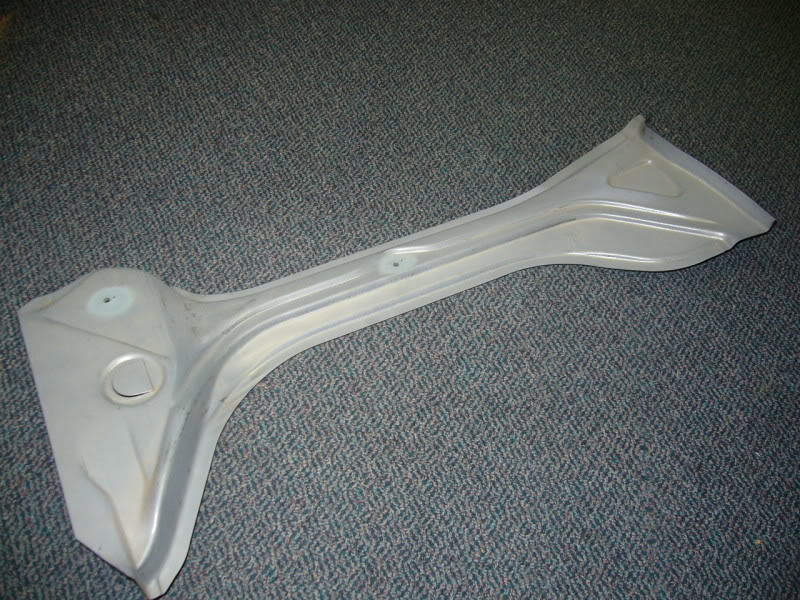
The parts LOOK good. I hope the fit is good.
This is what I ordered so far:
Suspension pan forward section
P1030270.jpg
Fuel tank support
P1030269.jpg
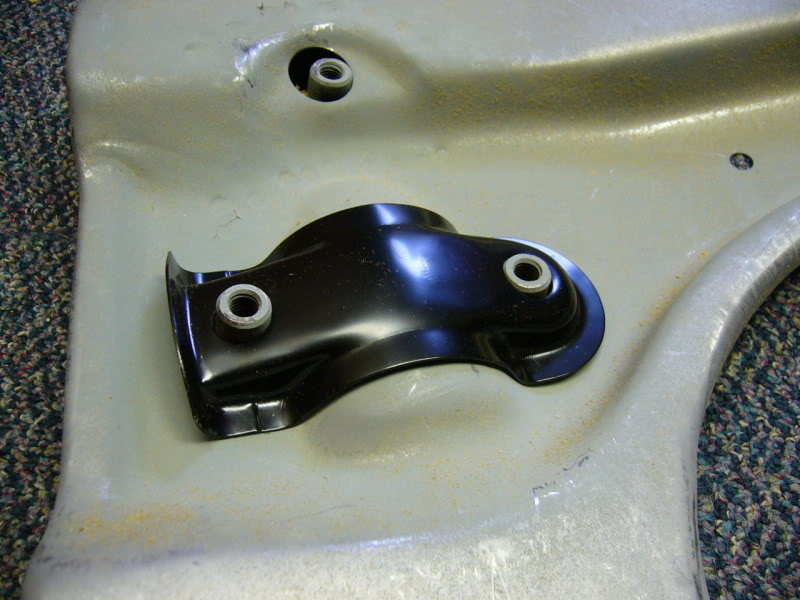
LCA reinforcements
P1030272.jpg
I will document this repair here, but it will be slow. I am slow and careful with this type of work by nature, plus I have the level 3 CFA exam to contend with in a month, so work will be slow, but I will post my progress up here for anyone who is interested. There are already many good threads between here and Pelican, but maybe there will be some new nuance that may add to someone who has to do this job in the future.
For now I would say that if you are looking at a 911, inspect the battery area very carefully!
Yeah, sometime in my 911’s earlier life, it fell victim to a battery acid leak. Unfortunate as this car’s body is exceptionally sound everywhere else. Rust is always a heartbreaker…
It actually looked like only a minor problem at first. Then, as I dug deeper, it got worse (as it pretty much always does with rust). I cut some sections from the battery tray to get a better look.
P1030258.jpg
The area on the outside (i.e. under the longitudinal) does have some rust but it is not bad, the vast majority of the metal remains intact. I will just weld in reinforcement to be sure. However, on the inner side (which opens into the cavity between the fuel tank support and suspension pan) the amount of metal loss is more significant. It has not rusted all the way through in any areas, but the metal on the bottom, close to the driver’s side lower control arm mount was noticeably thin (I could see it flex when I pushed on it). I debated doing some patches, but ultimately decided it would be best to just do it right.
A few days ago I ordered the sheet metal pieces I will need. I spent a lot of time searching. Restoration Design seems well-known, but their parts (at least the suspension pan) do not appear to be galvanized. I tried calling a bunch of times and then sent an email with my questions. I never got a reply so I tried Stoddard’s. Much better in my opinion. A friendly employee answered all my questions. The Stoddard pieces come from Dansk (who bought the original tooling from Porsche) and are galvanized [Edit: This point seems to be in dispute. I am almost 100% sure this is what the person from Stoddard's had told me over the phone, but either he may have been mistaken or I was hallucinating, as it seems that there is no other confirmation of this. So sorry, but I will say that the Stoddard's parts were good]. They cost more than the RD parts, but I decided to go with Stoddard as they fit my needs much better. Placed the order Wednesday and the parts showed up today (Monday) – and I am in Canada. [Edit: Since this started, RD is now under new ownership and you may get a completely different experience than I did.]
The parts LOOK good. I hope the fit is good.
This is what I ordered so far:
Suspension pan forward section
P1030270.jpg
Fuel tank support
P1030269.jpg
LCA reinforcements
P1030272.jpg
I will document this repair here, but it will be slow. I am slow and careful with this type of work by nature, plus I have the level 3 CFA exam to contend with in a month, so work will be slow, but I will post my progress up here for anyone who is interested. There are already many good threads between here and Pelican, but maybe there will be some new nuance that may add to someone who has to do this job in the future.
For now I would say that if you are looking at a 911, inspect the battery area very carefully!
Last edited by 500; Jul 23, 2012 at 12:45 PM.
Thread Starter
RL Community Team
Rennlist Member
Rennlist Member
Joined: May 2004
Posts: 3,500
Likes: 324
From: Toronto
Wow Ice, thank you for the offer.
It's funny, I was so looking forward to getting this car on the road so I could go to these GTG's to meet the P-car crowd and then the finish line got moved!
Ah well, it is going OK. The front of the car is all dismantled and as soon as I am back from the U.S. this week I will start the process of cutting out the old metal...
Team Owner

Joined: Aug 2005
Posts: 28,396
Likes: 1,605
From: Cambridge Ontario Canada
do you have a welder ? i was thinking of getting one fro small jobs. I just from the pics figured out what's what , I see the part below now matches your new part. I checked mine after reading this an all good so far. I got some undercoating from C.T ( the most expensive one ) and sprayed my battery box last year.
So far so good.
So far so good.
Thread Starter
RL Community Team
Rennlist Member
Rennlist Member
Joined: May 2004
Posts: 3,500
Likes: 324
From: Toronto
I spent most of last week in Houston, and I have headed there for a further four days this week. As such, the progress is slow.
However, I have all the bits and pieces disassembled on the front end and have started removing the old sheet metal.
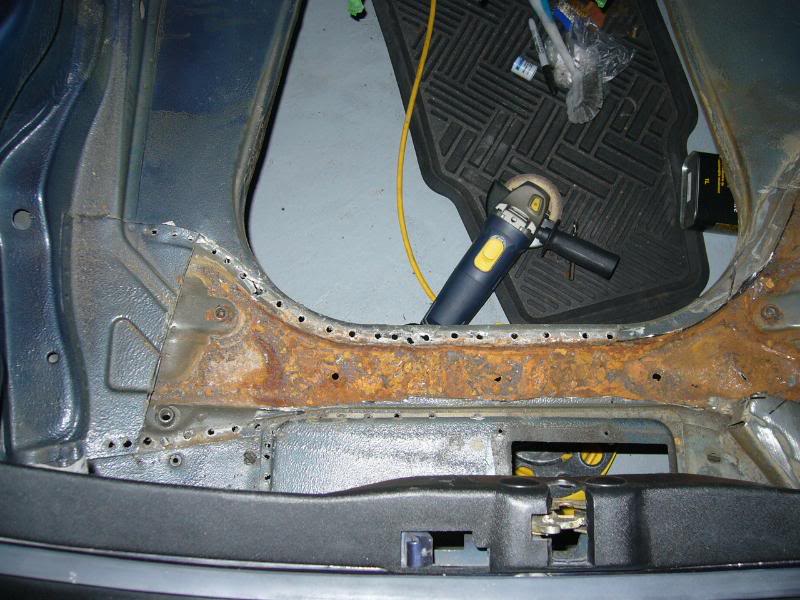
This is what the “very slight looking” corrosion ended up looking like in between the suspension pan and fuel tank support:
P1030295.jpg
None of the metal is rusted through yet, but this is waaayyy beyond POR15 or similar “cover up”.
I think one of the keys to this job will be removal of the metal to be replaced without messing up the metal to be kept. I spent a surprising amount of time on the junction between the fuel tank support (being removed) and the longitudinal (being kept). First I just removed the PVC to get a clear picture of what’s what.
P1030297.jpg
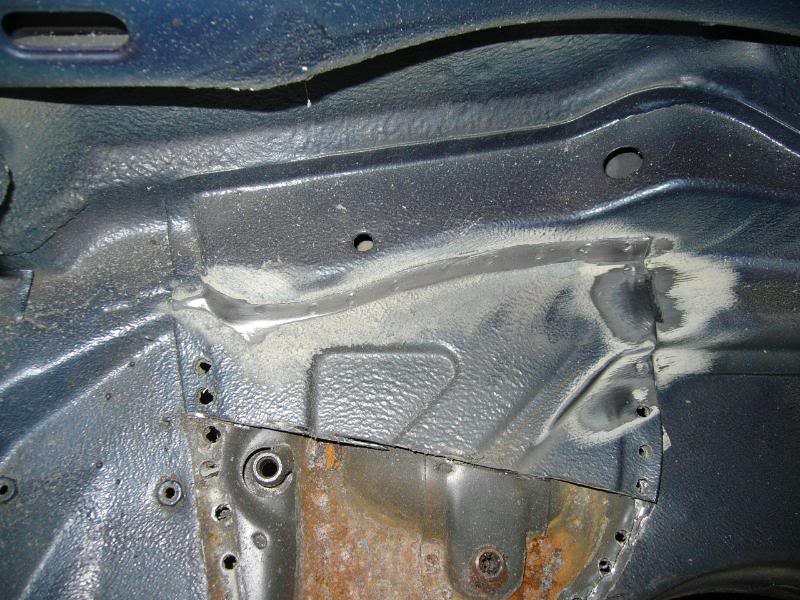
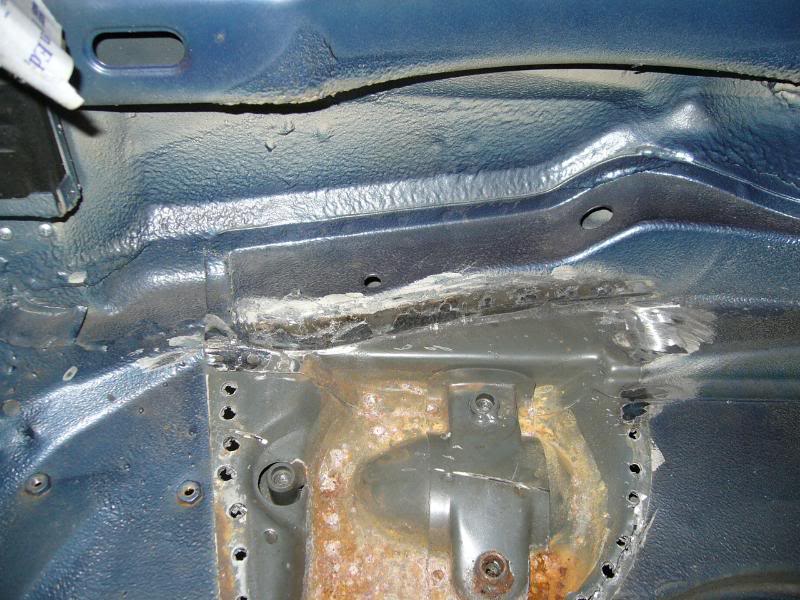
Many people will use a “spot weld drill” to drill out the weld on one side without drilling through the other sheet. I just used a grinder (carefully). After a greater amount of grinding than I expected, the removal of the piece is almost complete.
P1030298.jpg
Still a bit of old metal to go but the parent metal has been spared!
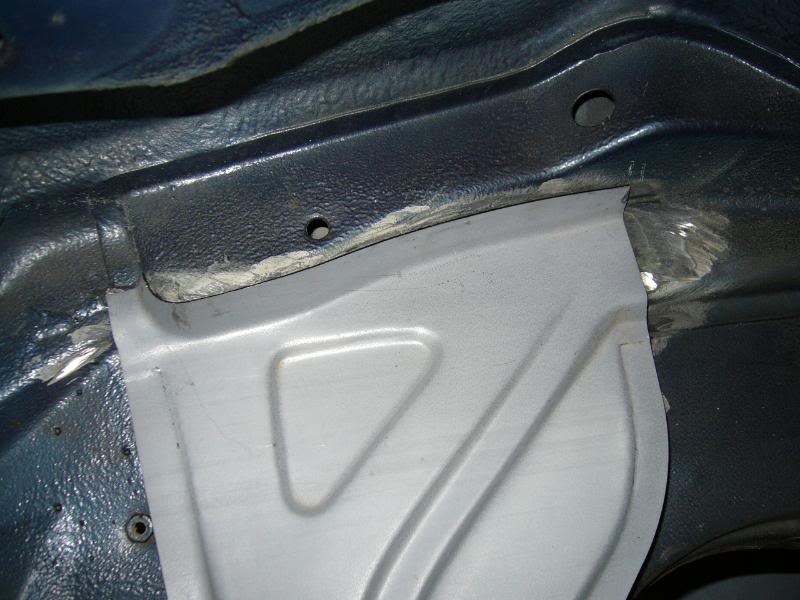
It looks like the contour of the new part will fit well – to be expected actually.
P1030300.jpg
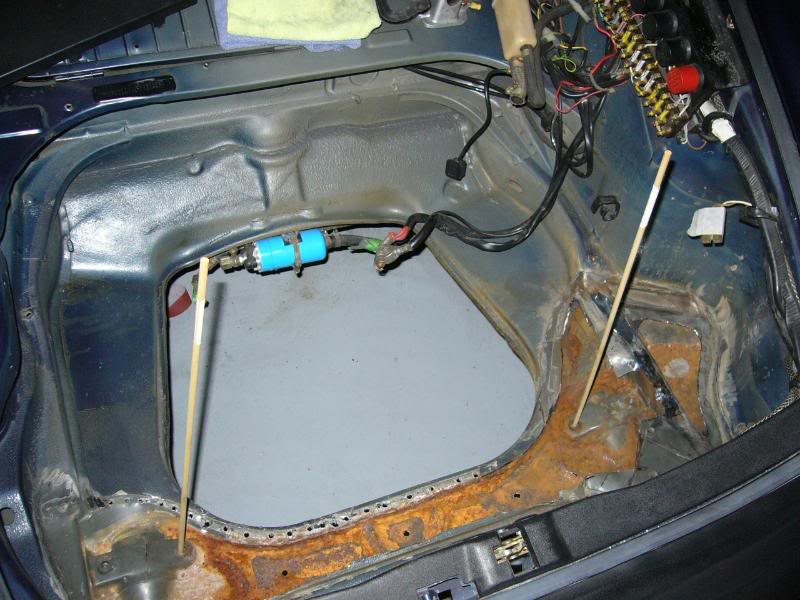
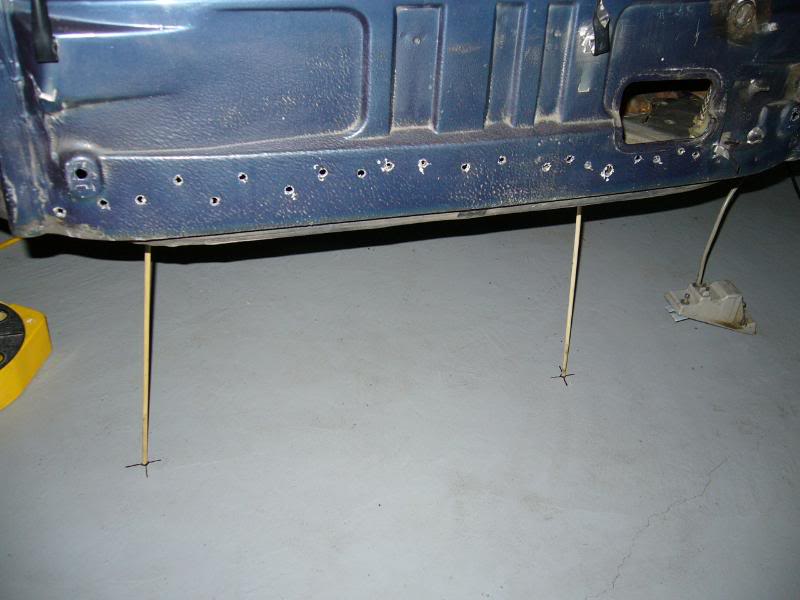
Before I cut out the pan itself, I am taking all sorts of measurements so that the fit of the lower control arms will be unhampered. One of the good ideas I am borrowing is using dowels as height indicators. I simply run them though the inside-most holes for the lower control arms (at the “natural angle” of the threaded boss), mark their location on the floor and then mark the height (on the underside of the threaded boss). As long as the car will remain undisturbed, this will provide accurate height reference. I also used similar dowels for horizontal positioning.
P1030301.jpg
P1030302.jpg
The way the sheet metal panels fit together, there is not going to be tons of room for adjustment, as the pan will “key” in between the longitudinals. But I expect there may be ability to “tweak” things a bit, so accurate measurements now should really help.
With my work schedule and the upcoming *%#$ CFA exam, it will be slow-going for a while, but I will try to keep plugging slowly.
However, I have all the bits and pieces disassembled on the front end and have started removing the old sheet metal.
This is what the “very slight looking” corrosion ended up looking like in between the suspension pan and fuel tank support:
P1030295.jpg
None of the metal is rusted through yet, but this is waaayyy beyond POR15 or similar “cover up”.
I think one of the keys to this job will be removal of the metal to be replaced without messing up the metal to be kept. I spent a surprising amount of time on the junction between the fuel tank support (being removed) and the longitudinal (being kept). First I just removed the PVC to get a clear picture of what’s what.
P1030297.jpg
Many people will use a “spot weld drill” to drill out the weld on one side without drilling through the other sheet. I just used a grinder (carefully). After a greater amount of grinding than I expected, the removal of the piece is almost complete.
P1030298.jpg
Still a bit of old metal to go but the parent metal has been spared!
It looks like the contour of the new part will fit well – to be expected actually.
P1030300.jpg
Before I cut out the pan itself, I am taking all sorts of measurements so that the fit of the lower control arms will be unhampered. One of the good ideas I am borrowing is using dowels as height indicators. I simply run them though the inside-most holes for the lower control arms (at the “natural angle” of the threaded boss), mark their location on the floor and then mark the height (on the underside of the threaded boss). As long as the car will remain undisturbed, this will provide accurate height reference. I also used similar dowels for horizontal positioning.
P1030301.jpg
P1030302.jpg
The way the sheet metal panels fit together, there is not going to be tons of room for adjustment, as the pan will “key” in between the longitudinals. But I expect there may be ability to “tweak” things a bit, so accurate measurements now should really help.
With my work schedule and the upcoming *%#$ CFA exam, it will be slow-going for a while, but I will try to keep plugging slowly.
Team Owner
Joined: Aug 2005
Posts: 28,396
Likes: 1,605
From: Cambridge Ontario Canada
that last shot is an excellent one and you can get a good idea of the project size. Did you have any idea the damage was that extensive until you peeled back the PCV and did some grinding ?
also are you going to replace oth the logtitudinal and the gas tank support ?
I guess you take the longtitudinal out first then the gas tank support ?
also are you going to replace oth the logtitudinal and the gas tank support ?
I guess you take the longtitudinal out first then the gas tank support ?
I haddah Google dat
Rennlist Member
Rennlist Member
Joined: Nov 2008
Posts: 11,501
Likes: 5
From: Fresno, CA
This is an interesting project! How badly is the pan rusted? I see surface rust, but are you going to go ahead and cut it out? The battery area looks like a complicated repair. I think most people will benefit from your pics on that area, as many cars have battery area corrosion.
Trending Topics
Thread Starter
RL Community Team
Rennlist Member
Rennlist Member
Joined: May 2004
Posts: 3,500
Likes: 324
From: Toronto
The pan is moderately bad in terms of actual rust. I probably could have sprayed the area with basitrol and been good for a long time. However, I am pretty fussy about things and what really distrurbed me was how easily I could depress the sheet metal with my finger in a few spots.
I have seen pictures of people that have had this much worse. But the amount of rust really did take me by surprise. I wish I had taken a picture of how it looked before I started removing PVC. It really did look minimal. At first I had intended to just fix things up with some sanding, primer, PVC and paint. Once I started investigating, I began to see more clues. Cut some access holes for a good view and then just thought "screw it - it's gotta get replaced".
I will be replacing all the affected sheet metal. I used to tig weld nice bicycle frames as a hobby so this kind of work feels manageable to me. I will use a MIG however (easier for out-of-position welding etc.)
Last edited by 500; Oct 20, 2009 at 10:52 AM.
I haddah Google dat
Rennlist Member
Rennlist Member
Joined: Nov 2008
Posts: 11,501
Likes: 5
From: Fresno, CA
I've subscribed to this thread.
Threads like these are great for future DIYers, and your pics are awesome. Maybe you could expand on some things as a research aid, for example:
Are you going to use mild steel wire? Stainless? Do you need to do anything special to remove the zinc coating prior to welding? Is there a concern about fumes? What rust prevention if any will you do between the sheet metal layers, and prior to primer and paint?
Thread Starter
RL Community Team
Rennlist Member
Rennlist Member
Joined: May 2004
Posts: 3,500
Likes: 324
From: Toronto
That is what I hope to do with thread, if I can add a bit of data to help others that would be good. I intend to get specific about the points you suggest. I am still thinking it through though, but as my plan comes together, I will try and detail it all here. It will just take a while because I work SLOW!!
Thanks for the positive feedback
EDIT:
Ice, in regards to your question above: The first part I'm taking out is what I call the gas tank support which is the sheet metal pressing that spans across the front of the luggage compartment just in front of the gas tank (and sits on top of what I term the suspension pan, the larger sheet metal pressing to which the lower control arms bolt). I am fortunate in that all the damage is confined to these two areas and the longitudinals (the parts running up either side of the compartment) are in good shape. Sometimes they are damaged and need to be repaired. Aside from the replacement pieces, the only repair I will have to do is the area under the driver's side longitudinal (where I cut the outer-most section of the battery tray away). Fortunately, the depth of the rust is very shallow here (less acid seemed to leak into this side). however, just to be sure, I will grind away this surface rust and weld in a reinforcing panel before I close that area up. I will show that and what I end up doing vis-a-vis seam seal, priming, rust preventative steps etc. I have a bunch of options swimming in my head at this stage though.
Last edited by 500; Jun 9, 2009 at 10:04 AM.
Thread Starter
RL Community Team
Rennlist Member
Rennlist Member
Joined: May 2004
Posts: 3,500
Likes: 324
From: Toronto
I have spent the last two weeks “on vacation” in a last-ditch study session for the level III CFA exam. The exam was on Saturday, and I am very fatigued now.
Even though I was studying every day, I managed on about half the days to spend an hour working on the car. It is a surprising amount of work to get the pan out, especially since I was trying not to gouge or otherwise damage the metal that is to remain behind.
Some people seem to have removed the old pan as one, relatively intact piece. I found it easier to cut it up as I worked on it. Although I drilled through the spot welds with first a �” bit, then a 5/16” bit, I still found that some of the areas needed follow-up grinding around the hole to completely removed the welded area.
Not really too much to this part of the job. Breathing protection is a must and I also used ear plugs after I discovered my ear “ringing” after a grinding session.
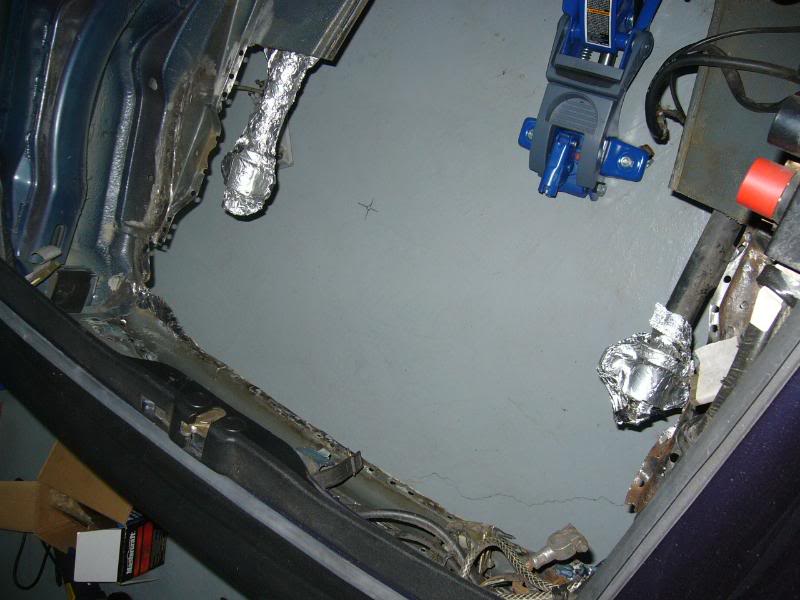
Eventually, I got to this point:
P1030327.jpg
The old pan is out, but I still have to clean all the metal etc.
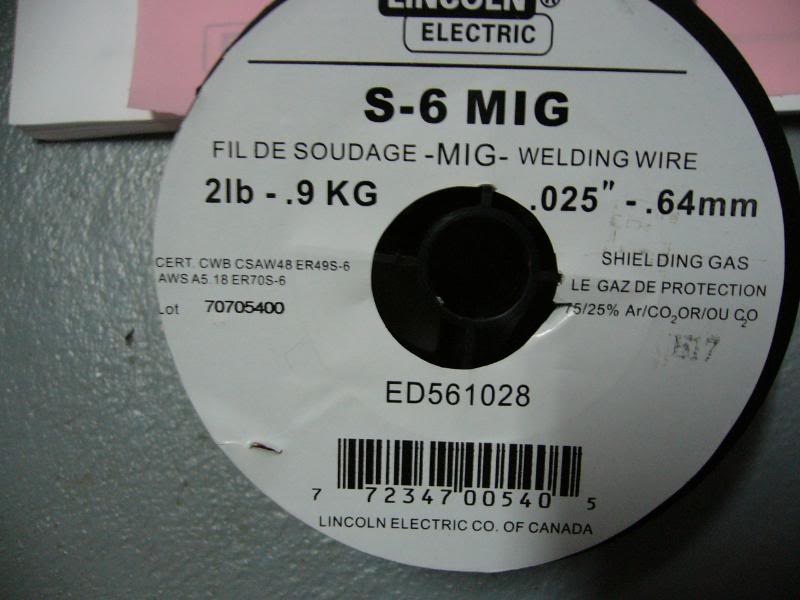
In the meantime, the welding machine I will be using arrived. It is an old Lincoln SP125 I picked off of Fleabay for a good price. After some reading, I decided to use 0.023/0.025” diameter weld wire. I purchased new contact tips, gas diffuser and nozzles to refresh the welding machine (which admittedly looked pretty tired).
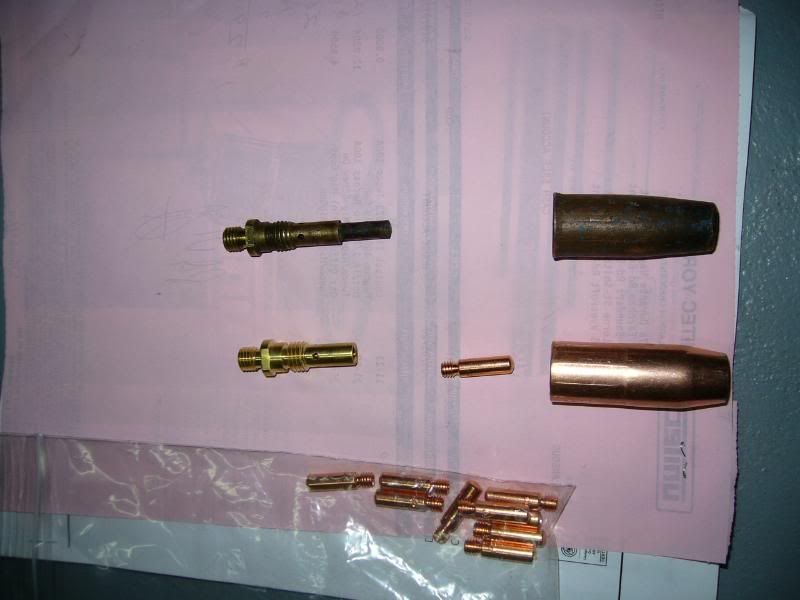
P1030305.jpg
I have a lot of experience with TIG, but none with MIG, but MIG is a much easier process. Other than the aforementioned new parts, I just needed a cylinder of appropriate shielding gas (a 75-24 mix of argon and carbon dioxide).
After setting up the wire drive, I proceeded to try a sample weld. No gas flow! Arrgghh, I thought, why did I buy used? Well, it turns out some sort of insects had built a nest inside the machine, and although I had already cleaned it out, it turns out that some of these bugs had made it into the gas solenoid! I cleaned out the offending material and bolted it all together and then it worked like a charm. One feature of this machine that I like is that the current and wire feed speed are both continuously adjustable over their range (as opposed to discrete switch positions). The machine welds nice and easy and I think it should be no problem to do the welds for this project. More info on that later.
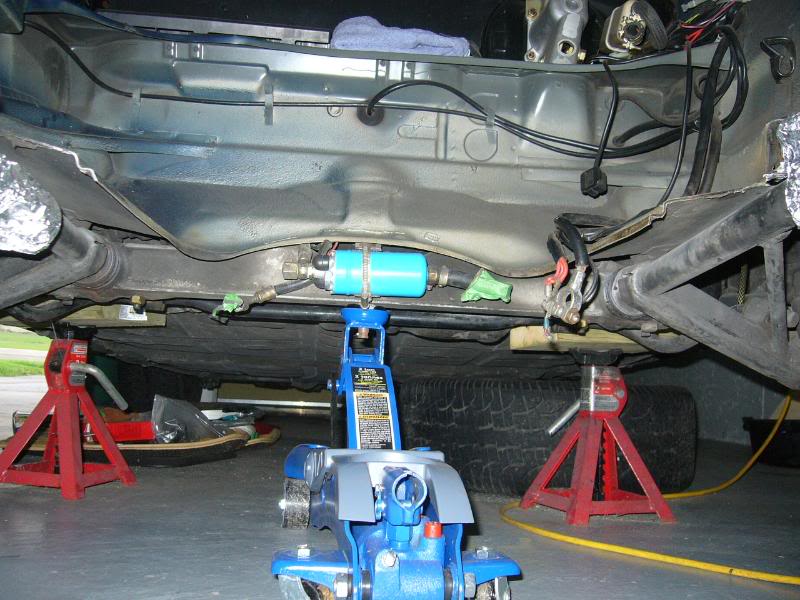
Once I had the old pan out, I was keen to set the new piece in place. I found that I needed a bit of room above the lower control arms to get the pan into place. I temporarily supported the aluminum cross-member with a jack and then loosened (but did not remove) the bolts that hold it to the car, as well as the steering rack mounting bolts. So, it is not necessary to remove any of the front suspension outside of the forward LCA mounts to do this job. I plan to remove the entire front suspension over the winter and replace the bushings, tie rods, ball joints, powder coat everything etc, but did not want to get into that at this time.
P1030328.jpg
I found it took a fair bit of patient fitting, tweaking and re-fitting to get the pan to sit in so there was no real force required to keep it in its proper location. What I am trying to say here is that the first time I fit the pan, it basically fit in, but I needed to “force” it in various locations to keep it in place. Usually it was due to a little area of bent metal on the car, or a burr or such that needed to be addressed to allow the pan to fit a bit better. I found that this adjustment phase really improved the fit of the pan. I did not cut the pan to fit until I had gotten as far as I could with this stage.
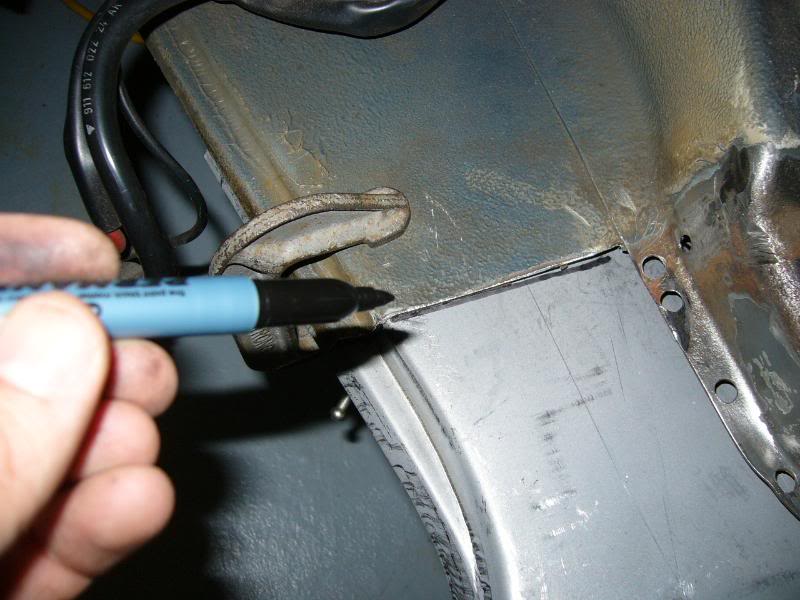
Finally I was ready to cut. Easy job of marking it off and cutting it with a cut-off wheel – just needed to be careful lining up the cut.
P1030334.jpg
P1030335.jpg
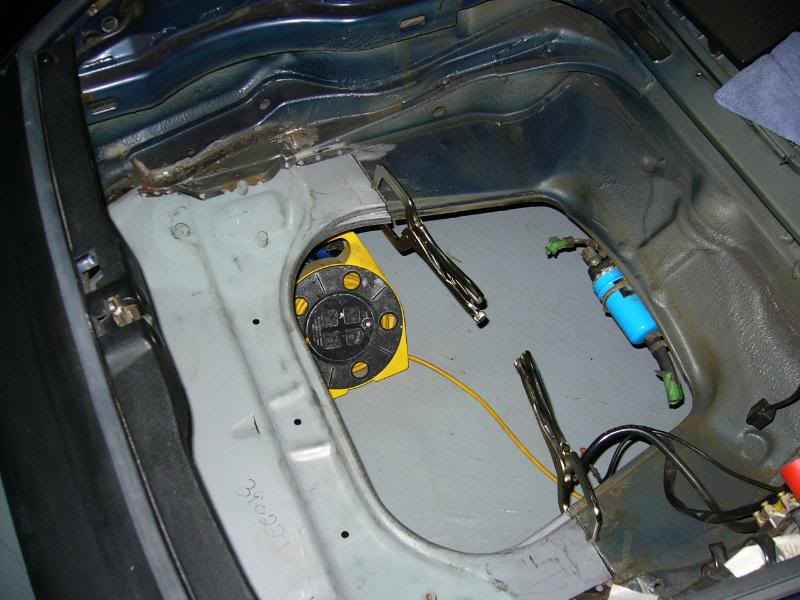
Now the pan sits in nicely and will soon be ready for welding. First I must super-clean the metal and then do a final tweaking of the flanges.
P1030341.jpg
Even though I was studying every day, I managed on about half the days to spend an hour working on the car. It is a surprising amount of work to get the pan out, especially since I was trying not to gouge or otherwise damage the metal that is to remain behind.
Some people seem to have removed the old pan as one, relatively intact piece. I found it easier to cut it up as I worked on it. Although I drilled through the spot welds with first a �” bit, then a 5/16” bit, I still found that some of the areas needed follow-up grinding around the hole to completely removed the welded area.
Not really too much to this part of the job. Breathing protection is a must and I also used ear plugs after I discovered my ear “ringing” after a grinding session.
Eventually, I got to this point:
P1030327.jpg
The old pan is out, but I still have to clean all the metal etc.
In the meantime, the welding machine I will be using arrived. It is an old Lincoln SP125 I picked off of Fleabay for a good price. After some reading, I decided to use 0.023/0.025” diameter weld wire. I purchased new contact tips, gas diffuser and nozzles to refresh the welding machine (which admittedly looked pretty tired).
P1030305.jpg
I have a lot of experience with TIG, but none with MIG, but MIG is a much easier process. Other than the aforementioned new parts, I just needed a cylinder of appropriate shielding gas (a 75-24 mix of argon and carbon dioxide).
After setting up the wire drive, I proceeded to try a sample weld. No gas flow! Arrgghh, I thought, why did I buy used? Well, it turns out some sort of insects had built a nest inside the machine, and although I had already cleaned it out, it turns out that some of these bugs had made it into the gas solenoid! I cleaned out the offending material and bolted it all together and then it worked like a charm. One feature of this machine that I like is that the current and wire feed speed are both continuously adjustable over their range (as opposed to discrete switch positions). The machine welds nice and easy and I think it should be no problem to do the welds for this project. More info on that later.
Once I had the old pan out, I was keen to set the new piece in place. I found that I needed a bit of room above the lower control arms to get the pan into place. I temporarily supported the aluminum cross-member with a jack and then loosened (but did not remove) the bolts that hold it to the car, as well as the steering rack mounting bolts. So, it is not necessary to remove any of the front suspension outside of the forward LCA mounts to do this job. I plan to remove the entire front suspension over the winter and replace the bushings, tie rods, ball joints, powder coat everything etc, but did not want to get into that at this time.
P1030328.jpg
I found it took a fair bit of patient fitting, tweaking and re-fitting to get the pan to sit in so there was no real force required to keep it in its proper location. What I am trying to say here is that the first time I fit the pan, it basically fit in, but I needed to “force” it in various locations to keep it in place. Usually it was due to a little area of bent metal on the car, or a burr or such that needed to be addressed to allow the pan to fit a bit better. I found that this adjustment phase really improved the fit of the pan. I did not cut the pan to fit until I had gotten as far as I could with this stage.
Finally I was ready to cut. Easy job of marking it off and cutting it with a cut-off wheel – just needed to be careful lining up the cut.
P1030334.jpg
P1030335.jpg
Now the pan sits in nicely and will soon be ready for welding. First I must super-clean the metal and then do a final tweaking of the flanges.
P1030341.jpg
Last edited by 500; Dec 22, 2010 at 07:57 PM. Reason: three = two...
I haddah Google dat
Rennlist Member
Rennlist Member
Joined: Nov 2008
Posts: 11,501
Likes: 5
From: Fresno, CA
I just read through your update! I probably have to read it again, but one question that pops into my head is whether you could bolt the A-arms at the rear to use them to help align the pan? I think the bolt holes are elongated fore/aft, but not left to right.
Thread Starter
RL Community Team
Rennlist Member
Rennlist Member
Joined: May 2004
Posts: 3,500
Likes: 324
From: Toronto
Actually yeah, that is another reason I did not want to remove the front suspension. Once I had the pan dialed in, one of the final checks (before cutting it) was whether the lower control arms would bolt up nicely.
In my case the LCA arms have what I believe are Weltmeister poly graphite bushings (something I am keen to change) and as such, the amount of "play" in a car with standard bushings might be different. However, even with these bushings, there was noticeable side-to-side play, so I would not rely on them as an alignment aid, but it was nice to see it all bolt properly into place, after confirming all my measurements (the indicatior sticks etc) were right.
As far as side-to-side adjustment goes, assuming the longintudinal structure that the sides of the pan weld to are not damaged, there is pretty much zero play side to side once the pan fits in. There are enough curves and undulations in the pan that it really does key into place. I have not had to actually line everything up. Once I had everything fitting smoothly, there was no real play and all the measurements were right (not that I could have done much).
now if a car has had more extensive damage and you are replacing the bottom sides where the pan welds to as well, then I expect there would be more opportunities for error.