

Lighted Door Sill Insignia Write-up
 08-14-2005 | 11:48 AM
#1
Thread Starter
Supercharged
Rennlist Member
Rennlist Member
Joined: May 2002
Posts: 18,925
Likes: 63
From: Back in Michigan - Full time!
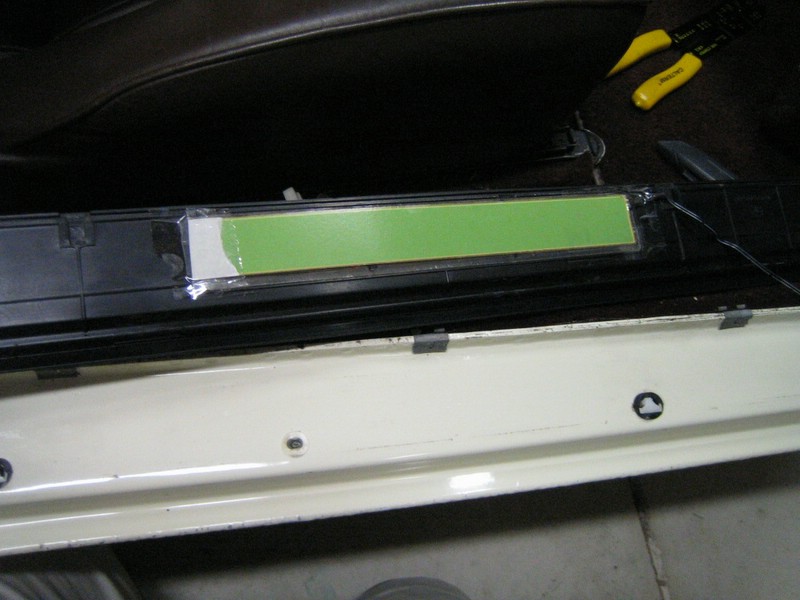
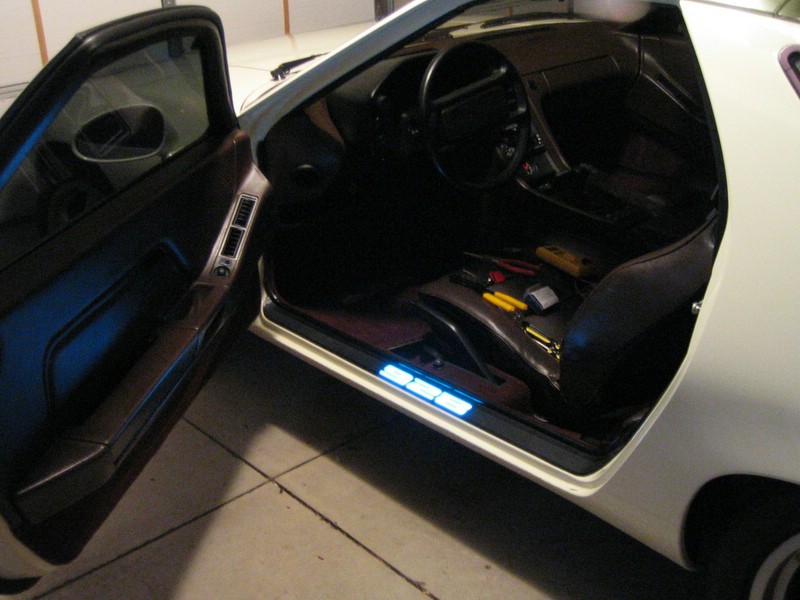
Okay. Here's my writeup for installing the lighting system for illuminating the door sills. The EL (ElectroLuminescent) Strips are availalbe from a vendor on EBAY called Lumi-Line. You'll need two strips that covers 1.5" X 10".
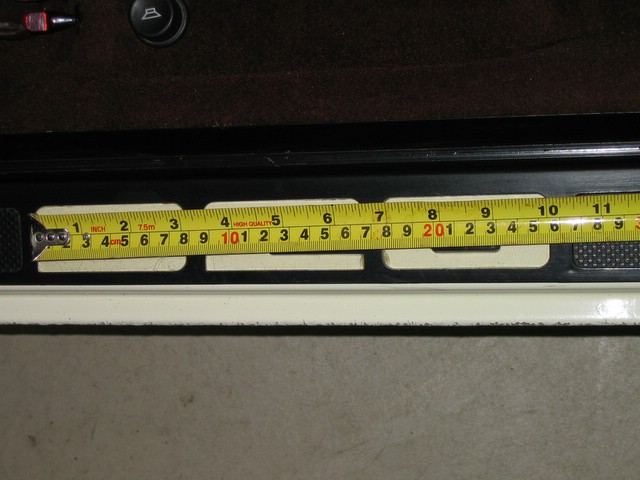
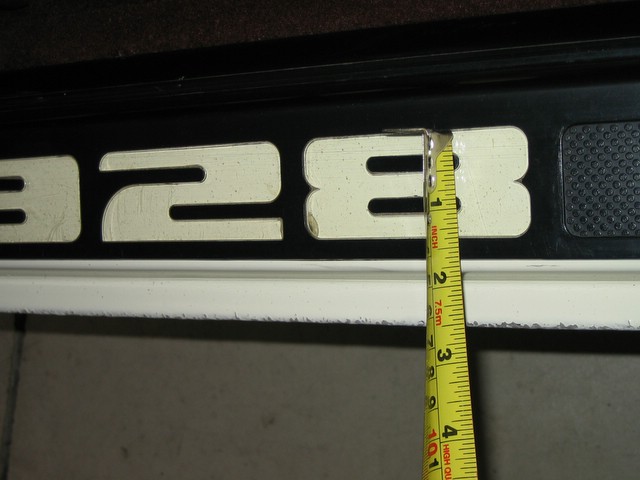
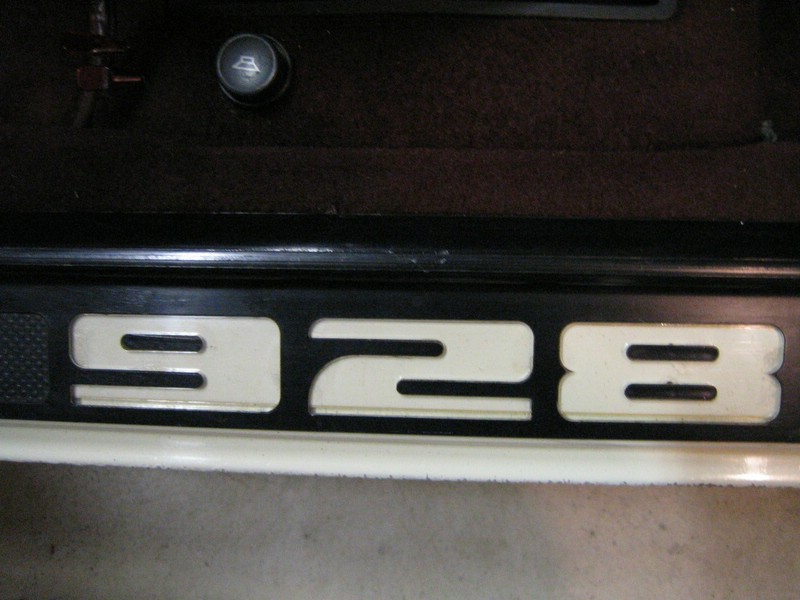
I ordered the 1.5" x 16" strips. These should have completely covered the "928" insignia, but he sent me the 1.25" strips which almost cover it, but it doesn't quite make it. Don't know if the 1.5" was a typo or if he made a mistake. The results are still acceptable, but you may want to verify that he can supply the 1.5" strips. Ok so on the the prep - Removing the Sill
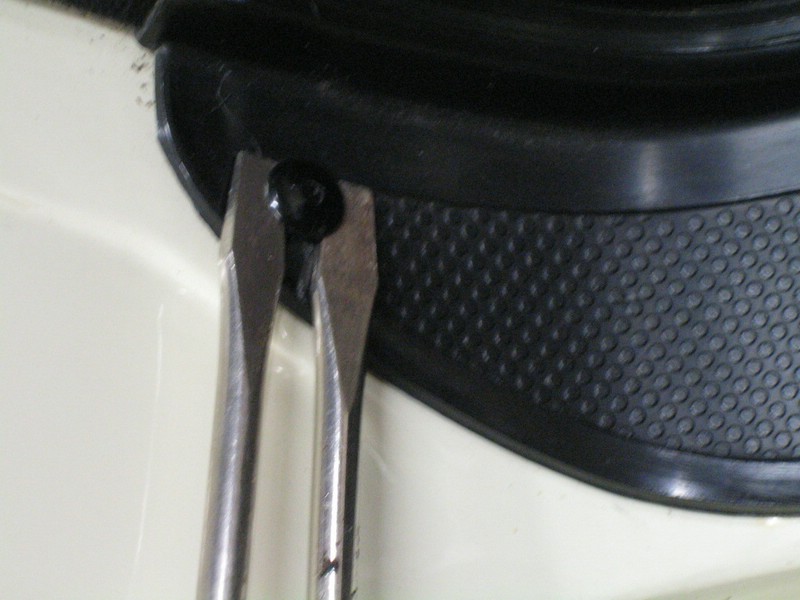
First thing to do is to remove the "rivet" at the back of the sill plate. I used a couple of screw drivers to gently pry it out. If you're careful you'll be able to reuse it. If you're not, you won't.
After you get this out, then there is a plastic plug between the 9 and the 2 the you have to pop out of it's hole.
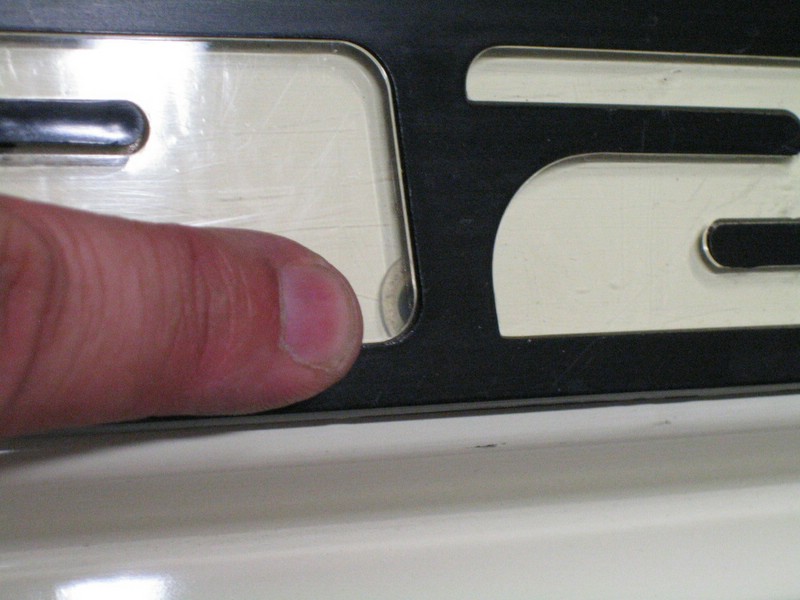
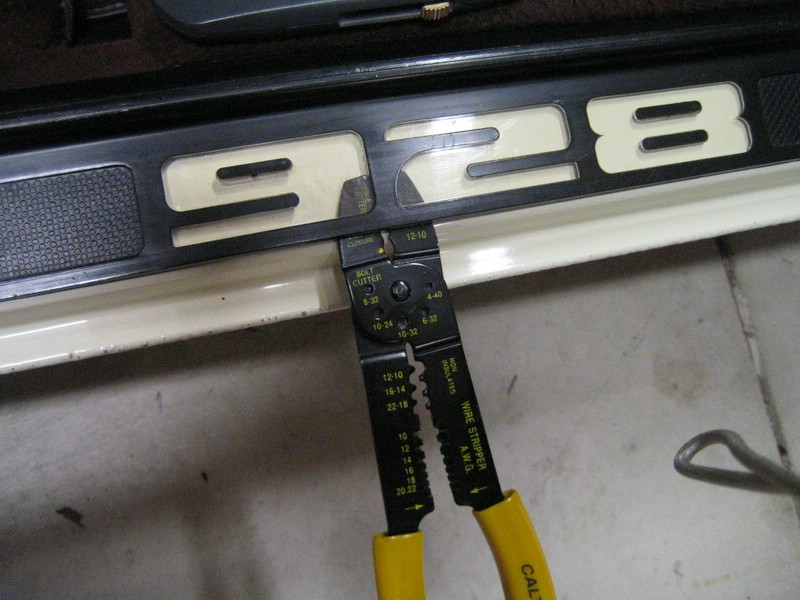
I found my wire strippers worked perfectly to gently pop this out. You will need to trim off the plug between the 9 and the 2 after the sill is totally free.
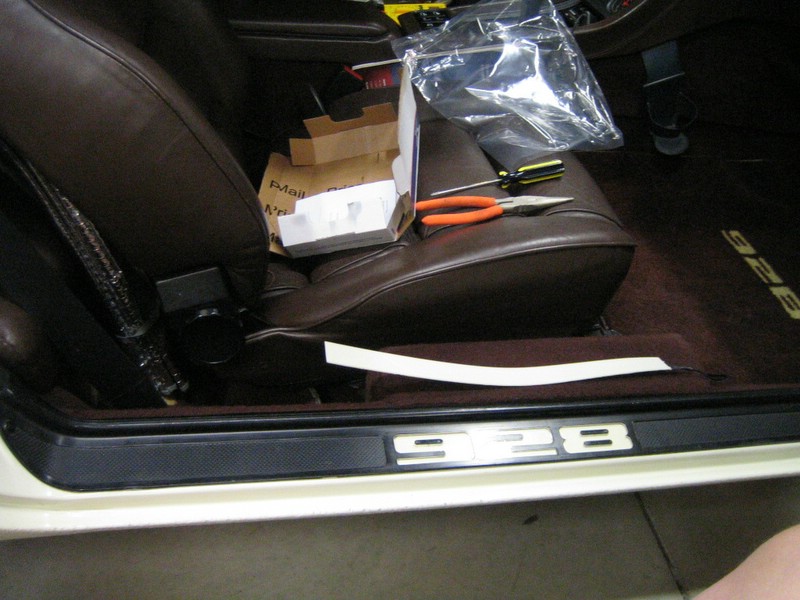
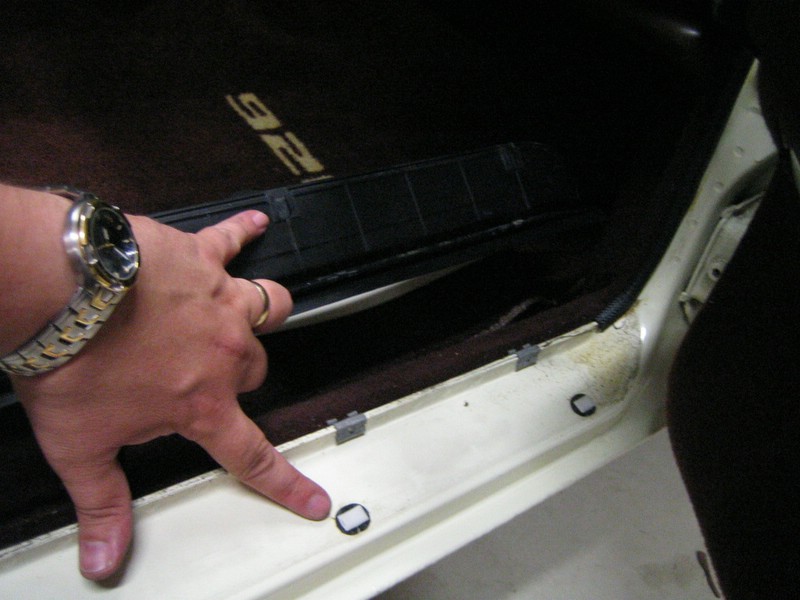
After to have these loosened, the you can lift up the lip of the sill. Don't lift too high, as there are little tabs that will break. After you get the lip up, slide the sill toward the interior of the car to disengage the tabs . I saved all me diver-side tabs, but lost a couple on the passenger side. At this point the sill should be free. Here's a picture of what I'm talking about.
Thanks Paul!
I ordered the 1.5" x 16" strips. These should have completely covered the "928" insignia, but he sent me the 1.25" strips which almost cover it, but it doesn't quite make it. Don't know if the 1.5" was a typo or if he made a mistake. The results are still acceptable, but you may want to verify that he can supply the 1.5" strips. Ok so on the the prep - Removing the Sill
First thing to do is to remove the "rivet" at the back of the sill plate. I used a couple of screw drivers to gently pry it out. If you're careful you'll be able to reuse it. If you're not, you won't.
After you get this out, then there is a plastic plug between the 9 and the 2 the you have to pop out of it's hole.
I found my wire strippers worked perfectly to gently pop this out. You will need to trim off the plug between the 9 and the 2 after the sill is totally free.
After to have these loosened, the you can lift up the lip of the sill. Don't lift too high, as there are little tabs that will break. After you get the lip up, slide the sill toward the interior of the car to disengage the tabs . I saved all me diver-side tabs, but lost a couple on the passenger side. At this point the sill should be free. Here's a picture of what I'm talking about.
Originally Posted by Paul (Champagne)
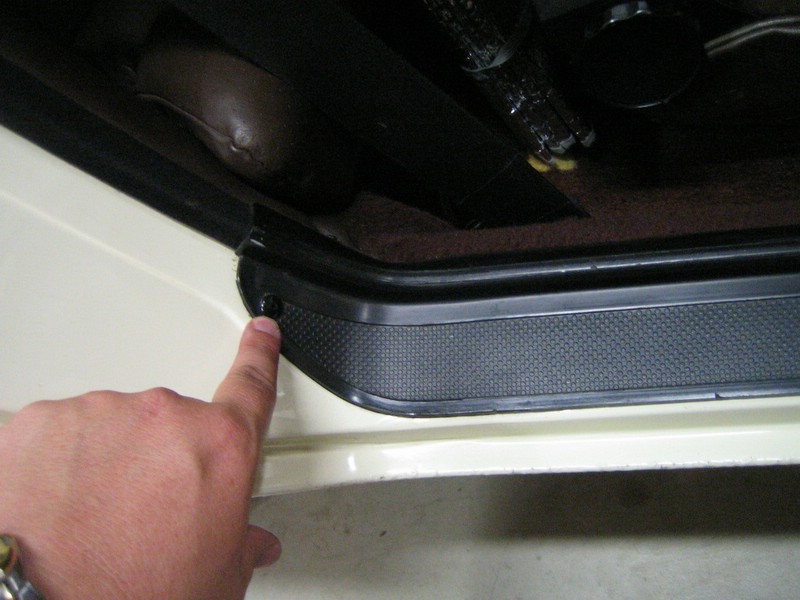
One note to add: the white buttons that are left on the car once you slide the sill towards the interior to remove it, can easily be removed from the car by turning them 90 degrees. They pull right out.
You can then slide the pins back on the sill piece, in their slots. Once the pins are back on the sill, the sill can be reinstalled by alinging the pins in their hole and pushing straight down. No sliding necessary. This makes the alignment of the light strip much easier.
You can then slide the pins back on the sill piece, in their slots. Once the pins are back on the sill, the sill can be reinstalled by alinging the pins in their hole and pushing straight down. No sliding necessary. This makes the alignment of the light strip much easier.
Last edited by AO; 08-22-2005 at 09:49 AM.
08-14-2005 | 11:53 AM
#2
Thread Starter
Supercharged
Rennlist Member
Rennlist Member
Joined: May 2002
Posts: 18,925
Likes: 63
From: Back in Michigan - Full time!
Next step is to trim the EL strip to the right length. Make sure you cut the end without the leads. I just eyeballed it and cut it with regular scissors. Then I used some clear packing tape to seal the end - I understand this is a pretty important step to keep moisture out. I don't know how long the tape will last, but I think it should work pretty good. I guess we'll see. Then the next step is to position it. Since my strip was a bit narrow, I needed to be very precise in the placement. I used a couple of pieces of packing tape on the ends to hold the EL strip in position (sticky side down). Now my picture shows the sticky part exposed, but I ended up putting the wax paper stuff back on because you have to slide the sill on, and the EL strip kept moving. So I put the wax paper back on with a little bit of it folded over in an "L" so I could pull it off after the sill was in place. But I'm getting ahead of myself.
Next step is to figure out the wiring. This is the passenger side, and I decided to make a
small cut in the carpet where no one could see it and slip the wiring into the amp cover.
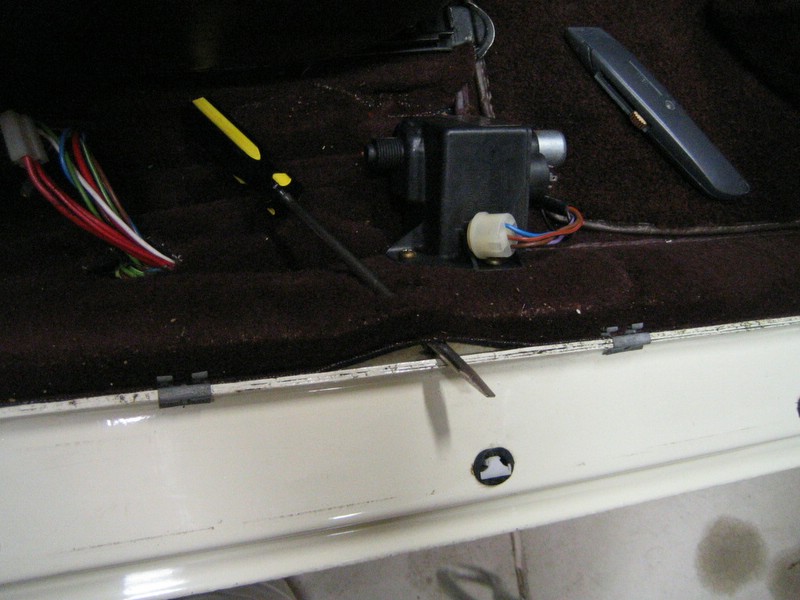
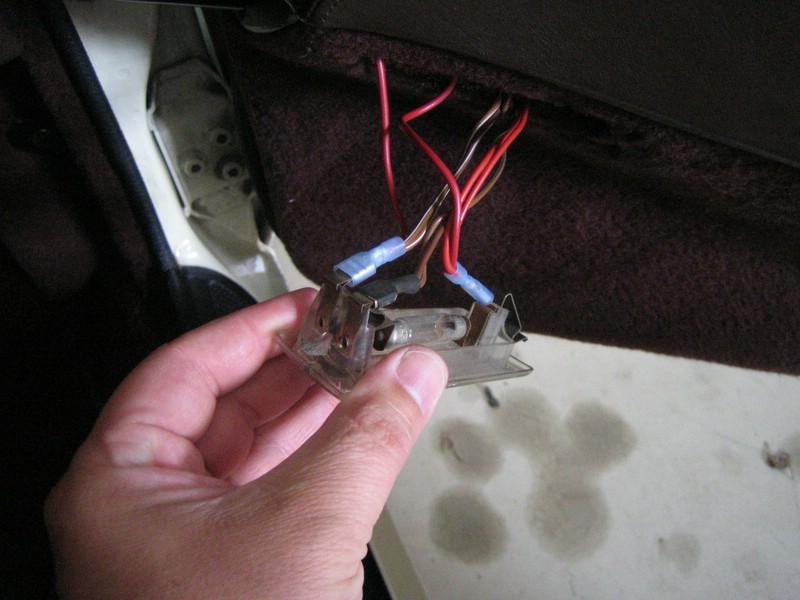
After you slip the wiring through this hole, re-install the sill plate. Now you get to start on the wiring. Since I don't have a good light source to tap into on the '82, I decided to use the door light. You'll need to snake 2 wires through the black plastic tubes that carry the wiring for the doors. I only had red wire, so you'll have to excuse me (I'm gonna go but some more black wire today). Anyway, Since you have the door sill all hooked up, you can temporaily touch the lead to the leads for the light and identify which ground lead is is activated by the door switch. Hook one end up to this ground lead and the other to the positive lead.
Then it's just a matter of routing the wired under the carpet and making the final connections. Repeat for the other side. I did the driver's side first and it took me 1 hour 30 minutes (with 3 beers ). Passenger side only took 45 minutes. I like the results.
OFF (Randy, I'm holding the button in with my free hand. )
)
ON

Next step is to figure out the wiring. This is the passenger side, and I decided to make a
small cut in the carpet where no one could see it and slip the wiring into the amp cover.
After you slip the wiring through this hole, re-install the sill plate. Now you get to start on the wiring. Since I don't have a good light source to tap into on the '82, I decided to use the door light. You'll need to snake 2 wires through the black plastic tubes that carry the wiring for the doors. I only had red wire, so you'll have to excuse me (I'm gonna go but some more black wire today). Anyway, Since you have the door sill all hooked up, you can temporaily touch the lead to the leads for the light and identify which ground lead is is activated by the door switch. Hook one end up to this ground lead and the other to the positive lead.
Then it's just a matter of routing the wired under the carpet and making the final connections. Repeat for the other side. I did the driver's side first and it took me 1 hour 30 minutes (with 3 beers
). Passenger side only took 45 minutes. I like the results.OFF (Randy, I'm holding the button in with my free hand.
) ON

Trending Topics
08-14-2005 | 02:54 PM
#9
Thread Starter
Supercharged
Rennlist Member
Rennlist Member
Joined: May 2002
Posts: 18,925
Likes: 63
From: Back in Michigan - Full time!
Here's the link to the guy's store. There may other vendors out there. No affiliation.
http://stores.ebay.com/id=179747937
http://stores.ebay.com/id=179747937
08-14-2005 | 03:16 PM
#11
Addict
Lifetime Rennlist
Member
Lifetime Rennlist
Member
Joined: Jun 2000
Posts: 40,449
Likes: 98
From: Insane Diego, California
Nice, Andrew! (perhaps I'm now forgiven for starting a new topic on this last week  )
)
Re. installing the EL strip - could some new double-sided tape just be used on the ends that don't show, and stick it directly onto the sill plate while it is removed (light side up), rather than having to position it perfectly onto the sill frame? That's the way I was planning to do it.
Alan's previous instructions indicated that he had to solder thin wire onto the contacts in order to have a low enough profile to fit under the sill when installed. Sounds like you were able to fit it under there without modifying the EL strip connectors?
Great write-up!
)Re. installing the EL strip - could some new double-sided tape just be used on the ends that don't show, and stick it directly onto the sill plate while it is removed (light side up), rather than having to position it perfectly onto the sill frame? That's the way I was planning to do it.
Alan's previous instructions indicated that he had to solder thin wire onto the contacts in order to have a low enough profile to fit under the sill when installed. Sounds like you were able to fit it under there without modifying the EL strip connectors?
Great write-up!
08-14-2005 | 03:36 PM
#12
Thread Starter
Supercharged
Rennlist Member
Rennlist Member
Joined: May 2002
Posts: 18,925
Likes: 63
From: Back in Michigan - Full time!
Originally Posted by Randy V
Nice, Andrew! (perhaps I'm now forgiven for starting a new topic on this last week )
Re. installing the EL strip - could some new double-sided tape just be used on the ends that don't show, and stick it directly onto the sill plate while it is removed (light side up), rather than having to position it perfectly onto the sill frame? That's the way I was planning to do it.
Alan's previous instructions indicated that he had to solder thin wire onto the contacts in order to have a low enough profile to fit under the sill when installed. Sounds like you were able to fit it under there without modifying the EL strip connectors?
Great write-up!
)Re. installing the EL strip - could some new double-sided tape just be used on the ends that don't show, and stick it directly onto the sill plate while it is removed (light side up), rather than having to position it perfectly onto the sill frame? That's the way I was planning to do it.
Alan's previous instructions indicated that he had to solder thin wire onto the contacts in order to have a low enough profile to fit under the sill when installed. Sounds like you were able to fit it under there without modifying the EL strip connectors?
Great write-up!
As for the connectors, I didn't do squat to them. I looked back at Alan's writeup, and the pics look the same. Maybe a difference between GTS/928 sill plates? Anyway, they're very thin and you shouldn't have an issue.
Good luck and let us know how they work out for you.
See you on the 27th
 08-14-2005 | 03:51 PM
#13
Addict
Lifetime Rennlist
Member
Lifetime Rennlist
Member
Joined: Jun 2000
Posts: 40,449
Likes: 98
From: Insane Diego, California
Originally Posted by Andrew Olson
I wouldn't do the double-sided tape because as soo as you tru to slide the sill on, it'll grab and reposition...
08-14-2005 | 03:59 PM
#14
Thread Starter
Supercharged
Rennlist Member
Rennlist Member
Joined: May 2002
Posts: 18,925
Likes: 63
From: Back in Michigan - Full time!
I guess i misunderstood you. The EL strip comes with an adhesive backing. I peeled back the paper on the EL strip a bit - enough so you can flip it over and have it stick out the edge of the sill. Then I taped the EL strip to the sill cover on the ends so it wouldn't move. Then I re-installed the sill. Then when everything looked good, I pulled the tab of the backing paper off of the EL strip. Then I pressed down to make surethe EL strip made good contact. DONE!
Hope this helps. Gotta run.
Cheers!
Hope this helps. Gotta run.
Cheers!
08-14-2005 | 04:03 PM
#15
Addict
Lifetime Rennlist
Member
Lifetime Rennlist
Member
Joined: Jun 2000
Posts: 40,449
Likes: 98
From: Insane Diego, California
Yeah, I understand. When I install mine I think I'll just stick it to the underside of the sill plate (with a couple pieces of new double-sided tape) and not worry about also sticking it to the door sill.
When you get back - tell me how you ran the wires from the carpet hole up to the door wire tunnel, and where did you set the small transformers.
Thanks.
When you get back - tell me how you ran the wires from the carpet hole up to the door wire tunnel, and where did you set the small transformers.
Thanks.