When you click on links to various merchants on this site and make a purchase, this can result in this site earning a commission. Affiliate programs and affiliations include, but are not limited to, the eBay Partner Network.
Hi Charlie:
Awesome DIY - thanks for sharing this!
I have an '04 4S, the image of yours which is still running the original IMS bearing @ 94k. I'd like to DIY the IMS Solution too. Where did you buy the kit? I checked the relevant site and it seems to be available only to professional installers?
Hi Charlie:
Awesome DIY - thanks for sharing this!
I have an '04 4S, the image of yours which is still running the original IMS bearing @ 94k. I'd like to DIY the IMS Solution too. Where did you buy the kit? I checked the relevant site and it seems to be available only to professional installers?
I'm not sure it is the original IMSB but for the time being that is my assumption. Once I pull it (maybe tomorrow or Saturday) I'll post pics and someone with more knowledge can verify.
I ordered it from ECS Tuning. They're based in Ohio so shipping didn't take long at all. I got the two special tool kits direct from LN engineering. LN also sells the solution kit - but at the time they were back ordered 4-6 weeks.
Not to disrespect ECS, but you can get it much cheaper from parts geek.
If the price will stay the same or Go down, I might do this project in the upcoming winter.
I'd like to DIY the IMS Solution too. Where did you buy the kit?
The units will be available with all other IMS Retrofit products in a few days at www.rndeuroparts.com
The products are technically supported by my company, The Knowledge Gruppe.
I don't think you'll find them anywhere else online any cheaper. RND Euro Parts was formed to be a DIY outlet for these, and other parts. I'm glad to exclusively offer their technical support, and all technical articles, along with future DIY videos, and more.
On the topic of tool kits:
More is needed than the IMS Solution driver tool. The cam locks, and other tools that are necessary are found in the tool kits that were mentioned earlier in this thread. Remember, none of these products were developed for DIY installs, and because of that the tool kits are offered in a manner thats more favorable to shops.
All of those reasons and gripes are the reason why we don't sell parts here at Flat 6. DIY efforts warrant an altered tool set, but I am out of that inner loop, so we'll have to see what happens.
Not to disrespect ECS, but you can get it much cheaper from parts geek. If the price will stay the same or Go down, I might do this project in the upcoming winter. http://www.partsgeek.com/catalog/200...pdate_kit.html
Thats a standard IMS Retrofit kit. Its more than 1,000.00 less than the IMS Solution.
Typically the cheapest place you can buy these components from, is also the place where no one associated with the company has done the job. Thats not the case with RND Euro Parts purchases. With The Knowledge Gruppe supplying all technical support, help is one email away.
Actually, at the bottom of the page at PG they have the IMS Solution listed for 1,328.73. That's quite a bit less than I paid, but its also listed as out of stock (makes me feel a bit better). It seems finding these in stock is the trick. I called some of the big distributers and while they may have them, they won't sell direct. ECS was the first place I came across to have them and I ordered immediately. Keep in mind, I literally had just bought my C4S and have stopped driving it until I addressed this (otherwise I'd over-run my 1,000 mile warranty). Minutes seem like hours at the moment.
That being said, I just ordered a ton of parts -
clutch kit (pressure plate, TO bearing, clutch disc and bolts) from SunCoast (shipped within an hour of ordering)
LUK dual mass flywheel, alignment tool, spline grease, pilot bearing, cam plug, rear main seal, oil drain plug washer, flywheel bolts, 5 quarts (3 for transaxle, 2 for front diff) of porsche manual transmission fluid (WOW that stuff is expensive) - from Pelican.
It looks like the porsche pilot bearing is out of stock at Pelican and it may delay my entire order until sometime in the first week of August :|
I had to stop myself, because the costs are really starting to add up and I've determined trying to replace everything I maybe could or should replace is turning into a fools errand. From the look of it, the previous owner had done a good job of keeping the car maintained and I suspect I am replacing parts that have already been replaced. Since I don't actually need daily reliable transportation, I'm putting a stop to this madness and going to replace the parts above and then put it back together and drive it for a bit before I go broke rebuilding the entire car piece by piece.
On the topic of tool kits:
More is needed than the IMS Solution driver tool. The cam locks, and other tools that are necessary are found in the tool kits that were mentioned earlier in this thread. Remember, none of these products were developed for DIY installs, and because of that the tool kits are offered in a manner thats more favorable to shops.
.
like i mentioned in my previous post.
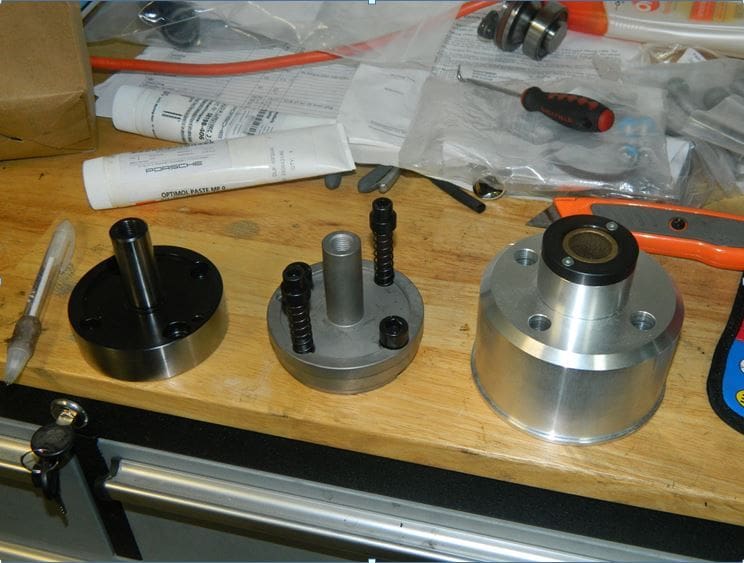
i understand the need for the pro tool kit, that includes cam locking tool, pulley lock pin, bearing extractor tool, bearing installation tool, and the other emergency "if the bearing brake" tool
if i have all that, the only thing i'm missing is the tool i marked in the picture, to install the cup on the shaft.
just out of curiosity, i'm wondering what are the other tools for.
i personally think that with the tools you designed and the simplicity of the solution itself (combined with excellent instructions), the installation is pretty easy.
i rather do 5 times IMSB installation then one rear wheel bearing replacement.
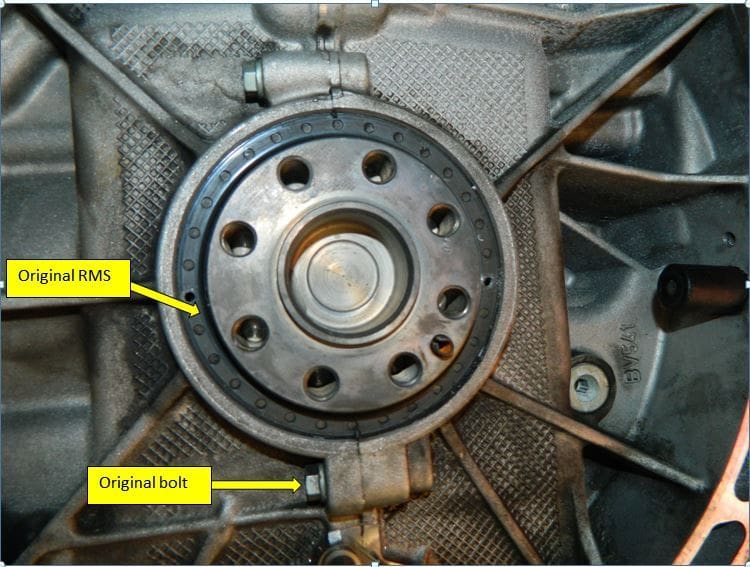
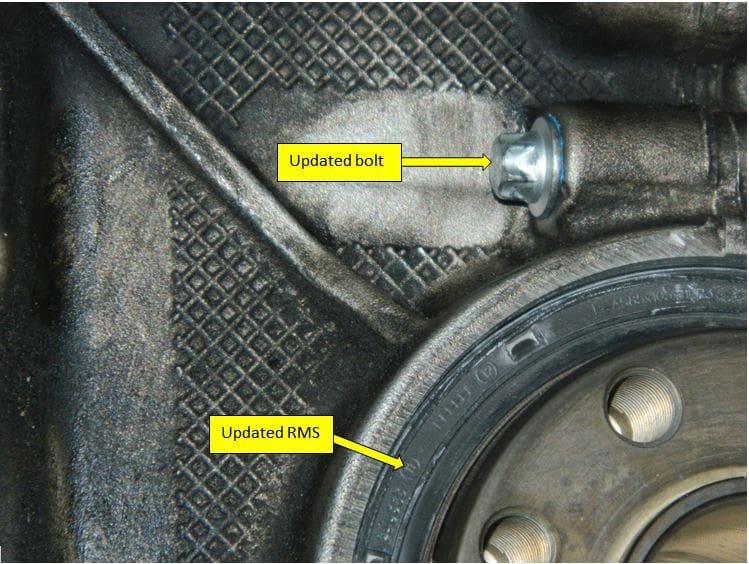
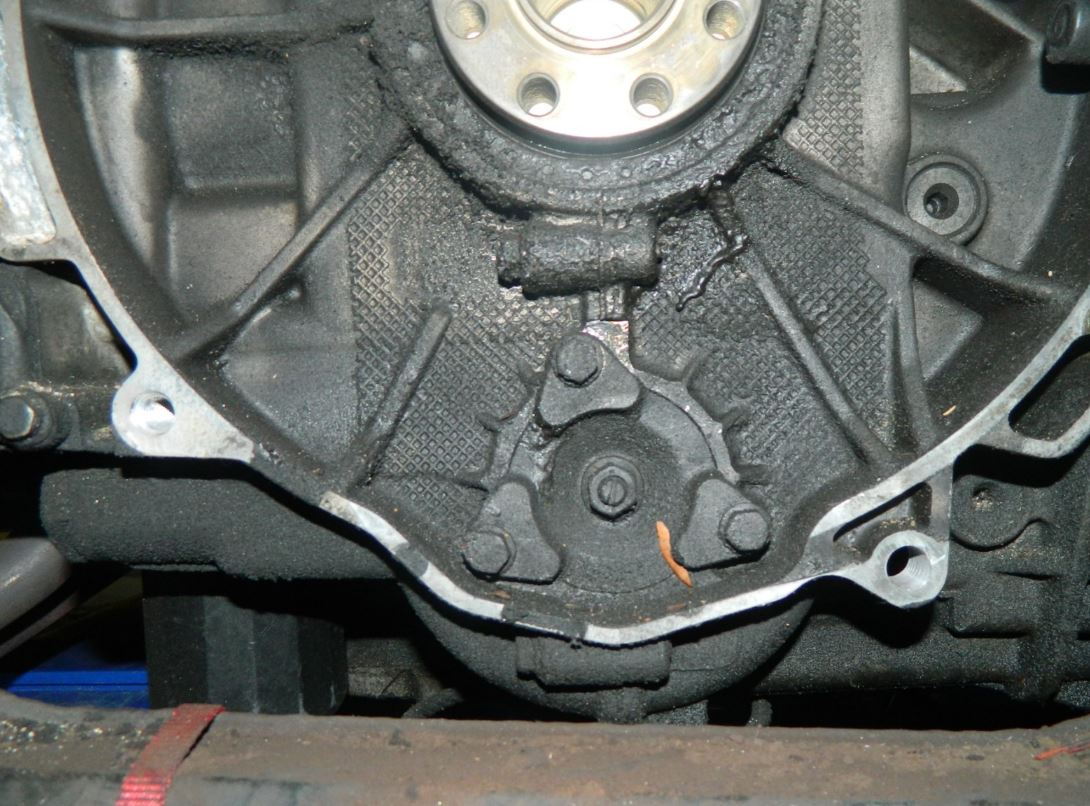
just thought to throw here some pics to show why in some cases the bolts must be replaced.
this is a pic taken of my 99 Boxster base with 165K miles.
that's how it looks when you leak fro the RMS, case bolts and IMSB cover.
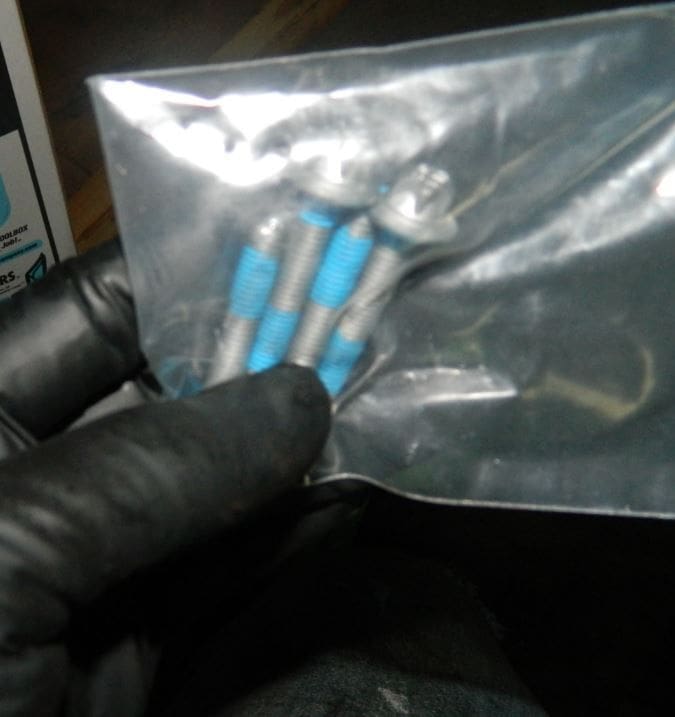
this is a pic of the encapsulated bolts.
in that case i also replaced the bolts and seal for the IMSB cover, and gave it a good clean before the new flywheel and clutch went in
Alright, I took a few days off because I still have to 'work' periodically. So, this is day 4 of focus on the project.
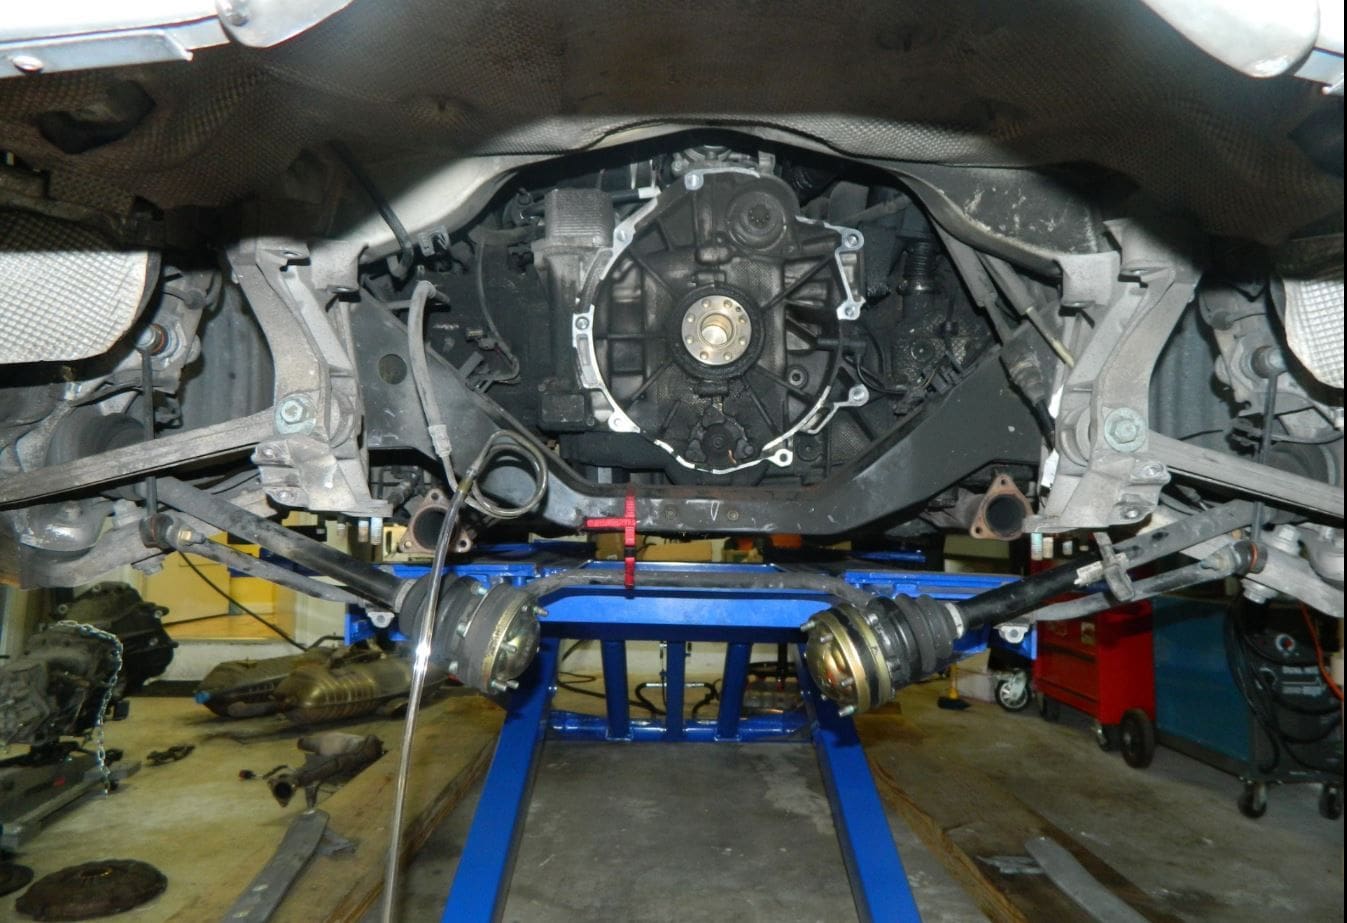
I started things off by cleaning around the IMSB cover and face of the engine case. My goal was to get as much of the dirt and grime away as possible to avoid getting anything inside the engine or on surfaces that seal when I pull the IMSB out. While doing this I made a point to avoid getting any acetone on the RMS - although I'm not sure that it would hurt anything.
I should also note that this was probably the hottest day of the year (saw the thermometer read 97 at one point). So, it made working under a car in a cramped space all the more enjoyable.
This is where I deviated from the IMS Solution instruction sequence slightly. Instead of pulling the cam plug and locking the cam in place, I opted to first mark and drill the hole for the oil feed line. My initial thinking was there was no sense in opening up part of the engine prior to making a mess with aluminum flakes everywhere - however the cam plug in question is at the rear of the car and nowhere near the work area so it doesn't really matter one way or another.
I used a center punch to mark the spot and used the recommended 1/8" drill bit for the first hole. Afterwards jumping to 3/8" seems like too much of an increase and I had trouble getting the bit to stay centered, so I used a few more bits between the sizes and everything went great. Working in this space wasn't as terrible as you'd imagine - it turns out that when sitting directly on the floor I could sit up more or less inside the transmission tunnel so I didn't have to stay propped up on an elbow in a weird position.
Once the hole was drilled I quickly realized there was no way to manipulate a saw to cut the slots in the space due to the large cross member and tight space. Instead, I used the center punch on the side of the block's (rim?) horizontally and then drilled straight through into the hole that I already made (see pic, it will make more sense). Once I had a slot to work with I began filing... and filing... and after what seemed like forever began to realize my file was dull. This marked the first interruption to go buy a tool/part (new set of files). Once all of the filing was done I used towels to clean off all of the aluminum dust and scraps and then followed that up with spraying compressed air to get it all off the block and out of the work area. After making the hole the recommended 20mm wide and testing the fit with the hose fitting I moved onto the next step.
Locking the cam. So, based on the directions you pull the lower cam cover/plug on the right head (when facing flywheel) which is at the back of the car. It is in a really tight space surrounded by exhaust and water pump hoses. What took about 15 seconds in the instruction video with the engine pulled, took several hours for me. But, I can save you a ton of time with what I learned.
First, the IMS pro toolkit includes the cam lock tool but does not include a bolt for it. My understanding is that each head is identical so I went to the front of the opposite head and there is a bolt on that side holding a ground wire. Great (but not really, continue reading)! I removed that bolt and began the tricky process of getting it started with the cam tool on it. This can be a trick because the space is too narrow to really get your hand into. My solution was to use a long flat head screwdriver and a ratcheting wrench (13mm). A trick for wrenches and sockets to hold bolts is to put a small piece of paper towel over the head of the bolt and then put the wrench on it, now it will hold in place and not fall out so easily. With paper towel in place, and cam lock tool on the bolt, I slowly raised it up through the tiny opening into the position - using the long screw driver to help maneuver and apply pressure from the back. Surprisingly I got it started after a few quick tries and was rather pleased with myself.
That's when things started going wrong - after threading it in a bit it became really hard to turn. Puzzled I started wondering if I'd cross-threaded the bolt or maybe the hole is in fact different than the one on the opposite head. I removed the bolt and verified the hole goes all the way through, so even though this bolt is much longer than it needed to be, it shouldn't be an issue. Repeated the process above and continued to have the same problem. After a few easy turns the bolt just got harder and harder to turn. At this point I'm really scratching my head and losing patience. I did a quick search and found a forum post where Jake states the bolt needed is a 8mm x 1.25mm. I wasted about an hour and a half trying to make this bolt work for the purpose and it would just not do it. Finally I gave up, rinsed off again and set out to Lowes to buy a bolt. Once I arrived I was able to confirm that the bolt I was using was in fact 8mm x 1.25mm. But, like I said, it was quite long so my thinking now is I will buy a shorter one and it won't be as much of a problem.
I bought a few lengths but I believe the one that ended up working for me was 14mm long. I am still not quite sure why I was having so much trouble but I suspect its 1 of 3 things: 1) I cross-threaded it due to the difficult spot it was in 2) the wrench was hitting something else and applying pressure to one side which made is less effective and difficult to turn or 3) there was gunk/grime in the hole and it was plugging up the threads.
Either way, the shorter bolt did the trick - although it was still hard to turn, I was able to get it tightened down and the cam lock firmly in place.
Long story short - save yourself hours of frustration and buy a few 8x1.25mm bolts in various lengths ahead of time rather than trying to scavenge one from another part of the car.
So, that was it for the day - not nearly as much progress as I wanted to make, but that's just how it goes sometimes. I think tomorrow I'll finally have the old IMSB out and possibly even the new one in.
I had exactly the same difficulty accessing that cam plug. This is no doubt one of the reasons most drop the engine to do this work. I will give you a tip that helped me. Wait until you are all done to reinstall that plug. Then support the engine and remove the air pump and the motor mount on that side so you can get a tool (punch or similar) through there to help pop the plug back in.
Day 5 turned out to be the least productive yet. I started things off by purchasing a 32mm socket in order to remove the cam chain tensioners but never got that far. The instructions say to mark each tensioner so that they don't get mixed up when re-installing. The first two were cake, both towards the bottom of the engine in plain site. The third, well this is where things get interesting. I am beginning to think dropping the entire engine/tranny may actually be less work in the long run vs. trying to do this with the engine in the car. Regardless, I'm committed at this point.
The third tensioner is under the AC compressor at the top rear right side (passenger) of the engine. The AC compressor on this vehicle is without a doubt the most difficult compressor I've ever removed and potentially the hardest single part I've removed. I seriously doubt that Porsche considered this to be removed while in the vehicle, it is as close to impossible as it could be without actually being impossible. After doing some googling I found someone that actually purchased a bore scope just to see there third bolt holding it on.
Important note - do not disconnect any of the hoses to the AC compressor! If you do this, you need to have your system evacuated and recharged. Just unbolt the compressor and get it out of the way as best you can while still hooked up.
So, here is a summary of how its done. It is hard, the skin on the top of my right hand is worn raw and I have a huge blister on the side of my thumb. I did not have a short 13mm 1/4" drive socket at the beginning of this and that made it quite a bit more difficult. Before starting get one, and 1/4" swivel connector and various length extensions. You'll have a much easier time.
The first step is to remove the ambient air temp. sensor. It is located on the intake manifold. It is held by a rubber grommet in a special slot between the intake runners. I first removed the sensor by carefully pulling it straight up, then removed the grommet by sliding it out towards the right side of the car. Remove the belt by putting a wrench on the belt tensioner and turning it clock-wise. Next, there are two fairly easy to access 13mm bolts at the front of the AC compressor. Once you have these loose (the lower one is difficult to fully remove until you have the compressor loose but the sooner you get it out of the way the better) you're ready for the nightmare bolt. It is in the center, at the back of the compressor, directly below the 90 degree metal elbow that the AC hose is hooked to. This means there isn't much space directly above the bolt, hence using a 1/4" short socket and swivel - this will fit. I used a 3/8" drive, which is thicker and it was just barely possible and much more difficult.
Eventually the bolt comes up far enough to where your socket/swivel hit the 90 degree elbow and I had to stop using the wrench and turn the bolt out by hand. When I say by hand, I mean the very edge of my thumb while contorted just to be able to touch the head of the bolt. Try shifting the AC compressor around to relieve tension against the bolt so you can actually turn it. Once the bolt is loose you can't actually take it out because it hits that 90 elbow, so you kind of have to hold it up out of the way while you work the compressor straight out towards you. Be very careful because there is a thin wire running from the front of the compressor back and into a wiring harness.
Once I had the compressor out, I discovered the remains of some kind of nest. Lots of little seeds and twigs on the cylinder head. I vacuumed all of that out with my Dyson. The third timing chain tensioner is now visible - it has a hex key hole and there is another bracket you must remove to access it.
In my other reading I discovered a very useful thread that illustrates the difference between TDC and 180 degrees off TDC. It turns out the slot in the end of the cam shaft is not centered, it is offset to one side. TDC has the slot more to the left (drivers side) of the car, while 180 off will have the slot more to the right of the vehicle. It is very, very, very hard to tell (I wasn't able to ) just by looking due to the strange angle and things in the way. The first time I was able to get the cam tool in the slot and tight but it just didn't seem right. After I found out about the offset, I loosed and pulled back the cam tool - then turned the crank 1 full rotation, re-locked, and tried the cam tool again. It fit noticeably better, so I re-tightened the bolt. I think for this particular job it probably would have been ok either way, but I'm glad I double checked and feel better that its seated correctly now.
So, that's it for the time being. I didn't get nearly as much done as I hoped, but thats just the nature of this type of project. The instructions with the IMS Solution include a great quote that says something to the effect of you can rush failure but you can't rush success. Just keep repeating that to yourself while you're trying to get that third AC compressor bolt out and it will help keep you sane.
SPECIAL EDIT NOTE: When re-installing the ambient air temperature sensor be VERY careful not to push the rubber grommet down without supporting it from below. I made this mistake when trying to re-insert the temp sensor and the grommet fell down on top of the head. I wasn't even about to remove the AC compressor again to get it so I ordered a new one. I tried shooting compressed air in there hoping it would fly out, no luck. Later that week I remembered I have a little flexible grabber tool so I did some blind probing and by some miracle got it on like the third try! When the sensor is in the grommet, it makes the entire thing too wide/ridgid to fit back in its slot. The best way to get it re-installed is to install the grommet, put a bit of grease on the sensor (remove the plug/wire from the sensor so you can push on the top) then carefully push the sensor down into the grommet while supporting the grommet so it doesn't fall. Also be absolutely careful you don't drop the sensor!
More to come tomorrow.
Cheers
Charlie
Last edited by charlieaf92; 08-19-2016 at 01:06 AM.
 07-21-2016, 08:26 PM