When you click on links to various merchants on this site and make a purchase, this can result in this site earning a commission. Affiliate programs and affiliations include, but are not limited to, the eBay Partner Network.
Some super great ideas. I get my enclosed in two weeks. What height from the floor do u guys put the tracks, since I want a tire rack over the hood. Thanks in advance
For future reference, measure each axle weight while everything is new and empty of miscellaneous. And looking at the picture the truck looks nice and level connected to the empty trailer, so measure that ride height for future reference while the suspension is new. Hopefully when loaded you don't get into one of those "nose bleed" stances.
On the new trailers, check wheel torques frequently AND keep an eye on functioning rear brake lights/turn signals/etc. (I am not sure if you have ever been to a trailer manufacturing facility or not...)
And unlike popular belief, WDH cannot defy laws of physics and make magic happen, so be careful on your first loaded trip.
Thank you for the advice, I will definitely find a chance to measure the exact weight of the trailer. I understand that WDH is just a support device and will definitely be safe with it.
Originally Posted by jerome951
Very nice setup. I'm planning on ordering a new F150 this week. If you ordered yours from the factory, what was the lead time??
I don�t see any possibility for custom ordered truck showing in dealership within 4 months�
Originally Posted by fnel1771
Some super great ideas. I get my enclosed in two weeks. What height from the floor do u guys put the tracks, since I want a tire rack over the hood. Thanks in advance
Very nice setup. I'm planning on ordering a new F150 this week. If you ordered yours from the factory, what was the lead time??
Whatever you do, definitely get the power boost... Having the ability to power AC off your tow rig that is quiet and easy to refuel seems like the dream...
Whatever you do, definitely get the power boost... Having the ability to power AC off your tow rig that is quiet and easy to refuel seems like the dream...
Wasn't planning on the Powerboost option. My trailer won't have AC so no real need for all that juice, but agreed, it's a really nice feature.
Plus, I've been driving a plug-in hybrid Ford product for 5 years. Somewhat buggy system so I'm skeptical of the PowerBoost's reliability.
Dealer indicated ~20 weeks for delivery, but said could be shorter.
Thank you, how often should the trans fluid be changed?
Look in the owners manual for severe duty cycle. If your truck didn't come with a tow package you might consider adding a transmission cooler. The truck forums will have lots of feedback for towing duty for your particular model / year. Enclosed trailers have lots of drag not just weight so they can put quite a load on the truck.
This thread has been great for ideas as my offseason project is to upgrade my barebones featherlite 20 foot enclosed trailer. One of the things I’d like to do is improve the floor surface because I have the plywood floor. I painted it last year and it looked great until I loaded the car in there a few times. I was thinking of doing a thin rubber covering that I could cut into place and tap down. I know there are a lot of garage floor rubber tile options that piece together but they all seem to be too thick. I’d love to hear of any ideas on this. Thanks.
This thread has been great for ideas as my offseason project is to upgrade my barebones featherlite 20 foot enclosed trailer. One of the things I�d like to do is improve the floor surface ....
I don't have a good floor suggestion type, but rather a warning that hot race tires will love to pull up against any flooring you install. If you try and install flooring that relies on adhesion, be sure to spend the effort on good surface prep. Especially since its already been painted once. Good luck.
This thread has been great for ideas as my offseason project is to upgrade my barebones featherlite 20 foot enclosed trailer. One of the things I�d like to do is improve the floor surface because I have the plywood floor. I painted it last year and it looked great until I loaded the car in there a few times. I was thinking of doing a thin rubber covering that I could cut into place and tap down. I know there are a lot of garage floor rubber tile options that piece together but they all seem to be too thick. I�d love to hear of any ideas on this. Thanks.
Aluminum Diamond Plate rectangles for the parking contact areas of the tires. Do not need to be huge, but do need to be screwed down. I have seen hot tires pull paint and plywood splinters when unloading a car. Driver got taged for having a corded tire, but was just plywood. Looked a lot like corded.
For future reference, measure each axle weight while everything is new and empty of miscellaneous. And looking at the picture the truck looks nice and level connected to the empty trailer, so measure that ride height for future reference while the suspension is new. Hopefully when loaded you don't get into one of those "nose bleed" stances.
On the new trailers, check wheel torques frequently AND keep an eye on functioning rear brake lights/turn signals/etc. (I am not sure if you have ever been to a trailer manufacturing facility or not...)
And unlike popular belief, WDH cannot defy laws of physics and make magic happen, so be careful on your first loaded trip.
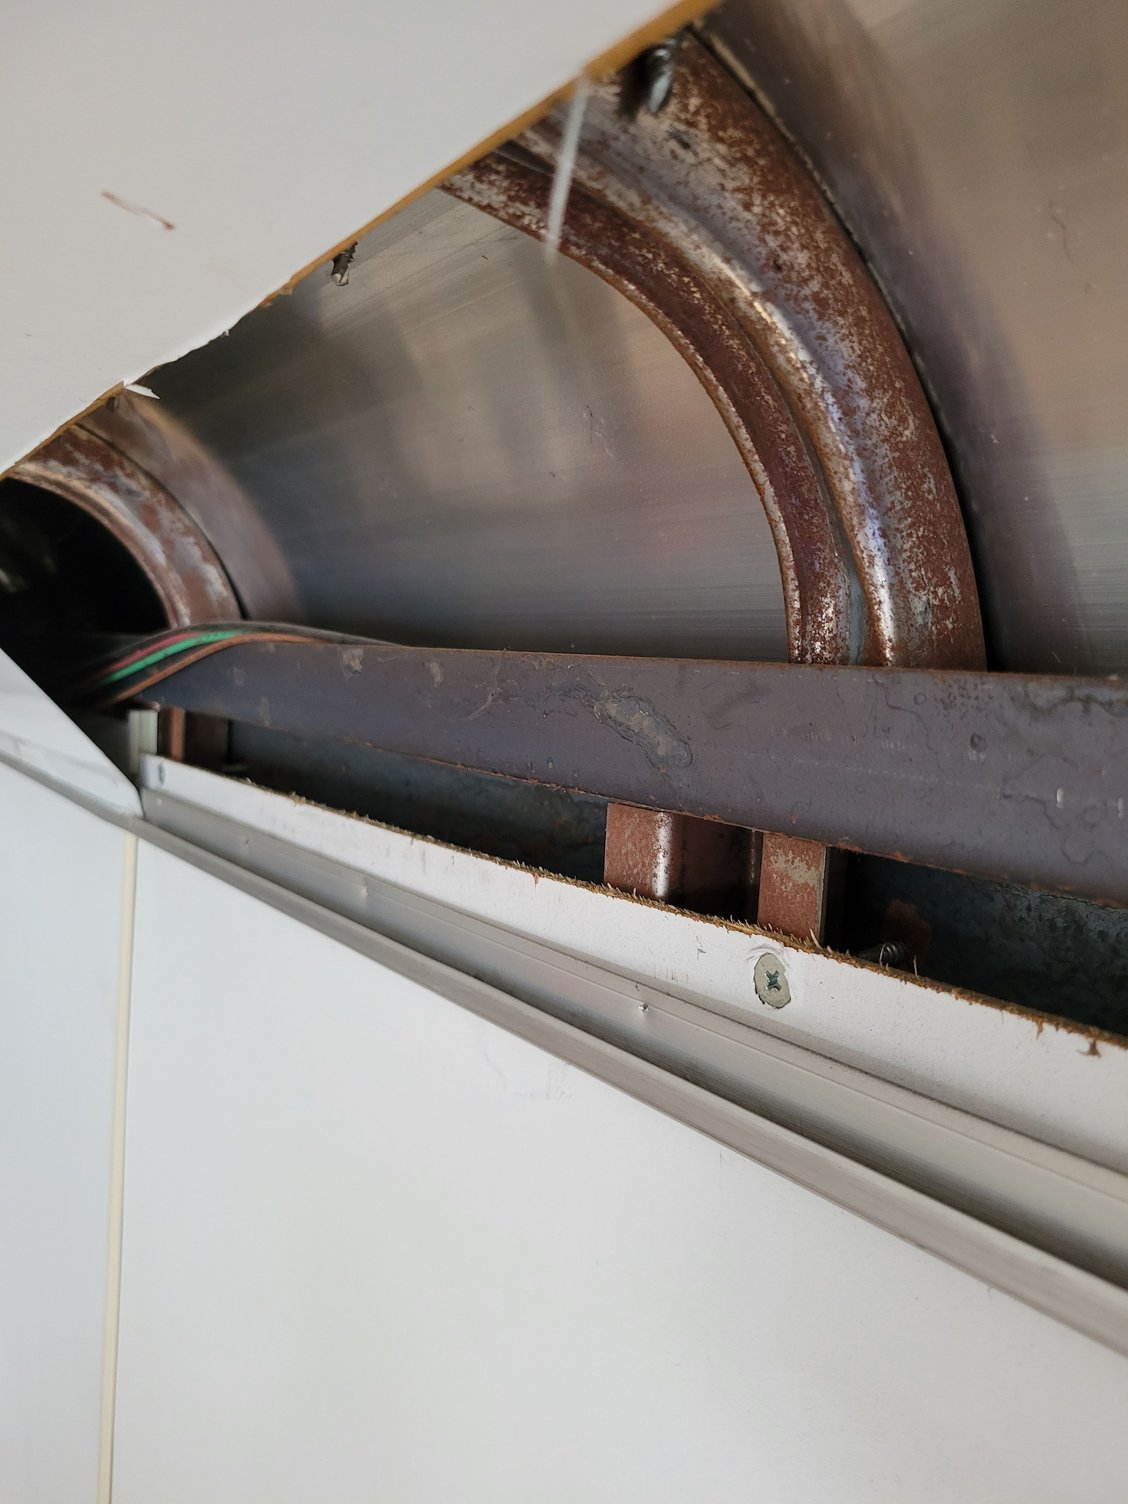
Bit of an old thread, but as I've been working on upgrading my enclosed Haulmark car hauler I see what you mean about what happens at trailer builders! Mine is a steel structure, and almost no corrosion protection. Surface rust on roof and wall beams, which I would not have known about if I didn't remove interior panels to add insulation.
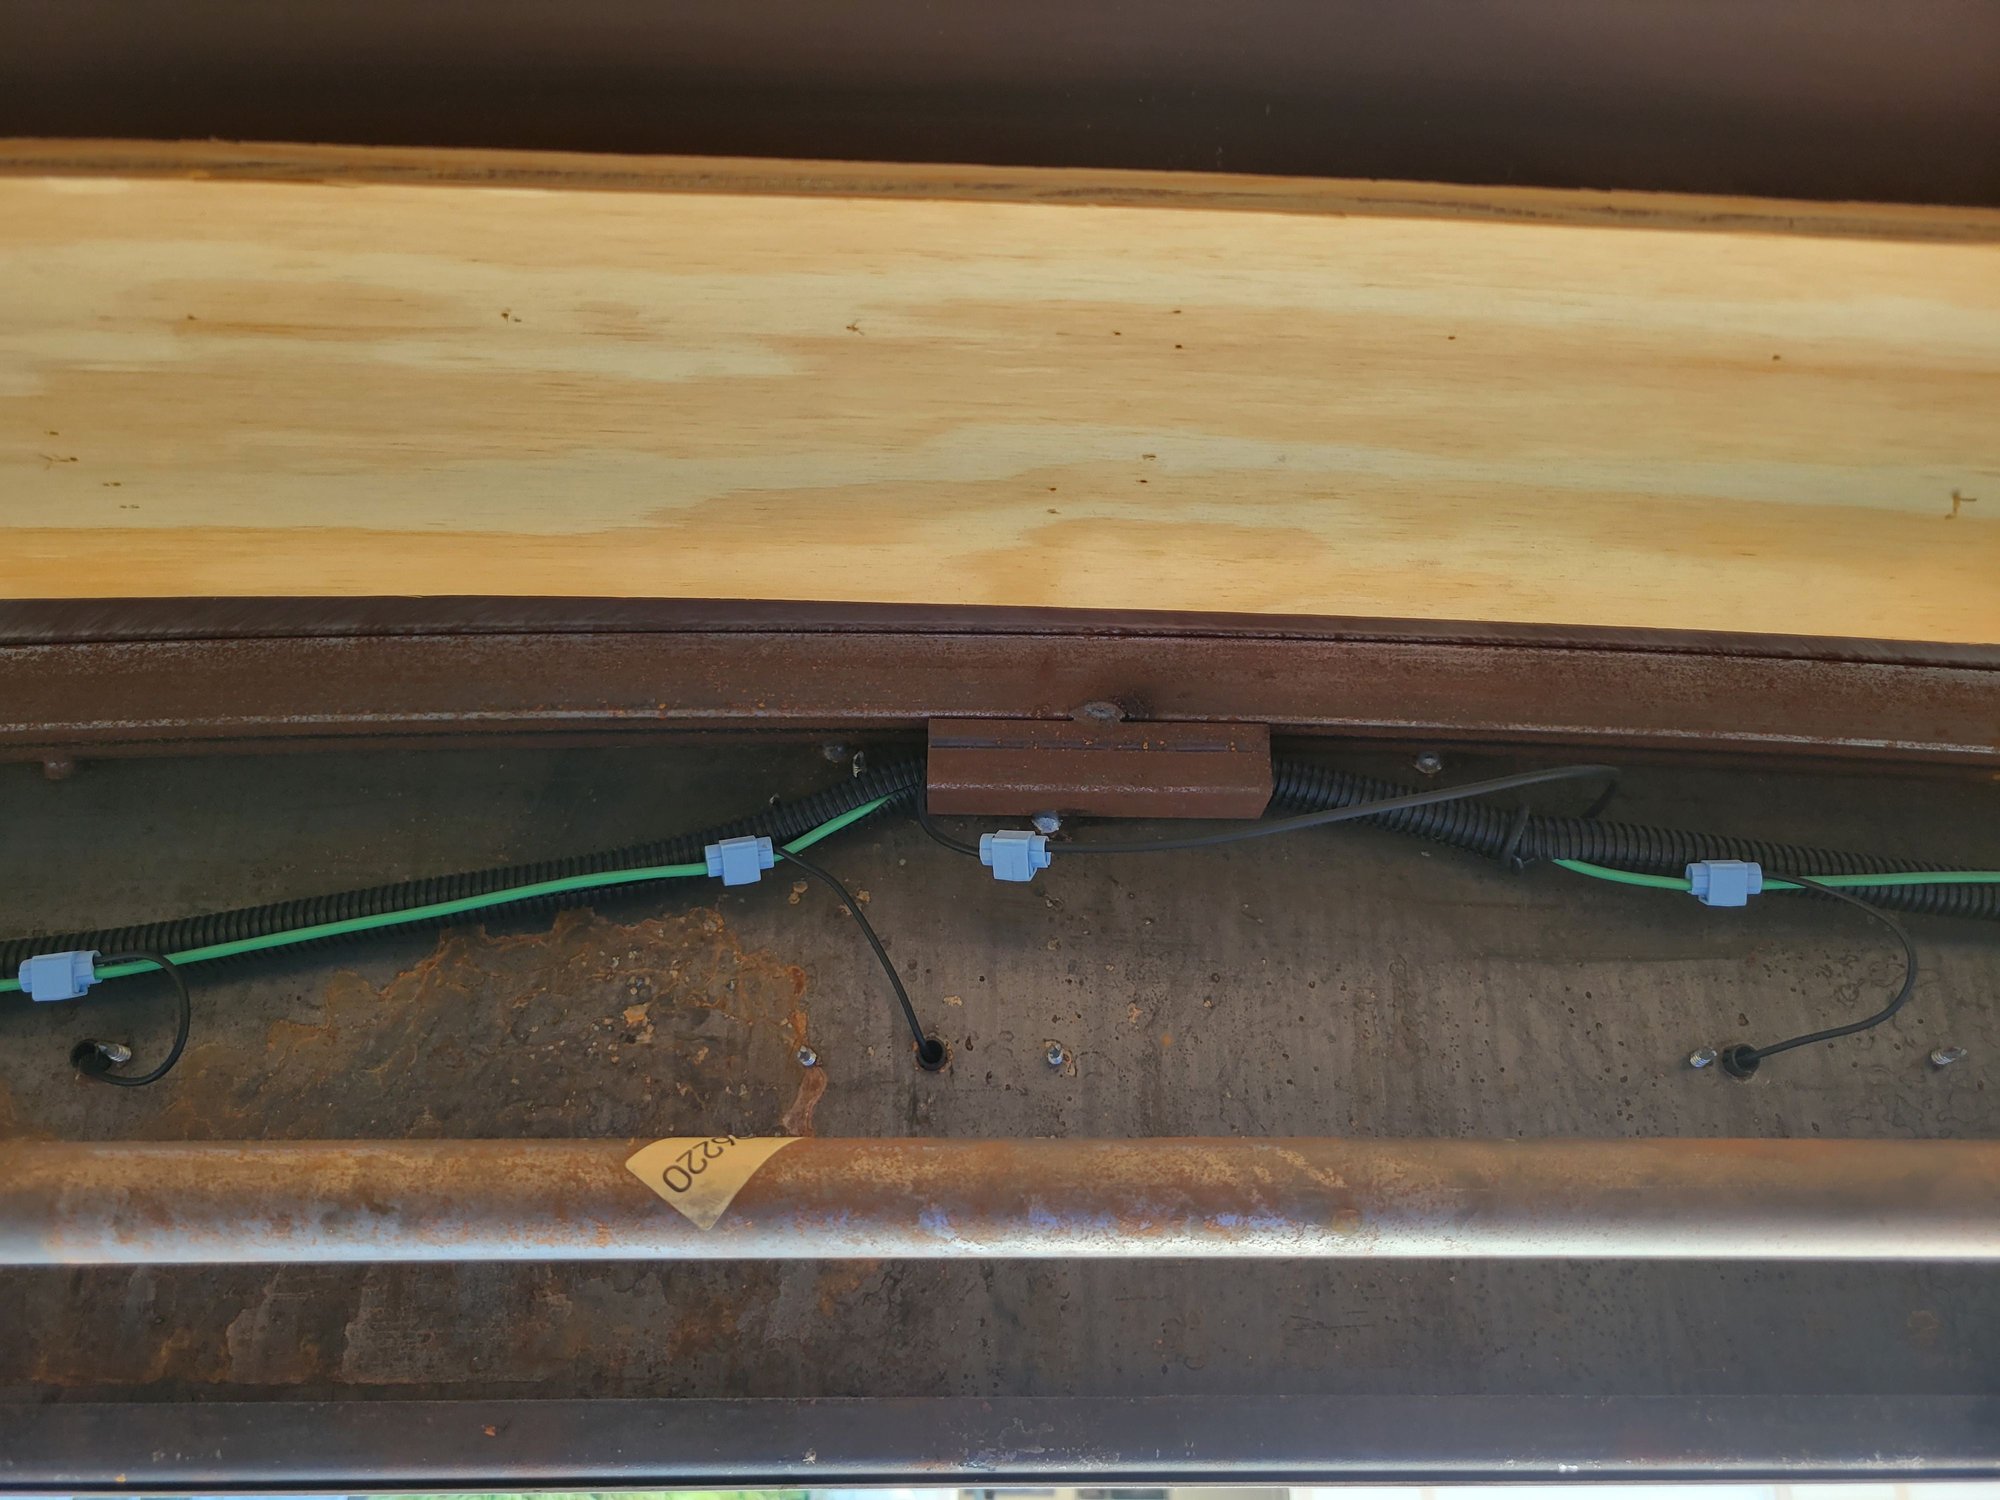
Wiring is scary the way it comes from the factory. Only 12v+ wires run, and the grounds are all to the frame with poor connections via screws or edges of lights. The wires are not properly supported, and go over metal edges and corners without abrasion protection. I added many stick-on zip tie mounts, and abrasion resistant sleeve where needed.
Not surprised, given the relatively low price these things sell for. They must try to build the whole thing in a day.
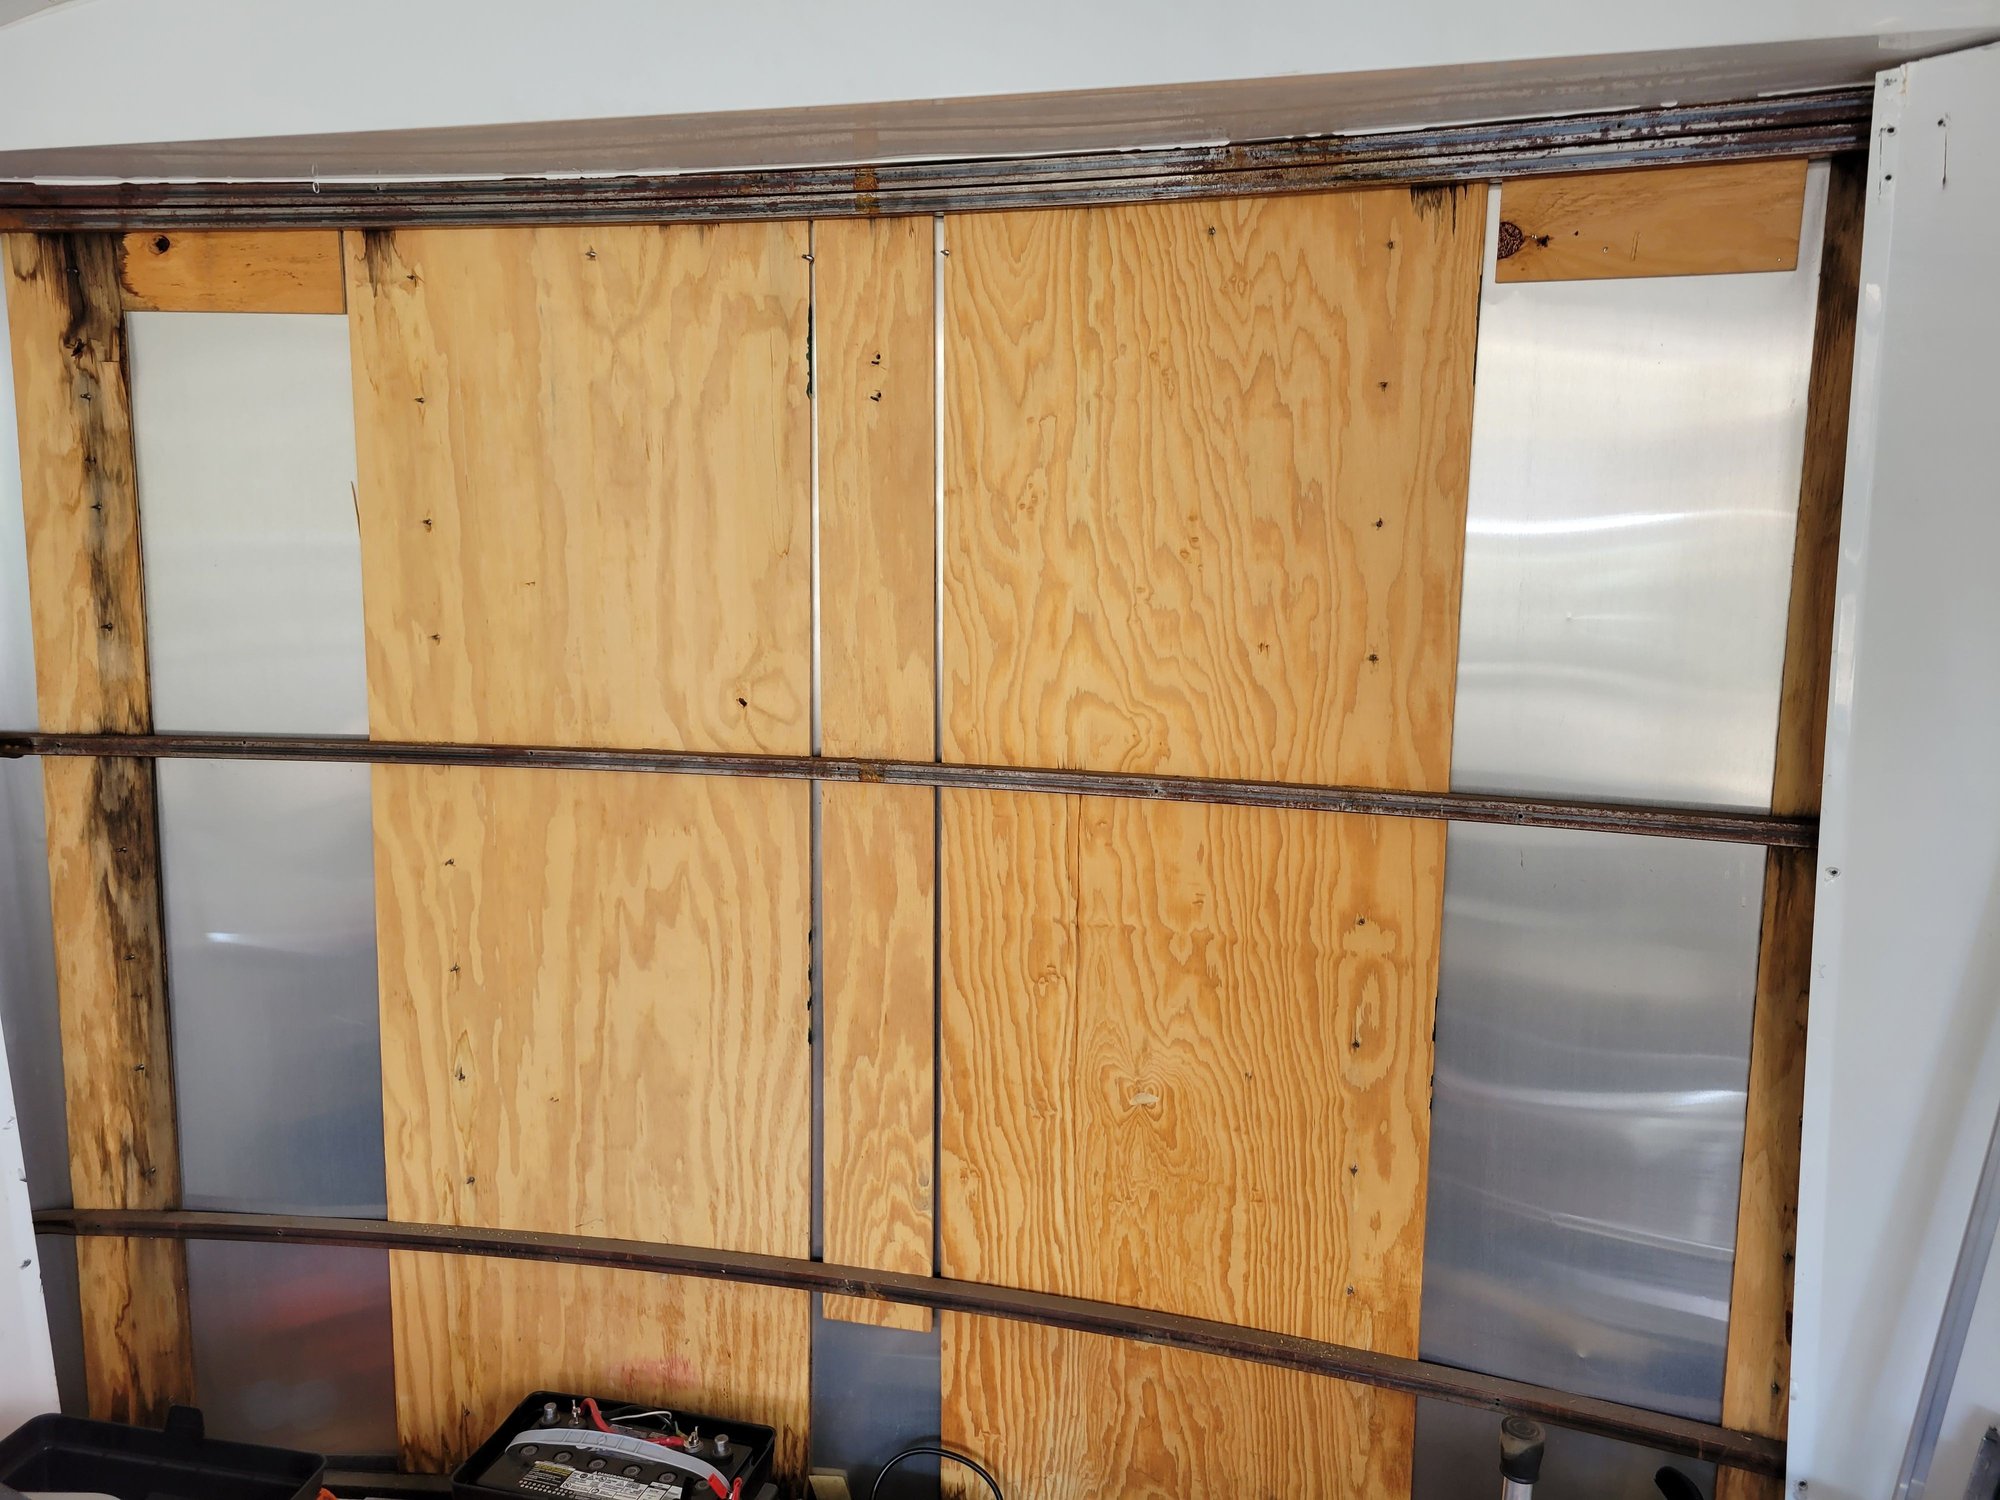
Top of the back wall, above ramp door. Bare metal surface and wiring using cheap splice connectors. Roof and wall beams are bare steel and rusty. Wires wrap over the metal edge with no protection. This is what the front wall looks like from the inside. Aluminum exterior is screwed onto thin plywood and hardly any framing. There was no sealant in the aluminum panel overlaps.
Bit of an old thread, but as I've been working on upgrading my enclosed Haulmark car hauler I see what you mean about what happens at trailer builders! Mine is a steel structure, and almost no corrosion protection. Surface rust on roof and wall beams, which I would not have known about if I didn't remove interior panels to add insulation.
Wiring is scary the way it comes from the factory. Only 12v+ wires run, and the grounds are all to the frame with poor connections via screws or edges of lights. The wires are not properly supported, and go over metal edges and corners without abrasion protection. I added many stick-on zip tie mounts, and abrasion resistant sleeve where needed.
Not surprised, given the relatively low price these things sell for. They must try to build the whole thing in a day.
Top of the back wall, above ramp door. Bare metal surface and wiring using cheap splice connectors. Roof and wall beams are bare steel and rusty. Wires wrap over the metal edge with no protection. This is what the front wall looks like from the inside. Aluminum exterior is screwed onto thin plywood and hardly any framing. There was no sealant in the aluminum panel overlaps.
TET GT3…I am glad that you are going over everything on your own and making the corrections. If that trailer is new, keep an eye on lugnuts, and if you are handy, check the brakes that they really function, and check the torque on the axle nut. The entire axle assembly including bearings/bearings/etc all come fully assembled from China and the trailer manufacturers just attach them to the chassis,,.so you get the idea.
TET GT3�I am glad that you are going over everything on your own and making the corrections. If that trailer is new, keep an eye on lugnuts, and if you are handy, check the brakes that they really function, and check the torque on the axle nut. The entire axle assembly including bearings/bearings/etc all come fully assembled from China and the trailer manufacturers just attach them to the chassis,,.so you get the idea.
Trailer is about 8 years old, so took some time to go downhill. First owner hardly used it, and mostly just needs lots of cleaning from sitting outdoors by airport hangars. I polish the paint and aluminum trim in sections when I have time.
RV place where I keep it has serviced the axles, bearings, and wheels so it's ready for any trip. I do want to replace the tires due to age.
Insulated front wall and roof, added LED interior lights in the 4 corners, wired in MaxxFan to replace original roof vent, and added vents in the floor to draw in fresh air. Still need to attach solar panel on roof, finish electrical system, add front tie downs, and add a side window or two.

 06-17-2021 | 01:54 AM