When you click on links to various merchants on this site and make a purchase, this can result in this site earning a commission. Affiliate programs and affiliations include, but are not limited to, the eBay Partner Network.
Spyder owners beware of your plastic covers on the decklid
Unfortunately I lost one of the plastic covers covering the hooks for the ragtop on the decklid. I appears they will default as time passes.
here is what happened:
I went to the German porsche gerunde meeting in dinslaken last May 1st. It was a relatively cold morning so I had the ragtop up and heater on. Stopped over at the Dutch German border to remove the ragtop -remember no high speed driving with the top up- drove to Dinslaken. At the site when parking I discovered that on go the plastic covers was missing.
ok, I drove the car at speeds it was designed for >250 km/h assuming all parts would remain on the car at all time�.
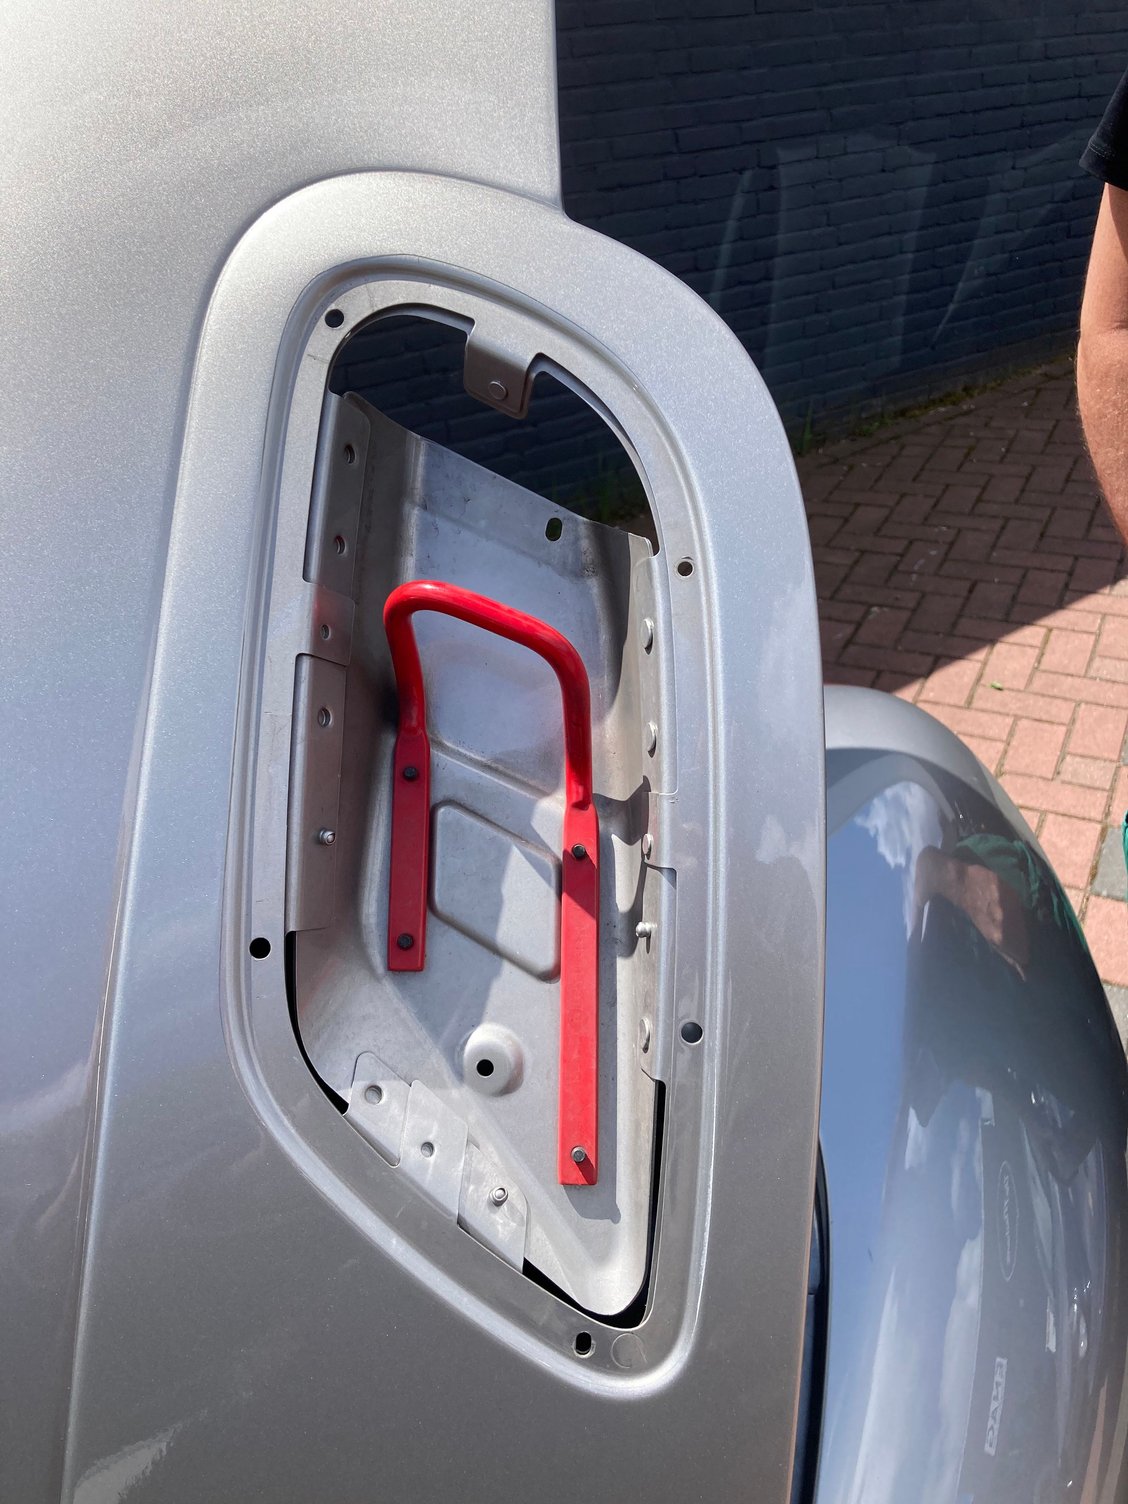
apparently the fixture of this plastic cover defaulted as all of the clips holding the cover had fallen down around the drain area. On the other side of the car already two of the holding pins are broken. See pics.
would anyone care to check their spyder if all of the fixing pins And slips are still in place?
I plan to inform Porsche about this production flaw. If there are more incidents it may help.
That happened to me as well, the tabs securing the trim become brittle and break. Only, I wasn't doing 250km/h, but more like 100 (60mph)... Several hours later I retraced my steps, found the trim on the side of the road, and my passenger picked it up! Miraculously, it only had a couple of tiny scuff marks that I easily touched up.
I then used E6000 glue to secure the attachment points. The glue can be peeled off with minimal effort but is strong enough to hold those trim pieces in place. Haven't had any issues for over 3K miles since I glued them on.
Does anyone have part numbers? I lost and found my right side cover yesterday. I did incidentally distinctly hear the last pin pop which sent it flying. I thought it was actually a rock hitting within the wheel well.
Already sanded and primed it. But the pins are now all broken on that side; therefore prefer to replace both with new ones.
I also think it's easy to take advantage of the oblong hole in the sheet metal beneath by drilling a hole in the cover and depending on whether there is space between the sheet metal and cover, devise long threaded bolt (preferably nylon) to hold the part in place better than the lock nuts. What I'm envisioning would hold it so secure that it would never come off simply from wind.
As an addendum, my dealer quoted me $700 per side. They come painted to your car's color code. Secure them or be sorry!
Also, I ordered some 1/8" round plastic pegs which I'll cut to length and super glue to the inside cover to align with the holes. What's odd is that this is how the pegs must have been secured to start. There's no evidence the pegs were part of the injection molding. The pegs break away clean with no evidence of ever being there. I'm starting to think it's the age of the glue used that's causing them to break now.
Between new pegs and lock tabs, and maybe some double sided tape along with the one-bolt idea, no more issue. We'll see. Tape and new pegs/lock tabs may be enough.
Last edited by MidEngineRules; 11-01-2022 at 09:47 PM.
Based on the previous, I did check the pegs, and by golly, one of the five pegs on the passenger side was MIA. I like the idea of super-gluing fabbed 1/8� plastic pegs at the missing original pegs� locations. I usually drive with the sun shade in position (SC = avoid the sun), so if the cover busts loose, the shade�s flying buttress will keep that cover from achieving escape velocity.
I paid around � 200 for one piece + a � 60 paintjob to get it in the right colour.
I will check the invoice for exact pricing and part number
The quote also included installation. I told my tech I wouldn't need installation, nor would pay so much. I typically only buy parts from Suncoast which is a dealer offering discounts. I will contact Suncoast only if my plans to affix the original cover doesn't pan out. I just have some more light sanding on the primer and then on to black once the correct color aerosol black and clear coat arrives. Until then, it's going naked. My peg stock arrives tomorrow (lifetime supply and then some). I sourced two types of plastic and two types of glue. I'll make small cross hatch marks with a exacto knife on the inside cover and peg endpoints to help with adhesion. Let the experimentation begin!
Thanks for taking one for the team! I’ve only had one peg break off so far and after trying several different glues I gave up and am one short as a result. It will be nice to know if there is a permanent solution. Please keep us posted.
Update, 1/8" pegs are too narrow. They actually fit inside (very tightly) the stock pegs which are hollow, so in essence the stock pegs have a 1/8" inside diameter. I ordered 1/4" pegs, arriving Sunday. The ones I ordered are also solid, so exponentially more surface area to adhere to the inside cover. Hope to be done with this project by mid week.
Will do. Only new info at this point is I ordered 3/16" solid pegs. The 1/4" perfectly fits only 3 of the 5 holes and I'm using metric internal tooth starlock washers and 1/4" is in between two of the sizes (M6 and M8).
I also noticed there's no gasket for the cover to absorb some vibration. Going to use some flat rubber round gaskets under between the cover and body, and between the washer and body to perhaps reduce some stain on the pegs.
If I wasn't so concerned about the aesthetic, it would be so easy to use tiny black screws to hold the pegs in place so they never break off. But that would mean you have to drill 5 tiny holes per cover (and into the pegs) and could see the screw heads from the outside.
Last edited by MidEngineRules; 11-07-2022 at 02:50 PM.
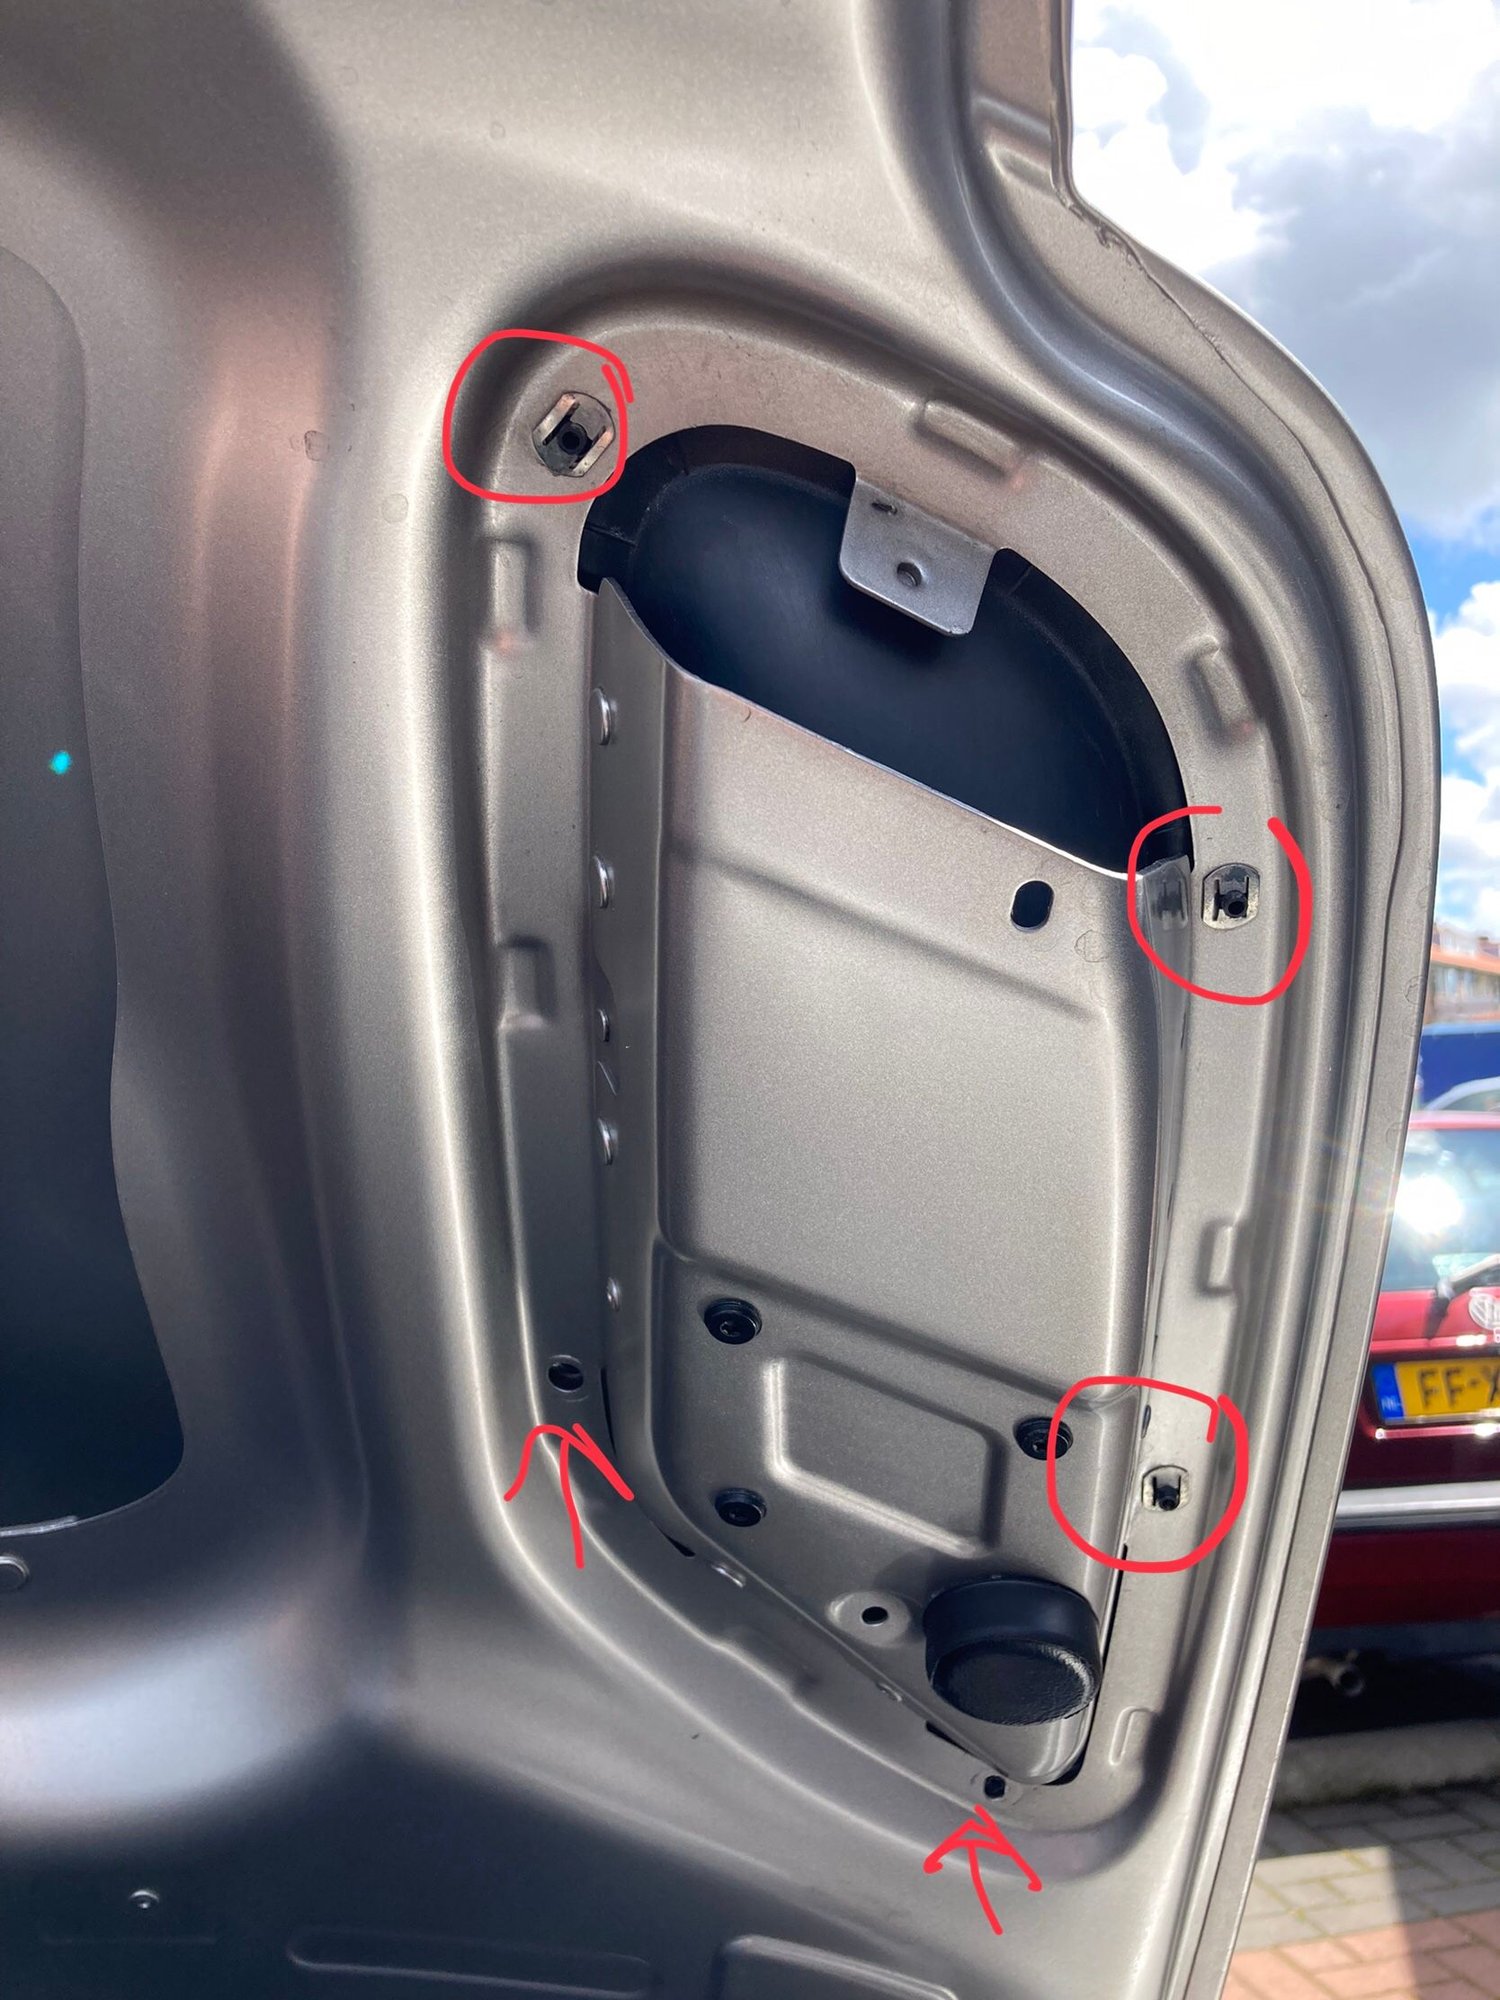
I think I will remove this cover and check the mounts’ status and then epoxy the existing screws in. I’m concerned though that the act of prying these off incorrectly may weaken or break these potentially fragile screws. Any tips on the safest way to pry n pop the covers off?
I think I will remove this cover and check the mounts� status and then epoxy the existing screws in. I�m concerned though that the act of prying these off incorrectly may weaken or break these potentially fragile screws. Any tips on the safest way to pry n pop the covers off?
I�m fairly confident that you�ll break all the plastic studs if you attempt to remove the covers. Godspeed.
 05-24-2022, 02:51 PM