When you click on links to various merchants on this site and make a purchase, this can result in this site earning a commission. Affiliate programs and affiliations include, but are not limited to, the eBay Partner Network.
Head studs, thread locker, and roughed-up washers.
New studs going in the heads.
Which/ if any / thread locker is currently the best choice for the head studs?
Any special curing procedure needed prior to "final" assembly?
In order to get the washers on the studs to keep from slipping, many folks suggest "roughing" them with sandpaper, I have never done this before.
200 grit? 400? Any preference here?
Before you set any studs have you measured the old studs before you removed them?
If not then it would be prudent to fit check them that means installing the head and gasket and then the nuts and washers .
What can happen is that the studs are not properly set either too deep or not deep enough.
To install the studs make sure the threads are clean ,
use red loctite,
screw them into the correct depth.
NOTE washers should be surfaced so they are smooth, do both sides, 400 grit paper is good for this,
turn the washer so it is done evenly
NOTE you could then add the gasket and head and a washer and nut and apply a lite load to the stud to set it in the hole.
NOTE make sure you put the correct studs into the correct holes their are a few short studs.
NOTE do not run a tap into the block this will reduce the holes grip,
If you need to clean the threads in the block,
take a head bolt and cut 3 even slices onto the tip of the bolt this will let dirt be pushed out of the threads as the bolt is screwed in
Why would you rough up both sides of the washer, wouldn't it then be more prone to spinning? I would think you would only roughen up the side against the head? Gonna be doing this again soon so really interested in know the correct way.
Interesting. I just read Stan's post over again and he uses the term "smooth" in regards to the washer surfaces, I thought the idea was to "roughen" one side (the head side) so the washers didn't spin?
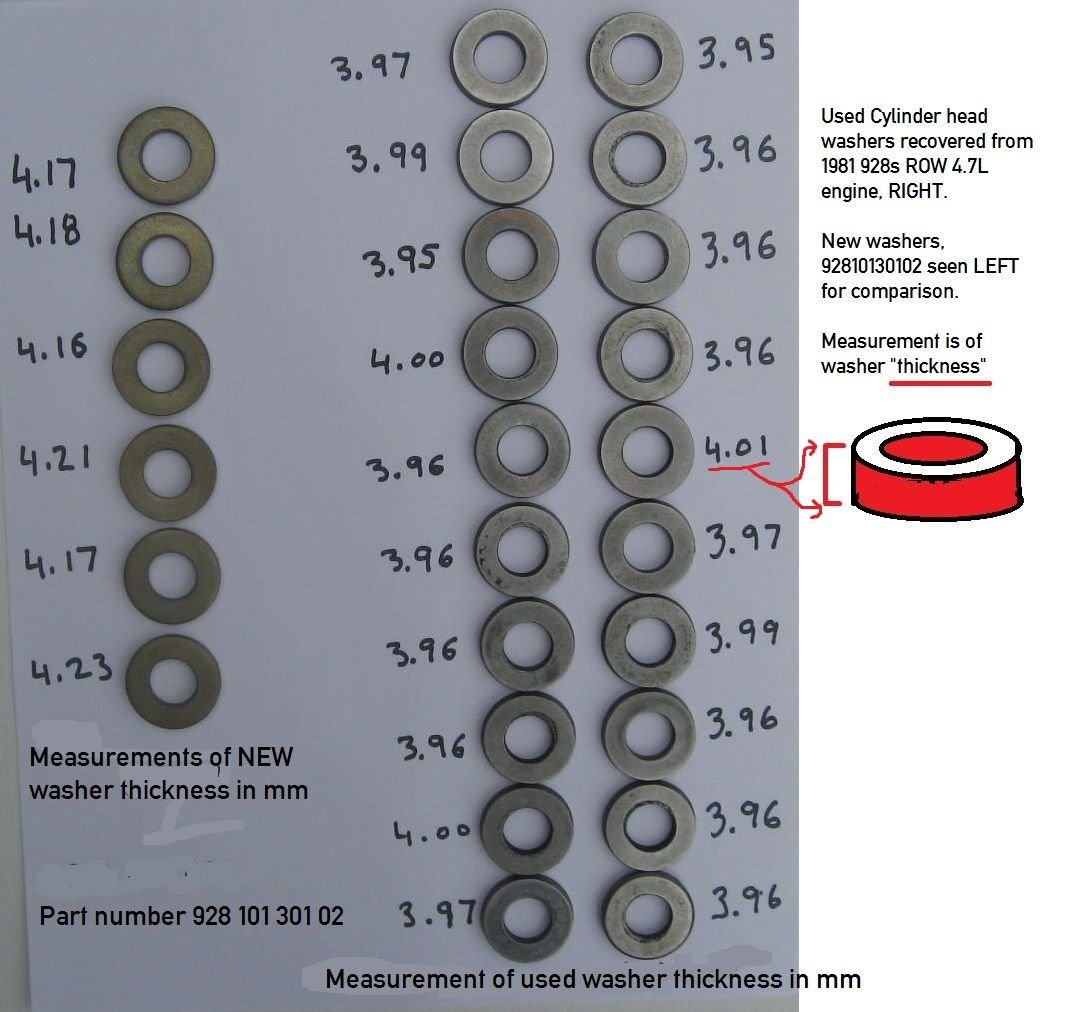
Some fresh data for those as obsessive compulsive as myself...
These used washers were cleaned with a plastic bristle brush and Simple Green, and lightly touched with 400 grit wet-dry paper (wet sanded)
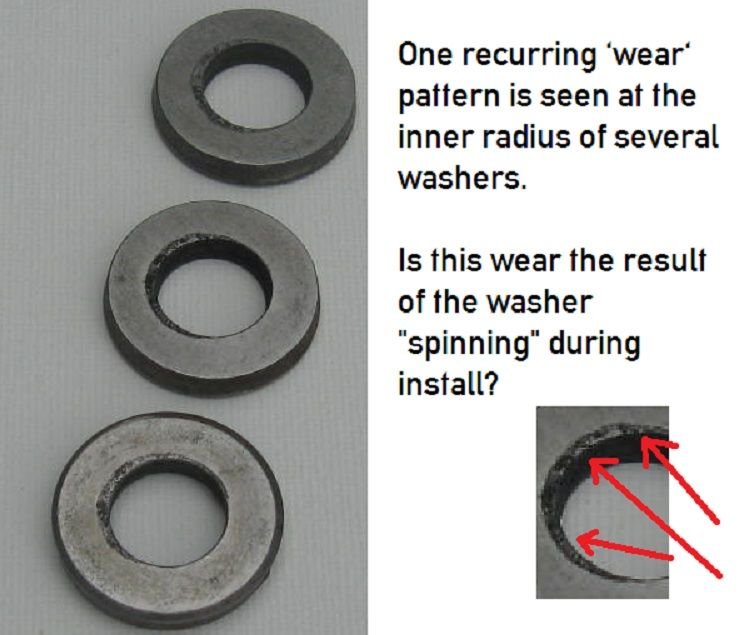
Do these findings seem "typical"? Is there anything to learn from these patterns?
LOL would you reuse these?
Dan
Last edited by Daniel5691; 05-19-2017 at 07:24 PM.
Subscribed to this Dan, brilliant informative detail here, I am a long way from needing to complete a task like this (engine still strong), but these threads are what "search" is all about, thanks.
Oh, and any chance of pictures detailing the actual assembly process?
Last edited by Kiwi'79; 05-19-2017 at 05:47 PM.
Reason: Typo
Unfortunately the new ones are on back order with no known delivery date. As if that would actually delay my "progress". Ha ha.
There's probably nothing special about these except for their dimensions. If push came to shove you could probably source a generic washer with the same spec online.
Thom these washers came from the Messerschmidt factory, Ace hardware will not have them in stock.
Its unlikely that the washers have gotten wider by being used,
the inner area that looks damaged is from corrosion,
the studs can live in a damp environment if the gasket oozes , and most do.
The washer is at the top of the area for steam to escape.
Note you might see when you wash an engine,
bubbles coming out from the head washers or nuts, (when you start it and let run to dry off)
this is steam escaping from the stud bores in the head.
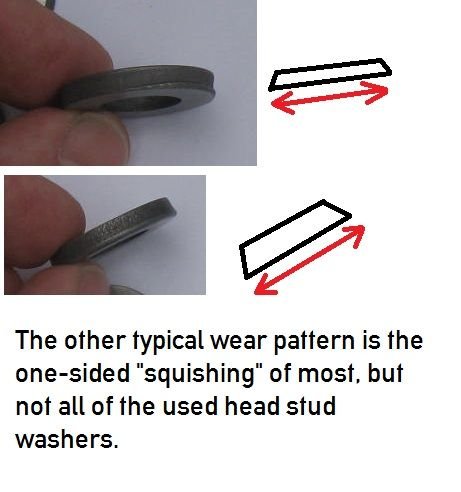
NOTE this squish area is the result of the punch press used to form the washers when they were made
NOTE the reason to clean/surface both sides of the washer will become evident when you actually go to do it , you will then notice how the washer is deformed where the seating surface of the nut rides.
These washers are made of hardened steel but they still deform at the nut seating area and work harden from the heat cycles, restoring the surface flatness gives the best results,
using 400 grit will give one side bite and make the surface smooth enough for the nut
On another tangent,
NOTE this same thing happens on the front wheel bearing thrust washer ,
if the nut seating surface has uneven spots then the washer may get caught and not slide on the nut or the bearing.
On the wheel bearing washer the washer will give an erroneous reading of being tight/loose if its thrust washer has not been surfaced on both sides and the nut seating surface.
NOTE also surface spindle the nut to restore flatness and remove burrs.
On another tangent
the same idea can be used on the cam gears and the 32mm washer/nuts.
When refitting the cam gears they should be surfaced so the mating areas are smooth,
NOTE you will notice how distorted the faces are when you surface them.
Do the large washers and the radial seal collar surfaces as well.
Doing this will reduce the tendency for the gear to walk and loosen.
When I install cam gears on the 16V cars, I am now adding a dab of blue loctite to the cam snout and the inner surface of the gears then a dab for the cam bolt this so they dont walk the bolt loose and shatter.
NOTE if the surfaces are not flat,
then walking of the gear on the cam snout will have a higher percentage that it will occur.
All of this I do is to prevent the gear from coming loose and damaging the cam/pulley.
This wisdom gleaned from fixing many 16 v camshafts and belt runs where the pulley came loose,
it usually started at the pulley mating surface


 05-19-2017, 10:40 AM