When you click on links to various merchants on this site and make a purchase, this can result in this site earning a commission. Affiliate programs and affiliations include, but are not limited to, the eBay Partner Network.
Did this last night and the tip I can give, after reading all the write ups, is that the proper flathead screwdriver size for the set screws that holds the electrical witch is the jewelers size screwdriver. BUT make sure to use a jewelers screwdriver with a thick handle (not the all metal thin ones you can buy at the dollar store) as you need to thicker handle to generate enough torque with your fingers (the all metal thin ones will slip). Also, removing the air ducts from the left corner of the dash (pull the ducts out too, not just the grill). Is the only way to see and get to the top set screw. Otherwise you will be doing it blind and the chance of success is almost zero. Also, don't need to remove the set screws, only make them flush with the hole and that is enough.
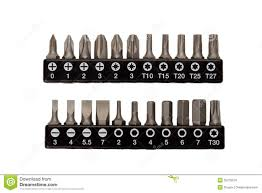
I just use the tip of a screwdriver, like something you put in a bit holder. See below picture, bottom row, first or second bit on the left.
As Schnelly says, you'll be back in there doing it again soon, so best just to buy a spare switch. Throw the screwdriver tip in the box with the switch and drop it in one of your map pockets. Otherwise, you are guaranteeing that Murphy will bite you in the *** with a switch failure at the most inopportune time and/or place.
BTW, I didn't need to remove the left corner air ducts either time I did mine. Just the air duct above the brake/clutch, which is just a squeeze together/pull out trick that takes 2 seconds.
The second one screwdriver bit is too wide, I've tried it. The first look about right.
Yes, I didn't tighten it too much, just enough for the the set screws to dig into the plastic. I was thinking the same thing, it will have to come out at some point again so no need to torque the crap out of them. Also, they are only there to hold the switch in place and there are no real forces on them.
I just use the tip of a screwdriver, like something you put in a bit holder. See below picture, bottom row, first or second bit on the left.
As Schnelly says, you'll be back in there doing it again soon, so best just to buy a spare switch. Throw the screwdriver tip in the box with the switch and drop it in one of your map pockets. Otherwise, you are guaranteeing that Murphy will bite you in the *** with a switch failure at the most inopportune time and/or place.
BTW, I didn't need to remove the left corner air ducts either time I did mine. Just the air duct above the brake/clutch, which is just a squeeze together/pull out trick that takes 2 seconds.
I did this one with the addition of a small socket sized to the bit for a little extra torque.
Interestingly enough, when I did mine recently, I discovered someone had replaced one of the grub screws with a longer, much longer one, that allowed the screw to be turned without any tool. Felt like it had a knurled end in fact. I couldn't see it, as I did it all blind, sitting in the seat.
I'm going to try removing the left corner duct so I can see it, and make a second one for the other side. Turns this job into a 5 min, tool-free task.
Just took mine out, thanks to all for the information. Used the small screwdriver bit, didn't need the socket and 1/4" ratchet as mentioned above, didn't need any more torque. I also looked at the description of the DIY on Pedrosgarage.com. I opened the switch and a piece of plastic that had broken off fell out. Now waiting for the part to arrive, I'm tempted to go an Audi dealer and see if he has one and keep the one that arrives in the mail for a spare.
Ignition Switch change made easier -special screws
Originally Posted by JTT
Interestingly enough, when I did mine recently, I discovered someone had replaced one of the grub screws with a longer, much longer one, that allowed the screw to be turned without any tool. Felt like it had a knurled end in fact. I couldn't see it, as I did it all blind, sitting in the seat.
I'm going to try removing the left corner duct so I can see it, and make a second one for the other side. Turns this job into a 5 min, tool-free task.
If any of you know the correct thread specifications for the set screws (aka grub screws in Canada and the old Commonwealth) I can try to track down thumb screws from an easy source for everybody. I have not done this switch r/r job so I have no left-over screws to measure. I am guessing from the description they are smaller than M2 ?
For example:
https://www.grainger.com/product/GRAINGER-APPROVED-Thumb-Screw-1PU96?s_pp=false&picUrl=//static.grainger.com/rp/s/is/image/Grainger/1PU76_AS01?$smthumb$
I do have the original screw I removed and will measure once I get hold of a thread gauge, but I think its more like M4 in truth. Larger than you may think. I had a Phillips head one in my box that matched. I just filed a point on the tip and threaded it in.
I do have the original screw I removed and will measure once I get hold of a thread gauge, but I think its more like M4 in truth. Larger than you may think. I had a Phillips head one in my box that matched. I just filed a point on the tip and threaded it in.
Here you go ??? https://www.amazon.com/dp/B00A9NH91Q...buying_options
This is important because we often have weird electrical questions on the Forum and the prime suspect is the flimsy switch. But replacing it is such a chore that people re reluctant to do it.Instead they fiddle with other more accessible potential culprits and we go round and round. Eventually the switch gets replaced and the thread is abandoned. Guess why ...

 09-02-2016 | 04:04 PM