When you click on links to various merchants on this site and make a purchase, this can result in this site earning a commission. Affiliate programs and affiliations include, but are not limited to, the eBay Partner Network.
I just saw this thread and wanted to add a couple points for anyone doing a brake pad replacement on the 958 / 92A Cayenne.
In particular the front pads. It is a pretty easy change if you have a couple tools that really make a difference.
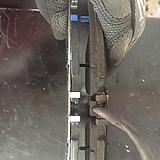
Since the 92A calipers are monobloc you will need to lift them off the brake disc to change the pads. So that means removing the two brake hydraulic line holders on the wheel bearing housing. Then remove the two caliper bolts - see OP post on proper tools for this step. On the front calipers, you need a set of guide pins (see attached photo, a VW part T10439) or some other make-shift solution to slide the caliper off the brake disc. The trick here is if you are using the guide pins you will need to turn the steering wheel such that the caliper is facing out and away from the wheel liner. Otherwise you cannot insert the guide pins. Also, use a small flat blade screwdriver (very small) to release the brake pad wear sensor so it can be removed prior to lifting off the caliper from the brake disc.
Once you have lifted the caliper off and onto the guide pins you can use your caliper spreader tool to push the pistons back into the caliper housing to make room for the new pads. These are 6 piston calipers so you really need to use the old pads to get a good reset of the pistons.
The brake pads just pop out - I twist the bottom of the pad inward and it releases from the spring.
Installing the new pads is essentially the reverse. Push the top of the pad inward against the inner edge of the caliper, and push on the bottom of the pad so it fits against the bottom of the caliper edge. There are two guide holes for pad fitment and these should line up. It takes a little trial and error to get it just right, but once you have done it, it is easy to do it again.
Same thing for the pad on the other side of the caliper. After both pads are installed, slide the caliper down the guide pins and onto the brake disc. Replace the caliper bolts and tighten to appropriate torque, for my CD it is 104 ft-lb or 140 Nm.
Reattached the hydraulic line holders to the when bearing housing and install the wear sensor (replace if worn or damaged). Bleed out any air bubbles if needed and attached the tire and do the other side. I always start the vehicle and pump the brakes a couple time to see if I have adequate pressure - if not then I bleed the line a bit.
It takes me about 45 min to do a side (includes lifting and tire off and on). I had purchased the guide pins which makes the whole process a lot easier.
Rear brake pads are very similar but you cannot easily use the guide pins (and the calipers are a smaller thread so they do not fit properly. Once you have the caliper bolts off, you will need a jack or some sort of platform to hold the caliper off the ground. I use a bottle jack with a built in jack stand. This has enough surface area so the caliper sits nicely on it and I can adjust the height so as not to have any stress on the hydraulic brake lines.
Brake pads pop in and out as with the front pads.
Finally, this is not meant to be a full tutorial, but rather some quick pointers and lessons learned from a brake pads change on the 92A model brakes. If you are so inclined you can save yourself several hundred dollars by DIY'ing.
Thanks for posting this information. This was very helpful. I replaced all pads and rotors on my 2012 Cayenne V-6 yesterday. The fronts definitely took longer than the rear.
I got a great deal on Zimmerman rotors from advanced auto online with free shipping. I used these rotors on my 911 with great success.
Thanks for posting. Do you also do your own oil changes? And if so, what system do you use to reset the service light? I've heard some Rennlisters have had luck with eBay devices instead of using the Durametric system.
I'm a local CA resident with a pro dura and am happy to reset your oil service right free of charge.
Just want to chime in that I used the instructions here to swap the front brake pads on my CD yesterday. The job was pretty easy, especially on the second wheel.
I ordered the spline drive tools suggested earlier in this post, as well as the ratcheting pad spreader. The spreader helped on the first caliper, although I was able to push the pads back on the second caliper with a screwdriver, so I didn't need it again (top tip; pull the cap off the brake reservoir when you are going to push the pistons back in).
I also didn't buy the guide pins; I was able to easily lift off the caliper by hand. I set it, on end, on the top of a heavy duty jack stand. I also used my breaker bar to stabilize it laterally; it didn't move. The hard brake line was a bit of a limiter to how it would move, but I had no issues.
Start to finish took me 2 hours, but I spent 30 minutes dicking around looking for tools. The second set of pads only took 30 minutes start to finish, and I wasn't hustling.
Surprisingly, nothing was stuck or rusted after 99,965 miles. And the original pads still had life left in them, even with 5-7k miles of towing.
New on left, old on right:
New on left, old on right:
I was able to re-use the brake wear sensors. I wasn't going to spend the $75 to replace them if I didn't munge them up, and they came off ok. Putting them back in was probably the hardest part of the whole job, and that wasn't tough.
This was a great way to save $600, even with the investment in the tools. The dealer wanted $900 to replace the front pads, and I got pads and tools for under $300. Suncoast Porsche had a good price on OEM pads. I would have spent less on aftermarket ones, but these lasted 100k miles so I thought the cost per mile was good.
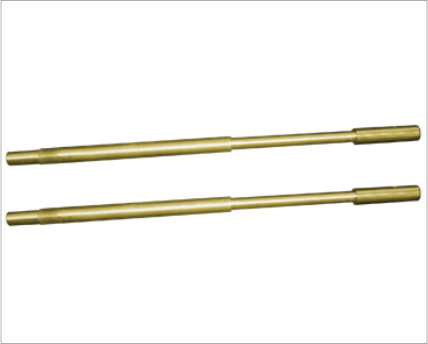
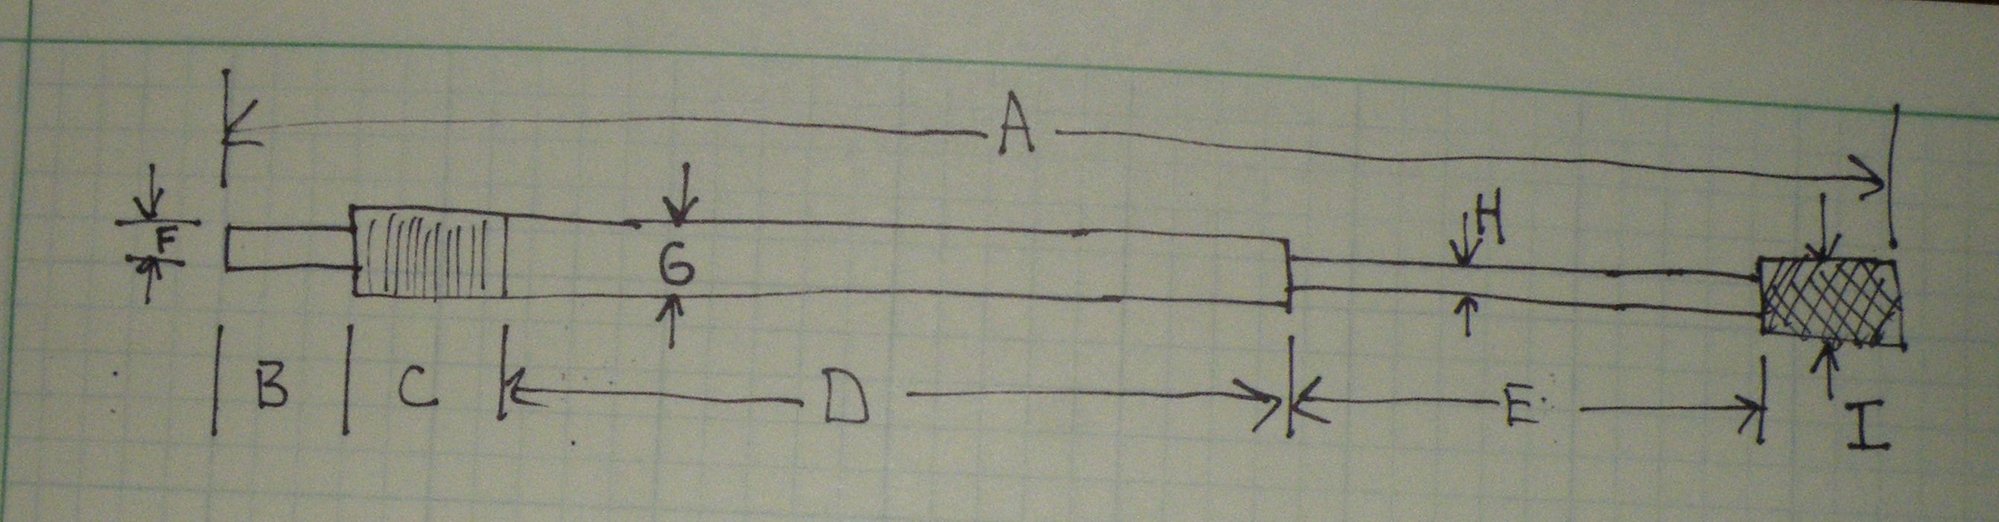
Hey Guys. Going to do a brake job on my 958 and I want to make the Caliper Guide pins to have the job go a little smoother. Could someone measure up the Guide pin and send me the dimensions? I have a included a print with the dimensions needed. They are labeled A thru I. Thanks in Advance and I really appreciate it!
Greg
Hmm.. do look a bit skinny. Let me use a metric micrometer instead of calipers..
F=12.4mm
G=13mm
H=10mm
I=14mm
Flats across the bolt-head, 12.4mm (13mm wrench fits exactly)
The question is - how was I reading the calipers wrong..? Go figure
chsu74 - since the real tools ordered from SnapOn were about $30 for the pair of them - how cheaply do you think Greg values his time? I can't see him making them for less than SnapOn will sell you the factory tool for.
Last edited by deilenberger; 07-12-2017 at 11:42 PM.
Don, Thanks!
You make a good point. I'm going to make them on a 1940's SouthBend Lathe that I restored, so everything will be manual (so I will spend many hours parked in front of the lathe.) Now if I had a modern CNC lathe, I could whip them out and sell for a profit....but that is a pipe dream right now.
Greg, I've always wanted an old South-Bend (but with a lead-screw - it makes the cuts neater).. and a few times came close to snagging one. Problem is finding one where the bearings on the headstock aren't blown out, and then thinking of things to make using it...


 01-10-2016, 04:43 PM