When you click on links to various merchants on this site and make a purchase, this can result in this site earning a commission. Affiliate programs and affiliations include, but are not limited to, the eBay Partner Network.
Is this a DIY-able job or something better left with an Indy to tackle?
Replacing your motor mounts requires an overall understanding of auto mechanics, some decent tools and some patience. I don't know how much the Porsche Dealer would charge but the motor mounts cost just under two hundred Each. The Dealer offers a "parts kit" which also includes the front sub frame mounts, bolts and some steering hose parts. I only replaced the motor mounts and the transmission mount/bolts. If the Oxygen Sensors have 100,000 miles and have never been replaced this is also a good time to replace all four Sensors. A month later I had to replace the Crankshaft Position Sensor and did all four O2 Sensors as well.
Replacement of 2006 Cayenne S Motor Mounts
This procedure may not be by the book but it worked for me.
Jack up the car on the front rear sub frame mounts and place a jack stand under the normal front jacking location. Remove both front wheels and remove both inner fender well covers.
VERY IMPORTANT THAT YOU SUPPORT THE MOTOR:
Place a Floor Jack, using a small 4" X 4" piece of wood under the oil pan directly BEHIND the Engine support Cross Beam or the cross beam the motor mounts are recessed in. Raise the floor jack with the jack handle towards the rear of the car, under the wood just enough to support and hold the engine in place.
Remove the bolt on the top of the air intake filter box, then push on the air box from the bottom, inside the fender well inward to remove the air box and access the bolts holding the top of the motor mounts to the engine. It is necessary to use a tight ratcheting ratchet to be able to loosen and tighten these bolts. Also remove the two bolts on the bottom of the Engine Cross Beam holding each motor mount. One bolt on the passenger side may not be accessible yet.
Loosen, Do Not Remove, both Rear sub frame bolts for some swing clearance. Then remove both of the Front sub frame bolts. Notice the Engine Cross Beam is bolted up together with the Front sub frame PLUS there is an additional bolt, towards the rear, to remove on each side holding the Engine Cross Beam in place. Now pry the Front of the sub frame downward to release it in the front and remove the motor mounts. The front of the sub frame will drop down about 10 inches allowing you to remove the passenger side last bolt and the motor mount. The drivers side motor mount can be removed through the air box hole in the fender.
The upstream Oxygen Sensors are now easy to access and run the new wiring. The downstream Oxygen Sensors can be Bosch Universal Sensor #15733, which only cost thirty dollars each but do require the use & connection of the current factory electric plug.
Reverse the above to reassemble. Use a jack to raise the sub frame back into place. Torque all bolts to factory spec and use Blue, removable, Thread Locker.
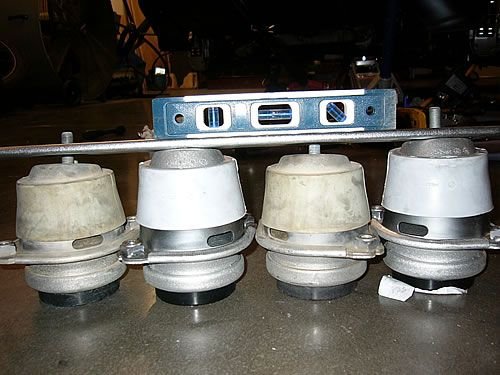
The Motor Mounts come LH and RH. Do Not mix them up. The Motor Mounts have an index pin that inserts to align the mount.
You can see the 20 mm difference in the Old vs New Motor Mounts.
Last edited by ciscorp; 01-22-2015 at 11:04 AM.
Reason: Add more information to post.
Yes I just had mine done, vibration went away.. nice and smooth again.
One of my mounts was leaking, the other was on its way.
Dealer wanted $1200 labor plus parts, local shop did it for $475. Book calls for 6 1/2 hours labor.
I am getting a sort of shudder, a small one when shifting down from 3 to 2. I only notice it when I apply the brakes and when it shifts down. If I let it shift down by removing my foot from the accelerator it does not seem to shudder. I have changed the transmission fluid only last month and the garage told me that there was nothing unusual in the old fluid they removed. It is smooth when shifting up and at all other shifts.
If it's only during certain gear changes.. I'm more likely to suspect the valve body if it's a 955 that is. 955 aisin valve bodies have selenoid sticking issues that can muck gear changes.
Yes it is a 955. 2006 S. It only happens when I brake to slow down and it shifts down from 3 to 2. If I don't brake and let it slow down, it does not happen. At least I could not notice.
Well mine definitely does a shudder when I am just coming to a stop. The Rpms dip down accompanied by a shudder and then they rise back up. It all takes place in about a second. I ordered a new throttle body seal (required when pulling) and im going to clean up the throttle body with carb cleaner. Pelican parts has a write up that im following. Will post back here with my results. I'm wondering if I should clean the MAF at the same time. Anybody out there clean their MAF?
Well mine definitely does a shudder when I am just coming to a stop. The Rpms dip down accompanied by a shudder and then they rise back up. It all takes place in about a second. I ordered a new throttle body seal (required when pulling) and im going to clean up the throttle body with carb cleaner. Pelican parts has a write up that im following. Will post back here with my results. I'm wondering if I should clean the MAF at the same time. Anybody out there clean their MAF?
Let us know if you need any assistance. A specialist should be able to help you over the phone if you run into a snag.
Bringing this back from the dead. How many people have done this mount replacement with out supporting the engine ? also what is your estimated time. this way seems much less involved and fairly straight forward. If anyone has a little more detailed on doing it this way please share thanks.
Bringing this back from the dead. How many people have done this mount replacement with out supporting the engine ? also what is your estimated time. this way seems much less involved and fairly straight forward. If anyone has a little more detailed on doing it this way please share thanks.


 01-18-2015, 06:20 PM


 https://rennlist.com/forums/cayenne-...-mounts-3.html