When you click on links to various merchants on this site and make a purchase, this can result in this site earning a commission. Affiliate programs and affiliations include, but are not limited to, the eBay Partner Network.
How to Calibrate Lane Change Assist (2015 Panamera 4 example)
While toying around with my original PIWIS III (consisting of a VM with PIWIS III and a VAS6154 VCI clone), I accidentally erased Lane Change Assist calibration data. When I went to recalibrate, I was never able to get past the first step of Automatic Coding, an error would display with the message "Coding not successful." This resulted in a dashboard error when activating Lane Change Assist with the error "Lane Change Assist not available. Service required." After a call to a local Porsche dealer, I was quoted ~$600 out the door for Lane Change Assist coding and calibration. So my next plan was to buy an already coded / calibrated Lane Change Assist from a donor car on eBay. Alas, this did not work and the dash warning persisted. So I did quite a bit of digging online and using the Porsche Panamera Service manual, I was able to find how the calibration process works...
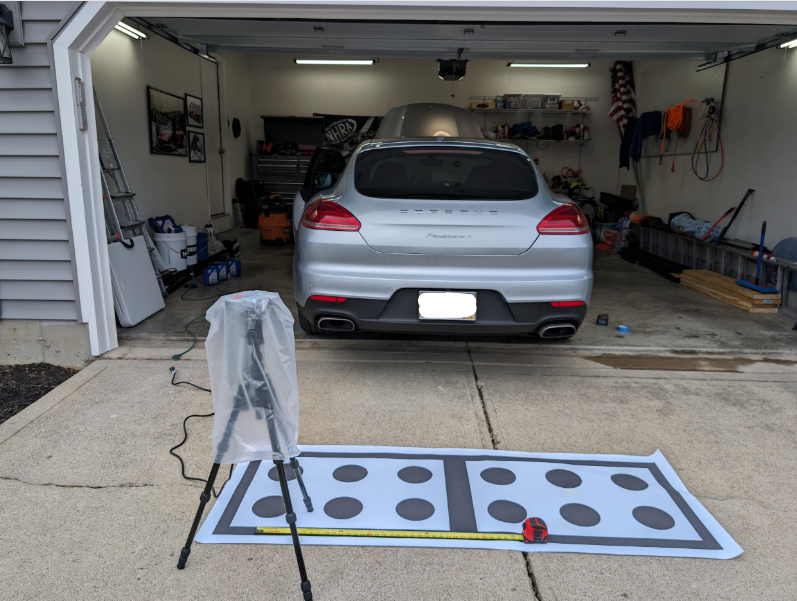
There are 3 tools required for this, a functional PIWIS, a VAS6350 Calibration board (for device positioning) and a VAS6350/4 Doppler Generator. The VAS6350 costs around $5,500, and the VAS6350/4 costs around $3,500. So with equipment price around $9,000 I was hoping I could figure out something a little more economically for a DIY. Turns out there is a PDF and Dimensions of the VAS6350 and others have printed and or made their own calibration board. So I went to a local FedEx print shop, and had a thick outdoor banner made for just over $100 with the pattern. I also found a thread on form for VW / Audi diagnostics, where there was discussion on the Lane Change Assist for an Audi A6. That thread can be found at: https://forums.ross-tech.com/index.php?threads/20145/ Cross referencing the hardware and software numbers of the Lane Change Assist module for this Audi, it looked almost identical to the module for the 2015 Panamera 4 that I have. In this discussion is how to build a Doppler Generator (VAS6350/4) using a blower fan. In a link found in this thread, a post on a Russian website showed a VAS6350/4 Disassembled and sure enough, it is a blower fan! A $3,500 fan may be the most expensive fan I have heard of...
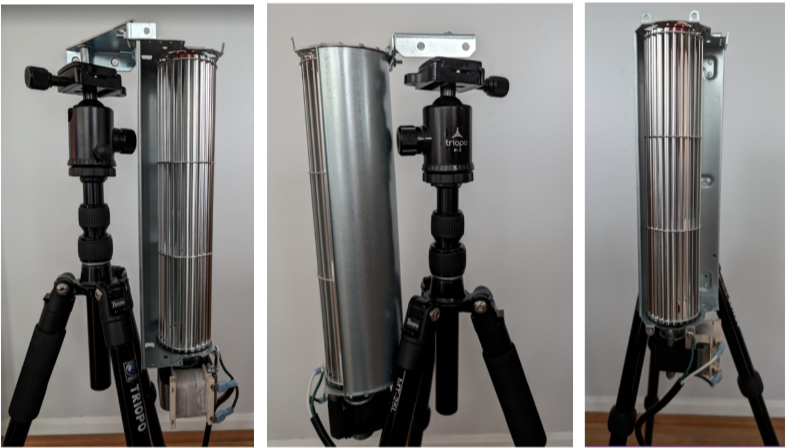
So using information from these forums I went ahead and built my own VAS6350/4 Doppler Generator using a fan used for air circulation on a fireplace I found on amazon for $33 found at:
. After a trip to the local hardware store, I was able to build a mount for the fan using an L Bracket, some nuts and bolts, and was able to mount it to a camera tripod I had laying around. The total cost of the fan and hardware was less than $50! Now I have the VAS6350 Calibration board and a VAS6350/4 Doppler generator. Now to get PIWIS III to work and code the Lane Change Assist.
I reached out to @rnlst_log who pointed me to a better VCI (the orange VNCI PT3G) and helped me get PIWIS III setup and working properly. I now had all the pieces to the puzzle on calibrating Lane Change Assist. Below are the steps with photos / screenshots of the process
1. Connect the vehicle to a battery charger for flash programming
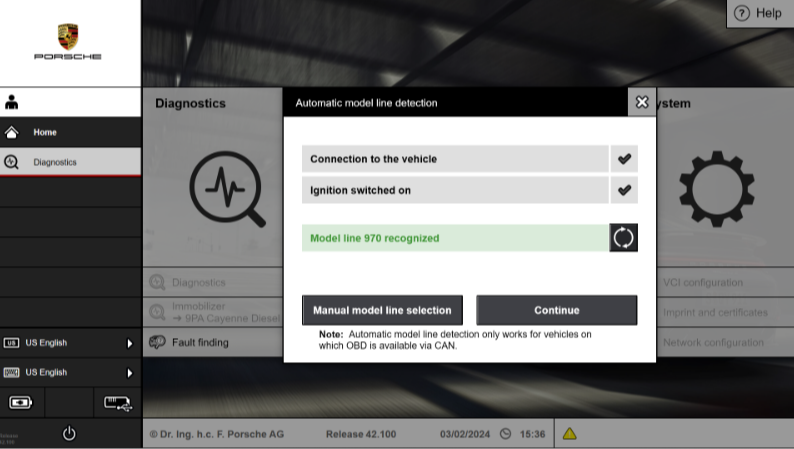
2. Open PIWIS III, turn the key in the car to power the car up without starting the engine, PIWIS should recognize the Panamera.
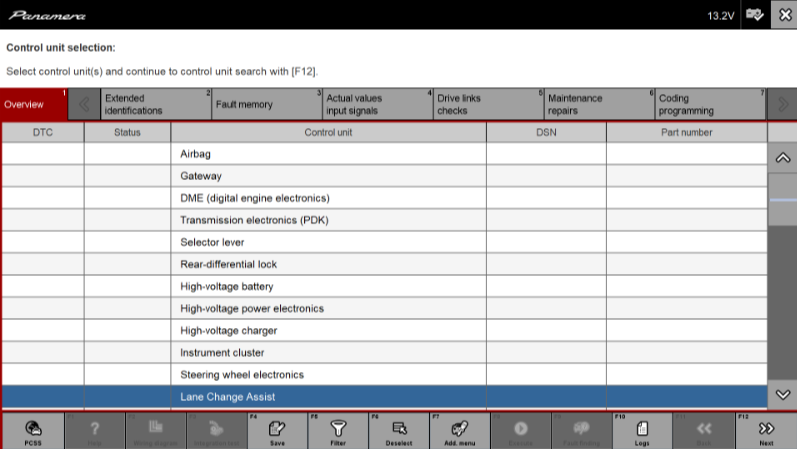
3. Select Lane Change Assist module, skip VAL
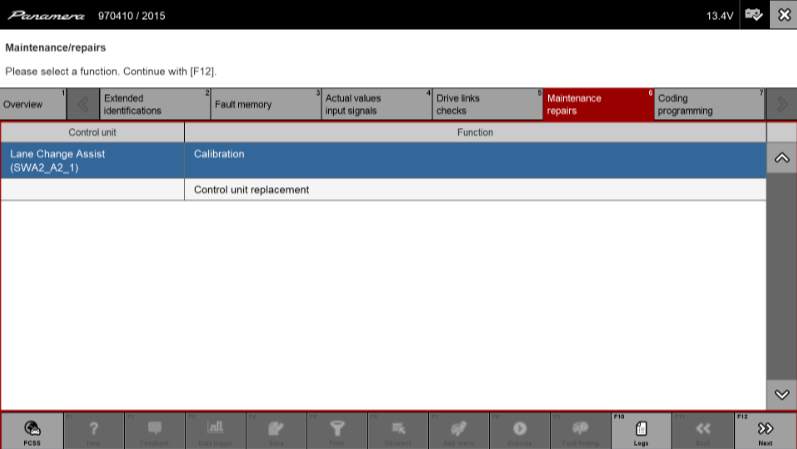
4. Navigate to Maintenance Repairs, click "Calibration"
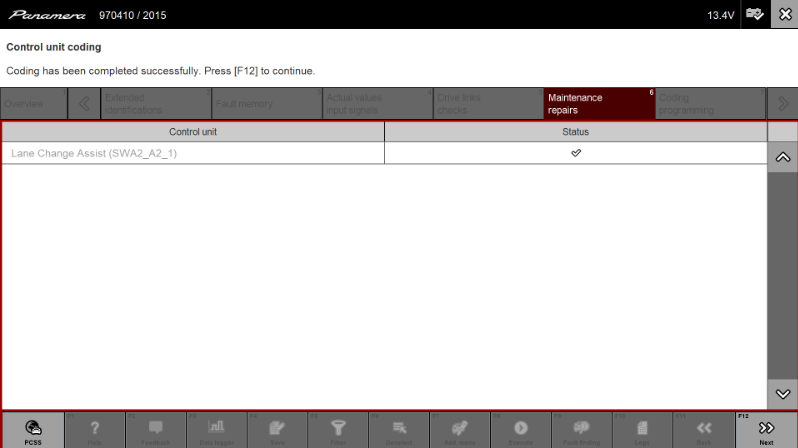
5. Automatic coding will take place (this is where the VAS 6154 / PIWIS III VM Clone failed).
This worked with PIWIS III on a laptop setup by @rnlst_log and a VNCI PT3G VCI.
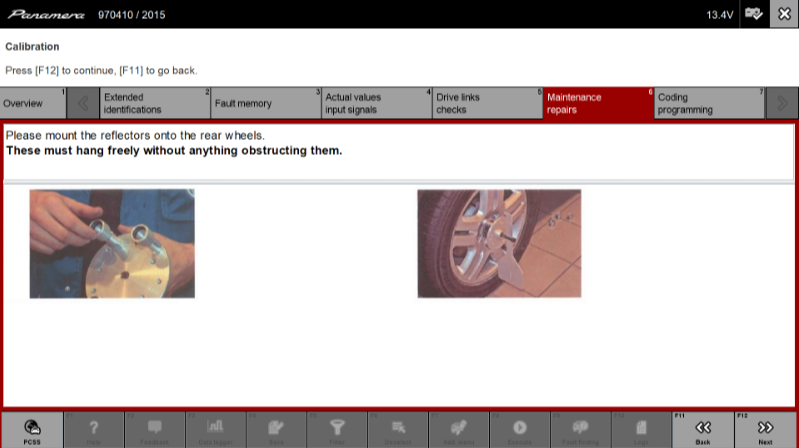
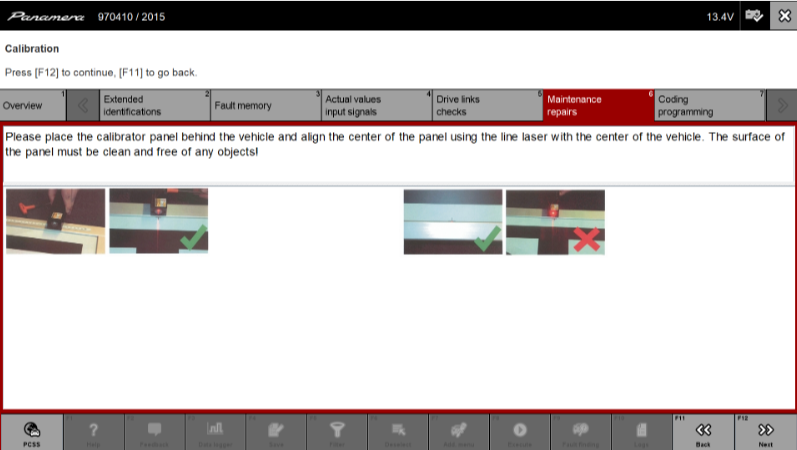
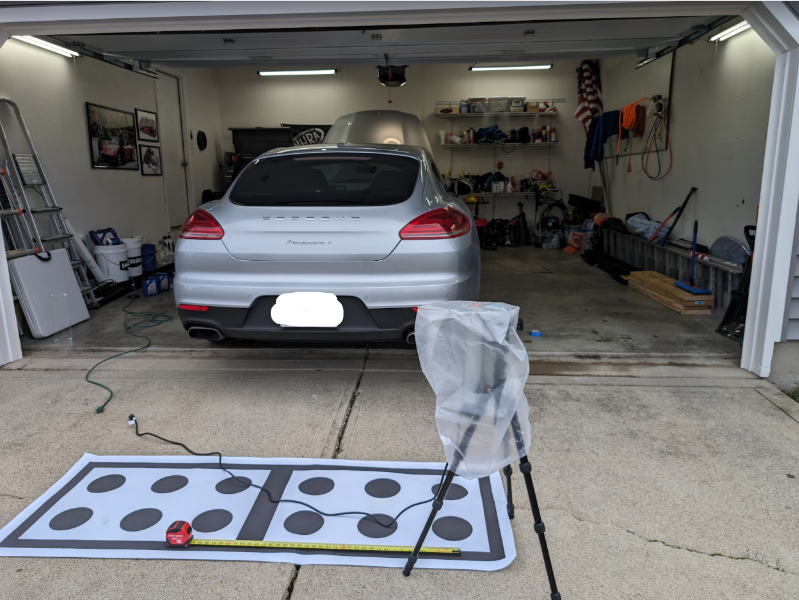
6. PIWIS will explain how to mount paddles to the rear wheels to measure distance to the VAS6350 Calibration board.
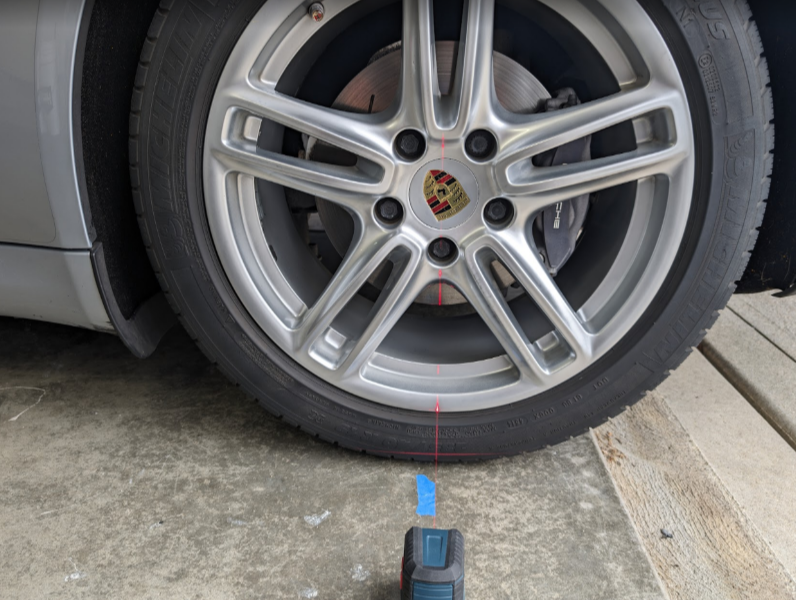
I used a laser level and masking tape on the floor to mark center of wheels.
7. PWIS will explain how to measure distance to the VAS6350 Calibration board from center of the rear wheels using a laser measure.
I used a tape measure.
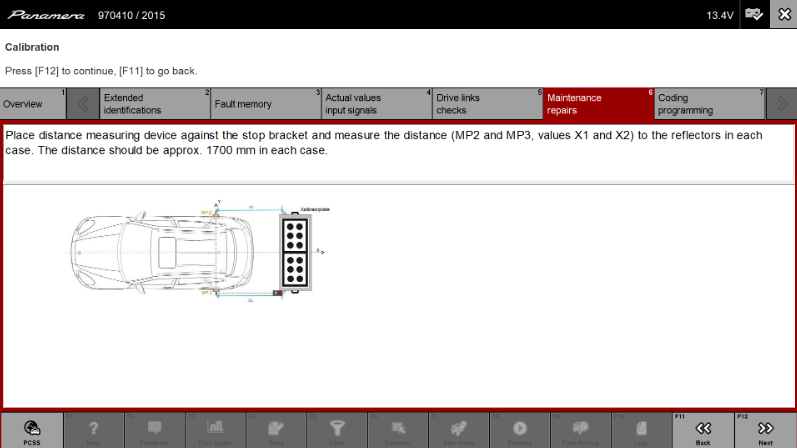
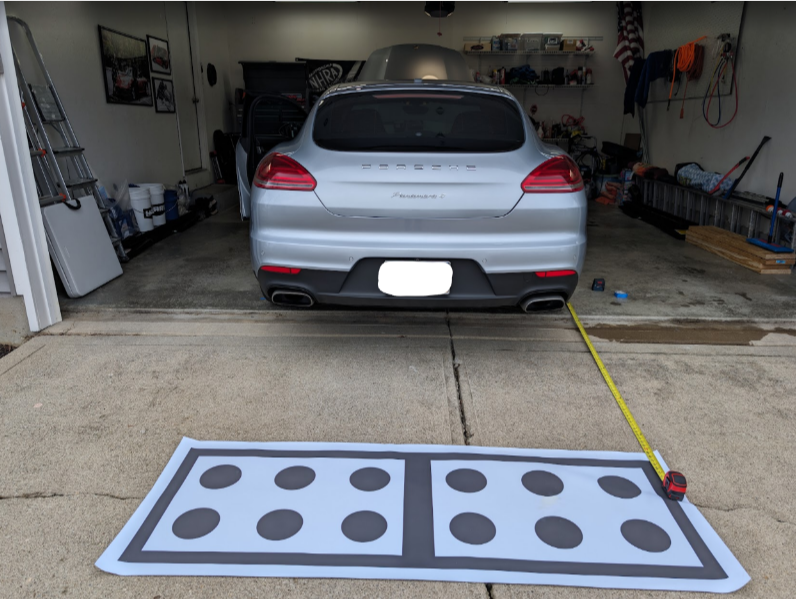
8. PIWIS shows the distance to the board from the center of the wheels at 1700mm.
I used a tape measure from the edge of the black line towards the car to the center of the rear wheels marked with masking tape on the ground.
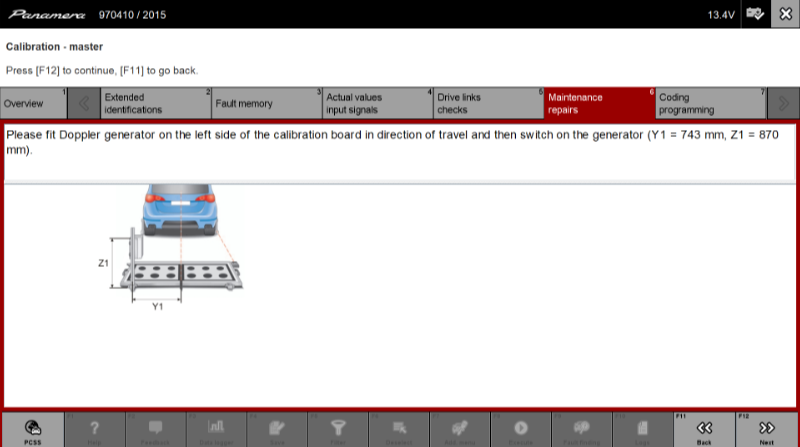
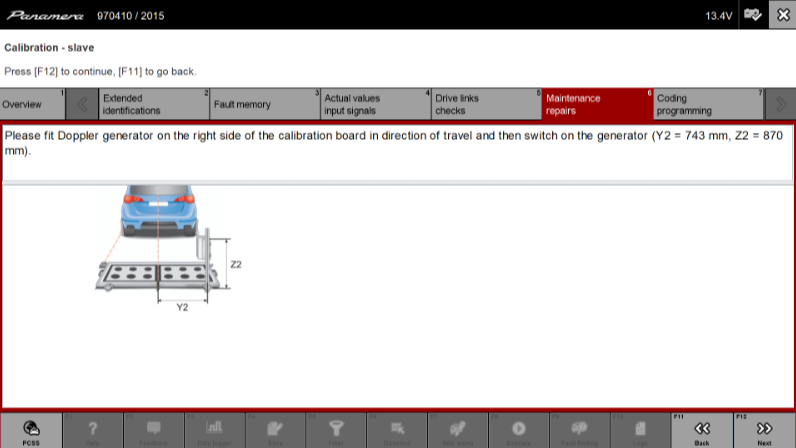
9. PIWIS will show the offset and height of the VAS6350/4 Doppler Generator at 743 mm left from center of car, and 870mm in height for driver side (in a left hand drive) calibration
Once again, I used a tape measure to place the Doppler Generator
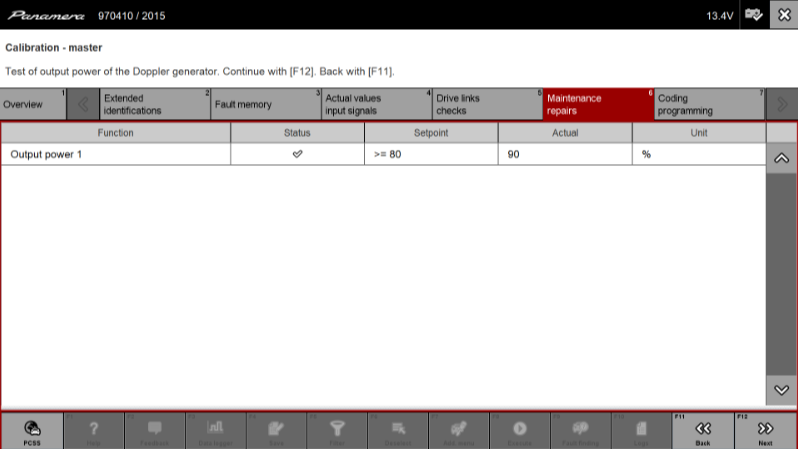
10. Plug in the Doppler Generator fan once it is placed
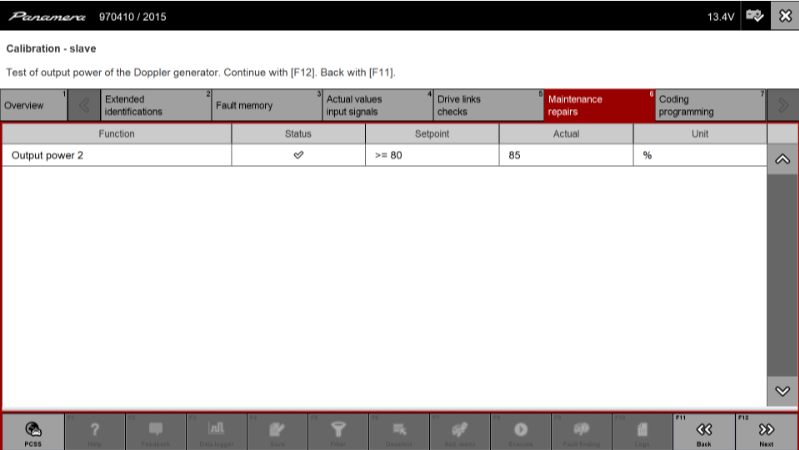
I did have to place a thick plastic bag over the fan to get it to spin faster and more consistent, otherwise I was getting lower output power ratings from PIWIS. PIWIS needs to show >= 80% output power. Just with the fan in the open air I was getting 35% - 40%. By adding a thick plastic bag around the fan, it prevented outside wind from affecting the fan, and allowed the fan to spin noticeably faster (I am guessing the air inside the bag got moving quickly and helped the fan rotate faster since it wasn't moving all of the air around it in the atmosphere). With the bag around the fan, I was getting 85% - 90% output power and it allowed PIWIS to continue. If you cannot get output power at or over 80% within a certain timeframe (I believe 1 minute) you will get an error and have to start the entire process over.
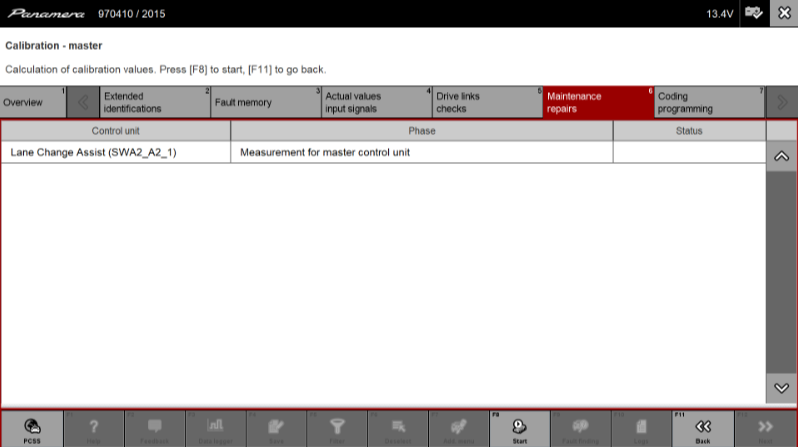
11. Once output power is adequate, PIWIS will measure the Doppler from the Lane Change Assist Driver Side (on a left have drive. You must start this process by clicking the F8 Start button)
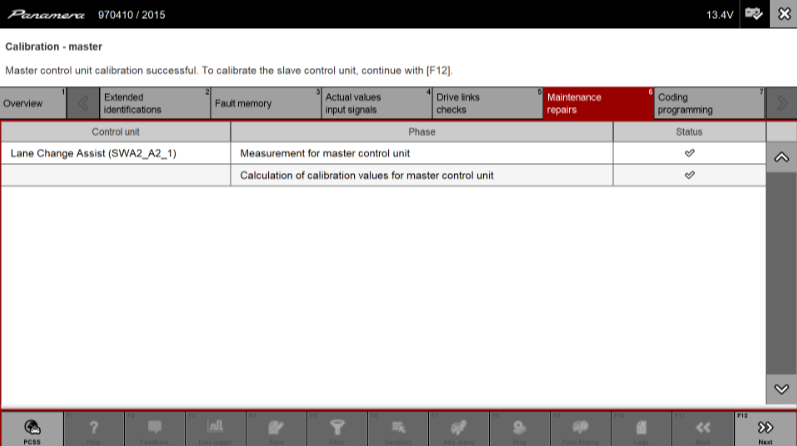
12. Once doppler is successfully measured, the calibration value will be calculated
13. Now PIWIS will show the offset and height of the VAS6350/4 Doppler Generator at 743 mm right from center of car, and 870mm in height for passenger side (on a left hand drive) calibration.
Once again, I used a tape measure to place the Doppler Generator.
14. Repeat step 10 to measure output power, it must be >= 80%
15. Once output power is adequate, PIWIS will measure the Doppler from the Lane Change Assist Passenger Side (on a left have drive. You must start this process by clicking the F8 Start button)
16. Once doppler is successfully measured, the calibration value will be calculated
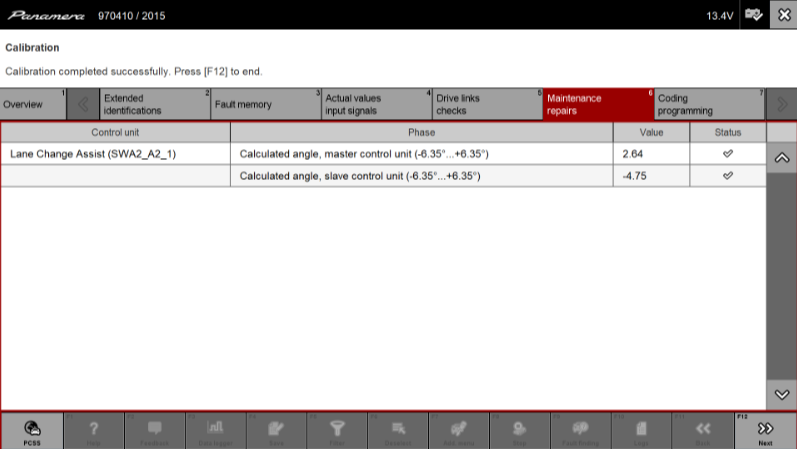
17. If all steps were successful, PIWIS will show calibrated angles for both driver and passenger side.
Lane Change Assist is now fully coded and calibrated!
This whole process from setup to cleanup took about an hour.
I found some interesting info on Lane Change Assist for the Panamera, including technical details below. The LCA uses a FMCW (Frequency Modulation Continuous Wave) RADAR in the 24 GHz range. Details on operation and parameters can be found at: fccid.io - Manual for LCA 2.0
For a detailed explanation on how FMCW RADAR works in automotive applications, see the YouTube video from MATLAB at:
Hopefully this guide can help someone trying to calibrate their Lane Change Assist after module replacement or an issue with the rear bumper, or possibly a retrofit of Lane Change Assist. If retrofitting, you will most likely need to add the option to the Gateway and maybe perform a vehicle handover in PIWIS.
@tx-911 - Thank you! Glad you found this informative.
Below is a discussion on the board with an image for dimensions, and one of the links in the discussion includes a PDF. Keep in mind the board is actually not really needed for lane change assist calibration, just for positioning. You could use anything that size (1900mm x 700mm) including something like masking tape on the ground. If you need to calibrate the rear camera though, this pattern I believe is required. Just added another tool to the collection
Wow that is impressive. Honestly I would have paid the 600 when it was offered lol.. Not much you can get from a dealer service dept for 600 bucks, but to each his own!
Awesome post here... i wish id seen this earlier! I have a VM version using the VX Diag SE with the Porsche license. I was collecting screen shots of the setup procedures to keep for myself when I decided to do the same with the Lane Change Assist. Selected "calibrate" just to open the routine to get the details of the procedure. I thought at first I must have selected the wrong thing when it started automatic coding! So yeah.. anyways.. I have the doppler and 6350 target and all but I just recently got my VM tester working this week. So I've already looked at getting the VNCI but I would like to get the same setup you went with so I can do the coding. Can you help me contact who helped you?
@rnlst_log is the one who got me squared away with the proper software. You may also find him on telegram at mhx_log. I used the VNCI PT3G he recommended, found at buyobdii VNCI PT3G
Out of curiosity, what are you using for the doppler generator?
@rnlst_log is the one who got me squared away with the proper software. You may also find him on telegram at mhx_log. I used the VNCI PT3G he recommended, found at buyobdii VNCI PT3G
Out of curiosity, what are you using for the doppler generator?
Thanks, I will reach out. I do alot of ADAS calibrations for the shop I work at. Its the doppler simulator made by launch i believe, it works great. I use it to calibrate the lane change assist on Audi/VW, Bentley and also some Mazda blindspots. I have done them with Autel on Porsche before but wanted to use PIWIS 3, so that's what led me down the VMware road. I also thought that it had to be a simple fan or disc that's spins inside so reading this confirmed that. Before I got one I was going to try to build one too but couldn't really find anything. Where did you find the images of the 6430/4 took apart again, Id love to see it.
Last edited by Bravo93bravo; 05-15-2024 at 01:17 PM.
 03-03-2024, 12:59 PM