When you click on links to various merchants on this site and make a purchase, this can result in this site earning a commission. Affiliate programs and affiliations include, but are not limited to, the eBay Partner Network.
There are several threads on this including this one, However finding it wasn’t easy. So in order to put something out there which is easy to find here goes.
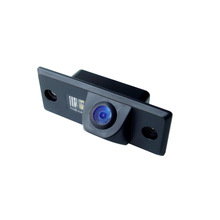
I installed a camera that just replaced the licence plate bulb with a half size led bulb and the camera. Nice and neat, but if you want to go drilling holes in your cayenne like the pro (!) above then go ahead.
So now hopefully you will have a cable running from the head unit to the number (licence) plate light.
The rest should be self explanatory, however for completeness I'll briefly talk about the wiring.
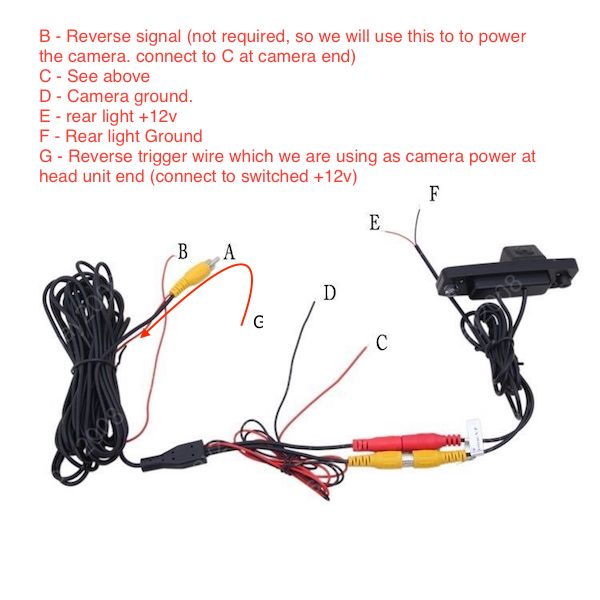
The camera wiring is a little confusing as there can be lots of wires at the camera end. I fitted a combined camera and led bulb. The bulb part needs power - positive and ground and is simply connected to the old wires that powered the old bulb (brown is ground).
The camera has an RCA jack which plugs into the end of the cable that you ran from the head unit, but the camera also needs power, so there is an additional positive and ground to power the camera, and finally a red cable that runs inside the RCA cable. This is for a reverse trigger.
Now the instructions that came with your camera will probably tell you that you need to run cables everywhere. - to reverse lights etc. Well you don't.
The Canbus contains a reverse selection signal, so that is available at the head unit. (See my aftermarket head unit install DIY). This just provides a signal to the head unit so that it switches to rear camera automatically when reverse is selected).
Ground is available in the tailgate - either the brown wire for the licence plate light, or, if you removed the trim, there is a chassis ground bolt right next to it in the form of a 10mm bolt that all the brown wires in the tailgate are fastened to.
That leaves one connection, the +12v to power the camera. Connect this to the red cable that runs along the RCA lead back to the head unit and you've solved all the problems. You can take power for the red wire from behind the head unit and don't have any more cables to run.
Happy days.
pic attached
You can take power for the red wire from behind the head unit. What do you mean by this? Connect the red wire to a wire somewhere behind the head unit? Which one?
I connected the red wire from the camera video cable to the red wire from the head unit, which is ACC (power comes on when car running). Then connected red wire at other end of video cable to the camera. Works great. $3 camera with butterfly mount on eBay is awesome.
I replaced my PCM 2.1 Bose with a Pioneer SPH-230DAB and reverse camera in my 2008 Cayenne Turbo following these directions. I thought I’d add a few things I learned in doing this to help make this job easier for others.
To begin, this post does a fantastic job at explaining and showing what needs to be done. I also looked to cai-store.com which has write ups on installing the head unit and reverse camera. There are other posts and videos on removing the panels which were also very helpful.
Regarding the head unit, getting the correct adapter to connect the new radio to the car’s original harness was a pain. The guys I bought my adapter through saw on their website that my 2008 had a PCM 3.0 so I got the wrong adapter initially and had to exchange it. If you wonder what adapter you will need I would suggest taking your head unit out before buying, looking to the connections, take pictures of how things are connected, and look to the adapter you’ll buy. This way you can piece together how it will come together. A number of car audio store sell lots of the pieces you’ll need so going with one store to buy everything will also give you some advice on what you need and makes exchanges easier if you take their advice.
The connection adapter itself just plugs together. The different connections are all unique sizes so male and female connections can only go together one way, no way to error here.
Regarding the reverse camera, I changed how I got my RCA cable back from what was described here and followed what the cai-store.com mentions as an option. I ran my RCA cable/ red power cable under the glove box by removing the lower panel, then along the floor, pushing the cable under the paneling and door sills. Once I got to the C pillar, I removed the cover and behind this was a single screw holding the top/front of the lower panel that runs to the back. I removed the screw and pulled it out far enough to fish an electrician’s snake through to get the cable up. When doing this take care not to let the cable interfere with the seat belt in the C pillar. I then ran the electrician’s snake from the C pillar to the D pillar (panel removed) under the vent next to the window. The rest of this post explains really well how to get the wire the rest of the way to the camera.
Removing panels was the worst part of this job and there isn’t an easy way to do it. The panels are flexible and I didn’t break anything. Go slow and have a long screw driver and remove one clip at a time. Look to diagrams and pictures of where the panel connects to help in removing all of them in a good order. Some panels require removing other panels first so keep this in mind.
The camera wiring explanation here is good too. Take care when buying camera that the dimensions line up to the light you have, some sites say the camera will fit but when you look at the measurements they won’t. I installed the reverse camera in place of the license plate light also. Two downsides to this, 1) the camera will always be a little off-center so the guidelines in the monitor view don’t line up exactly and 2) your license plate lights will be different colors and brightness. Both are minor things to me but might bother others.
Next, after I removed the rear hatch interior panel, I cut the wires to the license plate light. I connected my camera’s black ground wire to a ground point in the rear hatch. The ground point has a brown wire screwed to it; this was mentioned in this post also. The other white wire goes to the light’s red wire. At the head unit I connected the camera’s red power cable to the red wire in the adapter giving power to the radio. The wire adapter connector has a green reverse wire that signals to the radio when the car is in reverse so this is done automatically.
Making the head unit fit is tricky. As the cai-store post says some pieces will need to be pushed behind the radio space. I also used a long screw driver to lift other connection adapter pieces up so they are not all bunched at the bottom when I slid the radio in.
I hid my DAB radio antenna above my instrument panel in the space shown on the cai-store. I don’t know if reception will be good but I didn’t like seeing this ugly antenna on my windshield and my FM works fine anyway.
The ars24.com website from which I bought everything has a good instruction video on installing the radio bracket on the radio. It is in German but the demonstration is good and explains some things I didn’t know how to do.
Here is my parts list,
From Ars24.com
· Pioneer SPH-DA230DAB
· RTA 014.472-0 LENKRADADAPTER PORSCHE MIT LICHTWELLENLEITER - CAN bus with MOST
· DAB Antenne CX-DAB
· Antennenadapter Fakra auf DIN gerade ( Art. 8509 ) – antenna adapter Fakra to standard
· Radioblende Porsche Cayenne – brakets
From Amazon.de - Newbee_EU_Store
· 170° HD Camera 1280 x 720P Waterproof IP69K Reversing Camera Night Vision License Plate Light for Porsche Cayenne 2002-2010
Tools,
· Panel removal tools (good plastic ones for the center console especially)
· Electrician’s snake
· T20 T25 T30 bits, there might be more of these needed so buy a set
· Long screw driver
· Wire strippers, wire connectors, knife for the tiny license plate light wires
· Little zip ties to tie up the wires
It takes quite a bit of time so plan on this when you go in to it.

 05-30-2019, 06:52 PM