When you click on links to various merchants on this site and make a purchase, this can result in this site earning a commission. Affiliate programs and affiliations include, but are not limited to, the eBay Partner Network.
This topic is all-to-common in the 958 talk, and there's some instruction in the stickied Transfer Case thread, but no actual DIY write-up. Figured I might as well write something up since I already have the pictures, with an additional "What to definitely never ever ever ever do" insight.
"How To" Change Your 958 Transfer Case Fluid
This is a notorious topic for the 958, and from my understanding affects ALL except the diesel models.
What You Will Need
- A 958 Porsche Cayenne (For your sake hopefully one lacking the dying TC symptoms and you're doing this preemptively)
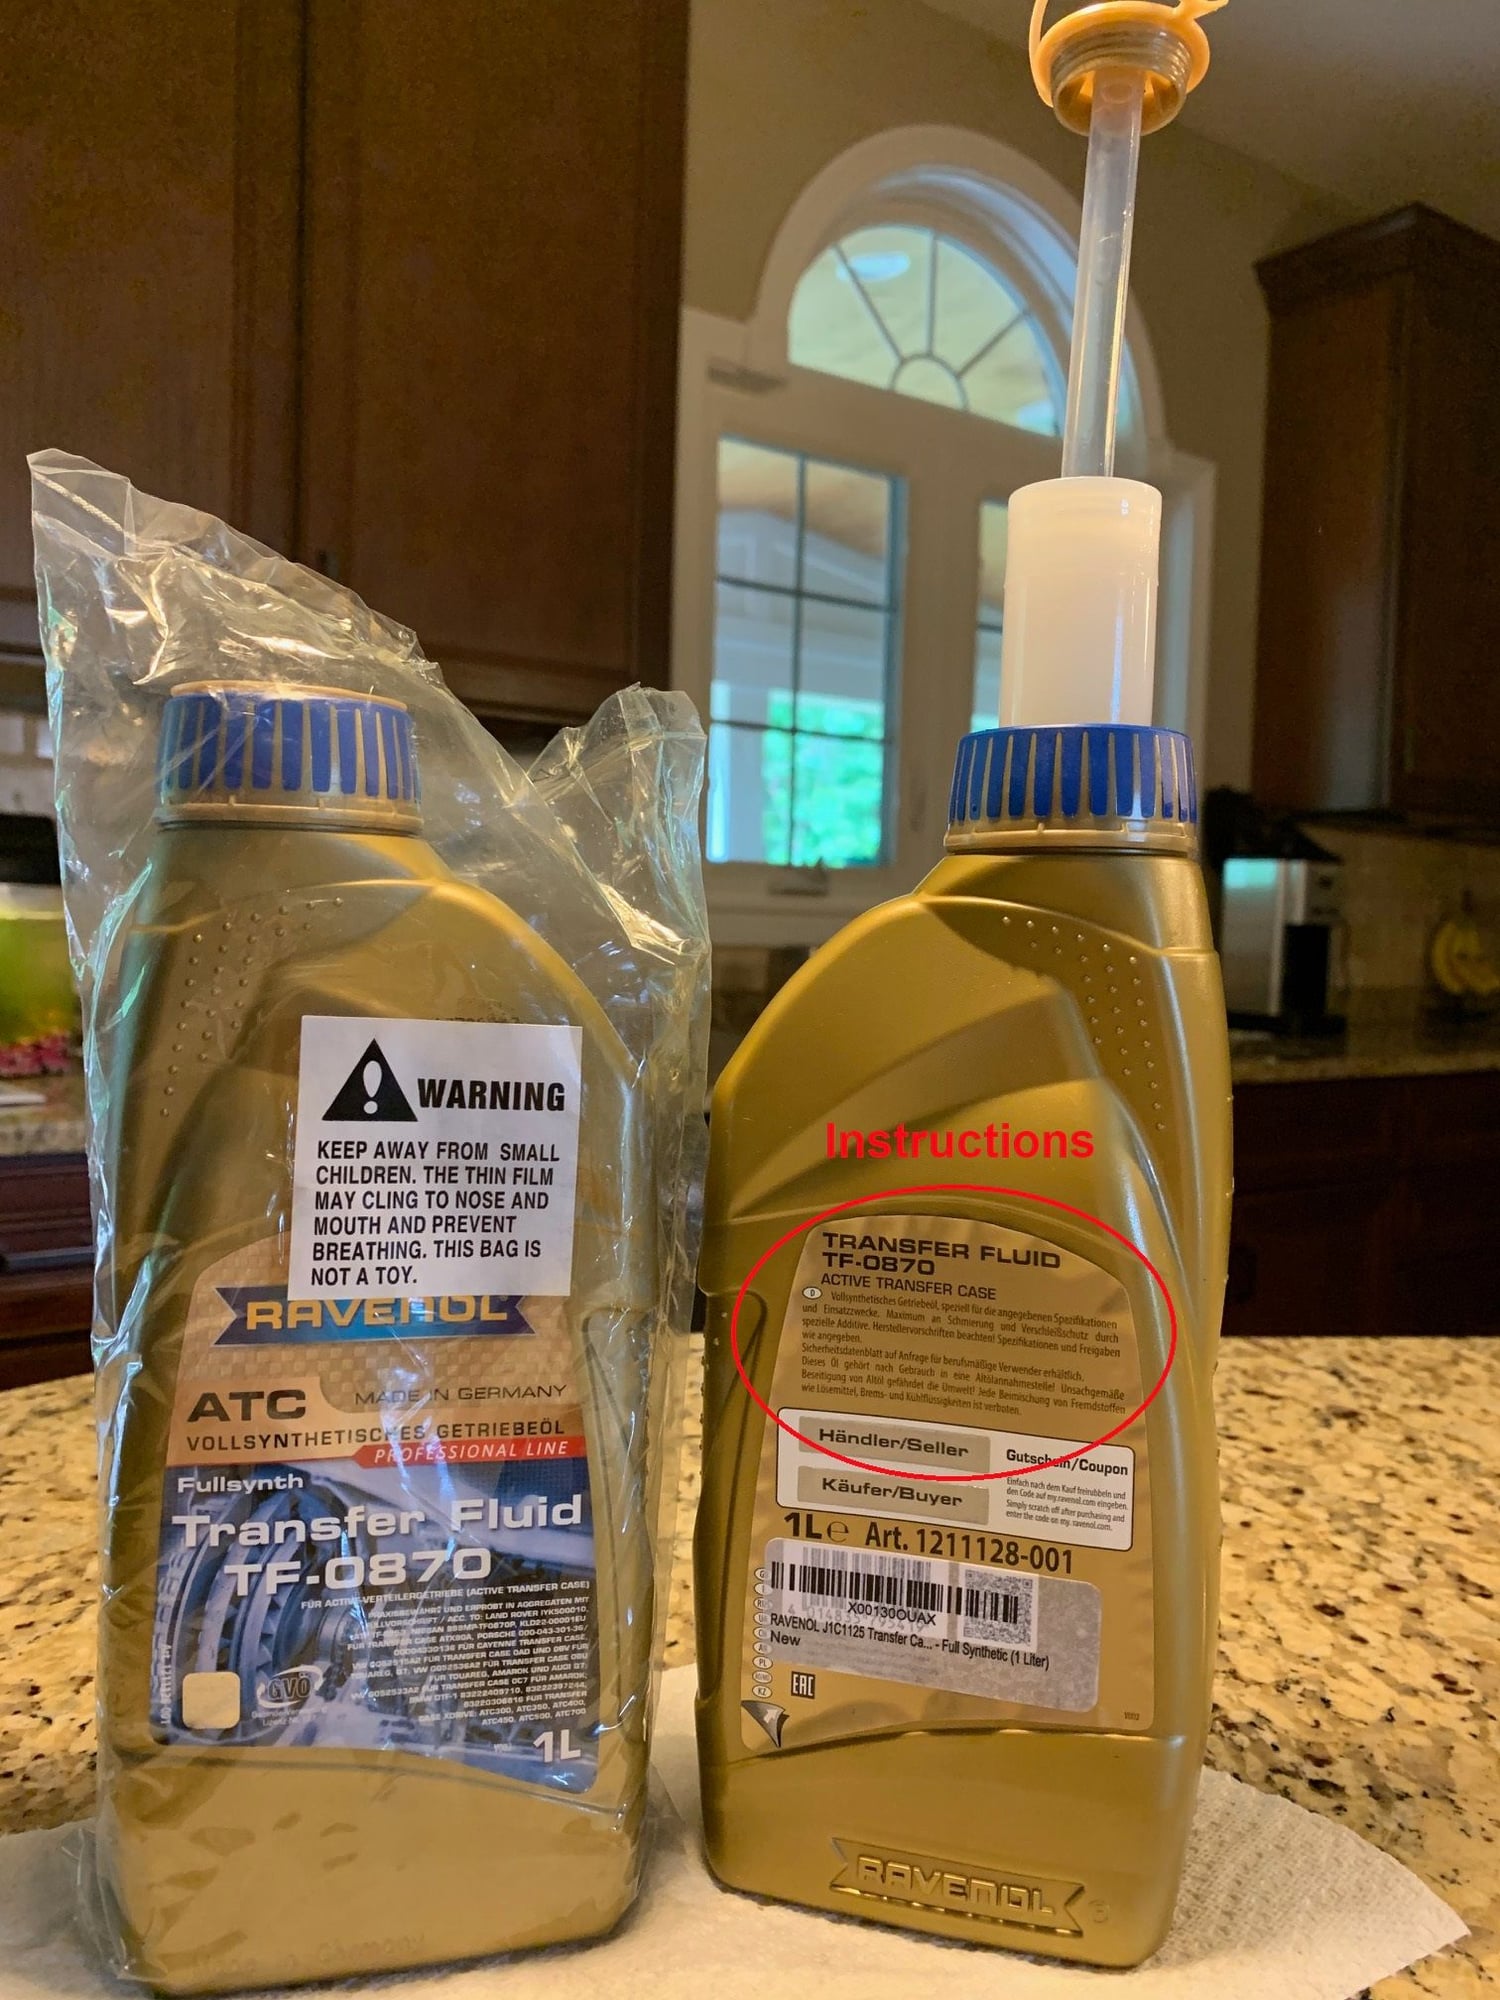
- 1 Liter Transfer Case Fluid. Many have reported best results using
(I ordered 2 liters because "stuff" can happen... in my particular case it did)
- Drain Pan (any size should suffice, capacity is under 1 liter)
Tools:
- 3/8" Ratchet
- 8mm hex bit. I used the same stubby one that was already in my hand from doing the differential fluid at the same time, but any should do. An 8mm Allen wrench will get the job done, but that's not advisable as you can't use a torque wrench that way
- 3/8" Torque Wrench. Be sure it's properly calibrated and you set the correct torque value (15 ft/lb OR 20Nm... do NOT get those values mixed up) I cannot even begin to stress the importance of this
Other
- New drain and fill plugs. I'd recommend using new for this due to the thread sealant that comes on the bolts. Trust me, that stuff's important.
- Good Music (to individual taste)
*A means of lifting the car while keeping it level is highly recommended. Many have mentioned raising the air suspension to it's highest level for servicing. Mine has standard suspension and I was able to do this all on the ground.
*Performing service when cold is recommended. Sticking your hands and face in the hot underbelly of the beast is not pleasant. ATF is bad enough, hot ATF oil is miserable. Additionally, aluminum housings and steel bolts have different expansion rates when hot, taking that variable away allows this to go more smoothly.
What To Do:
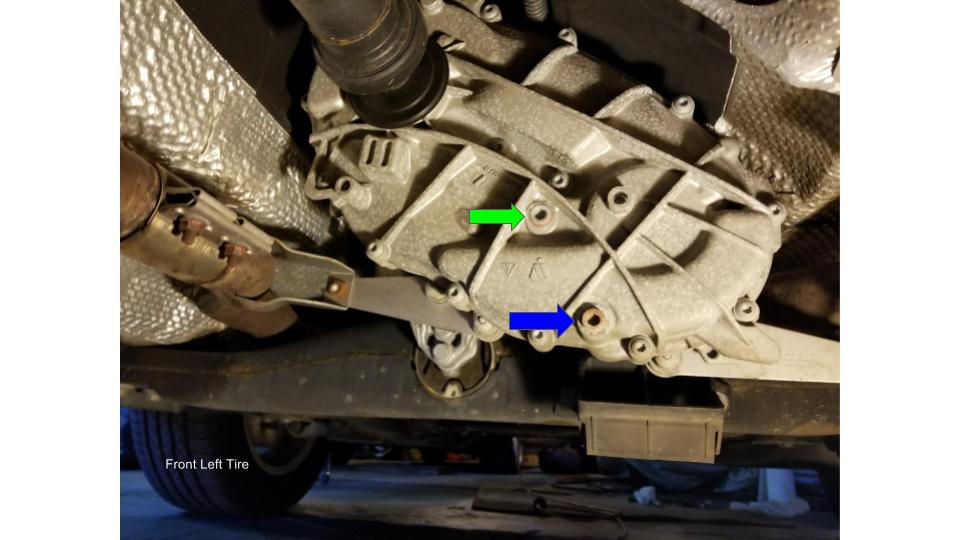
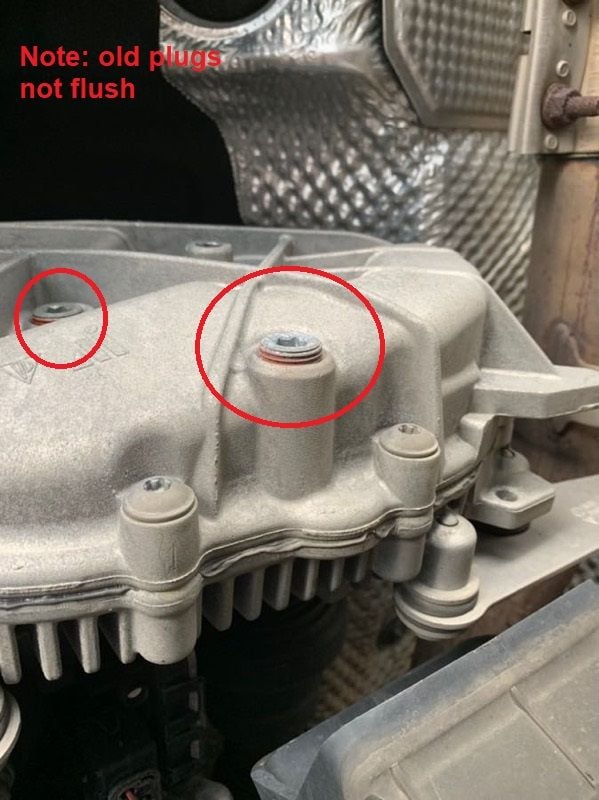
Photo of transfer case. Taken facing towards the front of the vehicle, from the passenger side: (GREEN = FILL / BLUE = DRAIN)
1. Slip on under the passenger side, roughly near the gap between the front and rear doors. Nothing in the way to remove.
2. Remove the FILL PLUG FIRST. Not only does this aid in fluid flowing out the unit easier/quicker, but if you can't get the fill plug off, and have drained the fluid, you'll have gotten into a sticky predicament.
3. With the pan underneath, remove the drain plug. The fluid in mine shot back an unexpected amount, so maybe have the front edge of the pan directly underneath the drain hole.
4. Clean as much fluid and debris from the threading of the holes as possible
5. When fluid finishes draining, carefully hand start the replacement new drain plug. The sealant will add a fair bit of resistance. Using your properly-calibrated torque wrench, set to 15 ft/lb OR 20Nm (again, do NOT mix those figures up) finish tightening the the drain plug (at the bottom of this write-up, read where it all went wrong for me and you'll understand why I'm being so adamant about proper reinstallation)
6. Fill the Transfer Case. You'll probably want to keep the pan under the unit for this step, as it's a fill-to-overflow unit. This is also why it's important that the vehicle is level when this is performed. Take your bottle of Ravenol, and pop the top up and a tube will reveal itself. With this tube fully extended, you'll be able to use this without the need of a pump to fill the transfer case. It should take the better part of that liter. When it starts overflowing, stop, let it do it's thing and clean up the remains.
7. Installing the new replacement fill plug is the exact same as step 5.
8. When you've done all this properly, be VERY glad that you're not me. Here's why:
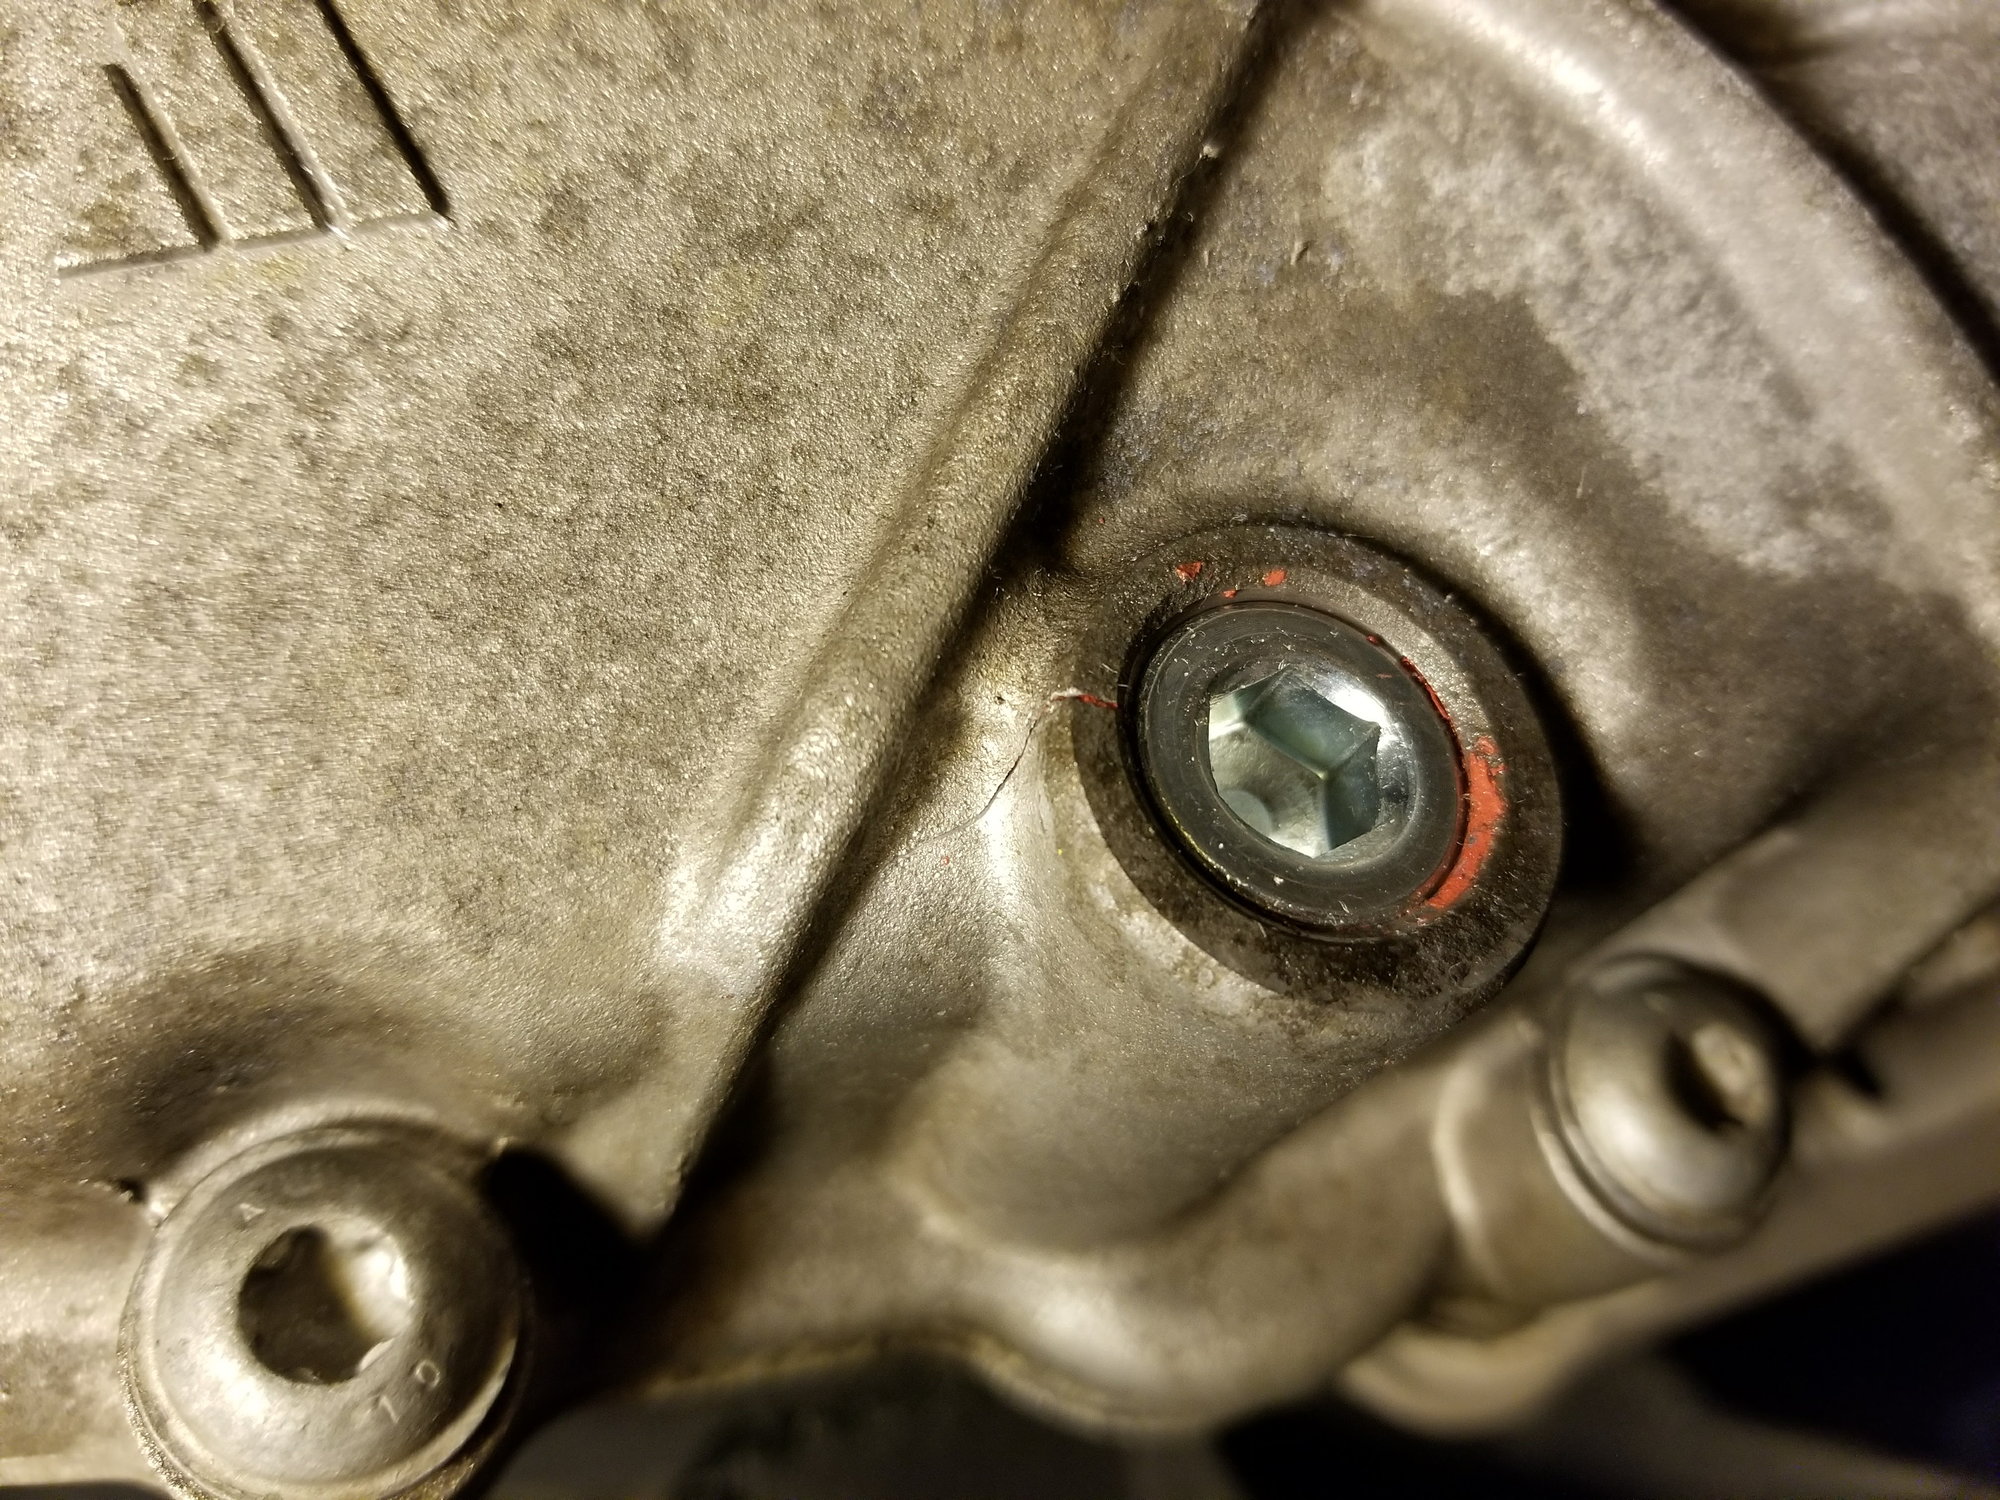
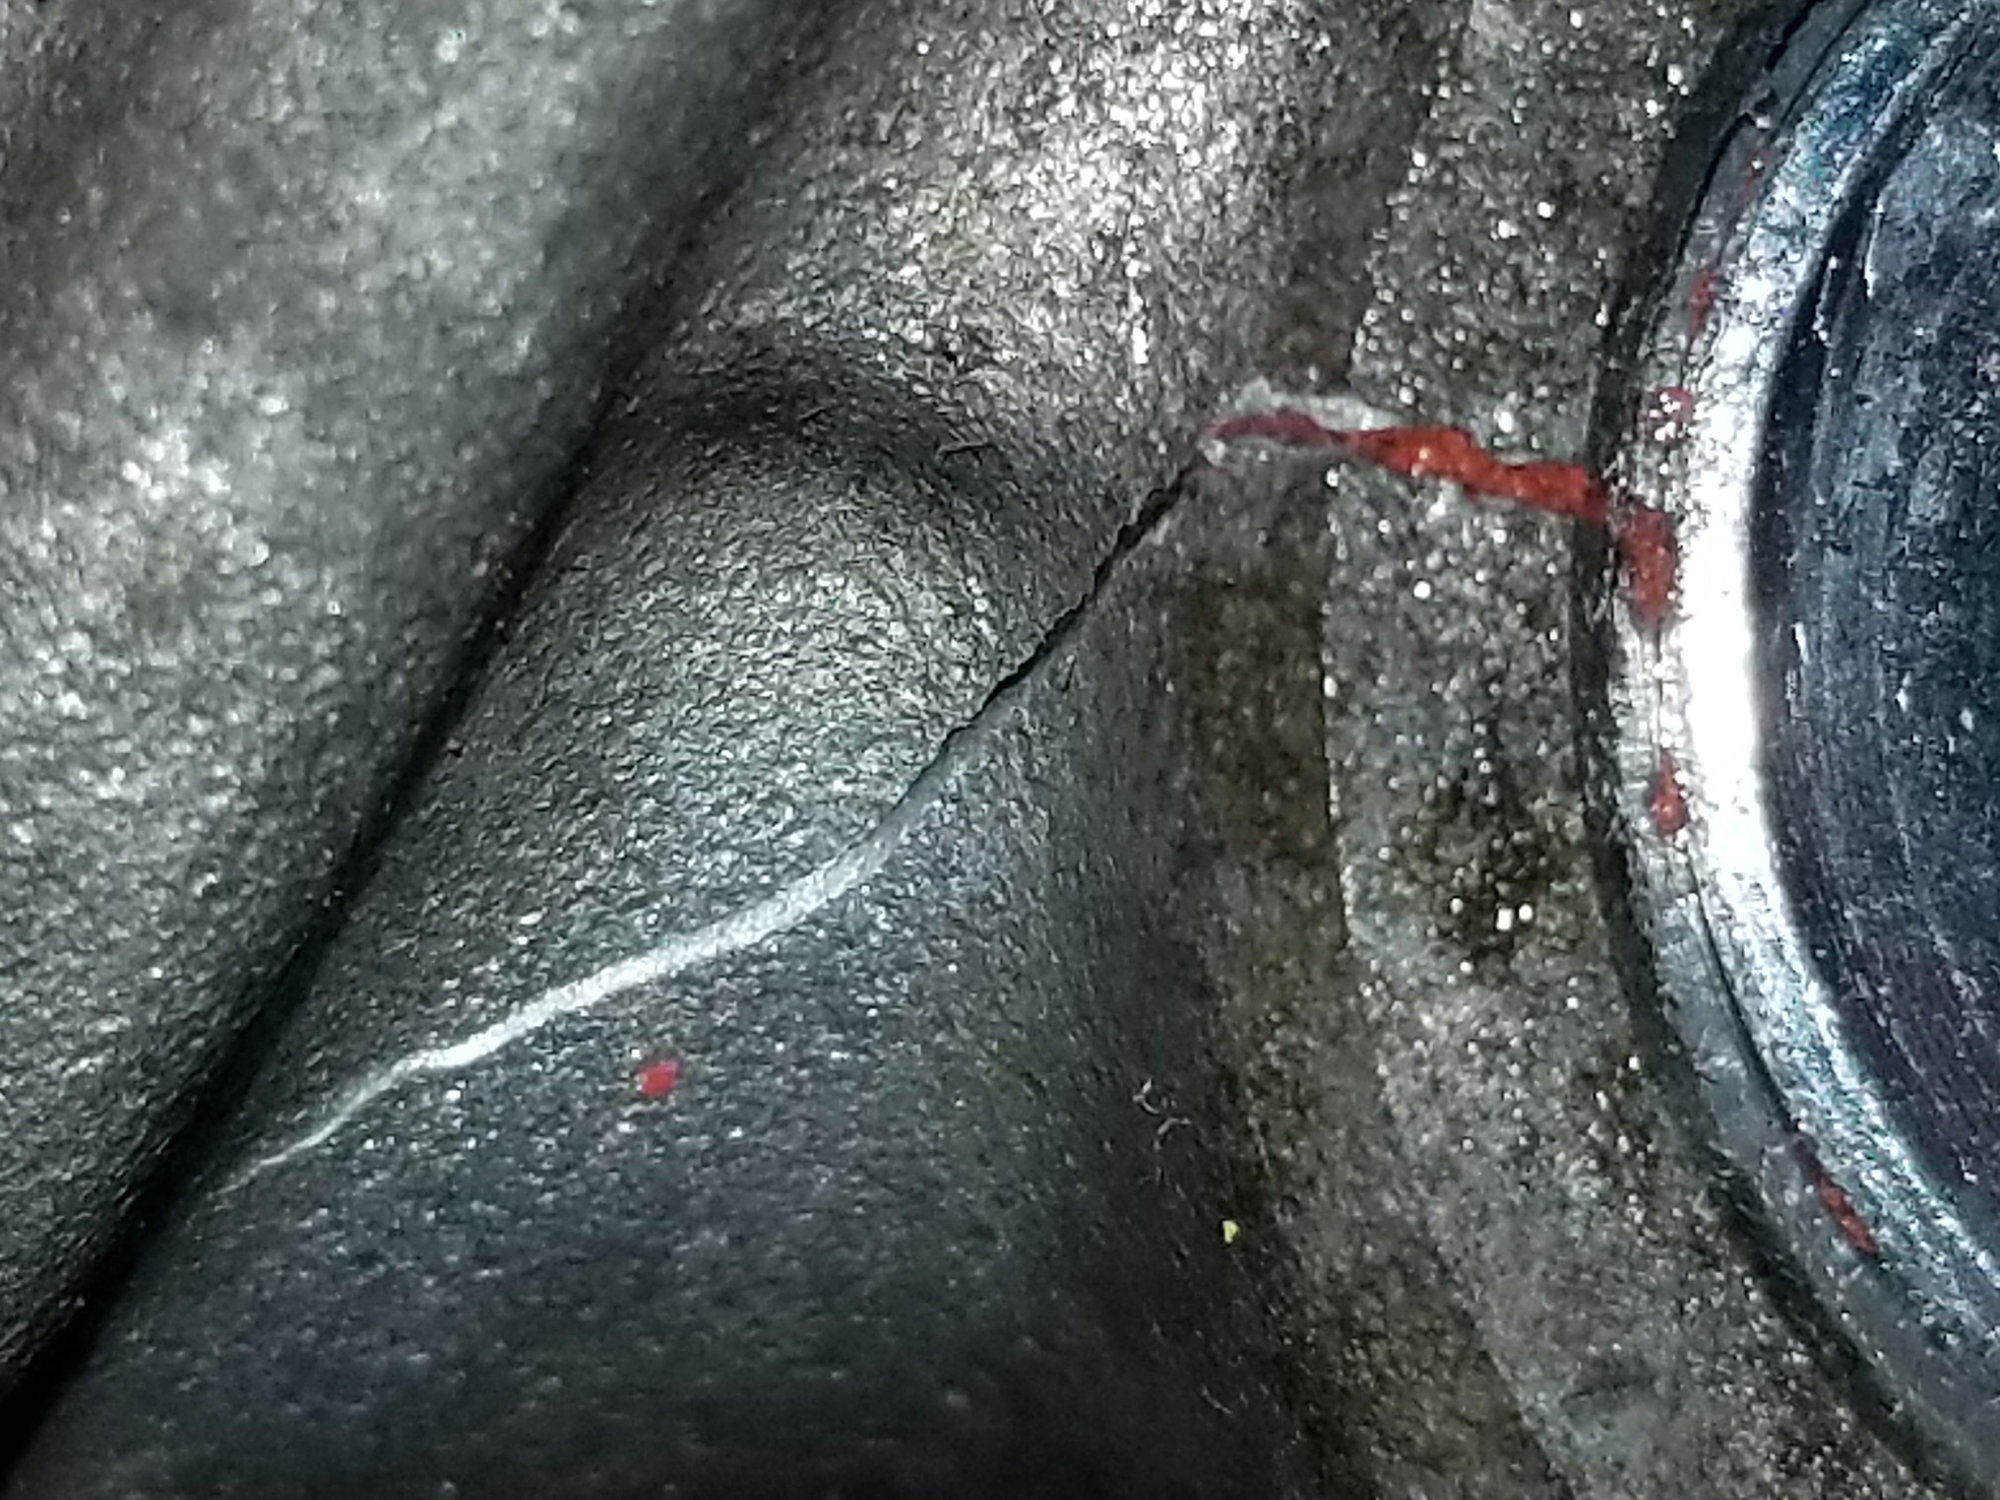
With all of my torque wrenches missing that day, I grabbed my father's 1/2" drive torque wrench that he had been improperly storing (locked on the highest setting, not all the way off) and a 1/2F-3/8M adapter. I then set it to 20 ft/lb..... I'm an idiot, DO NOT DO THAT. 15ft/lb OR 20Nm is the correct way... I got them backwards. Upon torquing it down and beginning to add fluid I noticed a small drip off the bottom of the unit, when it was nowhere near full. I then noticed the little hairline crack in the housing.
After some time, and me losing my bananas, the sealant (this is why buying new ones of these is a GOOD idea) had worked it's way into the areas of the crack allowing fluid passage and stopping it.
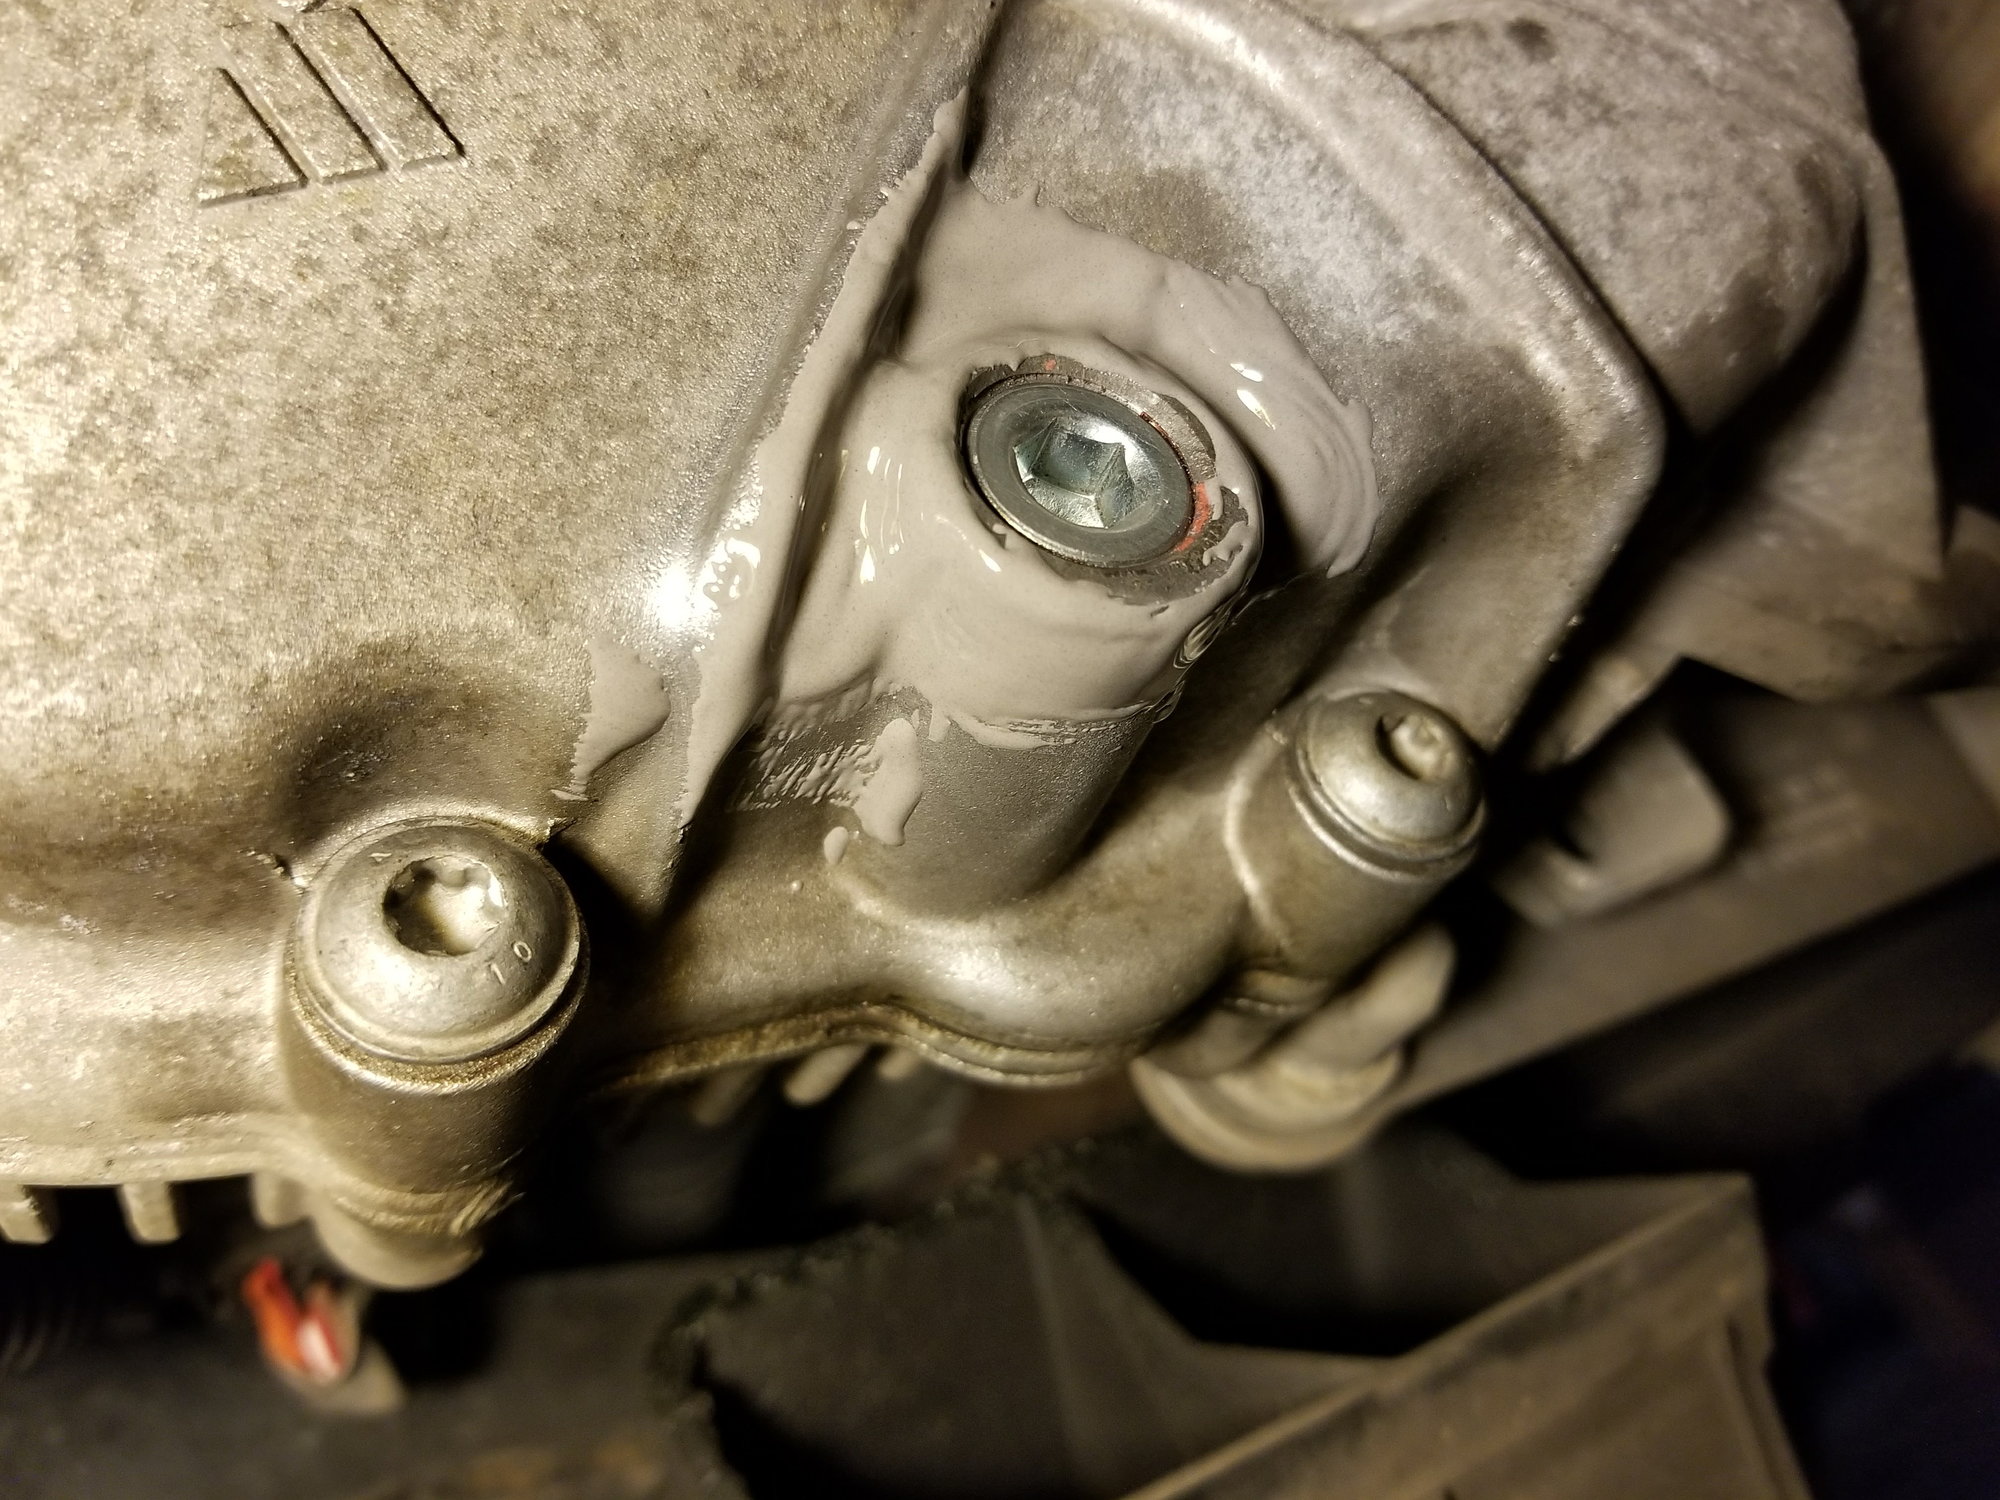
Seeing that had stopped the leak, but still left a crack exposed, I turned to my good ol' friend JB Weld. After some extensive cleaning with a wire brush and acetone around the affected area, using the tip of a safety pin I worked it into the crack as much as possible, then proceeded to give the entire area a healthy coating.
Now, this might seem like a hack fix. It kinda is, but I've seen this stuff hold transmissions and differentials together for a VERY long time, and those see much higher loads, temperatures, and more shock than this Transfer case will. Either way, I intend to replace it when these units, or even just parts like the rear cover, are more easily and affordably attainable. I've driven it, heat cycled it and check it repeatedly, and has shown to be holding up perfectly fine.
At this point you could be reading this thinking "why the hell would I listen to anything this guy has to say, especially when it comes to working on cars" or learn from my mistakes. I found out the hard way, and told you about it, so now you don't have to.
Standard DIY Disclaimer: (borrowed from deilenberger, and modified in this case) "You may be an ape with a wrench (like I apparently am). It's possible you should never be in the same garage as a car when you're holding a wrench (OK, Im not that bad). Therefore - what I just described is what I would do - not what I'm suggesting that you do. If you break it, bend it, pork it up, kill yourself doing it - I never told you to do it. I just told you how I'd do it. You're a big boy - man up if you screw up."
As always when servicing a motor vehicle, follow all safety precautions possible
Thanks much again - for the writeup that includes a "don't do this.." and I guess my disclaimer applies. Folks - be gentle tightening the fill and drain plugs. Snug and no tighter.
BTW - I doubt if the extra 5-ft/lbs was what cracked the case. The problem was the size of the torque wrench. Most 1/2" are not accurate at their lowest settings, plus the lever arm they provide is such that it's way too easy to overtorque small fasteners with them. The right wrench - an extra 5 probably wouldn't have mattered. I use a 3/8" electronic for most work, and for small values I'll dig out the 1/4" one, or the 3/8" dial one (an ancient SnapOn a neighbor gave me.. nice tool..) And then I'll try to sneak up on the value (set the clicker or beeper ones to 5 ft/lbs less than the required torque.. then when it beeps you'll probably find you're right where you wanted to be.)
So is it a myth that you have to fill the fluid in the Transfer case and Diffs only when they are at a specific temp and the only way to measure the temp is via hookup into a computer with a special cable and program?
Last edited by bcheney; 09-23-2017 at 11:30 AM.
Reason: Typo
So is it a myth that you have to fill the fluid in the Transfer case and Diffs only when they are at a specific temp and the only way to measure the temp is via hookup into a computer with a special cable and program?
You're thinking of the transmission - and that can be done just using a laser-digital thermometer. No need for a hookup or computer (although an iCarScan diagnostics tool will do this - to your smartphone..)
The diffs and transfer case are fill until oil comes out the fill plug. Install plug (gently in the case of the transfer case) and you're done.
I cracked my case at the drain plug as shown above and have been furious about this for the past week+ because I was using a properly calibrated torque wrench and following the above. I subscribed to Alldata today and the torque spec above is WRONG
The correct torque spec for the transfer case drain plug and inspection plugs is 13ft/lb or 17Nm
I'll repeat - highlighting the important stuff, what I said above:
Originally Posted by deilenberger
BTW - I doubt if the extra 5-ft/lbs was what cracked the case. The problem was the size of the torque wrench. Most 1/2" are not accurate at their lowest settings, plus the lever arm they provide is such that it's way too easy to overtorque small fasteners with them. The right wrench - an extra 5 probably wouldn't have mattered. I use a 3/8" electronic for most work, and for small values I'll dig out the 1/4" one, or the 3/8" dial one (an ancient SnapOn a neighbor gave me.. nice tool..) And then I'll try to sneak up on the value (set the clicker or beeper ones to 5 ft/lbs less than the required torque.. then when it beeps you'll probably find you're right where you wanted to be.)
I really doubt 2 ft/lbs was to blame for cracking the case.
Somewhere else I've make the suggestion that one tighten these using their brain and a standard 3" long Allen wrench. No torque wrench, no ratchet wrench - just a simple Allen wrench. A SHORT Allen wrench used with 3 fingers. The reason being - the short wrench provides less mechanical advantage so chances of over-torquing the plugs are minimized. The brain part is - knowing when to stop. Stop when there is resistance to turning. The plug will not bottom out and provide a solid torque reading. Since it's covered in sealant (goop) this changes the torque characteristics. Since it's a tapered plug - as the sealant is compressed - the torque required to turn it will decrease. LOOK at where the old plug is and how far it's in BEFORE removing it. Take a picture of it with your cell phone. Your goal is to get the new plug in about the same amount - or less. Use 3 fingers on the 3" Allen wrench, no cheaters, extensions or anything else. Do not hang on the 3" Allen wrench. Don't brace yourself to turn it.
If you insist on using a torque wrench - find a 1/4" drive one. The 12 ft/lbs will probably be in the middle of the range of the wrench, not at the lowest setting. The handle of the 1/4" wrench will be shorter so your muscles would have to work harder to over-torque it.
And a final suggestion a friend once made for beginning DIY wrenchers.. go to a lawnmower repair shop and ask if they have a "dead" engine they can give you. One that isn't worth repairing. Take it home - disassemble it - then reassemble it. Take it down to bits, then put it all back together again. By the time you're done you'll have a much better feel for how to wrench, and what sort of force can be used on what sort of parts. It doesn't matter if you screw up - indeed it's probably GOOD if you screw up - you're learning, and the engine is dead already. No loss for a screwup.
I've warned about this before - but I continue to see people who are cracking their transfer case covers. Don't be one of those people, it's not cool at all. After the first warning, I thought we'd never see another one - but I was wrong, I've seen at least 5 people reporting they've cracked their cases. This isn't good since Porsche probably won't take a transfer case with a JB-Weld fix done to it as a "core" against a new case - and they do want the cores back.
What I've said before:
Originally Posted by me
Somewhere else I've made the suggestion that one tighten these using their brain and a standard 3" long Allen wrench. No torque wrench, no ratchet wrench - just a simple Allen wrench. A SHORT Allen wrench used with 3 fingers. The reason being - the short wrench provides less mechanical advantage so chances of over-torquing the plugs are minimized. The brain part is - knowing when to stop. Stop when there is resistance to turning. The plug will not bottom out and provide a solid torque reading. Since it's covered in sealant (goop) this changes the torque characteristics. Since it's a tapered plug - as the sealant is compressed - the torque required to turn it will decrease. LOOK at where the old plug is and how far it's in BEFORE removing it. Take a picture of it with your cell phone. Your goal is to get the new plug in about the same amount - or less. Use 3 fingers on the 3" Allen wrench, no cheaters, extensions or anything else. Do not hang on the 3" Allen wrench. Don't brace yourself to turn it.
So if you have ANY DOUBT about your ability to do this job - simply DON'T DO IT. Pay a professional.
Great article . Worked perfectly. The recessed plugs are exposed by 2 or 3 threads, so the use of an Allen wrench is spot on. I can easily see
that if I didn't read this I would tighten them way too much!
Excellent write-up and thank you so much for the warning on the TC cracking!! Following Deilenberger's advice, I took a photograph of the old plugs before removal. I don't think I would have noticed that the plug wasn't flush or recessed if it wasnt' suggested in the write up.
Weird bottle design but effective. Don't worry, the bottle comes with instructions on how to open. Unfortunately the instructions are in German, which I can't read. Based on the amount of spatter when opening the spout, I'm reasonably confident it says "don't wear a nice shirt when opening the bottle." Too late.
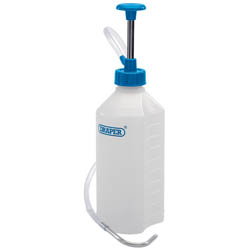
Bought some Ravenol Fluid from Ravenol.co.uk., also bought a Draper Multi-Purpose 1 litre bottle to pump the fluid into the transfer box.
The fluid in the transfer case was pretty dark in colour and there was plenty in there.
I put the air suspension on the highest setting, plenty of room to get under the car without jacking it up.
Took less than 10 minutes to drain and re-fill, just about the easiest job I have done on the car.
Have driven the car for about 20 miles now and haven't heard any thumps or felt any transmission jumps, not sure if I have caught the problem in time, will report back once I have put some more miles on the car.
Can't thank the community enough for the heads up on how to avoid the cost of a transfer box replacement.
Would be nice to see some pictures / schematics of the inside of the transfer case to see what the (assume it's a clutch pack) looks like
Would be nice to see some pictures / schematics of the inside of the transfer case to see what the (assume it's a clutch pack) looks like
If you poke around a bit in this forum - there are some threads on rebuilding the transfer cases, including links to videos.. You can see the inside quite easily. The clutch pack is about identical to a wet-clutch motorcycle clutch. Plates and friction disks.
If I happen across that thread I might consider making a DIY out of it, but my recollection was it wasn't quite complete.
I wonder if part of the problem with over-tightening and cracking the case is that the torque spec is (probably) a "dry" spec for a new case. At a fluid change, the threads are going to be soaked and slippery, and the torque needed to get to the same level of thread engagement is going to be lower.
I want to thank everyone, this information is priceless, my local dealer told me it would cost $500.00 for the transfer case fluid change! It cost me $79 and about 15 min of my time, and thanks to all the advice on this forum regarding over tightening the plugs, if I didn�t read this i would have cranked them down way too tight and probably would have cracked the case. Thanks again
 08-18-2017, 01:37 AM