When you click on links to various merchants on this site and make a purchase, this can result in this site earning a commission. Affiliate programs and affiliations include, but are not limited to, the eBay Partner Network.
This topic is all-to-common in the 958 talk, and there's some instruction in the stickied Transfer Case thread, but no actual DIY write-up. Figured I might as well write something up since I already have the pictures, with an additional "What to definitely never ever ever ever do" insight.
"How To" Change Your 958 Transfer Case Fluid
This is a notorious topic for the 958, and from my understanding affects ALL except the diesel models.
What You Will Need
- A 958 Porsche Cayenne (For your sake hopefully one lacking the dying TC symptoms and you're doing this preemptively)
- 1 Liter Transfer Case Fluid. Many have reported best results using
(I ordered 2 liters because "stuff" can happen... in my particular case it did)
- Drain Pan (any size should suffice, capacity is under 1 liter)
Tools:
- 3/8" Ratchet
- 8mm hex bit. I used the same stubby one that was already in my hand from doing the differential fluid at the same time, but any should do. An 8mm Allen wrench will get the job done, but that's not advisable as you can't use a torque wrench that way
- 3/8" Torque Wrench. Be sure it's properly calibrated and you set the correct torque value (15 ft/lb OR 20Nm... do NOT get those values mixed up) I cannot even begin to stress the importance of this
Other
- New drain and fill plugs. I'd recommend using new for this due to the thread sealant that comes on the bolts. Trust me, that stuff's important.
- Good Music (to individual taste)
*A means of lifting the car while keeping it level is highly recommended. Many have mentioned raising the air suspension to it's highest level for servicing. Mine has standard suspension and I was able to do this all on the ground.
*Performing service when cold is recommended. Sticking your hands and face in the hot underbelly of the beast is not pleasant. ATF is bad enough, hot ATF oil is miserable. Additionally, aluminum housings and steel bolts have different expansion rates when hot, taking that variable away allows this to go more smoothly.
What To Do:
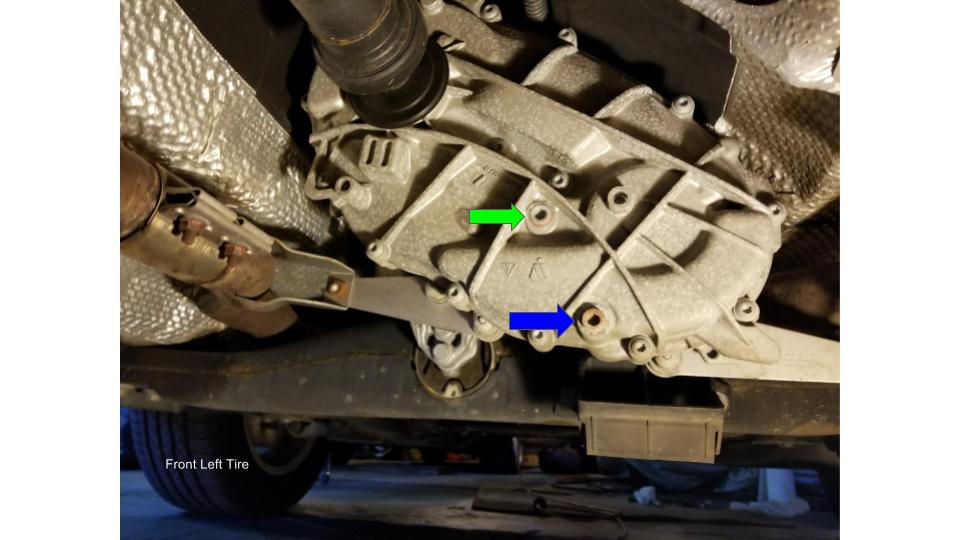
Photo of transfer case. Taken facing towards the front of the vehicle, from the passenger side: (GREEN = FILL / BLUE = DRAIN)
1. Slip on under the passenger side, roughly near the gap between the front and rear doors. Nothing in the way to remove.
2. Remove the FILL PLUG FIRST. Not only does this aid in fluid flowing out the unit easier/quicker, but if you can't get the fill plug off, and have drained the fluid, you'll have gotten into a sticky predicament.
3. With the pan underneath, remove the drain plug. The fluid in mine shot back an unexpected amount, so maybe have the front edge of the pan directly underneath the drain hole.
4. Clean as much fluid and debris from the threading of the holes as possible
5. When fluid finishes draining, carefully hand start the replacement new drain plug. The sealant will add a fair bit of resistance. Using your properly-calibrated torque wrench, set to 15 ft/lb OR 20Nm (again, do NOT mix those figures up) finish tightening the the drain plug (at the bottom of this write-up, read where it all went wrong for me and you'll understand why I'm being so adamant about proper reinstallation)
6. Fill the Transfer Case. You'll probably want to keep the pan under the unit for this step, as it's a fill-to-overflow unit. This is also why it's important that the vehicle is level when this is performed. Take your bottle of Ravenol, and pop the top up and a tube will reveal itself. With this tube fully extended, you'll be able to use this without the need of a pump to fill the transfer case. It should take the better part of that liter. When it starts overflowing, stop, let it do it's thing and clean up the remains.
7. Installing the new replacement fill plug is the exact same as step 5.
8. When you've done all this properly, be VERY glad that you're not me. Here's why:
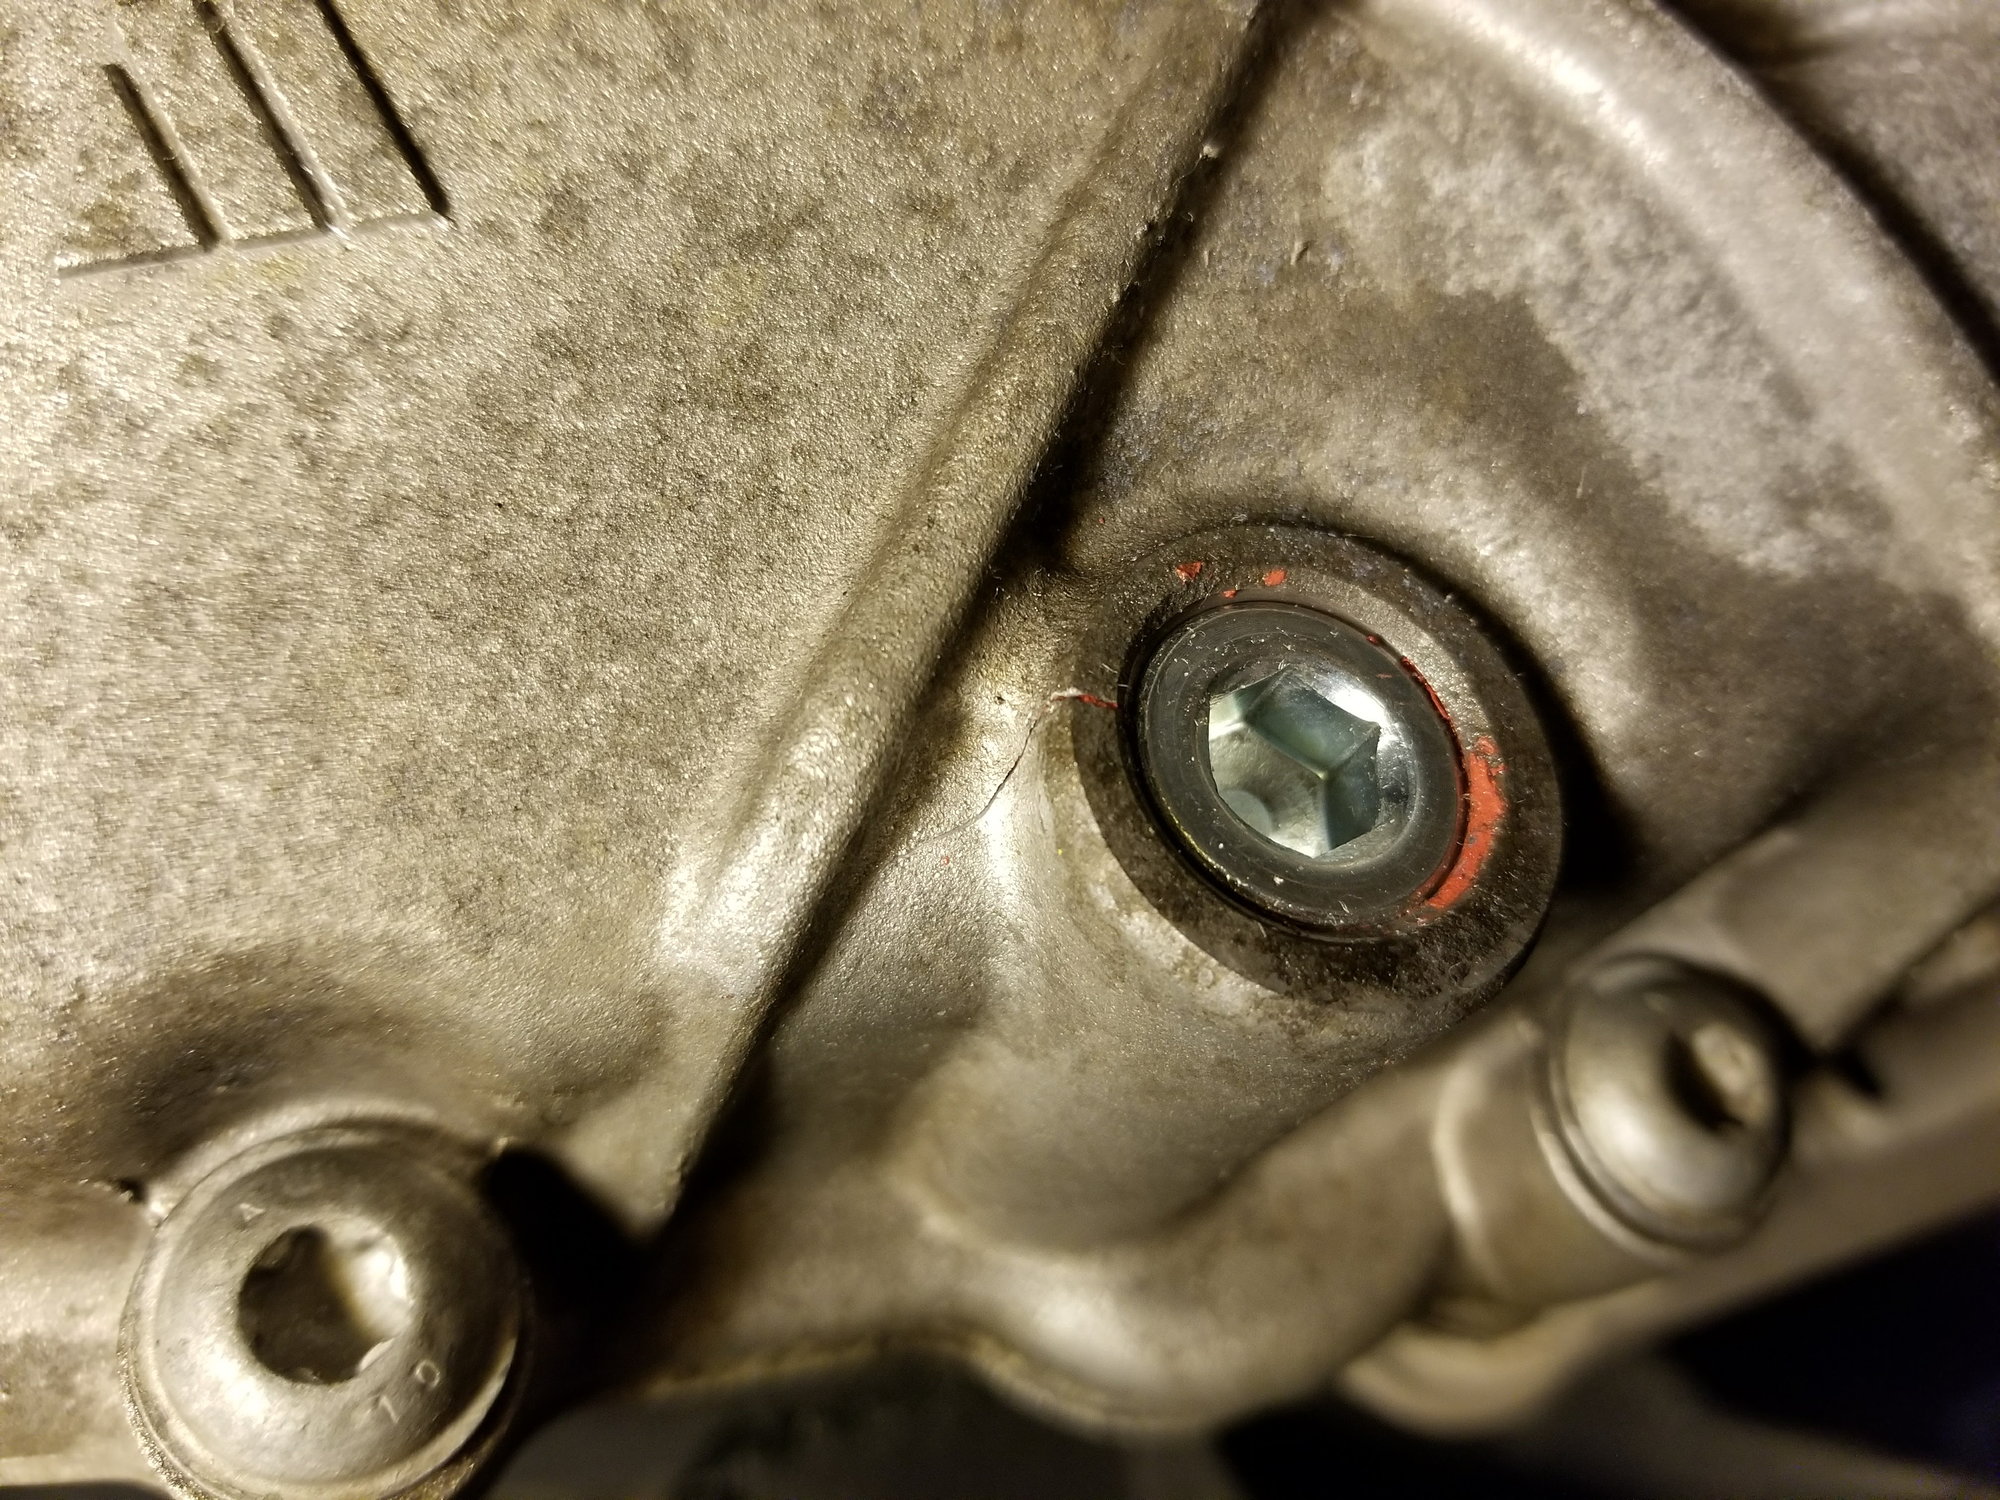
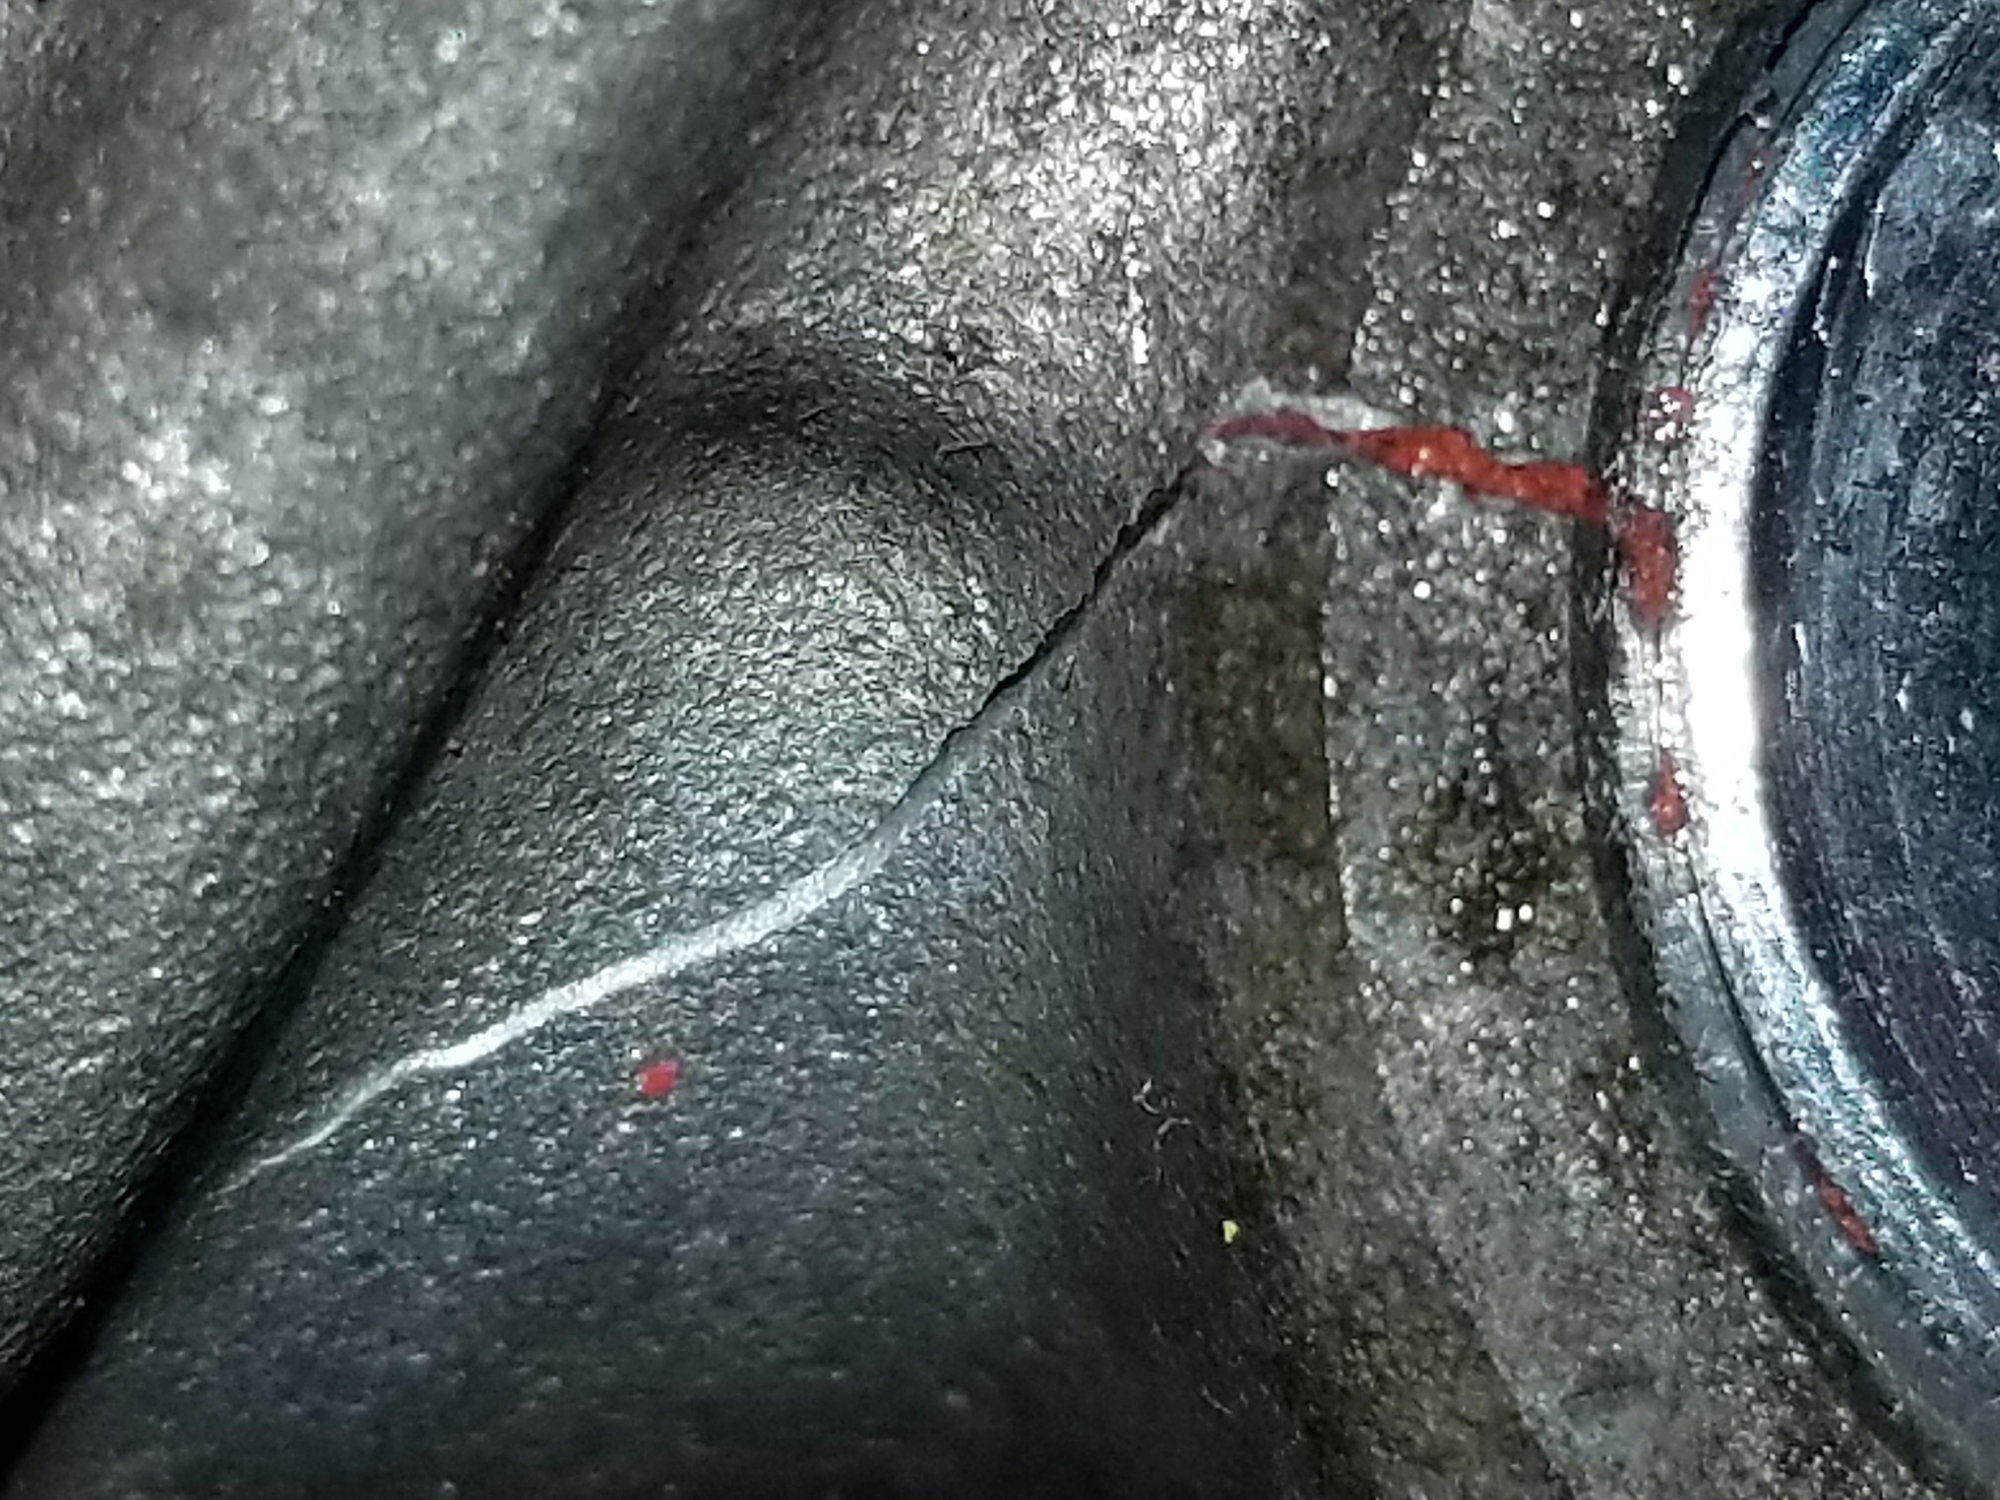
With all of my torque wrenches missing that day, I grabbed my father's 1/2" drive torque wrench that he had been improperly storing (locked on the highest setting, not all the way off) and a 1/2F-3/8M adapter. I then set it to 20 ft/lb..... I'm an idiot, DO NOT DO THAT. 15ft/lb OR 20Nm is the correct way... I got them backwards. Upon torquing it down and beginning to add fluid I noticed a small drip off the bottom of the unit, when it was nowhere near full. I then noticed the little hairline crack in the housing.
After some time, and me losing my bananas, the sealant (this is why buying new ones of these is a GOOD idea) had worked it's way into the areas of the crack allowing fluid passage and stopping it.
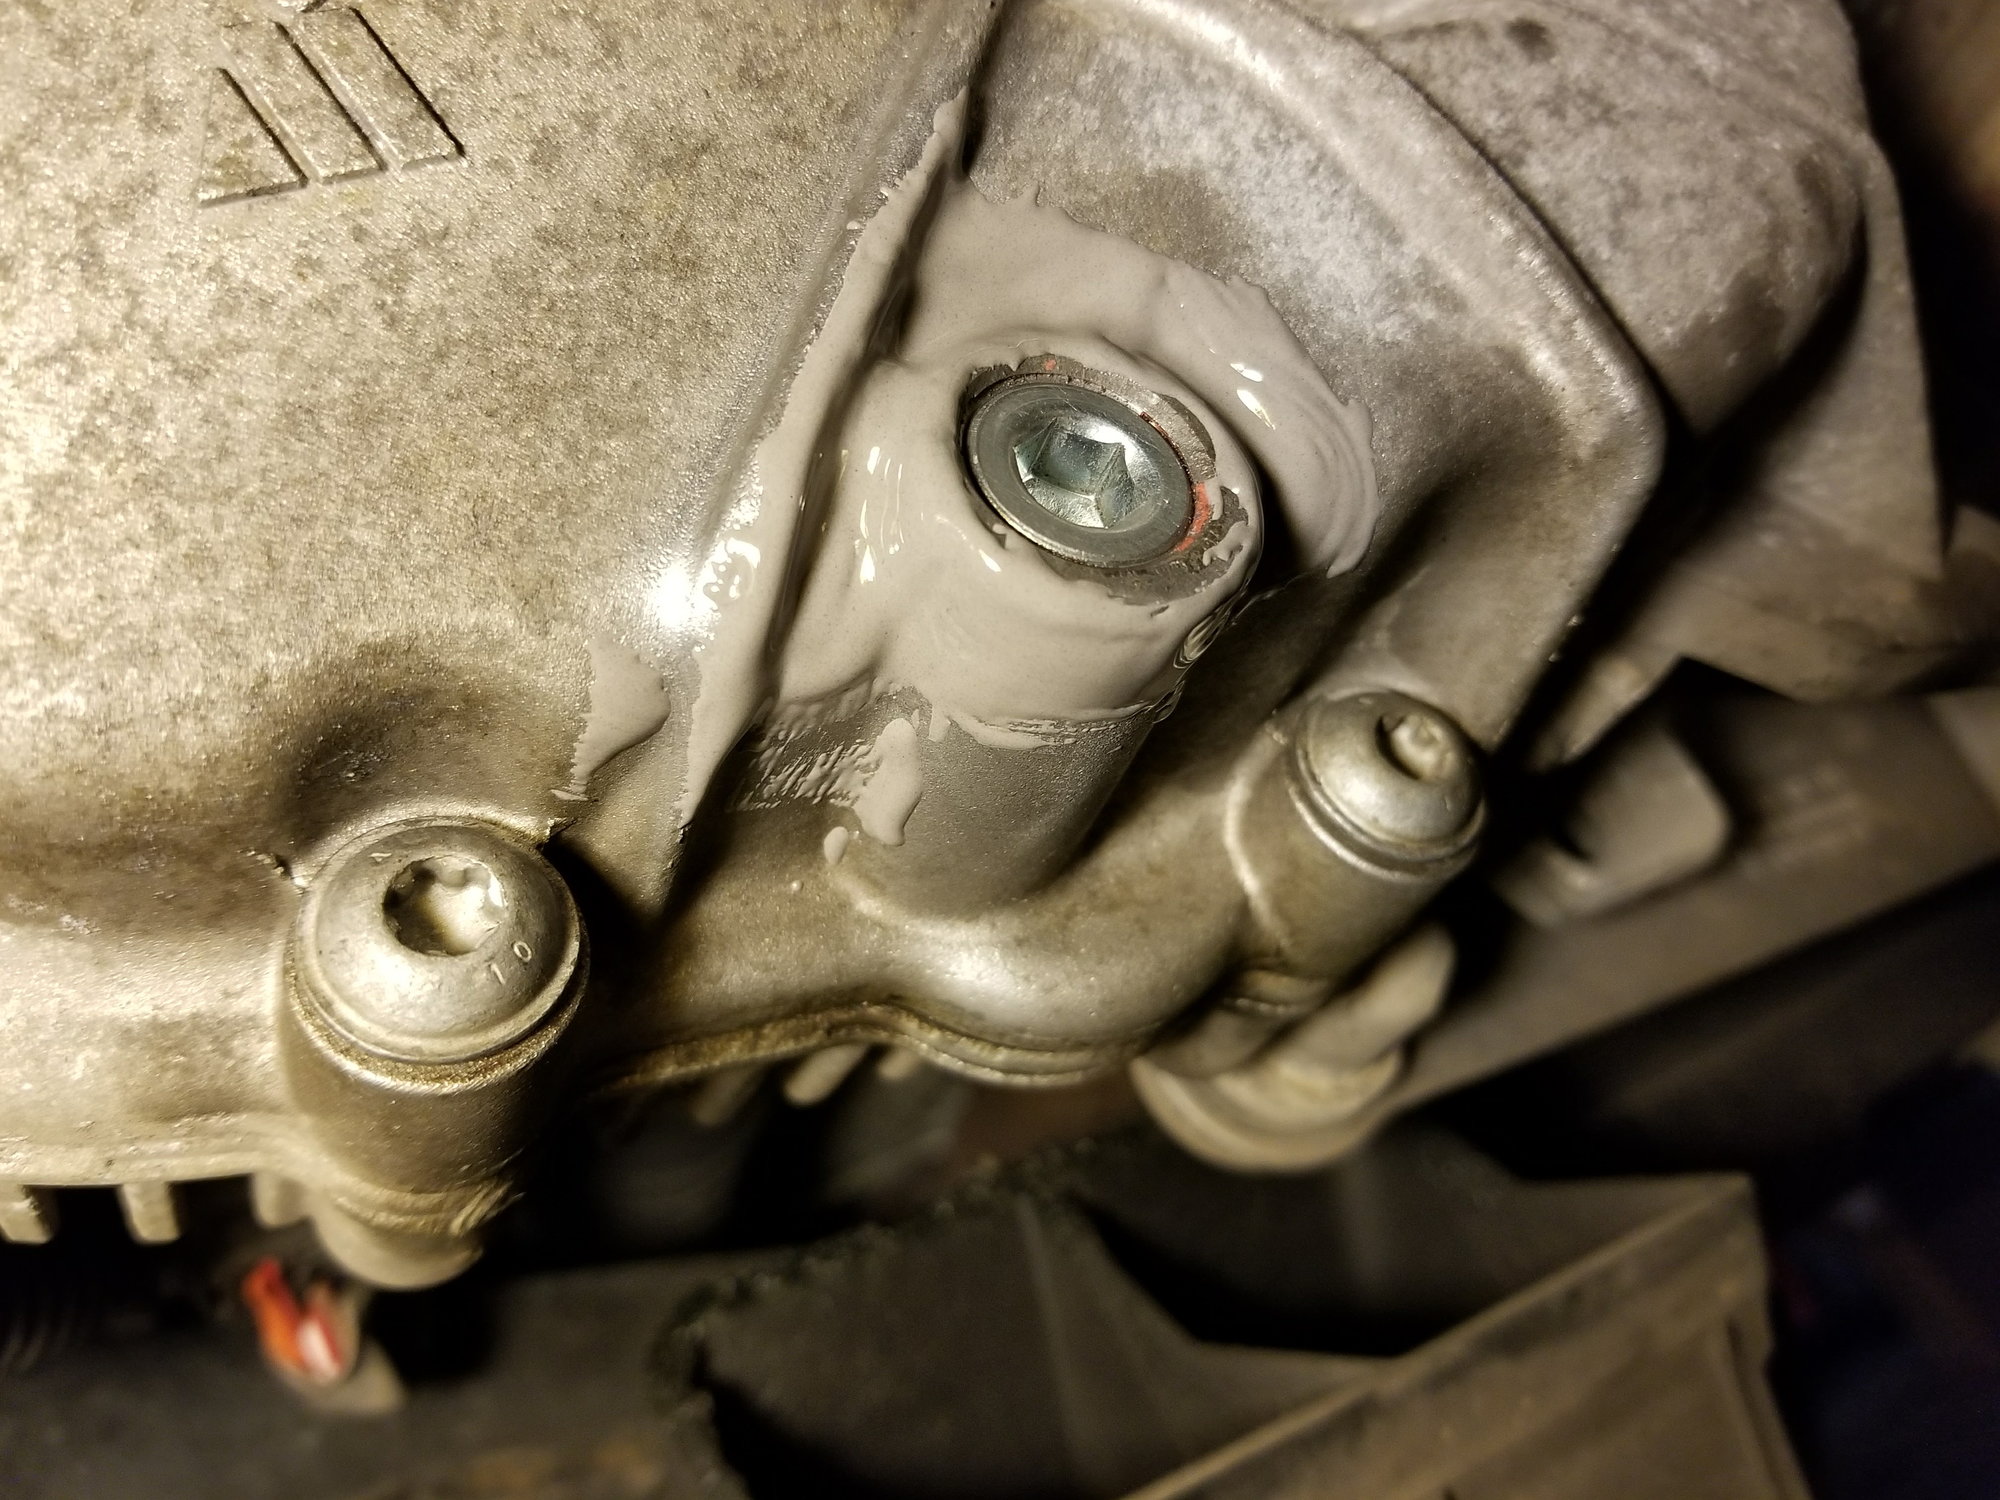
Seeing that had stopped the leak, but still left a crack exposed, I turned to my good ol' friend JB Weld. After some extensive cleaning with a wire brush and acetone around the affected area, using the tip of a safety pin I worked it into the crack as much as possible, then proceeded to give the entire area a healthy coating.
Now, this might seem like a hack fix. It kinda is, but I've seen this stuff hold transmissions and differentials together for a VERY long time, and those see much higher loads, temperatures, and more shock than this Transfer case will. Either way, I intend to replace it when these units, or even just parts like the rear cover, are more easily and affordably attainable. I've driven it, heat cycled it and check it repeatedly, and has shown to be holding up perfectly fine.
At this point you could be reading this thinking "why the hell would I listen to anything this guy has to say, especially when it comes to working on cars" or learn from my mistakes. I found out the hard way, and told you about it, so now you don't have to.
Standard DIY Disclaimer: (borrowed from deilenberger, and modified in this case) "You may be an ape with a wrench (like I apparently am). It's possible you should never be in the same garage as a car when you're holding a wrench (OK, Im not that bad). Therefore - what I just described is what I would do - not what I'm suggesting that you do. If you break it, bend it, pork it up, kill yourself doing it - I never told you to do it. I just told you how I'd do it. You're a big boy - man up if you screw up."
As always when servicing a motor vehicle, follow all safety precautions possible
Thanks much again - for the writeup that includes a "don't do this.." and I guess my disclaimer applies. Folks - be gentle tightening the fill and drain plugs. Snug and no tighter.
BTW - I doubt if the extra 5-ft/lbs was what cracked the case. The problem was the size of the torque wrench. Most 1/2" are not accurate at their lowest settings, plus the lever arm they provide is such that it's way too easy to overtorque small fasteners with them. The right wrench - an extra 5 probably wouldn't have mattered. I use a 3/8" electronic for most work, and for small values I'll dig out the 1/4" one, or the 3/8" dial one (an ancient SnapOn a neighbor gave me.. nice tool..) And then I'll try to sneak up on the value (set the clicker or beeper ones to 5 ft/lbs less than the required torque.. then when it beeps you'll probably find you're right where you wanted to be.)
It also could be that it was improperly stored and has likely never been calibrated, making it probably far off. You also make a valid point about larger wrenches not being quite as accurate at their bottom end. My personal preference for accuracy is a bar-type or dial-type wrench as it shows you exactly what you're at. I honestly wouldn't be surprised if an extra 5ft/lbs could be a large part of it, even with a calibrated wrench. That's adding an extra 33% of spec, normally torque values are +/- 5-10%. Also, the very thick sealant applied to this adds a fair amount to the diameter that the mating component was designed to work with, not to offset. The sealant only displaces a little bit during rundown, getting trapped in the threading and trying to work it's way outwards under pressure.
Either way, use the right tools, set to the right specs, and there won't be a myriad of variables trying to pinpoint the root cause of a failure.
I will bet it was because dial type torque wrenches are on good in the top 70-80% of scale.
So if the scale is 20-150 then it's only accurate from about 50lbs up.
Example spec: Accurate in clockwise direction +/- 3 percent from 20 to 100 percent of full scale.
Use a 3/8 wrench on fasteners of this size. I only break out the 1/2 for over 75lbs.
Very nice write up!! It seems much easier than I thought especially for PiG have the air suspension. Btw, for a new fill & drain plug, anyone get the part from the Porsche dealer? Is there any other place we can get the new plug? Thnx in advance!
Use a 3/8 wrench on fasteners of this size. I only break out the 1/2 for over 75lbs.
Hope the jb weld holds.
Normally I would as well. This case I didn't and it ended poorly, hence why I was adamant in my write-up to inform others to use a 3/8". One of the many things that could have caused this.
Thank you, I'm seeing no reason why it shouldn't, at least until these cases aren't ridiculously hard and pricey to get or until I can purchase just the rear cover and fix this properly.
Originally Posted by Eric Wong
Very nice write up!! It seems much easier than I thought especially for PiG have the air suspension. Btw, for a new fill & drain plug, anyone get the part from the Porsche dealer? Is there any other place we can get the new plug? Thnx in advance!
Thank you. The part number is 955-301-115-01, I ordered mine from Pelican. I think ECS and several others online have them as well.
What confuses me is that Pelican Parts says that the 000 043 305 63 fluid (which i understand to be the latest, revised fluid for non-hybrid and non-diesel) works with my 2016 Cayenne S eHybrid, but the PET catalog says otherwise. I'm currently running the Ravenol fluid which is compatible with the part number from PET that is meant for the hybrids, but i'm getting hesitation and occasional surges in power when starting off the line. This wasn't there when the Ravenol fluid was brand new.
Should I try the 000 043 305 63 OEM fluid meant for everything else or try the OEM version of 958 341 536 00 that is meant for hybrids?
Last edited by chiapet15; Mar 20, 2018 at 06:01 PM.
What confuses me is that Pelican Parts says that the 000 043 305 63 fluid (which i understand to be the latest, revised fluid for non-hybrid and diesel) works with my 2016 Cayenne S eHybrid, but the PET catalog says otherwise. I'm currently running the Ravenol fluid which is compatible with the part number from PET that is meant for the hybrids, but i'm getting hesitation and occasional surges in power when starting off the line. This wasn't there when the Ravenol fluid was brand new.
Should I try the 000 043 305 63 OEM fluid meant for everything else or try the OEM version of 958 341 536 00 that is meant for hybrids?
When in doubt - follow the factory specifications. I'd go for whatever Porsche spec'd originally.
Try tightening the plug on your transfer case to 20Nm and let me know.
I have enough experience to understand the feel when turning a wrench. With this plug in this case there is very little feedback, it just keeps turning with no perceived increased resistance. I was using a 3/8" torque wrench.
Based on what i have been reading regarding the cracking of the case from over tightening/torquing, whether by feel or with a torque wrench, i will try a different method that i have used in the field.
I will mark the plug and the case, also noting the height of the plug relative to the case. When i go to reinstall, with a cleaned up plug, add the appropriate sealant and reinstall to the original position. If there is sealant in the threads of the case, i may chase them carefully with a greased up tap ( grease to capture the sealant crumbs.
This allows you to continuously monitor the torque that's applied so you don't need to rely on feeling the click of a regular torque wrench. I find that when tightening the TC drain/fill plugs, the torque wrench will say that i'm already applying the specified torque, even though i can keep screwing the plug in if i wanted to. Once I the resistance builds up, I stop turning (event though i can keep going) as soon as the needle hits the mark.
That or digital wrench that shows you numbers and waning colors as you approach specified torqe. It vibrates and beeps when you reach specified torque and shows you the actual max torque achieved....