When you click on links to various merchants on this site and make a purchase, this can result in this site earning a commission. Affiliate programs and affiliations include, but are not limited to, the eBay Partner Network.
Long time listener, first time caller here. I searched the forums and the interwebs and have not had much luck, so here it goes.
Car info, 2013 Cayenne Turbo with 104000 miles.
I have a coolant smell coming from my car with no visible signs of a leak. From one of the other posts on here I thought it might be the line on top of the engine so I took the intake off and sure enough I have coolant dried in the V of the engine. I pressurized the system and can not find any signs of a leak on the lines on top or the thermostat housing area. I left it pressurized for a few hours and lost around 2 lbs of pressure but nothing...
Any suggestions on where to look next or should I clean up the coolant on the top of the engine, button it up, and keep an eye on the coolant level? I was hoping to prevent a pipe bursting and draining the coolant quickly.
I would just change out everything. I too have a small leak. Super tiny and as soon as I get a chance, I'm going in there and hitting every area of the cooling system.
Thats about where my head is at also. I'm going to pull the fuel rail and starter today and get everything cleaned up and give it one more shot; otherwise, I will start at the thermostat housing back and replace what's up there.
If you're going to take off the intake, just replace the small vent lines as those are known to crack/crumble apart and leak. No use going in there to clean things up without replacing that Y-shaped line.
And if you find your thermostat housing is not the bolted version, then that's your opportunity to pin those lines, as well as the rear crossover line.
The pipes out of the front of the thermostat are bolted. Are those the pipes you are referring to or us it the pipe put the back of the thermostat housing that goes to the back of the engine? I don't remember if it's bolted or not.
The pipes out of the front of the thermostat are bolted. Are those the pipes you are referring to or us it the pipe put the back of the thermostat housing that goes to the back of the engine? I don't remember if it's bolted or not.
Yeah, the two big pipes coming out the front of the engine/thermostat housing. Separate of your issue, but detectible when the intake is off, is the rear one which is an important one to determine if you have the newer threaded crossover pipe or not. If you don't, and it's still intact and not leaking, get it pinned ASAP (drill, tap, and place a set screw through it). It can be pinned with the engine in place, even the HPFP can remain in place. Unless you like the potential of being stranded, this is a must do on all V8 958.1s.
What's the best way to determine if I have the updated threaded insert? I dug around the back of the engine with some light and an endoscope but wasn't really sure what I was looking for.
What's the best way to determine if I have the updated threaded insert? I dug around the back of the engine with some light and an endoscope but wasn't really sure what I was looking for.
Unfortunately - it's not at all easy to see. Perhaps if you laid on top of the engine and can get your eyes in line with the rear of the engine you might be able to spot it if you have a really good flashlight. The majority of people assume the worst and plan on removing the HPFP to do the required work. Or remove the engine.. Kidding..
If you have an endoscope, take tons of pics and post them up here and we can guide you where to look further if you miss it. I believe there is a DIY on this website with pics to give you an idea of what you're looking for.
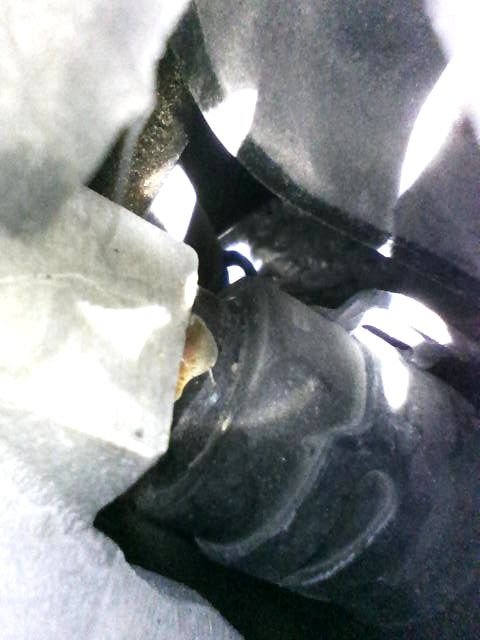
Sorry for the quality of the pic but I apparently purchased the Yugo endoscope. I believe this is the fitting referenced which is back of the engine, under the HPFP, coming out of the horseshoe shaped manifold and mine appears to be the old style....
That's a good pic - but try to get it angled to the left so you can see it better. Usually the hose is pressed against the aluminum part... yours might be slowly "emerging"... not good!
I tried to get go the other side of it, but it was difficult with the fuel pump in the way. I may start prepping to replace it, or pin it sooner than later. There is a good discussion on her to tap the hole but it also included the person making his own threaded fitting with a lathe. That option is out for me so I will have to come up with a different method or have someone make the fitting.
It's not all that hard to pin it if you have the extensions and adapters to reach in there. Just make sure it has not loosened already and is leaking. Of the ones I've done, the hose was against the aluminum part.


 03-21-2021, 10:54 AM


 Kidding..