When you click on links to various merchants on this site and make a purchase, this can result in this site earning a commission. Affiliate programs and affiliations include, but are not limited to, the eBay Partner Network.
Had the same failure at 93,000 miles / three years ago on my 2008 S; I epoxied it back in. No further issues; currently at 187,000 miles and counting - knock on wood. I used MasterBond Supreme 11HT-LO because of the high temperature rating, resistance to impact, thermal shock, vibration and stress fatigue cracking.
Had the same failure at 93,000 miles / three years ago on my 2008 S; I epoxied it back in. No further issues; currently at 187,000 miles and counting - knock on wood. I used MasterBond Supreme 11HT-LO because of the high temperature rating, resistance to impact, thermal shock, vibration and stress fatigue cracking.
Thanks for the info, that is great to know. You obviously did a great job with the fix.
Could I ask; did you scuff up the surfaces in any way, or just clean the parts really well, or both?
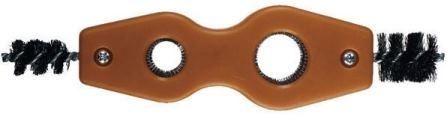
Both. First I removed the pipe stub from the hose to more easily have access to that part and not kink / twist the rubber coolant hose, then I used a copper pipe cleaning brush similar to this one -
to remove the existing residual [failed] adhesive. For both parts the goal is to create score lines perpendicular to the long axis of the pipe stub and within the manifold recess (rotate the cleaning tool versus using an in / out motion). While I prepped the manifold a helper liberally poured distilled water into the coolant reservoir to flush debris removed out of the manifold recess (didn't want any of that stuff in the coolant system). Then apply positive air pressure to the coolant reservoir tank with compressed air or just cup a hand over the fill port and blow - you want to remove / push the water from / out of the manifold port to have a dry surface for the new epoxy. I then used a clean lint-free rag and acetone to clean both parts. Dry fit the stub into the manifold to check seating depth and freedom / uniformity of fit. Do a final clean / wipe with another clean piece of lint-free rag. Only apply the epoxy to the pipe stub - if you apply it to both parts you'll risk getting a glob of epoxy pushed into the manifold during assembly and potentially contaminating the coolant system. The tolerance of fitment is fairly tight - you don't need a lot of epoxy; dry fitting the parts will give you an idea of how thick the epoxy application will be. Unlike the original 'factory' application, apply a uniform film of epoxy around the mating surface on the pipe stub. Insert the stub into the manifold and rotate a quarter turn CW and CCW to spread the epoxy uniformly between the mating surfaces. The curing time is well documented in the data sheet / application instructions for the epoxy - I doubled it before re-attaching the rubber coolant hose. It sounds a lot more complicated than it was - this is an easy fix. Cheers and Happy Thanksgiving
I'll be tackling this over the weekend, and hopefully ordering the epoxy tomorrow. If you by any chance have the lot number from the invoice or product, that would be most appreciated (or even the date of purchase).
MasterBond asked for that info to help ensure I get the same formulation that you used (apparently there is more than one for that product/part)
Happy Thanksgiving
Originally Posted by egr58
Both. First I removed the pipe stub from the hose to more easily have access to that part and not kink / twist the rubber coolant hose, then I used a copper pipe cleaning brush similar to this one -
to remove the existing residual [failed] adhesive. For both parts the goal is to create score lines perpendicular to the long axis of the pipe stub and within the manifold recess (rotate the cleaning tool versus using an in / out motion). While I prepped the manifold a helper liberally poured distilled water into the coolant reservoir to flush debris removed out of the manifold recess (didn't want any of that stuff in the coolant system). Then apply positive air pressure to the coolant reservoir tank with compressed air or just cup a hand over the fill port and blow - you want to remove / push the water from / out of the manifold port to have a dry surface for the new epoxy. I then used a clean lint-free rag and acetone to clean both parts. Dry fit the stub into the manifold to check seating depth and freedom / uniformity of fit. Do a final clean / wipe with another clean piece of lint-free rag. Only apply the epoxy to the pipe stub - if you apply it to both parts you'll risk getting a glob of epoxy pushed into the manifold during assembly and potentially contaminating the coolant system. The tolerance of fitment is fairly tight - you don't need a lot of epoxy; dry fitting the parts will give you an idea of how thick the epoxy application will be. Unlike the original 'factory' application, apply a uniform film of epoxy around the mating surface on the pipe stub. Insert the stub into the manifold and rotate a quarter turn CW and CCW to spread the epoxy uniformly between the mating surfaces. The curing time is well documented in the data sheet / application instructions for the epoxy - I doubled it before re-attaching the rubber coolant hose. It sounds a lot more complicated than it was - this is an easy fix. Cheers and Happy Thanksgiving
Apologies for the tardy reply - have been out with the family all day. Don't have either; an engineer friend of mine in the aerospace industry brought over their supply after we discussed a number of solutions including threading, drill / tap, brazing, and TIG welding. All of those solutions didn't pass the 'straight-face test' at the time (nor do they now) because those alternatives all required engine removal.
My guy is overseas right now and unavailable for a few weeks / month. If MasterBond isn't able to recommend a solution given the specifications of the application do a search for aluminum to aluminum epoxy with a -50 to +300 degree F operating range. You quite literally only need a half teaspoon worth of material. Permatex� 4 Minute Multi-Metal Epoxy (among others) meets those spec's and is readily available. I'm convinced it wasn't the original adhesive per se that failed but the rather hap-hazard application - the pipe stub that came out on my coolant distribution tube / manifold only had about 25% surface area coverage from the original adhesive application.
No problem at all. thanks for the additional info. I'll be calling them tomorrow as they were closed on Friday.
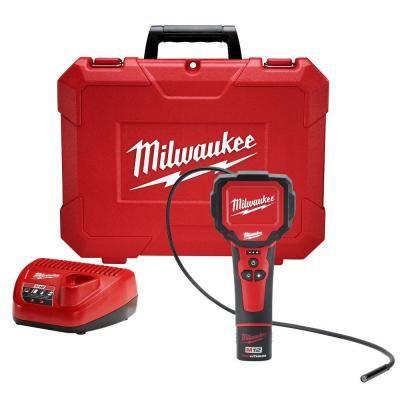
I got the HP Pump out yesterday without too much hassle. Using an inspection camera really made the job a lot easier.
Will let you know how it goes.
Originally Posted by egr58
Apologies for the tardy reply - have been out with the family all day. Don't have either; an engineer friend of mine in the aerospace industry brought over their supply after we discussed a number of solutions including threading, drill / tap, brazing, and TIG welding. All of those solutions didn't pass the 'straight-face test' at the time (nor do they now) because those alternatives all required engine removal.
My guy is overseas right now and unavailable for a few weeks / month. If MasterBond isn't able to recommend a solution given the specifications of the application do a search for aluminum to aluminum epoxy with a -50 to +300 degree F operating range. You quite literally only need a half teaspoon worth of material. Permatex� 4 Minute Multi-Metal Epoxy (among others) meets those spec's and is readily available. I'm convinced it wasn't the original adhesive per se that failed but the rather hap-hazard application - the pipe stub that came out on my coolant distribution tube / manifold only had about 25% surface area coverage from the original adhesive application.
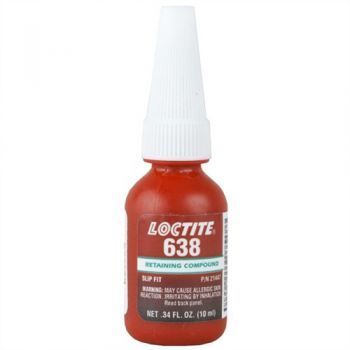
From what I could tell Porsche is using Loctite 638 for these parts on multiple models (very interesting read here in Porsche's response to NHTSA - http://www-odi.nhtsa.dot.gov/acms/cs...009-57948P.pdf), but I could not determine for certain if it also applied to earlier Cayenne's such as mine (2008), although the document references vehicles dating back as far as 2001 using this adhesive.
They cite inconsistent manual application of the adhesive (bead thickness) as one of the reasons for failure.
There is also an updated/improved formula of Loctite 638 since my car was manufactured 2008. I figured if the bond lasted 7 years I may as well use the same adhesive and just try and be very careful with getting very full coverage of the adhesive.
I also noticed that the fitting was still very snug before removing the old dried adhesive. This means explains why some people have complained about slow leaks before the sudden failure occurred. In my case there were no such warning leaks whatsoever. It just let go all at once during a downshift.
I considered the option of tapping into the housing and inserting a retaining screw. However there was really too little room to do this from above.
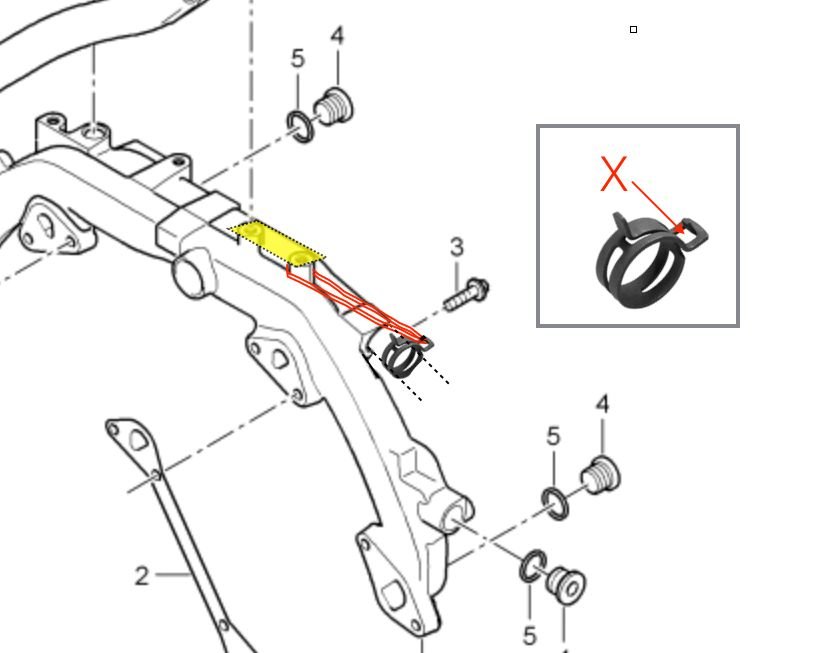
Thinking of some alternative options to at least eliminate a catastrophic failure (pipe blowing completely out of the fitting) I came up with a very simple fix.
I used 2 strands of 100lb stainless steel hanging wire (flexible) to create a tether securing the hose to the water distributor. I simply threaded the wire between the opening on the top of the hose clamp (refer to position X in the attached diagram) and through the cavity between the 2 mounting points on top of the distributor which are sealed from above (yellow shaded area) by another part.
I kept a very minimal amount of slack in the wire tethers to ensure they would not interfere with the assembly, but at the same time, if the adhesive ever fails in future the insert piece would not be able to move more than about 2mm. This should prevent a large and sudden coolant loss.
Of course I should emphasize that I have not been able to put the concept to test. I am simply stating what I have done to get some peace of mind and avoid the alternative of a $3500+ bill to have the engine dropped and the water distributor replaced.Hence to anyone who tries this option - it is entirely at your own risk.
Despite doing a lot of reading first, this job was still a real pain because you just have to be very slow and patient the first time around whilst you get the feel of how things fit together. Especially the HP pump. Although now that I have done it once, I really don't mind doing it again if I really have to as it would be a lot quicker the 2nd time around.
The tools that I would consider essential are as follows I'll list the exact ones I used for reference:
Milwaukee M12 inspection scope (note not the one I used in the original picture posted. That was a friends scope. What I like about the M12 is the excellent depth of field and the rotating screen.
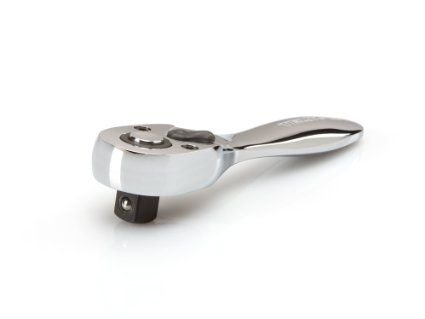
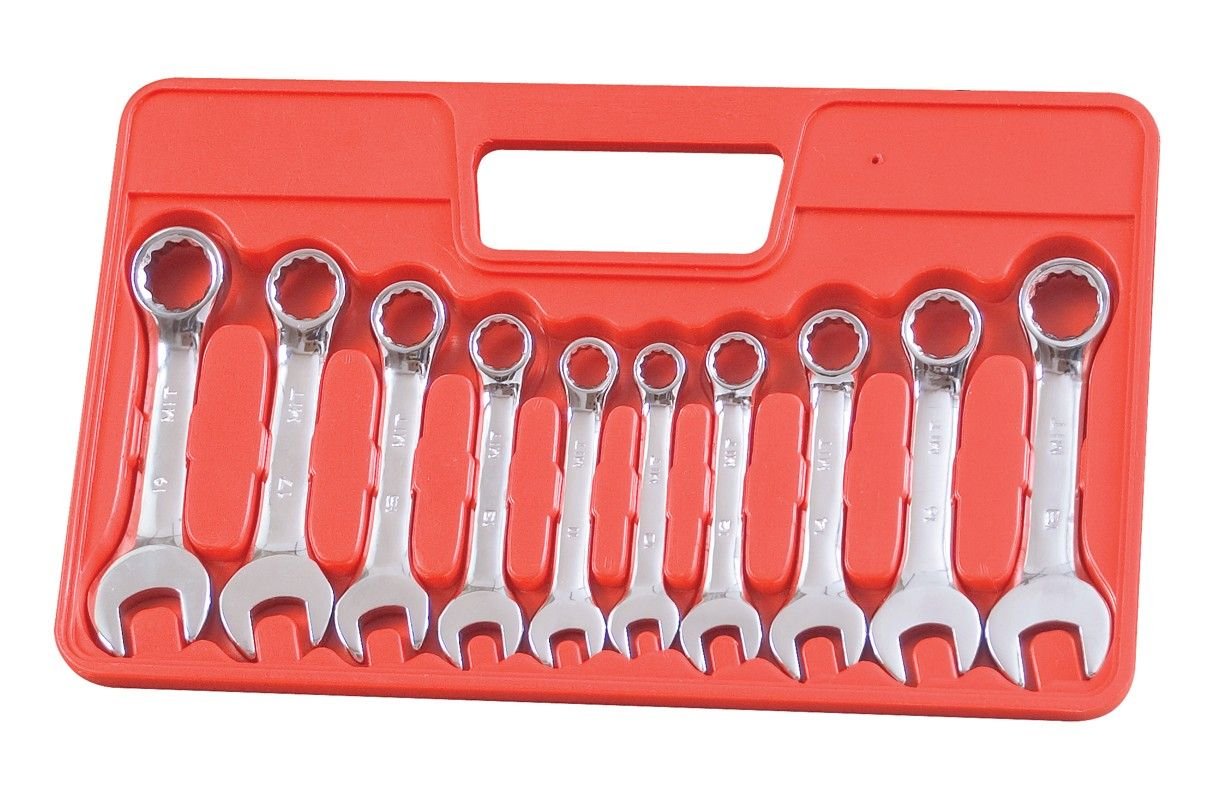
Because of the very tight spaces, the following wrenches are really helpful:
Tekton Stubby ratcheting wrench 3/8
Tekton stubby metric wrench set
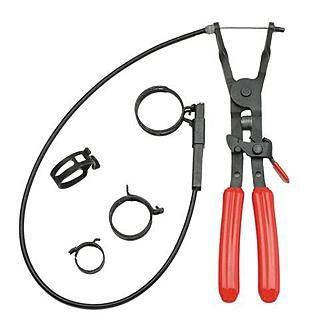
Lastly you should replace the hose that connects to this part which means removing a clamp which is even lower down in the engine bay and impossible to get off without one of these:
Craftsman remote hose clamp pliers
Pipe brush to clean inside the neck of the distributor and around the fitting. I also used emery paper to clean off the old adhesive.
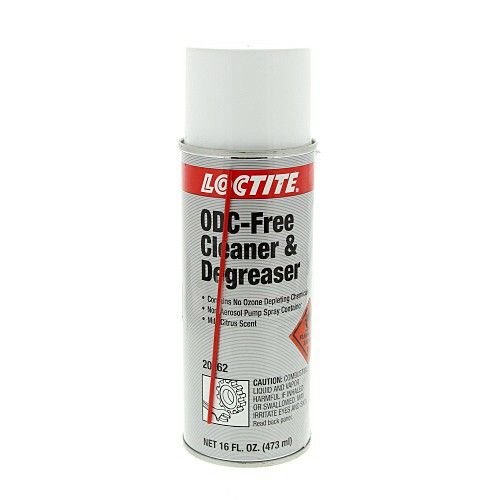
I also used the recommended Loctite degreaser 7070:
Loctite 638 Adhesive:
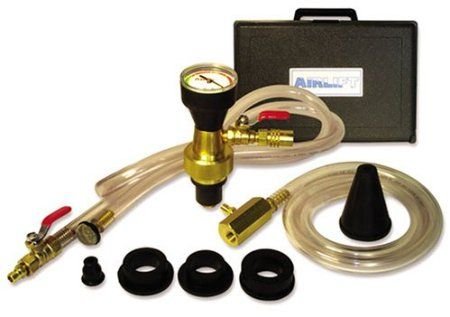
Finally the Airlift UVIEW 55000 coolant filling tool. I cannot say enough good things about this product. I was unable to drain all the fluid from the radiator because the lowest hose fitting just would not budge. I eventually gave up, as I was really concerned I might damage the actual plastic connection. This tool is meant to be used on a completely drained system, but for this application it worked just as well. I poured several gallons of distilled water through the coolant reservoir to flush the water distributor before refitting the rubber hose. (note I left the adhesive to dry for a full 8 days before doing this - not necessary but I had to travel so it worked out well and at least ensured really good cure time) I then forced out as much of this water as possible with compressed air into the reservoir.
When it came time to fill up with new fluid the UVIEW showed that there were no leaks in the system, and then it pulled the new coolant into the system in no time at all with no issues.
Last edited by EMC2; 01-08-2015 at 06:44 PM.
Reason: Added cleaner degreaser info
Nice write up. Based on my experience you should be good to go; the critical part of this solution is "getting very full coverage of the adhesive," versus type (within reason) of the adhesive. Well done coming up with the "tether" idea. My loss, too, was catastrophic with absolutely no warning (despite not wearing a helmet) - see Mr. Lewis' comments under 'Conclusions and Summary' on page 20, of the NHTSA pdf you noted.
I, too, found Porsche's response to NHTSA interesting, to say the least. I'd like to have access to the enclosures noted within that reply; insofar as the use / application of adhesive for coolant pipe fittings within our vehicle model year (2008) was "limited [from] the scope of the subject" within NVS-213 swm / PE13-009 (page 1). Here are some additional links I found:
Thanks again for the input a few weeks back
Appreciate all the links too - I'll be reading with interest.
I was looking at the photos of all the failed parts. The adhesive always seems to separate from the insert at the deepest end of the piece inserted into the distributor neck. I noticed when I "test" inserted the fitting after cleaning all the old adhesive off that the neck seemed to not be perfectly cylindrical. The hole seemed to taper in as it went deeper thus allowing more play at the opening of the neck. Not sure if you observed the same, but this could certainly be another contributing factor. I created a little rig to hold the piece correctly centered after applying the adhesive and to try and again ensure the adhesive distribution was as consistent as possible around the circumference.
Originally Posted by egr58
Nice write up. Based on my experience you should be good to go; the critical part of this solution is "getting very full coverage of the adhesive," versus the type (within reason) of the adhesive. Well done coming up with the "tether" idea. My loss too was catastrophic with absolutely no warning (despite not wearing a helmut) - see Mr. Lewis' comments under 'Conclusions and Summary' on page 20, of the NHTSA pdf you noted.
I too found Porsche's response to NHTSA interesting to say the least. I'd like to have access to the enclosures noted within that reply; insofar as the use / application of adhesive for coolant pipe fittings within our vehicle model year was "limited [from] the scope of the subject" within NVS-213 swm / PE13-009 (page 1). Here are some additional links I found.
These are the parts I ordered for the job - note these apply to a 2008 Cayenne S, so please confirm fit for your specific model year.
I order many of my Porsche specific parts here, and it's also a great lookup resource: http://www.jimellisporscheparts.com
95510632210 water hose (S bend hose)
95551240700 clip (hose clamp for upper connection into radiator)
I could not find the part number for the other hose clamp for the lower end of the hose which is slightly larger. ( just reused the original one for that connection)
These are needed for the HP Fuel pump:
1 Stopper high-pressure pump clutch . PLUG. 94810511400
1 o-ring 94811061500
When I did the repair I didn't use any parts - just prepped the surfaces and epoxied in place. I don't recall an overly wobbly fitment. If the tolerances between the mating surfaces is too tight, I would think, the adhesive won't provide the mechanical grip it is specifically design to create
Agreed - I use Suncoast also for the more common service items, coolant, filters, plugs, coils etc. Great service and very fast.
Jim Ellis is great when you need an obscure (not frequently ordered) part that is not typically stocked by anyone but the dealers or Porsche themselves.
Originally Posted by egr58
I don't have an experience with your vendor; I've been using Sunset Porsche as my parts supplier for years - great service. Their new web portal -
When I did the repair I didn't use any parts - just prepped the surfaces and epoxied in place. I don't recall an overly wobbly fitment. If the tolerances between the mating surfaces is too tight, I would think, the adhesive won't provide the mechanical grip it is specifically design to create


 11-26-2014 | 08:46 AM