When you click on links to various merchants on this site and make a purchase, this can result in this site earning a commission. Affiliate programs and affiliations include, but are not limited to, the eBay Partner Network.
I have a 2004 cayenne turbo, I’ve been looking for a while now for videos or instructions on how to replace my front wheel bearing and the tools I might need. If anyone has done this before and can give me some good instructions on how to replace these, or maybe a good video to watch that will help that would be greatly appreciated.
I have a 2004 cayenne turbo, I’ve been looking for a while now for videos or instructions on how to replace my front wheel bearing and the tools I might need. If anyone has done this before and can give me some good instructions on how to replace these, or maybe a good video to watch that will help that would be greatly appreciated.
There are tools for purchase to remove the bearing...old school way with a press works. There are some good videos on YouTube via Pelican parts. I used a cheap bearing from Rockauto...with major regrets...the National bearing from Advanced Auto parts is a good choice. ABS encoder on both side so there is no mistake installing the bearing on the wrong side. Once you remove the steering knuckle. A 32mm socket should fit to press the hub out. Then pressing the old bearing out of the knuckle. You'll need a beefy pair of snap ring pliers. Clean everything well before starting makes things good a lot better. If you get to the point of putting the new bearing in . Put the bearing in the freezer for a few hours. Heat the steering knuckle up to not over 200*F bearing may/ should slip right in . Freeze hub ...I didn't do this but just thought of it. Warm the inner race with a blow dryer and press the hub in should got smoothly. Be cautious of over pressing. Follow all torque specs when reassembling. Be safe ..hope this helped
I've done my rear ones and made a video, not got around to the front ones yet.
As mentioned, make sure you get the bearing in the right way round as there is a reluctor ring on one side. I got it wrong and had to push the bearing back out again and they can come apart when removed.
Use a paperclip to determine the magnetic side, which sits inboard. Be careful of the sensor.
I've done both front and rear wheel bearings using the method I'll lay out. It's far easier than methods I've come across that involve taking the entire knuckle off and using a hydraulic press to remove and install the bearing. This way you leave the knuckle on the car and don't have to do an alignment afterward.
Porsche Cayenne 955 Turbo S
Front Wheel Bearing Replacement (On-Car, No Press)
Vehicle: 2006 Cayenne Turbo S
Bearing: Precision 510082 (purchased from Oreilly for $127).
Method: On-car, no knuckle removal, no shop press
CRITICAL TURBO S FACTS
• Bearing size: 82 mm OD / 45 mm ID
• Magnetic ABS encoder – orientation matters
• Inner race must be supported when pressing hub
• Axle nut torque is extremely high and exact
TOOLS USED
Bearing / Hub Tools:
• Maddox FWD Bearing Kit (I purchased from Harbor Freight)
• EverTough Hub Remover & Installer Kit (aka OEMTOOLS 27213). Rent this from an auto parts store. I've rented from Auto Zone and Oreilly. EverTough is the Oreilly kit and it's the same as OEM Tools branded version. You pay for the kit full price and then get a full refund when you return it.
Hand & Power Tools:
• 3/4" Drive Torque wrench capable of 340 Ft-lbs. I use a Vevor model that is available on Amazon for $101.
• 32 mm 12-point axle sockets - 1/2” drive for axle nut removal with impact gun and 3/4” drive for final axle nut torquing)
• ICON 12 in. Internal Straight Snap Ring Pliers (I bought from Harbor Freight)
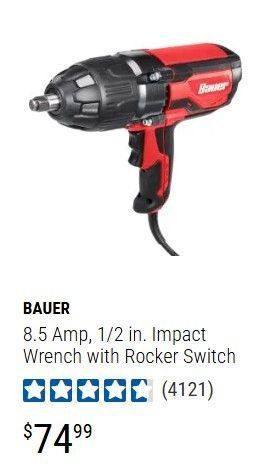
• BAUER 1/2 in. Impact Wrench (8.5 amp) (I bought from Harbor Freight)
IMPORTANT NOTE (AXLE NUT REMOVAL)
The BAUER 1/2 in. impact wrench has sufficient torque to remove the front axle nut with the vehicle safely lifted. The wheel does NOT need to be on the ground when using this impact.
Before getting started, watch this video before going forward, he’s done a good job of showing the generic process we’ll use and I’ll refer to specific parts of the video in the procedure I outline:
PROCEDURE
1. With vehicle securely lifted, use 1/2 in. impact and 32 mm 12-point socket to remove the front axle nut.
2. Remove wheel, wheel well (not required but it exposes areas to hang brake caliper and just gives more space to work), brake caliper (hang it out of the way), rotor, dust shield and ABS sensor.
3. Push axle inward. My axle was rusted in and stuck. I had to spray penetrating oil and let it sit for a while. I put the axle nut on backwards to provide a good surface for hitting with a small sledgehammer. Eventually it broke free without damaging any threads on the axle.
4. Disconnect upper control arm ball joint in order to swing the knuckle forward to move the axle out of the way to gain access to the back side of the bearing. Once done, reconnect the upper control arm ball joint just finger tight to provide stability for next steps. *Note that if you’re going to replace the axle, you’ll need to also remove the bottom strut bolt. This isn’t hard to do. The only tricky thing about actually getting the axle out is that I did have to turn the key to on position so that I could turn the knuckle to two different positions which allowed me to get it out.
5. PULL HUB OUT OF BEARING (EverTough Kit)
· Refer to 1:00 in the video for a great visual of how to set up for hub removal.
· Using the “Bracket” which is the large metal assembly in the kit, bolt the “horseshoe adapter” that correctly overlaps flat areas on the knuckle.
· Lubricate forcing screw threads with WD-40 or similar
· I use an extra axle nut (1.77” OD) on the back side of the knuckle as a washer, because it is the perfect diameter to pull only the hub (not large enough to interfere with the bearing) and because the forcing screw fits inside of the axle nut without interference. I can’t remember if the 2.1 Step Washer in the kit works. If someone can verify, please let me know.
· You’ll have to find the correct orientation and then hand tighten everything to make sure the horseshoe adapter is seated properly and pulling the hub exactly in the correct direction before using the impact to remove.
· Apply steady force to forcing screw to pull hub outward
· Expect inner bearing race to remain on hub (normal)
· STOP if hub *****, horseshoe adapter tilts, or force spikes suddenly
· Back off, re-lube, and re-square before continuing. This isn’t likely because the force to pull the hub out isn’t all that great.
6. When you remove the hub, the bearing inner race will still be attached to the hub. This is where the Dremel tool with metal cutting disc comes in. I don't do a diagonal cut like the video says, I just cut straight up and down. It cuts faster than you think it will, so take a bit of time and make sure you're not cutting into the hub. The race is pressed on, so when you remove enough metal, you'll feel it separate when you cut through enough that the metal finally breaks. At this point the race is not under pressure and you can slide it off with a flathead screwdriver or other pry tool.
7. Remove bearing snap ring using snap ring pliers. The first time I did this job, I forgot to remove the snap ring…Not Smart…I bent the “Bracket” on the kit before coming to the conclusion that I messed something up. I took some time reflect and noticed my mistake. Surprisingly, the snap ring wasn’t damaged and I was able to get it out and proceed.
8. Remove old bearing– TWO-STAGE METHOD:
• Refer to 5:38 on the video for reference on getting the bearing started to come out.
• The reality is that our 955 bearings are so large that these kits don’t have an Adapter Sleeve large enough to accept the entire bearing. The bearing OD is larger than the largest kit spacer ring ID. So, we use a two-stage method.
STAGE 1 – BREAK THE PRESS FIT
• Set up the press stack like in the video using the largest Adapter Sleeve in the two kits on the outside and the best fit Step Washer on the engine side.
• Lubricate threaded rod, washers, and nut
• Press bearing outward approximately 10–15 mm
• Stop when resistance decreases, indicating press fit is broken. If you go further you’ll begin to feel the bearing interfering with the receiver cup and this is a perfect indicator to stop.
STAGE 2 – CLEAR BEARING USING HORSESHOE ADAPTER
• Refer to 7:50 on the video as he shows a generic version of this method.
• Install Evertough “Bracket” adapter on receiver side
– Horseshoe supports the knuckle face
– Open section allows bearing to exit freely
• There will still be significant force needed to fully remove the bearing. A set of three horseshoe-shaped adapters (labeled D, E, and F) are in the kit and are used to support the hub/bearing during extraction. There is enough force required that if you don’t use two of these horseshoe-shaped adapters at the same time, you can bend the lone adapter. You’ll see that one of the three adapters is too small to fit around the knuckle. Use the screws that are included in the kit to bolt both of the other two adapters to the horseshoe bracket. Ensure horseshoe sits flat and is centered on knuckle.
• I didn’t document the Step Washer I used on the engine side of the press stack, so if someone does document it, please let me know and I’ll update.
• Continue pressing bearing out until fully removed
• Bearing must remain square during entire operation
• STOP immediately if bearing tilts or horseshoe shifts
Congrats on getting this beast of a bearing out!
9. Clean bore and snap ring groove thoroughly.
10. Verify ABS encoder orientation (magnetic side faces sensor; faces the engine).
11. PRESS NEW BEARING INTO KNUCKLE
• Refer to 8:56 on the video for an example of how to do this.
• Make sure the ABS encoder/magnetic side of the bearing is facing toward the engine.
• Reconfigure the press stack using the best size pieces of the kits. (I didn’t document the ones I used, so if someone does document them, please let me know and I’ll update.
• Lubricate threaded rod, washers, and nut with WD-40 or similar
• Start bearing square by hand
• Apply slow, even pressure using the impact
• STOP if bearing ***** or force spikes – re-square if needed
• Press until fully seated against knuckle shoulder (you’ll hear/feel it with the impact)
• Confirm snap ring groove is fully visible before installing snap ring
12. Install snap ring fully and verify seating.
13. Press hub back in using EverTough kit:
• Objective: press hub into bearing WITHOUT loading inner race
• Inner race MUST be fully supported before pressing. Do this by using the exact size Step Washer that you used to remove the old bearing. Remember that you have to support the bearing (not the knuckle) on the engine side of the press stack.
• Refer to 12:28 on the video. Use the best fitting washer from either kit and place against INNER bearing race from the engine side of the knuckle.
• Install flat hub driver disc against hub center
• Use forcing screw to press hub inward
• Lubricate forcing screw threads with WD-40 or similar
• Apply steady, controlled pressure
• STOP immediately if force spikes or hub stalls suddenly
• Back off, re-check inner race support, re-lube, re-square
• Continue pressing until hub is fully seated and flush
14. Reassemble suspension, dust shield, brakes, axle, and wheel.
15. Torque axle nut to 340 ft-lbs.
Let me know what needs to be tweaked and I'll update. Good luck.
That probably works on cars not exposed to much salt. I used a 20 ton press on my front wheel bearing and could not get it out of the knuckle. My solution was to lay some hot nasty MIG beads on the bearing's outer race after removing the inner race and *****.
Oh, I needed a 20 ton axle puller to get the axle out of the hub.
Whoa! That bearing was basically welded in there and you had to do the only thing possible, completely destroy the bearing to break the galvanic corrosion "weld". Ouch.
Porsche's Top 5 Most Questionable Naming Decisions
Slideshow: For a company obsessed with engineering precision, Porsche has occasionally named its cars in ways that left even loyal enthusiasts scratching their heads.
Pogea Racing's 964 Porsche 911 Reimagination Stands Out in a Crowded Field
Slideshow: Pogea Racing's latest Porsche 964 project blends carbon-fiber construction, modern chassis upgrades, and up to 500 horsepower while keeping the air-cooled 911 experience firmly analog.
Talos Takes Your 991 Porsche 911 GT3 to the Next Level for a Cool $1.13 Million
Slideshow: Talos Vehicles has transformed the Porsche 911 GT3 RS into a carbon-bodied, race-inspired machine that costs well over $1 million before the donor car is even included.
9 Vehicles Porsche Helped Engineer that Aren't Porsches
Slideshow: Long before engineering consulting became trendy, Porsche was quietly helping other automakers build everything from supercars to economy hatchbacks.
9 Features and Characteristics That Only Porsche People Understand
Slideshow: Some brands build cars. Porsche builds traditions, obsessions, and a few habits that stopped making sense decades ago but somehow became part of the charm.




 Wheel bearing replacement

 Just changed my driver's side front