When you click on links to various merchants on this site and make a purchase, this can result in this site earning a commission. Affiliate programs and affiliations include, but are not limited to, the eBay Partner Network.
Anyone done this before? I need to replace one and and was wondering if it was straight forward.
I’ve seen the pelican parts guide for the door card removal.
I’ve got a door that is a bit temperamental - it doesn’t always lock and gives a door lock feedback fault code, so I am going to replace it.
Finally, does the new one need to be coded (kessy).
Thanks.
Are you asking about the door lock actuator assembly, or the door lock cylinder? Front door / rear door? Need info on opening up the door, or do you know all that?
Are you asking about the door lock actuator assembly, or the door lock cylinder? Front door / rear door? Need info on opening up the door, or do you know all that?
Thanks
The latch actuator assembly - rear.
Any info would be good.
Thanks for confirming, I did not want to waste the effort before writing this. Most of it is from notes I took recently while solving a rear DLA issue myself on my 2004 Cayenne S.
First off - there is a way to lock the door manually - shown in the OWNER's manual. Poke a little screwdriver or key through a hole to make it lock. Simple, but not convenient, of course.
If you look on the painted steel door surface facing the inside of the car, back by the lock, you'll see a little **** for the child lock. Very close to that is a rubber cover thing with an icon of a lock on it. Pull that off, and the orange plastic below it can be manually moved to lock the door. Move that orange thing, then close the door and it will be locked. Of course, only do this if there is no problem with unlocking, and it would be good to test it before actually closing the door.
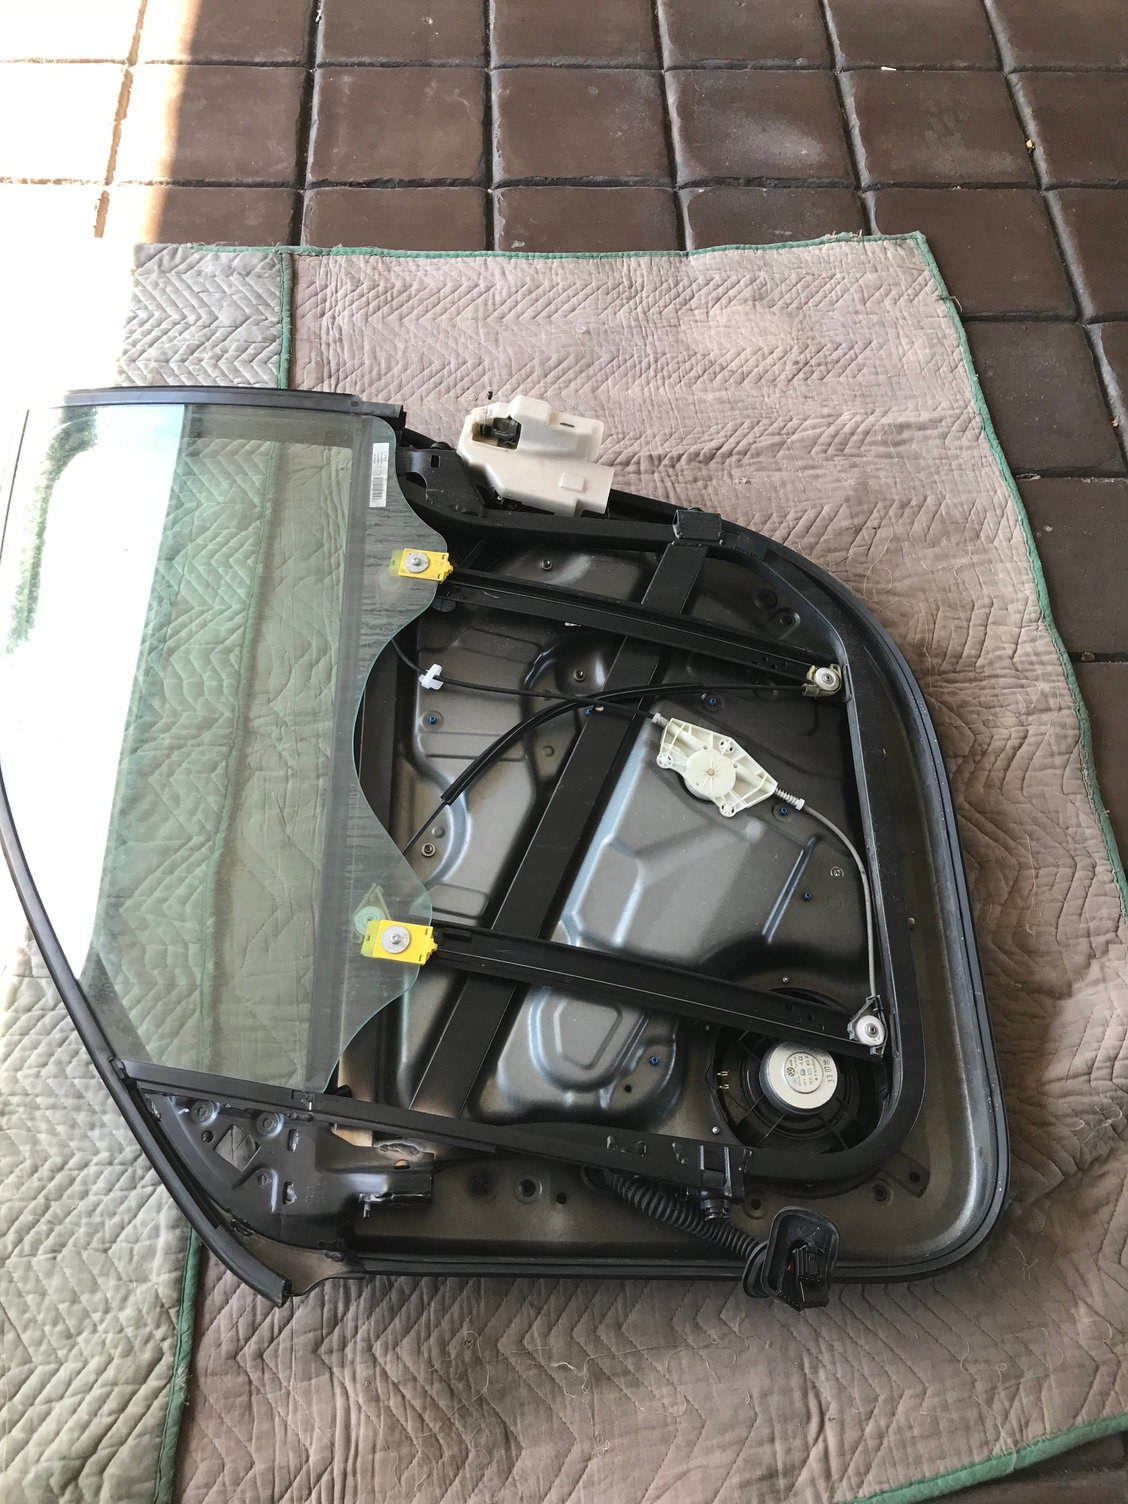
DLA - door lock actuator DUC - door unit carrier = a big assembly comprising the window frame, window, door lock actuator, wiring, steel frame, and steel inner shell.
My DLA failure symptoms - Jan 2018 left rear door, 2004 Cayenne S with 102k miles
began intermittently, then over a period of a week or so became almost constant
Door would fail to lock. Maybe a very quiet clicking sound (only noticeable when the DLA was in-hand), but no clunk. No other problems at all.
Same problem with key fobs, central locking, door locking, on a full, charging battery.
Manual locking with the red plastic thing poked with a screwdriver DID still work.
(I tried and basically failed on repairing the DLA itself - it wears out mechanically, and others have reported failed solder joints)
When you finally access the DLA and want to confirm whether the problem is with a switch, controller, wire, etc. upstream, you can test the DLA by applying voltage directly. Two pins actuate the lock (#1 and 2 for the 7-pin connector going to the actuator assembly). I confirmed that triggering those pins with plus and then minus voltage will very nicely and reliably open and close the lock, powered with an old 9V battery (at about 8V, and was plenty powerful - it might run on 5V).
To access the DLA:
Overall approach - can't just take it apart a little. Need to take the whole thing out. The inner panel comes off, then the whole DUC comes out, then you replace the DLA in the DUC. Would be the same thing if doing the regulator.
These instructions are for the rear left door. A door that has a key cylinder in it (i.e., driver's door) will need some extra steps to deal with that, at least.
pop off the top plastic strip at same height as the inner door handle release. Just pops straight out
pop off the handle cover. pops straight out
pop off the horizontal cover in line with the handle. start at the front. At the very rear edge is a little tab that faces rearward, so after things pop out, the thing slides forward slightly to remove.
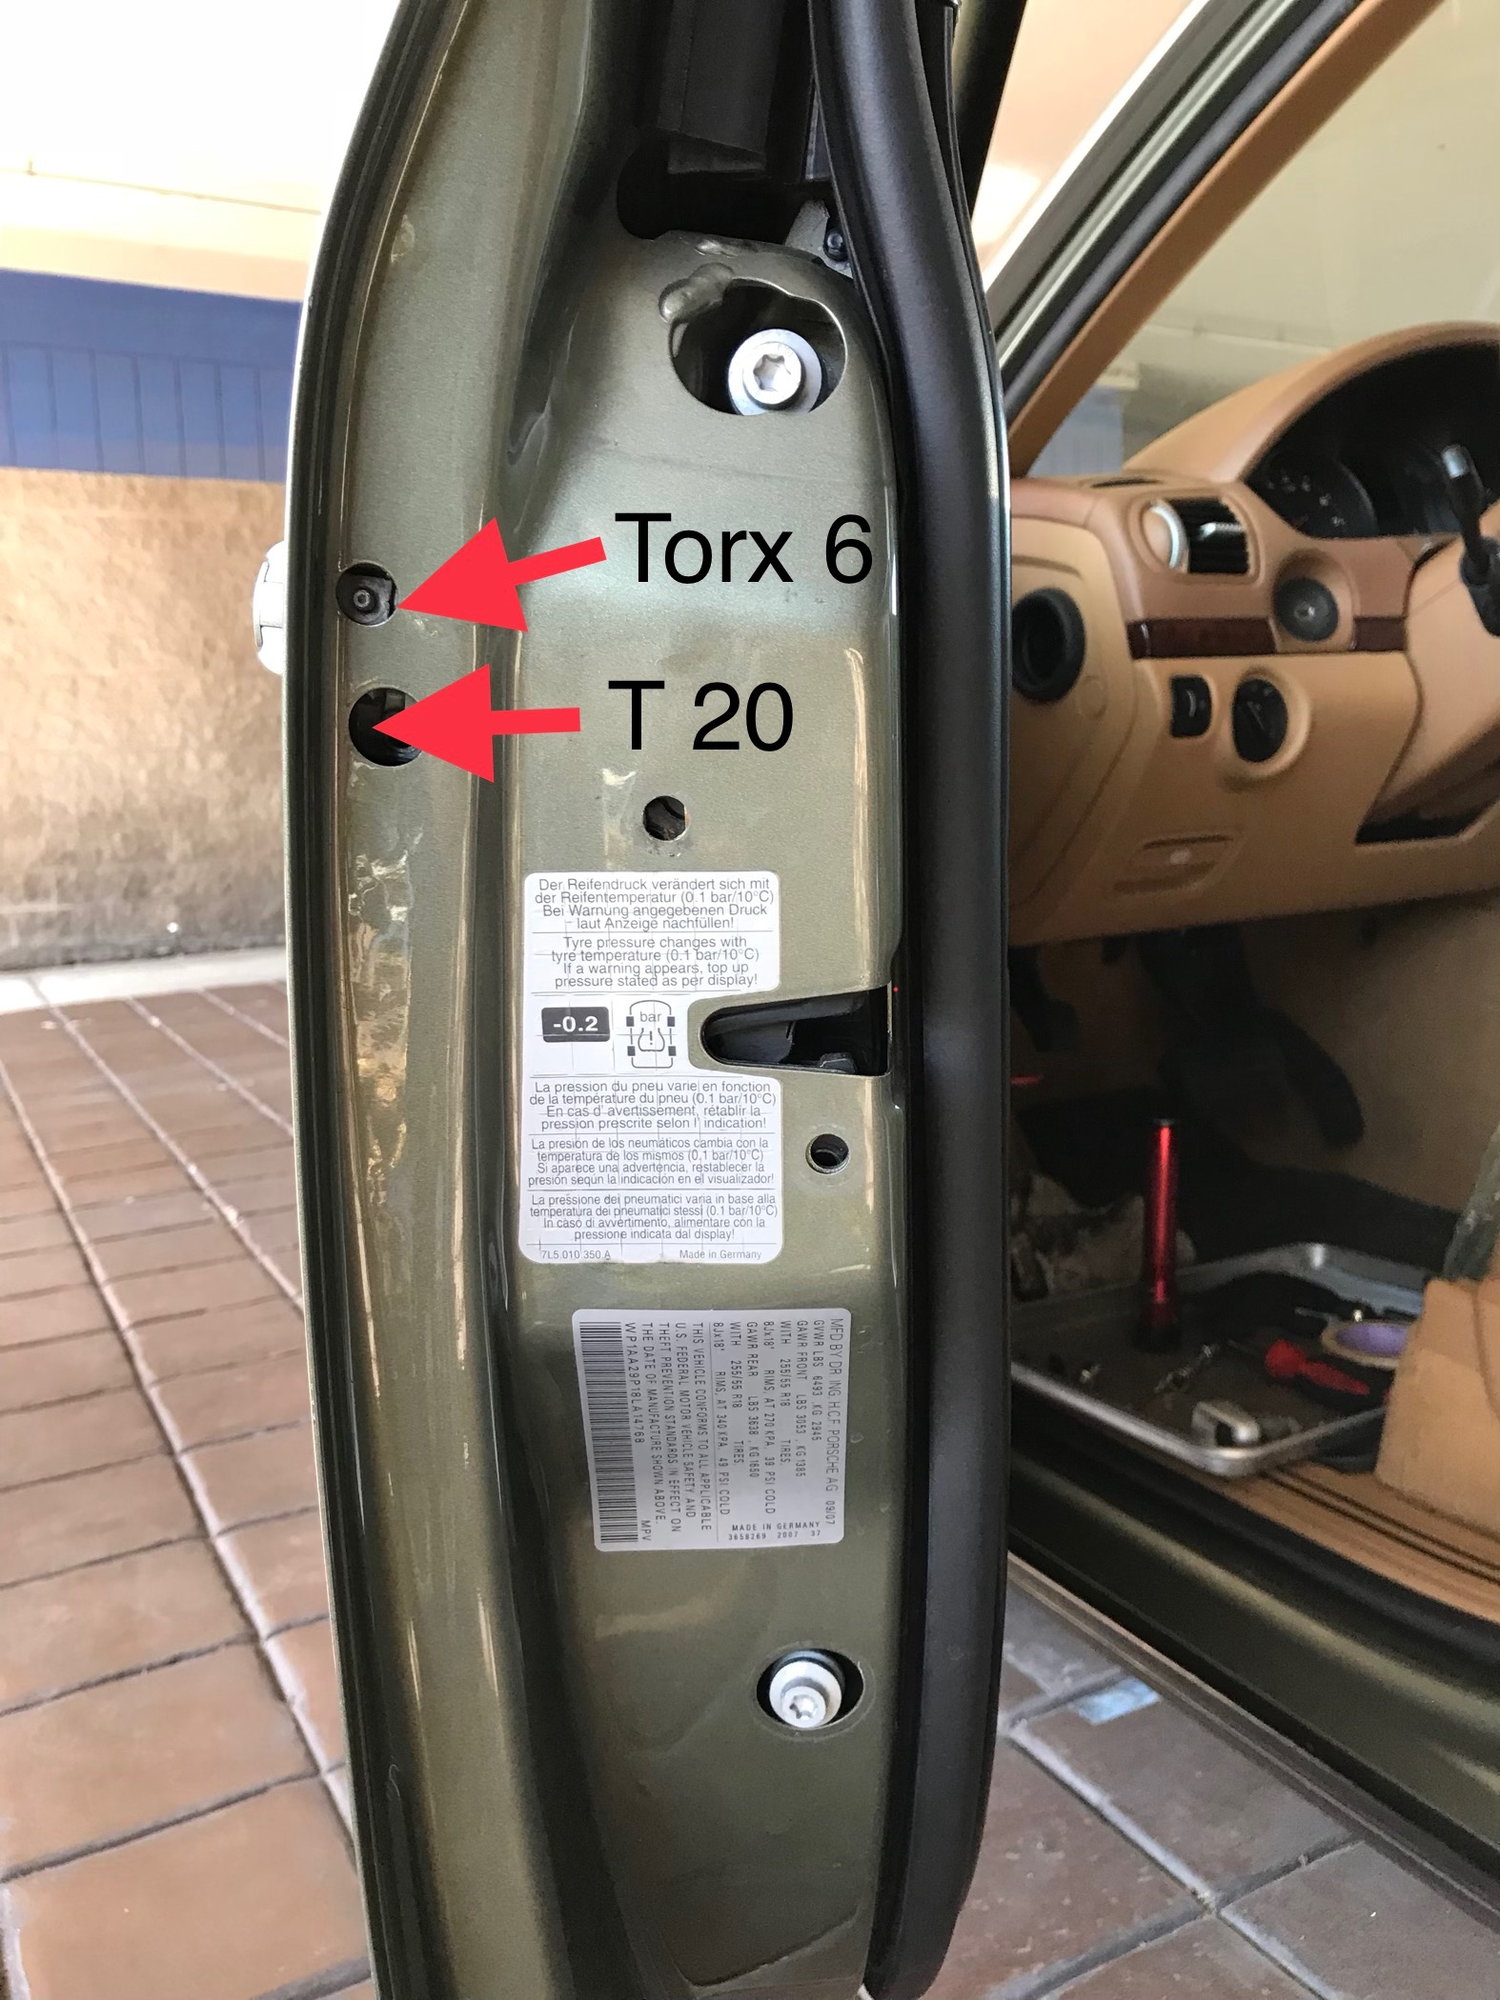
Remove 4x T30 screws under the door handle and horizontal thing
Remove 2x T20 screws into the carpeting at the very bottom.
At that point, the whole panel can be pulled out, held in only by plastic snaps. It levers at the top, so then lift it off once all snaps come out.
A couple (maybe just one) electrical connections, then the cable for the inner door release disconnects easily.
The wiring is kind of a maze in there, so if removing it, take photos.
To remove the DUC
unplug the wiring that goes from the door to the B pillar. At the B pillar, pull off the rubber housing, unclip and pull out 3x wiring connectors. Push all of the above through the hole in the door.
Remove 8x black T25 screws going through the black sheet metal.
Remove 2x XZN M8 black screws holding the striker plate.
Remove the "door lock plug" (where the key would go if there were a lock cylinder in this door)
- remove black circular plastic plug in the rear door jamb
- loosen, but do not fully remove the T20 screw. About 6 full turns should be enough. After this is loose enough, the door lock plug can just easily pull straight out with some wiggling.
With the door lock plug removed, you can see a little cable in there. pull it out of the serrated groove, so it hangs loose, attached to the door lock actuator on the other end.
Remove the four T45 screws, 2 on either side of the door, 2 covered by circular plastic plugs, 2 covered by bigger ~rectangular plastic panels. 3 of the 4 will have little adjustable donuts that may fall out when removed. These are for adjusting alignment of the door carrier WRT the door itself. So if they are already adjusted well, remember which one goes in which location, and also do not adjust them (they are a two-piece unit, with a left handed thread in there, so turning it will expand or contract it).
EDIT - if you find you do need to adjust the donuts, post #15 below was written to address this.
At this point, the DUC is just sitting on two pins near the top of the door. It should just lift up and pull forward a little to clear the door lock actuator, then can be removed.
If replacing the DLA, two rivets will need to be drilled out. On the left rear door, I replaced those with M5 screws and nuts when reinstalling.
When reinstalling
You MUST assemble the full DUC first, before attaching the DUC to the door. Cables, grommets, screws to hold the door lock actuator plastic (where rivets were drilled out), DLA electrical plug connected, etc.
May need to use masking tape to hold the adjustable donuts in place while lifting it in.
The rubber cable housing may interfere with the DUC frame while installing, so make sure it routes in properly.
Lift it into place, with the pins resting on their pivots. Tuck the DLA in first. This should go easily if everything is assembled properly. Having a helper to adjust cables, etc. while lifting it in would be good.
Reinstall 4x T45, 2x XZN M8, 8x T25 screws.
Reattach little cable to outer door handle - with maximum SLACK. There is about 6mm of adjustability range there. If too tight, it will not allow the lock mechanism to reset, preventing it from opening. If too loose, worst case is that the outside door handle would not work. Not good, but WAY better than having the door not open at all without using the jaws of life. With maximum slack, mine works fine.
Put door lock plug back in place, screw in T20 screw to hold it in. Test the hel! out of the lock / latch / releasing before actually closing the door. Not just the lock/unlock. It needs to release when unlocked and the handle is pulled.
I had a couple of threads where I first asked if anyone had done this, and then sent out a false alarm when I had temporarily closed the door permanently:
Great write up oldskewel. I'd like to add, that if you are removing the DUC on a front door, there is also a tiny T6 set screw that you will have to loosen in addition to loosening the T20 screw that is mentioned, pirior to being able to remove the "door lock plug".
Gosh, any good DIY with photos for front door actuator replacement?
Just removed the Passenger side inner door panel, it looks overwhelming to take it apart without it.
In dire of some help. I am at the following step: "loosen, but do not fully remove the T20 screw. After this is loose enough, the door lock plug can just easily pull straight out.". Unfortunately the door lock plug does not move at all. What am I doing wrong?
Last edited by h0vard; 01-18-2020 at 10:42 AM.
Reason: Language
if needed you can completely remove that T20 screw. Doing that will make it a little tougher to reinstall, but since you're stuck, it may make sense to remove it completely just to make sure you loosened it enough. I don't know how I remember this, but I think I remember counting about 6-7 full turns of the screw to get it sufficiently loose to allow removal of the plug.
Like many things, it may just be stuck, even with all fasteners removed. Tapping and prying it should get it loose if you've done all the other steps.
Just did this job and I thought I'd add a little to the discussion. Overall not too hard of a job but I couldn't find any info on adjusting the door unit carrier "donuts". Due to the design, they WILL come out of adjustment. Just the act of removing the bolts will screw them in to their home position. If your following oldskewel's guide this can leave you feeling a little SOL but don't panic.
Here's how to adjust them:
Fully screw in the adjustment donuts before hanging the DUC back on the frame. The threads are reversed.
Hang the DUC on the frame, have everything ready to be put together (wires, cables etc)
Fully screw in the front upper T-45 bolt don't tighten it yet. This will be the pivot point for adjustment so it should be snug but not tight. There is not adjustment on this corner. Just to reiterate: only install the front upper T-45 leave the other 3 bolts out.
Fully screw in all the black T-30 bolts then back off a turn.
Install and tighten the door latch bolts.
Install the door handle cable in it's loosest position, close the latch with a screwdriver and make sure it opens when you pull the handle. If it doesn't then make it incrementally tighter and test again until it works.
Gently close the door and pay close attention to the alignment of the window frame to the body, it should sagging. The goal is to get the window frame to the same position it was in before it was taken apart. It should be loose enough to move it by hand.
Use your left hand to lift the DUC and use your T-45 the adjust the front lower donut (just stick it in there lol just don't be too forceful it should turn freely when you lift the DUC). Turn it counter clockwise to raise the DUC. Remember that the upper front T-45 bolt is the pivot point.
Close the door frequently to check your adjustment. Once it's correct the seals around the window should be straight and you shouldn't need more than a finger to fully close the door. If you can't get it 100% that's fine move onto the next step.
Use your T-45 to adjust the rear donuts until they are snug, this may push the DUC forward a tad. Close the door to check the alignment and make additional adjustments to the front lower donut if necessary.
Once it's lined up you're done! Just install the rest of the T-45s, tighten the T-30s and check the window frame alignment again.

 02-04-2018, 06:39 PM