When you click on links to various merchants on this site and make a purchase, this can result in this site earning a commission. Affiliate programs and affiliations include, but are not limited to, the eBay Partner Network.
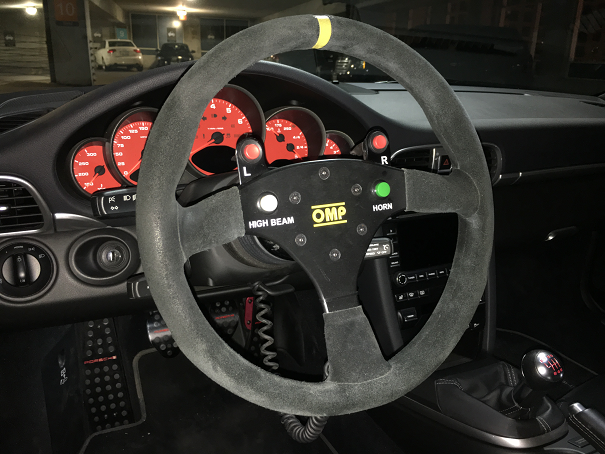
While the Cup Car steering wheel mod has suited me well this season, that curly cord was driving me crazy. It was like Chinese drip torture every time it would brush against my knees. It would also get caught in the stalks sometimes or bind in the small crack between the boss hub and column cover on lock to lock turns however infrequent. It was a source of anxiety in what was otherwise one of the most enjoyable parts of the car. You have not lived until you navigate traffic with indicators on the steering wheel. It also liberates your normally restrictive head light flashing and horn honking. Over the past few months I became an expert lane changer and instant ******* to anyone who sat at a green light for more than half a second or parked in the fast lane.
After thinking about a few ways to rid myself of this curly cord nuisance I researched a few options.
Pitch it all and go back to OEM -Not an option.
Install a wireless button system -Wat?
Relocate the cord to inside the column and boss hub -Lazy
Hack a few more steering modules -potentially brick my entire steering control module assembly... but hacking involved
I'm a red-blooded American so obviously I chose #4.
The timing of a post by RL user powdrhound was the kick in the rear needed for what happened next.
He mounted a wired 22-pin Krontec QR-03 hub in his 996 that ran switches to the steering wheel on one end and a curly cord through the boss hub and into the steering column covers. Very neat, very pro, very cool. Here’s a thread to his work.
Let’s emulate amateur style.
First a parts list:
Cup Car Wheel
Sparco Switch plate
4x Switches
22g wire-heat shrink-resistors
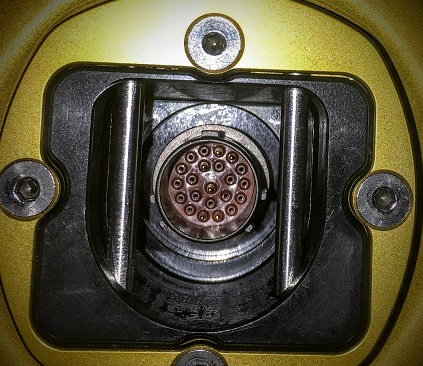
Krontec QR-03-22P (pinned Quick Release)
Krontec QR-20 (20mm spacer to hide wires)
Boss Hub
Assorted tools
I'll note that powdrhound has the main components of this as a kit and that will save many of you a lot of time finding these parts. I didn't even know these parts were what were in his kit after I had already purchased most of them.
On to the pretty pictures.
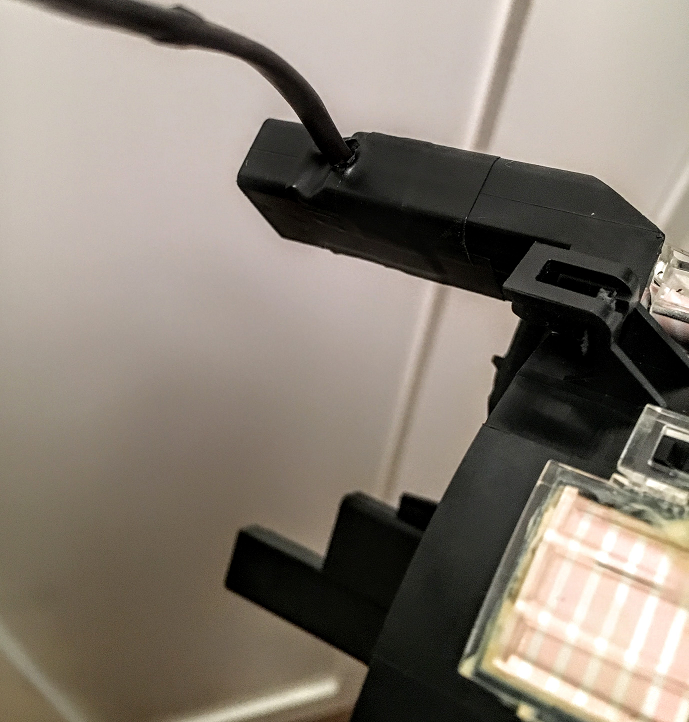
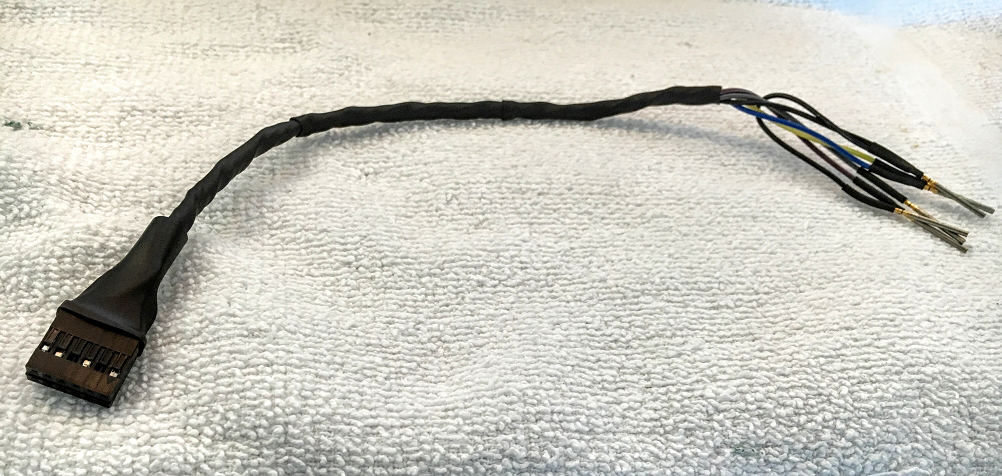
Wire the steering wheel buttons and note on your shrink or color code which wires run to which switch. I used Raychem shrink boots and wrap on the wheel and HellermannTyton shrink boots and wrap on the QR.
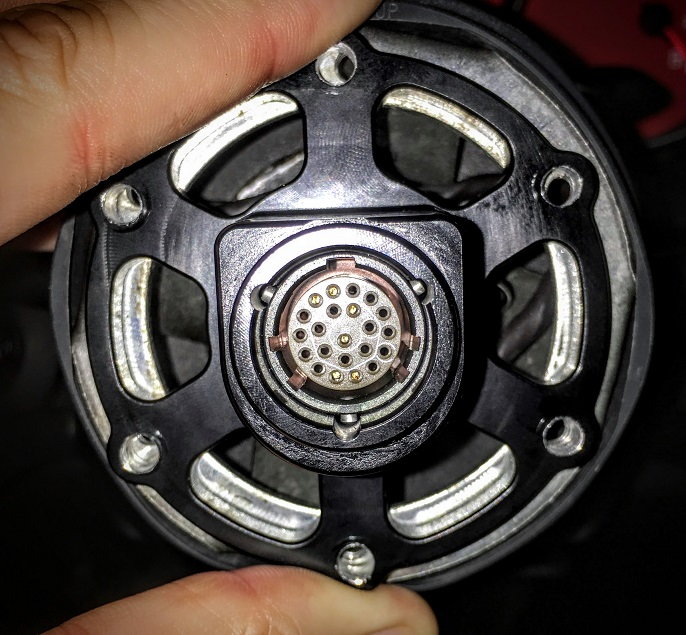
Note your selected pin holes, insert the pins into the Deutsch ASDD connector and attached the female portion of the QR hub to the wheel. Look at her. She is ready to accept you.
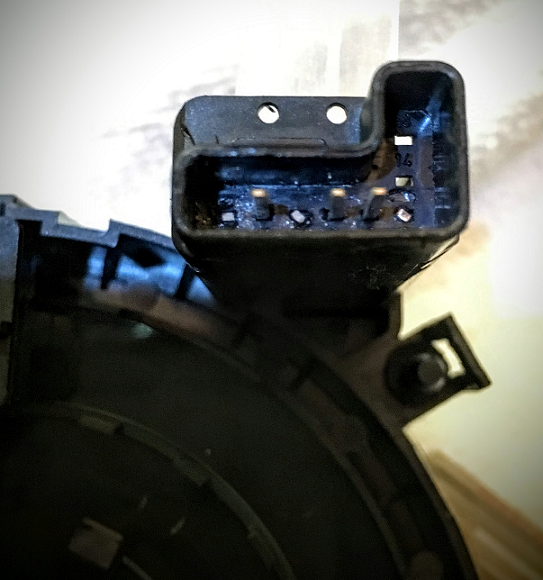
So, wiring the steering wheel was the easy part. Now how do I get the indicator and high beam wiring I did from the indicator control module in my previous post to the QR through the boss hub?
I knew that an OEM multifunction wheel had to have some sort of pin-out to connect to and there were plenty of unused pins on the spring clock since my car was a manual and didn't have multifuntion. That means there must have been unused pins on the other side too. I used a multimeter to figure out which were which.
Legend:
Ground
Horn
Low Speed Airbag+
Low Speed Airbag-
High Speed Airbag+
High Speed Airbag-
Empty
12V power
Empty
Empty
Empty
Empty
What about that other block of pins over there you ask? No idea. Didn't look into. Didn't need to. I had my pin outs identified (7-12) and could attach the leads from the indicator module to these pins which then flow through the clock spring's coiled tape-wire to the front connector and eventually the QR.
Here's how I did that.
First, I BOUGHT A USED CLOCK SPRING FROM EBAY. Cannot stress enough the risk of bricking parts you need to function when guinea pigging. Use different parts.
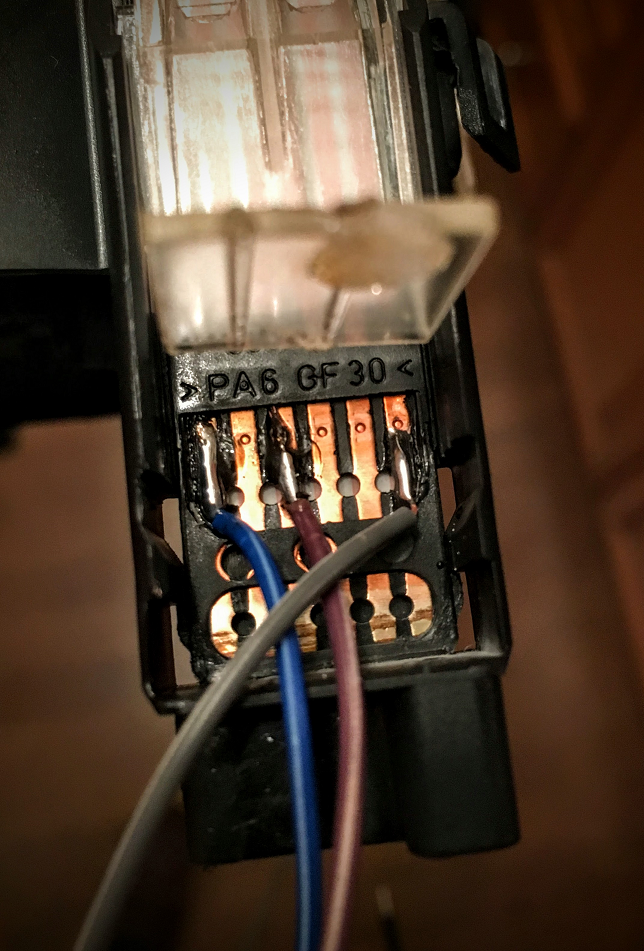
Second, I clipped the pins I would be using from the connector so they wouldn't create a circuit I didn't necessarily want created and that the ECU/CAN wouldn't recognize.
Third, I soldered the leads from the indicator module to the connecting tracks at the back of the clock spring. This particular set of tracks has an access door for testing which is incredibly convenient.
Lastly, to finish off the clock spring I shrinked and sealed the wires and soldering points in the arm.
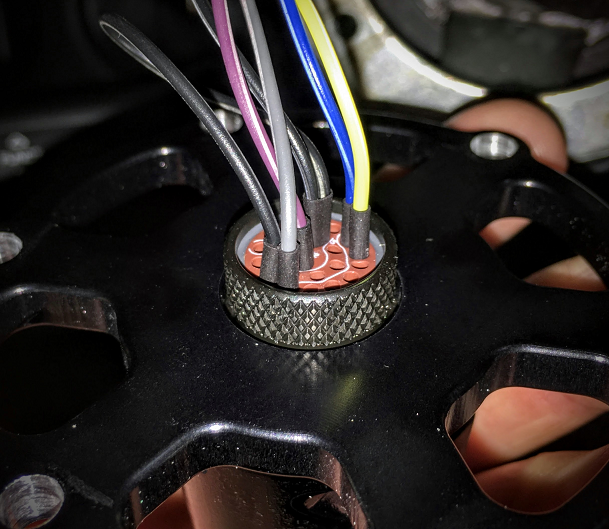
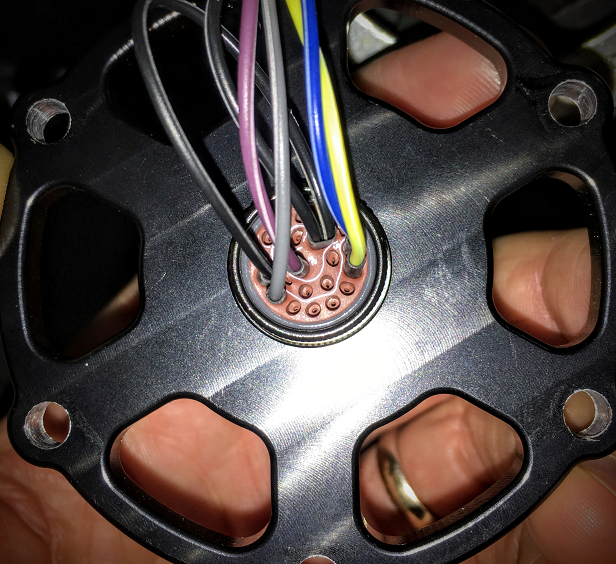
For this part I started by making a small wiring harness that led from the front face of the clock spring to the male part of the QR.
Next I inserted the pins according to my labeled diagram created earlier.
I then offered up the finishing male end to the boss hub.
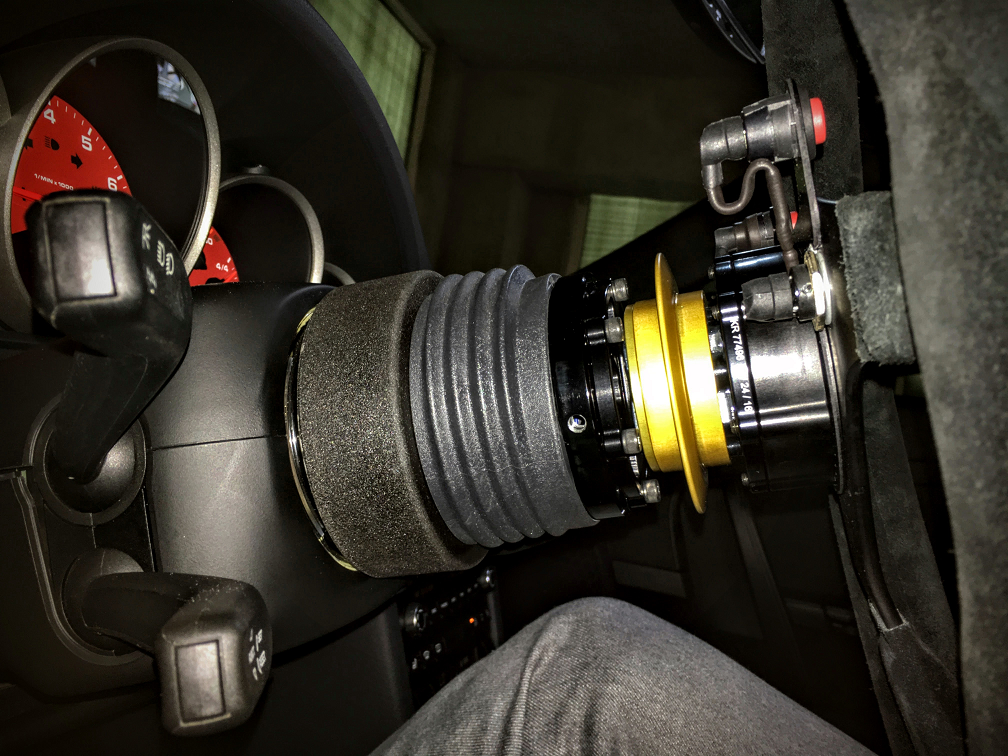
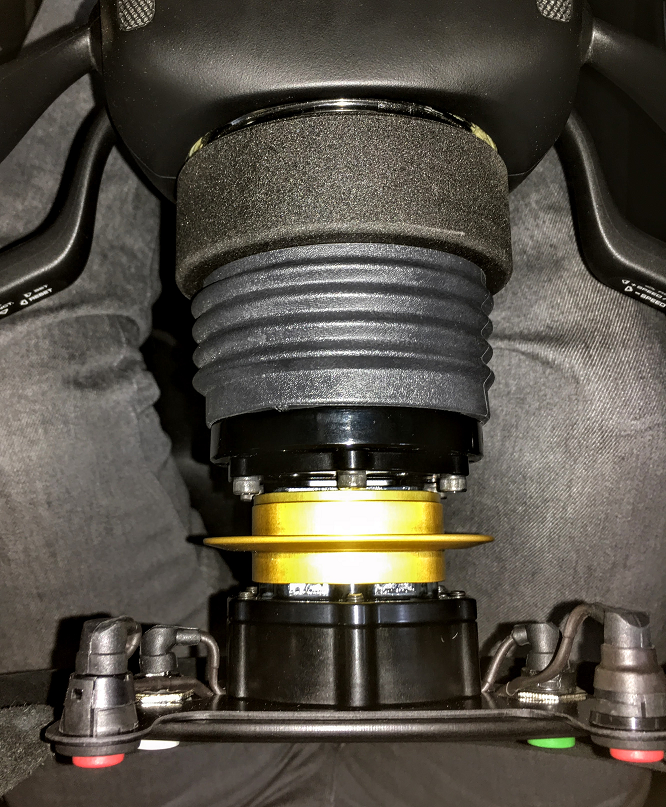
Finally, I inserted a left over 8mm spacer between the QR and boss hub for a bit more space, wired it all up (indicator module->clock spring->QR->steering wheel), tested it and then torqued everything down and here was the end result:
Everything works as it should, no problems after 100 miles and about 3 hours of driving
I'll get a better picture of it head on but it's essentially identical as before (by design!) sans the curly cord.
I also now have the ability to remove the steering wheel for security and also to ease ingress and egress of a car fitted with my next mod, GT2 Bucket seats (!!!).
This thread is amazing. Although I don't wrench, track or race (I know, I know, I'm not a "real" car guy...) and have a C4S not GTS, this thread is one of the best on here and why Rennlist can be such an incredible resource. Even if some of this (hell, most of it) is Greek to me, I'm following...
Thanks! There have been so many helpful threads on this forum I thought I'd start my own and pay it forward. And it's a fun story to tell. Hopefully others do the same and increase the collective knowledge of the community. That's the idea anyway.
This thread is amazing. Although I don't wrench, track or race (I know, I know, I'm not a "real" car guy...) and have a C4S not GTS, this thread is one of the best on here and why Rennlist can be such an incredible resource. Even if some of this (hell, most of it) is Greek to me, I'm following...
^^ ditto ... thanks to 'nw' and the many other Rennlisters who share so much knowledge and perspective
I also now have the ability to remove the steering wheel for security and also to ease ingress and egress of a car fitted with my next mod, GT2 Bucket seats (!!!).
GT2 Buckets, harness, GMG half cage and fire ext. all going in my 997.2 GTS this week. Will provide any useful feedback.
GT2 Buckets, harness, GMG half cage and fire ext. all going in my 997.2 GTS this week. Will provide any useful feedback.
My newborn can't sit in the back for another two years so I was considering going with a half cage until then and keeping the BK harness bar for afterward. Still considering it. Definitely post up your own build. I'm a big fan of the street driven track cars.
Adding performance but maintaining streetability requires cleverness and creativity.
Great job nwGTS...i miss my black GTS and going to the track.
I'll spend some of your money here...LOL...you should really upgrade the front brakes. Get some GT3/Turbo 6 pot calipers and either OEM 997 350mm Turbo rotors or Girodic Turbo rotors. You need rotors spec'd for the Turbo because Carrera and Turbo use the same uprights and your rotor offset will be correct and this way you don't have to change to GT3 uprights....then use Pagid rs19 Yellow front and RS14 Black pads n the back. This will even out the Carrera forward brake bias some and you will brake flatter. You will not a big change at the track, heel and toe braking will be easier and your brakes will last longer. Oh and GT2 Cup brake ducts.
You're absolutely right. Those brakes, a numeric shifter and E88s are on next season's upgrade list. Winter is a fun time to source all the parts while the car hibernates. Would have been convenient for both of us if you waited a year to unload your car. I'd have literally bought the entire lot of parts. LOL
The car was looking clean here right before I tossed on the track wheels, cameras and numbers.
Sorry it's been a while since my last update. I did a big interior overhaul the past couple months. Items that were added include:
GT2 buckets
Brey Krause Harness Bar
Schroth harnesses
BK Sub bars
BK extinguisher mount
Ram camera mount on the BK bar
The racing/DE forum here really helped me out with how to install the harnesses and 3-pt belts correctly on these GT2 buckets (it's a tight fit) and which ram mount would fit the double-thick center tubes of the BK harness bar. So, big thanks to those guys.
I forgot what a harness was like. It's been over a decade since my SCCA formula days. I'll echo whats been said before. These seats are probably the best seats ever made for a car. They are incredibly supportive yet still comfortable. The fact that they fold, have airbags, are FIA certified, have removable inserts and are only around 25 lbs is incredible. They are well worth the upgrade cost.
They are also worth conserving, which is why I opted to purchase twin sets of bolster and head rest protectors and I went so far as to clear vinyl wrap the entire carbon seat back and lower bucket. They will be long protected from track and gym bags tossed in the back and future toddler kicks.
I also rigged a retractable hook using the passenger sun visor clip. The higher bolsters of the Sport Buckets make it tough to get in and out. Ingress and egress is a breeze though when I remove the steering wheel. I have to put it somewhere so I now just hang it off this passenger visor hook. I'll post a pic of that later.
I'm off to the track tomorrow and will post a vid of a few laps from HLT once I can get those uploaded.
You're absolutely right. Those brakes, a numeric shifter and E88s are on next season's upgrade list. Winter is a fun time to source all the parts while the car hibernates. Would have been convenient for both of us if you waited a year to unload your car. I'd have literally bought the entire lot of parts. LOL
LOL...had I known....taking off all the cool mod's and selling them off 1 by 1 was a total PIA. No one wanted the car with mod's, they all wanted the car bone stock. It was such a better driving car street and track with the mod's I did...oh well.
You're doing an awesome job with yours. E88's will look nice....Bilstein B16 Damptronics with your TPC control module would be heaven...and the brakes up grade.
great job on the getting the steering functions to work!
Thanks! Though both are fun, I enjoy tinkering with the electronics and control modules more than the nuts and bolts TBH. There's probably too much time dedicated there for the output, but I dig it.

 08-04-2016, 02:11 AM


 ) and have a C4S not GTS, this thread is one of the best on here and why Rennlist can be such an incredible resource. Even if some of this (hell, most of it) is Greek to me, I'm following...


