When you click on links to various merchants on this site and make a purchase, this can result in this site earning a commission. Affiliate programs and affiliations include, but are not limited to, the eBay Partner Network.
DIY for switch to a 997 Turbo Wing assembly on a Carrera
About a year ago I posted a thread describing my ongoing effort to add the wing assembly from a 997 Turbo to my Carrera S. Near the end of the thread I promised a DIY but never followed through. I've had a couple of PM's asking questions about this over the last year, and most recently Jumpin' Joe was asking about the DIY so it seems like a good time to follow through.
The first thing you should know is that the Turbo wing assembly is the same for 997.1 and 997.2 models. Similarly, it will fit both 997.1 and 997.2 Carrera models. A caveat is that you may have to change to a narrower aftermarket air intake as well. I'll include a photo in a later post in the series, but in my case the airbox was about one-quarter of an inch too wide on the right side and would have pushed the hydraulic cylinder on the wing fairly hard to the right. Another poster in my original thread, dethman, said that he was able to retain the stock airbox. I don't know why there was a difference, maybe his car wasn't an S and it has a different airbox? In my case I use a Fabspeed dual cone intake and have been happy with that, plus I get the nice intake growl it provides.
If you are interested in knowing some of the lessons learned as they occurred the original thread is here: https://rennlist.com/forums/997-foru...on-my-c2s.html. I'll skip a lot of that material here and try to keep this one as simple as possible.
Speaking of the original thread, I'd like to give a lot of thanks to Pete (Petza914) who had done this before and gave me a lot of valuable guidance.
When looking for a Turbo wing assembly, try to make sure you get one that includes the wing blade itself (it retails at $6383 alone!) and all of the hydraulics in good working order. Those are the most expensive parts. It appears that the original deck lids off of Turbos always have a part number of 997.512.221.00 (whether a 997.1 or .2). The replacement deck lids you find in parts diagrams have a slight different number: 997.512.921.00. I've seen this kind of singe digit change in other replacement parts before and don't know why it is done. The deck lid I used on my 2009 S has the 221 part number.
Edit: Looking at the current parts diagram more closely, I see that the diagram is showing the the "921" version has two lamps, my "221" version only has one mounted in the center (as you will see in photos in later posts). That may coincide with a change in the wiring harness number from 997.622.670.00 to 997.622.670.01 where it appears the newer harness adds a connector for a second light. If you have a single light opening then I guess if you can't find a 00 version that a 01 version would work.. you'll just have an unused lighting plug.
You also have the option of replacing the upper panel that sits below the back window and the deck lid. On the Turbos there is a high-mounted brake light in the wing so it doesn't need one in the trim panel below the rear window. I'll describe swapping out this panel this in a later post.
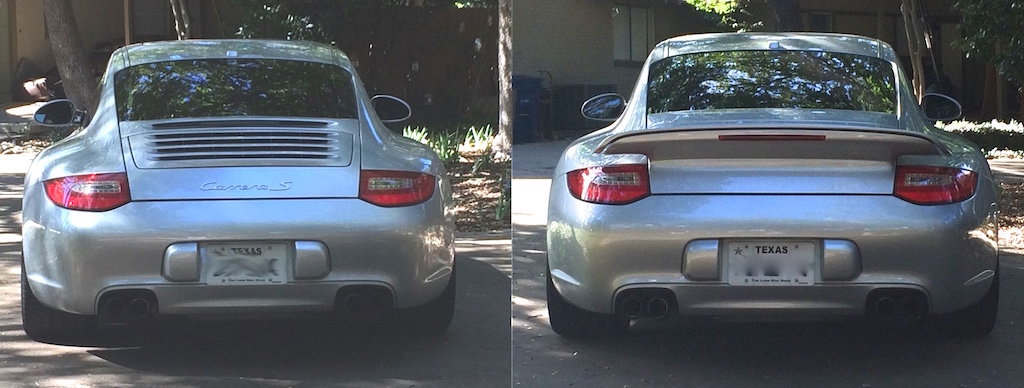
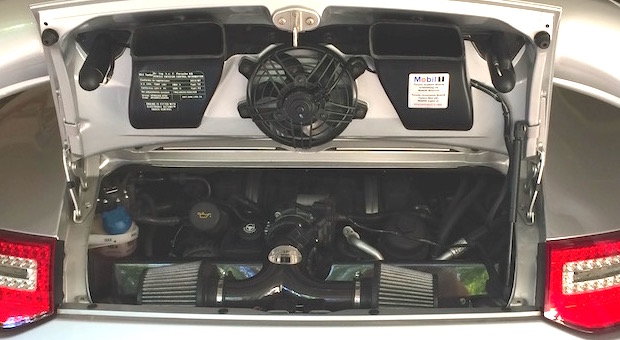
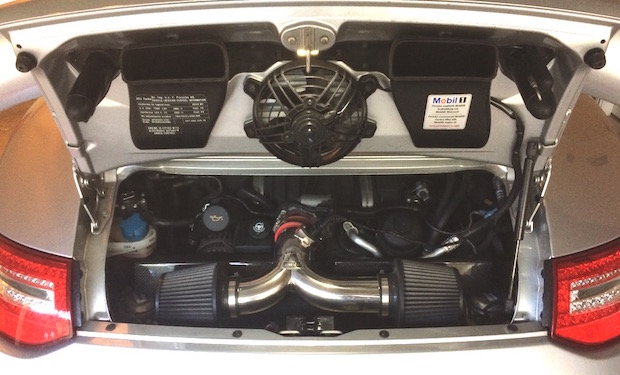
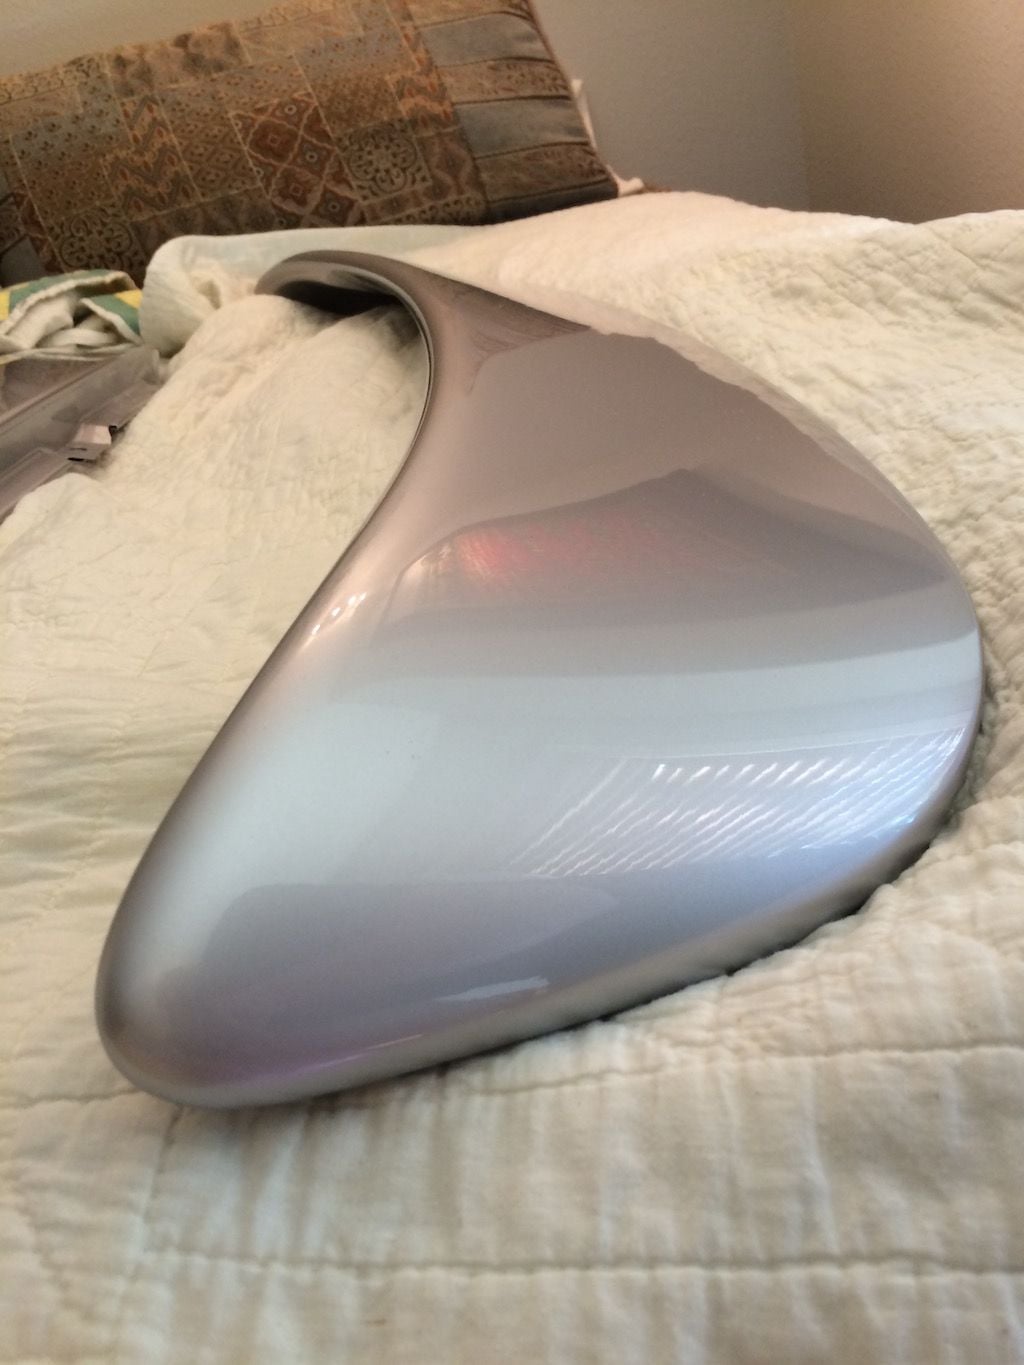
I'll post more as time permits. For now, here are a couple of before and after photos. Sorry about the different time-of-day lighting and slightly different angles, but you can get the gist of it from these. It did eventually add a 911S logo to the deck lid but it isn't in this photo.
Last edited by StormRune; 10-15-2015 at 11:09 AM.
Reason: Info on second light change in newer wing
The good news on doing a Turbo wing graft onto a Carrera is that the electrical connector is a completely plug-and-play change. The wiring harness for a Turbo plugs right in and does all of the right things. The wing will raise and lower at the same times as your previous spoiler, and it responds to the spoiler up/down button the same way.
The high mounted brake light does all of the right things too. It's behavior is slightly different that the normal Carrera one that switches to the one in the spoiler when the spoiler is up. Instead, the Turbo one will always use the one in the deck lid just below the wing blade and the normal one below the rear window is always disabled... if you keep it and don't replace that panel.
You also don't have to change the hinges to the Turbo hinges. A Turbo comes with two dampers installed and requires a different left-side hinge on the deck lid side. Fortunately, a single damper in good health holds the deck lid up just fine so there is no need to change out the left hinge to a Turbo one.
As mentioned in the first post, you want to find one with the wing blade and all of the hydraulics in place. In my case I ended up spending somewhere near $500 for most of the other parts since everything else was missing. I was lucky and got the upper panel included even though it wasn't shown in the eBay ad. I never bothered to replace the rubber strip at the back edge of the deck lid. Here are some of the part numbers you may need to know. You can also get the numbers and parts for most of these from sites such as GaudinPorscheParts.com at a discount. My local dealer ended up price matching them which made it easier for me in case I needed to return something (like the left hinge and damper I didn't use at Pete's recommendation).
997.512.221.00 Deck lid from an original Turbo
OR
997.512.921.00 Deck lid as shown in parts catalogs
996.512.987.00 Adjustable bumper (2)
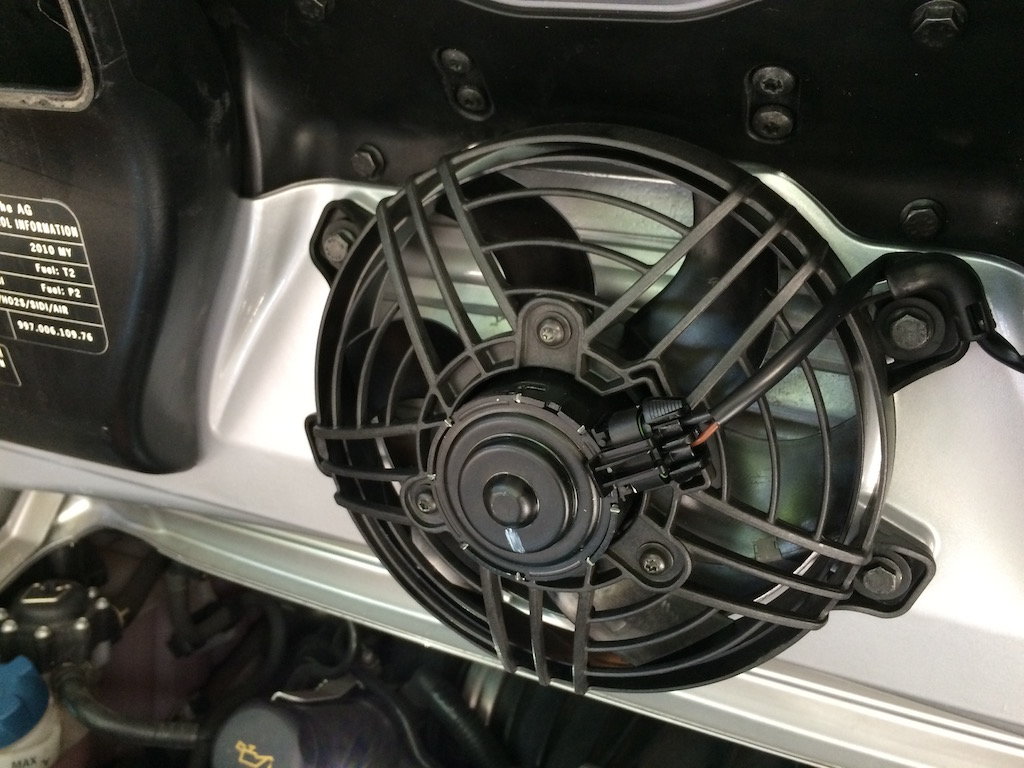
997.624.056.05 Fan assembly (includes sleeves and spacers)
900.378.223.09 Fan bolt (4)
997.632.201.00 Lamp
997.622.670.00 Wiring harness (The one I have for only 1 lamp)
OR
997.622.670.01 Newer wiring harness (2 lamps?)
997.631.052.01 Red center brake light
997.110.171.01 Intake duct left
997.110.172.01 Intake duct left
999.591.712.40 Intake duct retainer (2)
997.504.445.01 Upper panel from an original Turbo (no upper brake light slot)
OR
997.504.345.01.GRV Upper panel as shown in parts catalogs (no upper brake light slot)
A note about the intake ducts. If you manage to get the factory airbox to fit you will not need these since the openings dump out in the wrong place. You'd want to leave the ducts off since the openings in the metal deck lid are a better matchup for the factory airbox intakes. If you happen to get a Fabspeed dual-cone intake, the good news is that the ducts drop the air right on top of the cones.
Last edited by StormRune; 10-15-2015 at 11:05 AM.
Reason: Corrected two part number errors
So once you've had the good fortune to find a donor wing assembly, you'll need to disassemble and clean it up a bit before sending it to a paint shop that you think is capable of getting a Porsche-quality finish that matches your car. I declined the paint-shops offer to do a blend since I want to be able to put the car back to stock later if desired... plus I just didn't think a blend would be necessary. There are a lot of angle changes and panel back there and I think it would be hard to tell if there was a very slight difference. It my case it looks like a 100% match.
The disassembly is mostly obvious. The only trick is removing the wing blade. To do this you'll have to extend the wing and it was likely retracted when removed. There are two ways to do this without uncoupling the hydraulics altogether. The safest is to move the wing over near the car, use the proper harness to hook it up temporarily, then extend it using the in-dash switch.
I didn't do this, but what I did is risky if you aren't careful. I used a low amperage 12v power supply and applied power directly to the pump motor contacts. I initially did it very briefly to see if the blade tried to move in the right direction. It didn't. I reversed the leads and tried it briefly again and it bumped outward ever so slightly. With this known to be the correct direction, I applied power until the wing was out just enough for me to access the spanner holes in the hydraulic tubes. If you drive the motor too far you may damage something so be extremely careful here... or do the safe way described in the prior paragraph. Remember that the couple wing blade doesn't extend very high, take a look at the photos below. I understand that ones from a cabriolet extend further, but you don't need to go all of the way out to get to the holes for the spanning wrench.
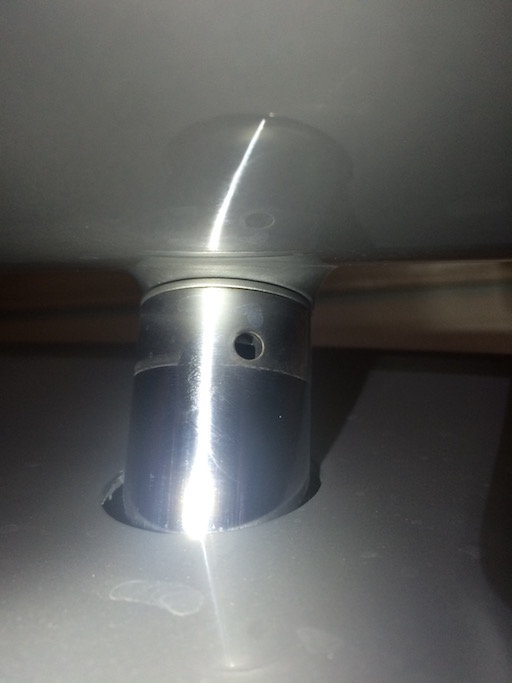
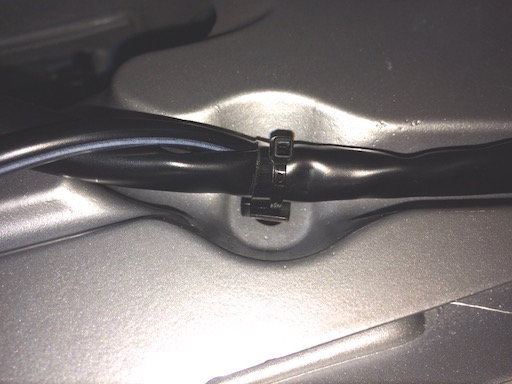
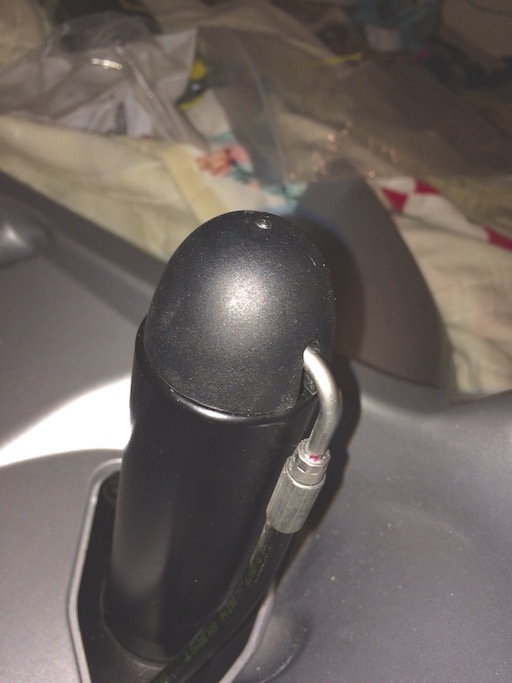
Once you have the wing extended, you will see a hole just below the top of the stainless steel cylinder. Note that this cylinder is actually made of two nested parts and the outer part rotates independently of the part that screws into the wing. This allows the hole for the spanner to rotate into a "closed" position so that water doesn't get into the cylinder.
To remove the wing, you'll have to rotate the outer hole in the cylinder to align with the inner hole on the part that actually screws into the wing. Here is a photo of the outer cylinder in the closed position.
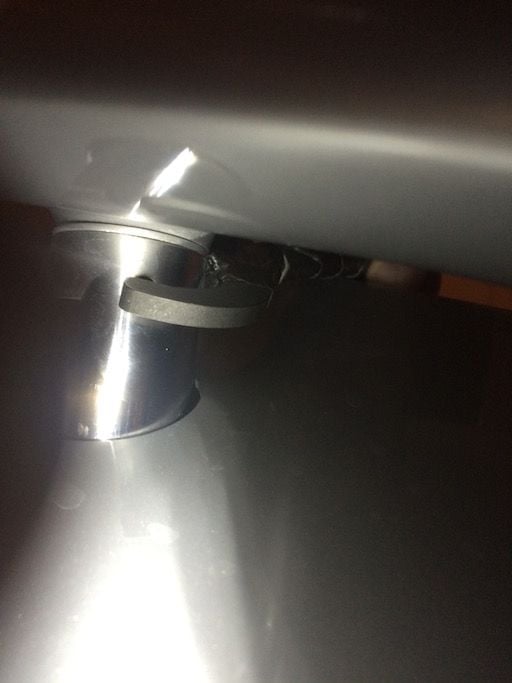
The outer cylinder doesn't rotate terribly easily. I did it by building up several layers of duct tape into a half-inch wide strip. I placed the sticky side against the cylinder and used a pair of channel lock pliers, applying as little pressure as possible, to rotate it until I could see the holes line up. You can see the holes in the lined-up position in the next photo.
Once you have the outer and inner holes lined up you use a spanner wrench to unscrew the cylinders from the wing. Porsche sells a special tool for too much money, or you can buy a normal spanner wrench. I used a 36mm one and padded the handle and the base of the crescent where it rests against the cylinder with lots of duct tape to make sure I didn't scratch the cylinder or the paint around where the handle swings... there's not a lot of space to work so it would be easy to scratch something here. Here's a photo of the wrench, followed by a photo of it on the cylinder. Note that the screw threading is normal threading that turns counterclockwise to loosen when looking from the bottom upwards, but you are typically looking at it from the top so from the top you are turning clockwise to loosen.
Really transforms the car!! Love it.
One day I will do mine!!
Thanks! Hopefully this will be useful to you.
Originally Posted by Louis de Funes
that looks really great
so all in all what $$$ are we talking about for this mod
And thanks again! The biggest cost driver is how much the deck lid, wing blade, and hydraulics assembly costs as a unit. I got my from a car shop on eBay at $3k for the assembly and $200 shipping and got the upper panel as an unexpected freebie. It also had the two air ducts and the lamp included. In all I spent around $400 in replacing the missing parts.
The paint job was $700. I saved some money on the paint by disassembling everything myself beforehand. The cost included painting the inside of the lid plus extra attention to detail and some extra coats and polishing to match the original paint quality and texture. They also showed me three different variations of Arctic Silver (to my surprise!) and we picked two of those for test spray to compare against the rest of the car. The differences were extremely fine but subtly noticeable. We picked one of those and it seems to be a perfect match.
The only special tool required was the 36mm spanner wrench but it only cost around $20. 36mm doesn't seem to be perfectly the correct size, but once I padded the inner edges with duct tape to make sure there was no scratching of the cylinder it did just fine. You can also buy a special Porsche tool for more money.
So altogether I spent around $4300 to do this, not counting the cost of the Fabspeed dual cone intake which varies on whether you find a new one at retail, one sale, or a good used one.
For those already following this DIY and on the outside chance you've already copied the parts numbers down, I've updated the first two major sections with some corrected part numbers and some info about the two versions of deck lids (221 vs 921) and wiring harnesses (00 vs 01) I've found in the online part catalogs.
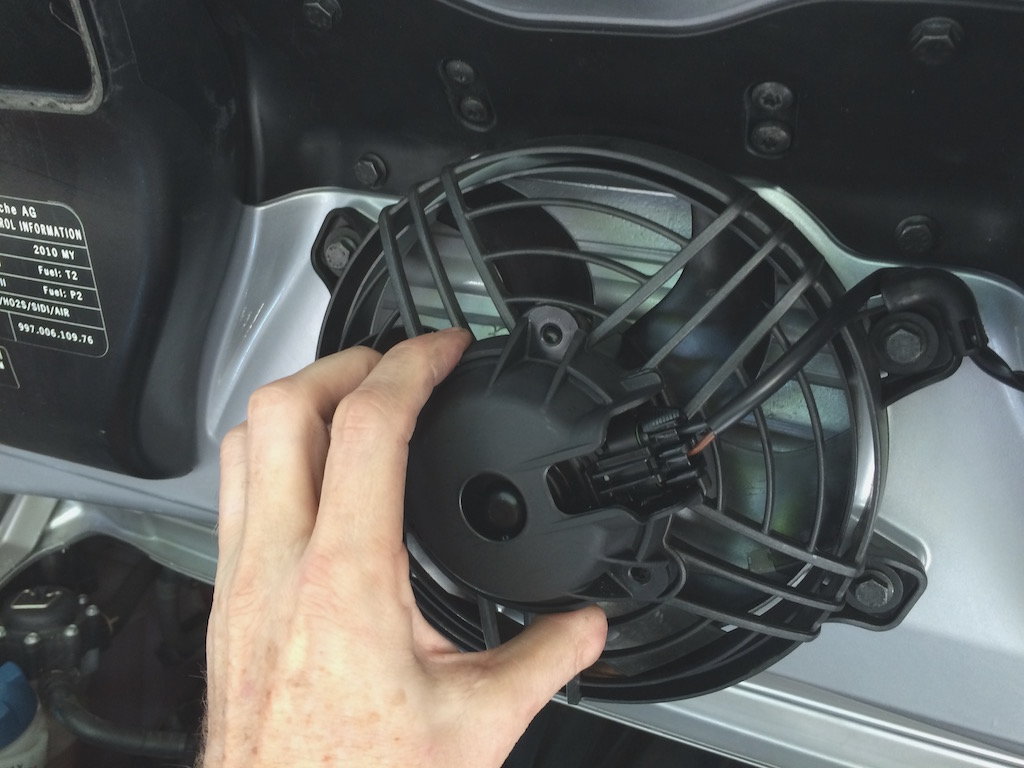
So at this point all of the pieces should be in the paint shop. While all of this is happening, you need to change your intake air box if it seems the hydraulics won't straddle it. I'm pretty certain you will if you have an S (I don't know about non-S). Originally I used a Fabspeed carbon fiber intake but was having trouble with the MAF sensor mount on the carbon touching the Turbo fan assembly. I mitigated this to a large degree by removing the back shroud on the Turbo fan as shown in these photos:
By talking about this here you may think I'm getting ahead of myself, but this is probably something you'll buy early so you'll want to be thinking about it early. Looking around the web one day previously I had found that some of the original Fabspeed intakes were made from stainless tubing. I decided to buy one of those also and then I'd keep the one that fit the best and sell the other. It turned out that the MAF mount on the stainless one is positioned differently and provides comfortable clearance for the fan, so I kept that one. I am also less nervous about getting the hose clamp too tight on the stainless. Unfortunately the stainless ones can be hard to find, but fortunately the carbon ones work once you remove the fan shroud and if you make sure the intake tubes aren't mounted with any upward tilt. You also have a little inward outward movement to play with. Be sure to look at the fan clearance to the MAF as you close the deck lid the first time. I actually put a light and by smartphone on video mode inside the engine compartment pointed at this area as I closed the deck lid fully to see how much clearance I had.
So jumping ahead for a moment, here is the finished installation with the carbon intake, following by another shot showing the stainless version. If you look closely you can see the MAF mount is closer to the engine and more ahead of the fan on the stainless one:
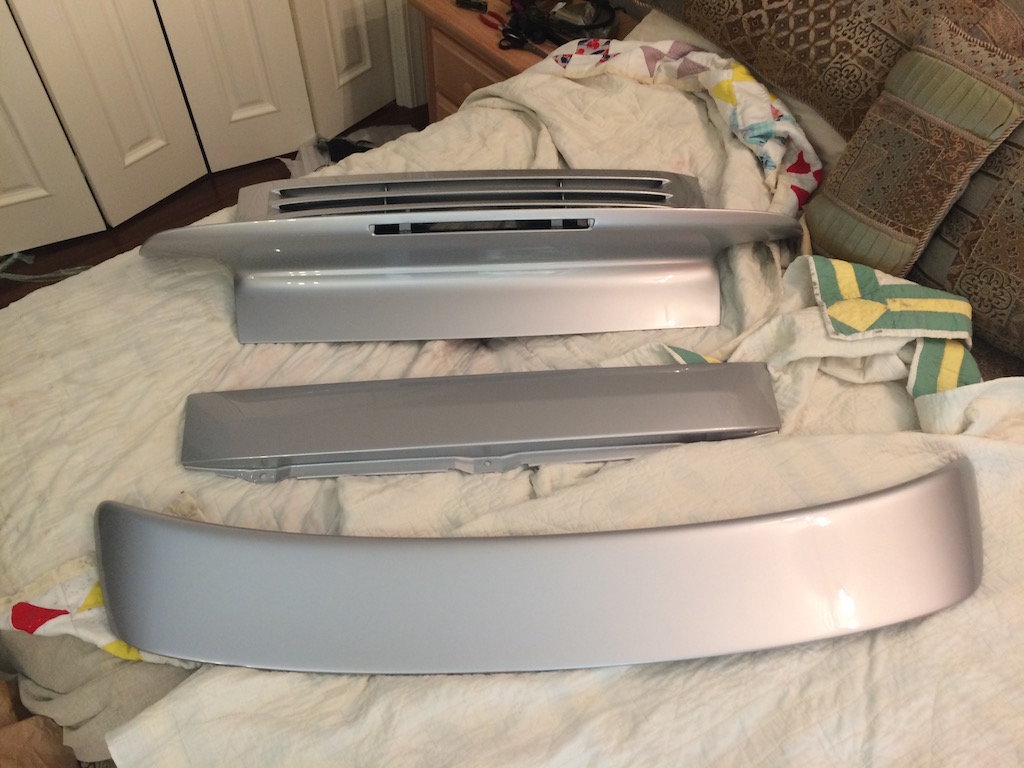
Here is what the donor deck lid looked like when I received it. Notice the hydraulics are in place and it included the latch and the single lamp in the center. If you are lucky you may find one with an intact wiring harness too. In my case the guys removing it weren't careful and had ripped several wire out of the connector and crushed part of it with pliers.
When you get it back it from the paint shop it will look like this. This photo includes the optional upper panel.
The extra money was worth it since I ended up with a very nice finish like you see here:
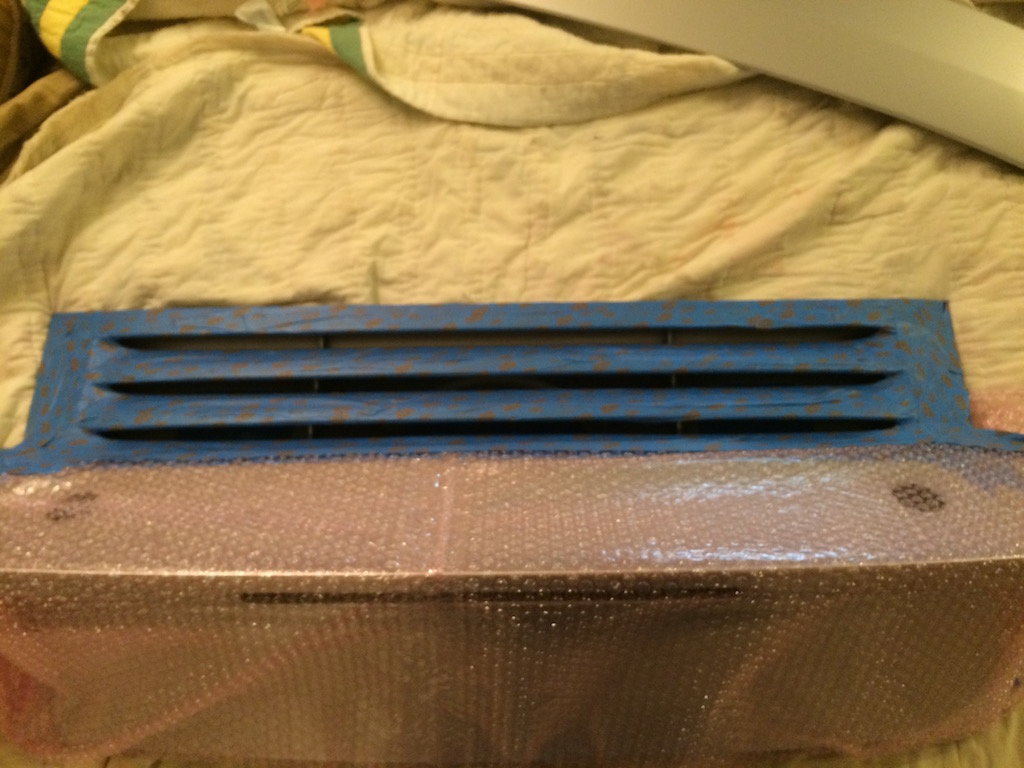
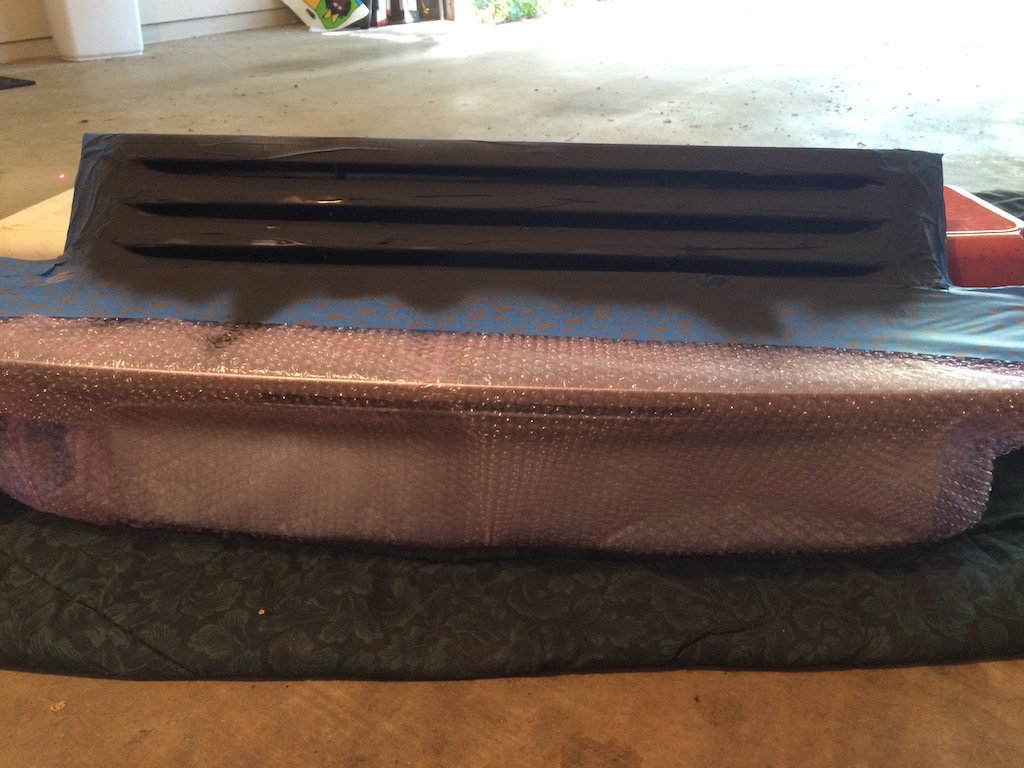
Now if the paint shop didn't figure out a way to mask off the flat black finish inside the grills, you'll end up with "overspray" inside this area, as shown here:
The good thing is this isn't too hard to fix yourself, you just need to do a lot of masking tape to make sure there isn't any overspray problems with the black. You should also close off the openings on the back side so that the blow-through doesn't mess up anything either. To be safe, I waited a few days to make sure the paint was well on its way to curing and spent extra for high quality masking tape especially made few newly painted surfaces. For the paint I used high-temp flat black automotive paint. Be sure to clean off any compounding residue you find inside the slats for maximum paint adhesion. Here are some photos.
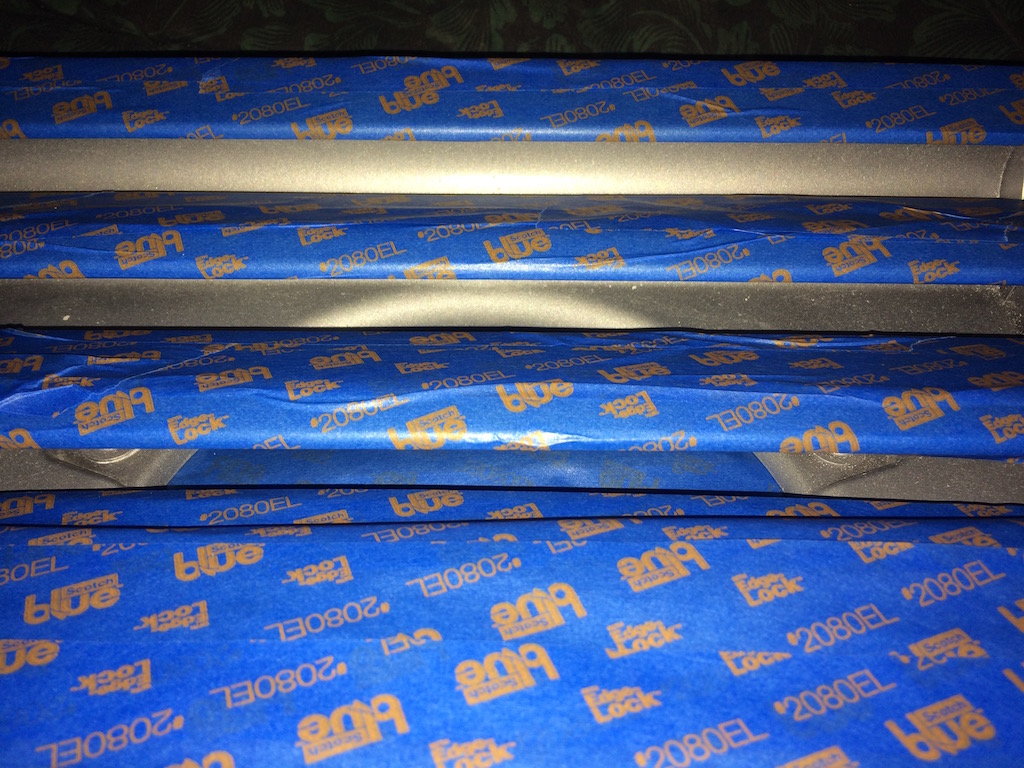
The final result turned out very nicely and has held up well. For those of you not familiar with removing masking tape, pull slowly and carefully to the side since pulling straight out from the surface could pull off some paint:
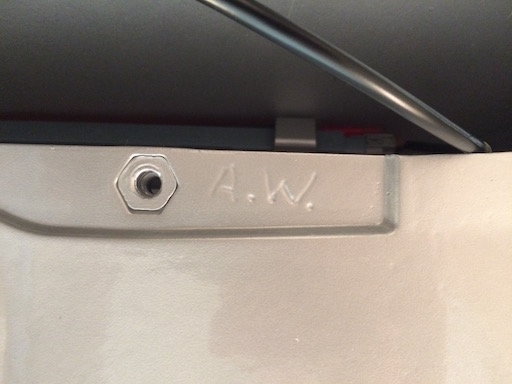
I recommend assembling all of the parts onto the deck lid before putting the deck lid on the car. An interesting trivia item is that under the hydraulic plate it appears that the workman engraved his/her initials. I don't know if you'll find this on all of the deck lids or not.
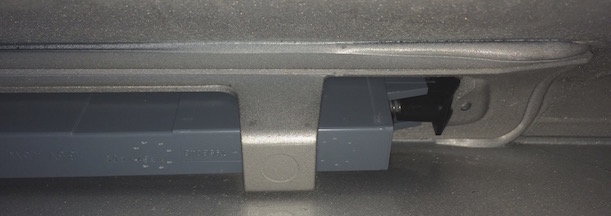
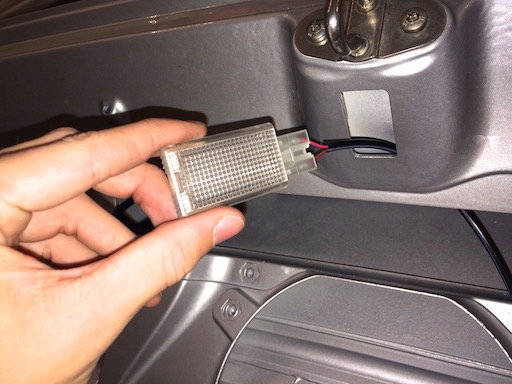
An easy first step is to put the brake light in the deck lid. You won't be able to get to it to hook up the electrical connector after you've put the hydraulic pump mounting plate in place so do it now. It won't go in upside-down correctly so make sure the shape matches with the shape in the hole the way you have it oriented. It has two spring-loaded retaining clips and simply snaps in. Here is a photo from the inside showing on of the clips locked in position:
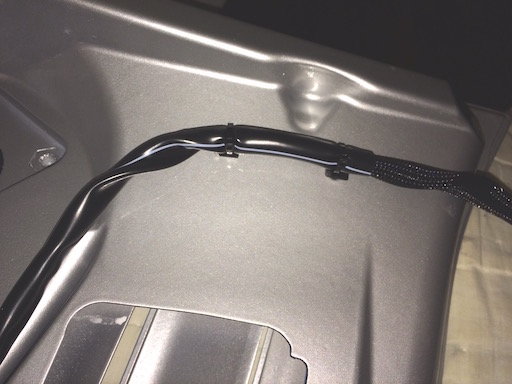
As long as you are doing that, you should go ahead and put the harness in place. The retaining clip mounts are pre-positioned so all you have to do is place the cable and snap it into place. They run along well-defined channels in the deck lid.
Now is a good time to run the cable for the light out through its opening, plug in the light, and snap it into place.
And before getting the pump and hydraulics in the way, go ahead and plug in the high-mounted brake light too.
Do not hook up the fan yet since it is somewhat in the way of the hydraulics when you put those in place. I'll cover the hydraulics in my next post.
Finally for this step, you'll want to add the two Turbo bumpers that screw into the bottom edge of the deck lid. I'd suggest screwing them in about halfway up their threads for now. You'll need to adjust them later during final assembly.
This may help as well.... he is my same project done years back. Pictures and documented the install etc...
It looks like you may have been the first judging from the dates. I wish I had uncovered your posts when I poked around a year ago! Thanks for the extra info, especially from the point of view of a 997.1 since I may accidentally introduce 997.2-specific details without realizing it.
Next step: Now you should be ready to install the hydraulics back into the wing, assuming that you removed them before painting. I guess I forgot to cover removal, but that is much more obvious since you tend to unbolt things that you can remove in the order they can be removed. My recommendation for removal is to take pictures of how everything is positioned as you take them off so that you can be sure you put them back the same way.
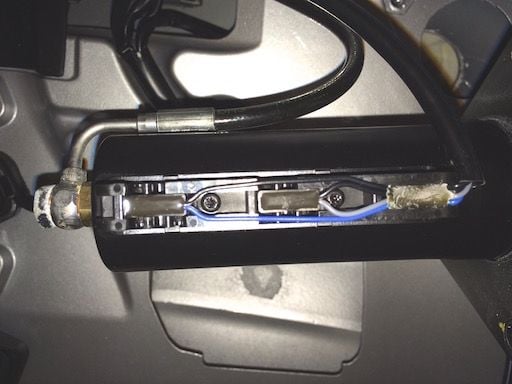
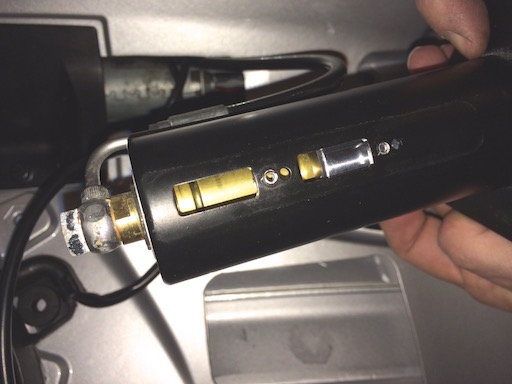
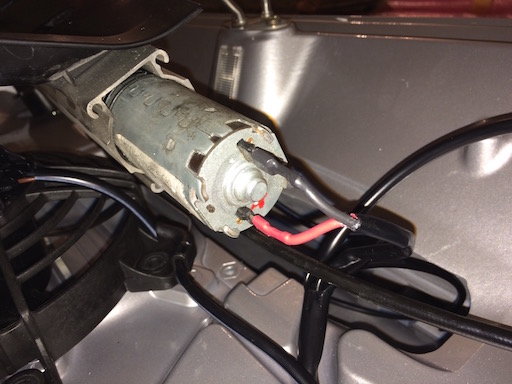
Before reinstalling the cylinders, I became curious as to how they know when they are up or down. So I opened up the side of one of them since it was easy to unscrew. Inside, there are two microswitches as shown in the first photo. Removing those reveals the actual hydraulic cylinder (the stainless sleeve part you see on the outside just helps keep water out and just looks nicer). When the detente in the brass cylinder in the second photo reaches a switch it causes the switch to change state, allowing the computer to know the wing is at its full up or full down position.
Before getting the motor down into its recess, you'll want to hook up the electrical connections. Just in case the motor isn't clearly marked with a red mark like mine was, you'll want to make sure that it is clearly marked so that there is no risk of hooking up the motor backwards. Ideally you should have removed the pump and the motor as an assembly on the mounting plate. Here is a photo of the motor plugged into to the harness just before the whole assembly is placed back into its recess in the deck lid.
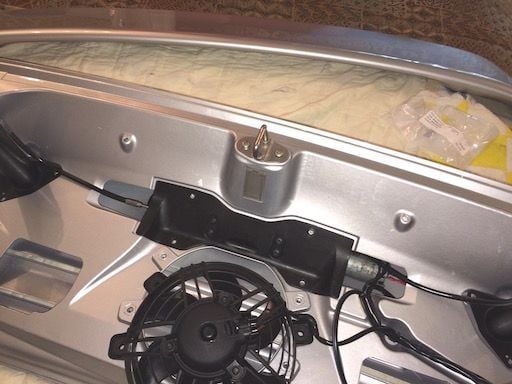
Once that is lowered into place you should be able to place the cylinders into place and make sure all of the hydraulic lines are smoothly routed and not entangled in the electrical lines. I'd suggest positioning all of these before bolting any of it down. I went ahead and plugged in the fan and loosely positioned it as well to make sure that everything was falling correctly into place. Note that the attachment points of the lines on the hydraulic cylinders can be rotated a bit. I ended up rotating mine towards the front of the car to keep the from getting between the air intake filters and the cylinders just to make sure there was plenty of clearance. Put the end caps back on and your hydraulics are done.
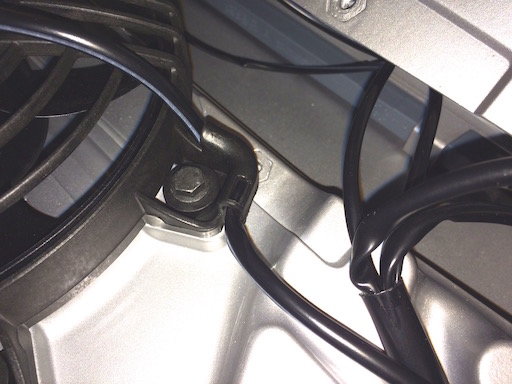
Once everything looks good, bolt it all down. The cylinder bases only fit one way so there are no worries there. Go ahead and bolt the fan down too. Make sure its electrical line follows along the ell-shaped guide for maximum neatness.
yes think I am the OG of the 997TT wing on a none turbo car.... doing so with fully operational wing blade raising and lowering at correct speed automatically+ could use the manual button as well in car. He did a great job, was a neat project.... miss that car.
Good luck with your project...
Originally Posted by StormRune
It looks like you may have been the first judging from the dates. I wish I had uncovered your posts when I poked around a year ago! Thanks for the extra info, especially from the point of view of a 997.1 since I may accidentally introduce 997.2-specific details without realizing it.
At this point, all of the deck lid internals are assembled except for the ducts. I'd recommend waiting on these until the deck lid is installed to give you better handholds for placing the deck lid on the car. You also need to reattach the wing.
Since you extended the wing in the disassembly step, it should still be extended. I'd recommend a second set of hands for this next step to make sure nothing goes wrong when you attach the blade. Flip the deck lid over so the top is in its upright position, still on a nice soft cushion of course. With someone holding the wing blade's slots carefully above the screw threads on the cylinder, align both sides and use the spanner to turn the cylinder in the tightening direction. Once you have the threads on one side safely started, start the other one and take turns tightening the cylinders so that you don't get the blade significantly askew.
With the wing blade securely tightened, you need to reverse the earlier step of rotating the outer stainless cylinders so the holes no longer align with the inner cylinder holes. This keeps water out of the inside of the cylinders. Again, I used several layers of duct tape to create a thick pad about a half-inch wide, applied the sticky side to the cylinder, and rotated it with channels locks using just enough pressure to not slip. You only have to turn it just enough to thoroughly close the hole.
In the end it should look like this again. And the good news is you are now ready to remove your old deck lid and put the new one on the car.

 10-14-2015, 08:02 PM