Notices
997 Forum 2005-2012
Sponsored by:
Sponsored by:

Plasti Dip Interior Trim DIY

Thread Tools
 
Search this Thread
 
Old 03-15-2015, 05:24 AM
  #1  
dc2000
Instructor
Thread Starter
 
dc2000's Avatar
 
Join Date: Jul 2014
Posts: 181
Received 80 Likes on 20 Posts
Default Plasti Dip Interior Trim DIY

Hey everyone,

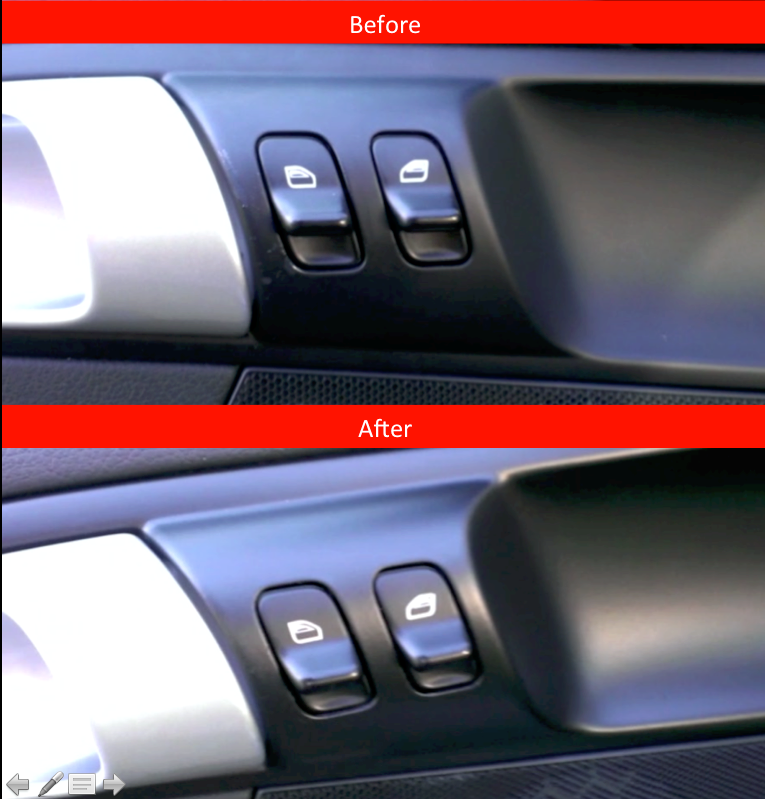
I shared my DIY project on 6speedonline, but thought some people here could also benefit. Like a lot of folks, my new-to-me 997 came with small scratches on the plasti trim surrounding the door handle and window switches. Rather than replace the entire piece and tear my door apart, I decided to plasti dip the trim piece with it still on the car. I'm surprised to how closely black plasti dip matches the factory plastic finish. Anyhow, here are before and after pictures along with a video I made! I highly recommend trying plasti dip for interior repairs, especially if your interior is black.

Cheers,
Dennis


Old 03-15-2015, 06:00 AM
  #2  
Racetwin2
Three Wheelin'
 
Racetwin2's Avatar
 
Join Date: Nov 2014
Location: Swedish expat in Latvia
Posts: 1,575
Likes: 0
Received 47 Likes on 33 Posts
Default

Truly impressive!

Thanks for sharing. I have the same issue on driver side but have cocoa brown so I am afraid of the color match.

However it is also a PITA to remove the door trim since I read you have to dismantle everything and then drill some kind of rivets out.

Will probably order a spray can and try it out on a separate piece first.

Well done and thanks for the advice
Old 03-15-2015, 01:06 PM
  #3  
997_Toronto
Three Wheelin'
 
997_Toronto's Avatar
 
Join Date: Aug 2013
Location: Toronto
Posts: 1,401
Received 3 Likes on 2 Posts
Default

Very nice, why don't we (or do we) have a dedicate DIY section on this board?
Old 03-15-2015, 08:35 PM
  #4  
BED997
Rennlist Member
 
BED997's Avatar
 
Join Date: Sep 2011
Posts: 546
Received 82 Likes on 53 Posts
Default

Great idea. I need to do the exact same thing on mine.
Old 03-15-2015, 11:25 PM
  #5  
BrakingBad
Drifting
 
BrakingBad's Avatar
 
Join Date: Oct 2013
Location: NC
Posts: 2,110
Received 97 Likes on 67 Posts
Default

Originally Posted by 997_Toronto
Very nice, why don't we (or do we) have a dedicate DIY section on this board?
We do.

https://rennlist.com/forums/997-current-production-147/
Old 03-17-2015, 01:03 AM
  #6  
CosmosC4S
Three Wheelin'
 
CosmosC4S's Avatar
 
Join Date: Jul 2006
Location: NEast Florida
Posts: 1,521
Likes: 0
Received 0 Likes on 0 Posts
Default

Finish looks Good! But should have sanded the peeled area down first before spraying, for a perfect finish.
Old 03-17-2015, 01:48 AM
  #7  
dc2000
Instructor
Thread Starter
 
dc2000's Avatar
 
Join Date: Jul 2014
Posts: 181
Received 80 Likes on 20 Posts
Default

Originally Posted by CosmosC4S
Finish looks Good! But should have sanded the peeled area down first before spraying, for a perfect finish.
I agree, however, I didn't just in case it turned out really poorly. At least, the trim would be no worse off. Now that I know it's a match, I might sand the trim if I need to redo it.
Old 04-03-2015, 09:02 AM
  #8  
Q 997.2 C4S
Racer
 
Q 997.2 C4S's Avatar
 
Join Date: Jan 2015
Location: St. Louis, MO
Posts: 304
Received 74 Likes on 27 Posts
Default

Originally Posted by dc2000
I agree, however, I didn't just in case it turned out really poorly. At least, the trim would be no worse off. Now that I know it's a match, I might sand the trim if I need to redo it.
Dennis: Thanks for sharing your helpful video. I need to fix my door spear too and was wondering how long ago you plasti-dipped yours and how well it's holding up to wear. TIA!


Quick Reply: Plasti Dip Interior Trim DIY


All times are GMT -3. The time now is 08:08 PM.