

DIY Maintenance: Cabin Air Filter Replacement for 997.1 and 997.2
 06-14-2014, 07:06 AM
#31
Rennlist Member

Just fyi, Amazon has a ton of these parts as well, usually with Free shipping. Just want to offer a variety of buying options when you have a need. I got my plugs there as well for about $8 a plug - so $50 for the exact same Bosch plugs. I get my oil filters there (Mann) for $13 or less.
Unfortunately these filters aren't kept in stock normally, so I guess I got lucky. A few months later, I checked Amazon again and they had 3 more of the air filters I needed. This time they were from a different vendor who sold them for $15.00 each. Even at triple the cost of my first purchase, it was still an amazing deal compared to dealer cost.
Sean
 06-14-2014, 01:54 PM
#32
Drifting
Thread Starter
Sure thing bindaham... glad the posting was of help. Re the aluminum bracket. Are you the original owner of the 997.1? If not then perhaps the prior owner added the aluminum bracket. More likely that's what Porsche installed from the factory for ROW 997.1 cars. I was lucky enough to do a Porsche factory tour three weeks ago. It seems that 911 US bound cars had some unique differences vs. ROW so I would not be surprised if this was might be one of the differences back in the MY07 build years. It's all good as long as you can get a proper filter and fitment with that metal bracket in your 997.1.
06-15-2014, 04:48 PM
#33
AutoX

Agreed. I'm technicaly the second owener of this fine 2007 997 Targa 4S, might as well be the first since the car has only 19K miles  . Much appreciated once again for your valuable input, gentlemen like your good self make our car experience more enjoyable.
. Much appreciated once again for your valuable input, gentlemen like your good self make our car experience more enjoyable.
07-09-2014, 08:58 PM
#36
Rennlist Member
My 06 has aluminum bracket. This is odd. What's normal?
I didn't use the foam thing upon re-installation. Seemed a little over top, and the tab holes were torn. No ill effects.
I didn't use the foam thing upon re-installation. Seemed a little over top, and the tab holes were torn. No ill effects.
07-09-2014, 09:22 PM
#37
Drifting
Thread Starter
Glad it help.
That's the 2nd report of the aluminum bracket in a .1 car. I wonder if the factory switched from one type(aluminum) to the other depending on availability of parts at the time of build.
That's the 2nd report of the aluminum bracket in a .1 car. I wonder if the factory switched from one type(aluminum) to the other depending on availability of parts at the time of build.
02-01-2015, 11:17 PM
#38
Rennlist Member
From what I understand the bracket is part of the phone antenna; for those with it, does your car also have the phone module?
Thanks for the guides, will be doing this soon.
Thanks for the guides, will be doing this soon.
06-05-2017, 09:28 PM
#40
Instructor
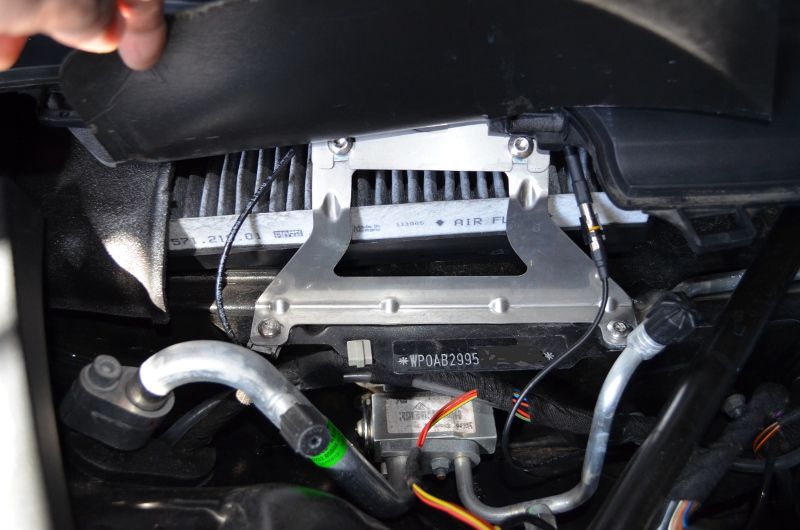
The procedure for the 997.2 is nearly identical to the instructions above. The only real difference is that there is an aluminum bracket that needs to be removed prior to changing out the filter. A T30 driver is needed to remove the four screws. See photos below. There are a couple of wires that you need to work around, but it is not necessary to remove them.
Bricker
06-05-2017, 11:17 PM
#41
Rennlist Member

Just did this last weekend on a 2006 c4s, and I have the bracket.
I had a difficult time getting the filter in, as the one I received off Amazon seemed too big no matter how I tried. I verified part numbers to be correct, and ended up getting it in but some of the pleats are squished.
I had a difficult time getting the filter in, as the one I received off Amazon seemed too big no matter how I tried. I verified part numbers to be correct, and ended up getting it in but some of the pleats are squished.
06-06-2017, 01:47 PM
#42
Rennlist Member
Just did mine - thanks for the reminder. Get mine from Amazon as well. Mann 3360. Replaced this one after about 6.5 months and 5.5k miles.
08-03-2019, 07:33 PM
#43
Rennlist Member

Just did this last weekend on a 2006 c4s, and I have the bracket.
I had a difficult time getting the filter in, as the one I received off Amazon seemed too big no matter how I tried. I verified part numbers to be correct, and ended up getting it in but some of the pleats are squished.
I had a difficult time getting the filter in, as the one I received off Amazon seemed too big no matter how I tried. I verified part numbers to be correct, and ended up getting it in but some of the pleats are squished.
After I got it seated, I noticed a plastic clip on the right side of the box, which looked like it could be removed, and might be blocking the way.. I also looked at the connection in the middle of the larger wire to the right, and it looked like a quick disconnect, perhaps set up get out of the way. Perhaps someone can confirm that wit the photos above. Well, I try both next time.
Off the subject, I was surprised to find that the two spring clips on the top that take the screws were slid over the bracket and not the metal frame on the top. In other words, they were not attaching the top of the frame to the bracket. Also, the right Botton screw was very loose, so the bracket was held on by one screw. I'll have a talk with the dealer, who last replaced that filter...
01-21-2022, 01:40 AM
#44
Rennlist Member
I�m interested in what purpose that left wire serves as well. I have the metal bracket and both wires on my 997.2 C2S. I agree that the metal bracket appears to be a phone antenna, but there is an additional box above it, like maybe a sensor or additional antenna. I accidentally damaged the connector while replacing my windshield cowl and I can�t figure out what it does. I�ll guess take it apart again, grab the PN and look it up... it just needs to warm up a little.
02-17-2023, 03:31 PM
#45

Background and Goals
My '08 C2S currently has 58K miles and 4.5 yrs on the clock. It's that time of year again... the pollen report indicates a very high count for the next few days and during this time of year my wife's acquires a fiendish dependency on nasal stray. So amongst the various projects this weekend I also replaced the cabin air filter within our vehicles.
I consider this DIY project a level 1-2 out of 10. It's a simple task requiring only a few steps to perform properly. Here are some instructions and pics which may help others.
Tools Required:
- a pair of hands
Parts:
- Cabin Air Filter for ~$20: http://www.pelicanparts.com/cgi-bin/...C%20Each%20%20
Instructions for the 997.1: Look further down the thread for the 997.2 additive instructions from DGrayling
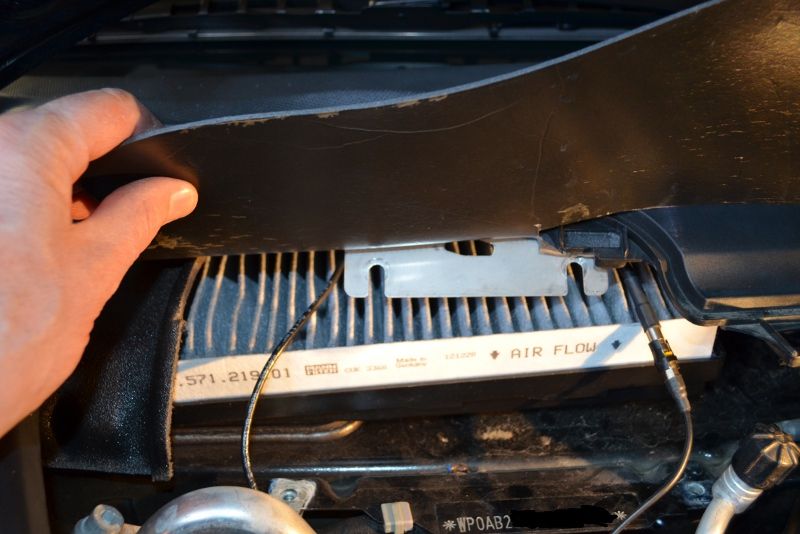
Remove the cover above the battery compartment within the frunk by turning the two plastic tabs. Then remove the side cover as well by lifting it up. Note that the thin plastic retainer strip running along the side is held down via Velcro tape.
Attachment 716564Attachment 716565
Attachment 716566
Lift up the foam flap covering the cabin air filter assembly. Note the plastic retainer bracket at the center of the filter. Slide it to the left to remove. There is also a retention tab on the right side towards the rear of the filter. Flip that tab down. Now the filter can be removed.
Attachment 716568Attachment 716569
Attachment 716570Attachment 716571
Attachment 716572Attachment 716573
The paper filter is now accessible and it is pliable so push it in the middle to loosen it from it's frame and lift it out. Note the inlet port/opening under the air filter chamber. This is a good time/opportunity to vacuum any debris out of that area.
Attachment 716577
Attachment 716578
Attachment 716579
Now install the new air filter noting the direction of airflow... arrow should point down. When the new filter is properly secured into it's frame you should not see the foam sealant liner at the bottom of the paper filter. The foam part of the paper filter should be hidden if the filter is pressed down far enough. Afterwards it's time to re-attach/re-install all the latches and panel parts in reverse of the above instructions.
Attachment 716583Attachment 716584
An inspection of the old filter reveals that it does have some oak tree pollen seeds lodged in there. I recall that Porsche recommends a much longer period in between changes for the cabin air filter but I prefer to change it at least once every year even if I've only put 5-6K miles on the car... Especially as it's only $20/filter and makes my better half a happy camper in the passenger seat.
My '08 C2S currently has 58K miles and 4.5 yrs on the clock. It's that time of year again... the pollen report indicates a very high count for the next few days and during this time of year my wife's acquires a fiendish dependency on nasal stray. So amongst the various projects this weekend I also replaced the cabin air filter within our vehicles.
I consider this DIY project a level 1-2 out of 10. It's a simple task requiring only a few steps to perform properly. Here are some instructions and pics which may help others.
Tools Required:
- a pair of hands
Parts:
- Cabin Air Filter for ~$20: http://www.pelicanparts.com/cgi-bin/...C%20Each%20%20
Instructions for the 997.1: Look further down the thread for the 997.2 additive instructions from DGrayling
Remove the cover above the battery compartment within the frunk by turning the two plastic tabs. Then remove the side cover as well by lifting it up. Note that the thin plastic retainer strip running along the side is held down via Velcro tape.
Attachment 716564Attachment 716565
Attachment 716566
Lift up the foam flap covering the cabin air filter assembly. Note the plastic retainer bracket at the center of the filter. Slide it to the left to remove. There is also a retention tab on the right side towards the rear of the filter. Flip that tab down. Now the filter can be removed.
Attachment 716568Attachment 716569
Attachment 716570Attachment 716571
Attachment 716572Attachment 716573
The paper filter is now accessible and it is pliable so push it in the middle to loosen it from it's frame and lift it out. Note the inlet port/opening under the air filter chamber. This is a good time/opportunity to vacuum any debris out of that area.
Attachment 716577
Attachment 716578
Attachment 716579
Now install the new air filter noting the direction of airflow... arrow should point down. When the new filter is properly secured into it's frame you should not see the foam sealant liner at the bottom of the paper filter. The foam part of the paper filter should be hidden if the filter is pressed down far enough. Afterwards it's time to re-attach/re-install all the latches and panel parts in reverse of the above instructions.
Attachment 716583Attachment 716584
An inspection of the old filter reveals that it does have some oak tree pollen seeds lodged in there. I recall that Porsche recommends a much longer period in between changes for the cabin air filter but I prefer to change it at least once every year even if I've only put 5-6K miles on the car... Especially as it's only $20/filter and makes my better half a happy camper in the passenger seat.
I can not find and in my 08 carrera 4s mk1 is destroyed
thanks!