
Mod - FVD Oil Pan plus Baffles
 02-22-2013, 01:18 AM
#1
Drifting
Thread Starter
Background and Goals
My '08 C2S (997.1S) currently has 56K+ miles and 4.5 yrs on the clock. I've yet to track the car but with COTA on the outskirts of Austin and Texas World Speedway two hours away I'm looking forward to trying out a few DE sessions this season. Last year I started with a few mods that should help to protect and increase the reliability of the car on the track. The 3rd radiator and the grill mesh were installed to assist with cooling and protect the radiators. A new water pump was pre-emptively replaced as that is a known failure item. These DIY projects are listed on the RL 997 DIY sticky. In this DIY I’ll be adding an FVD oil pan with baffles as another step towards prepping the car for the track. I expect to see the following benefits:
- increased oil capacity (10 quarts vs. 9 quarts)
- cooling fins to help off vent some engine oil heat
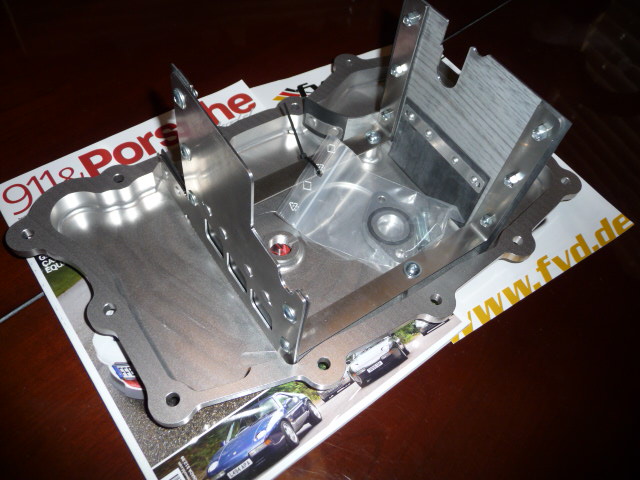
- baffles to help compartmentalize oil and retain oil pressure during hard turns
I consider this DIY project a level 4 out of 10 mainly due to the tricky fitment of the baffles. Below are some instructions which may help others.
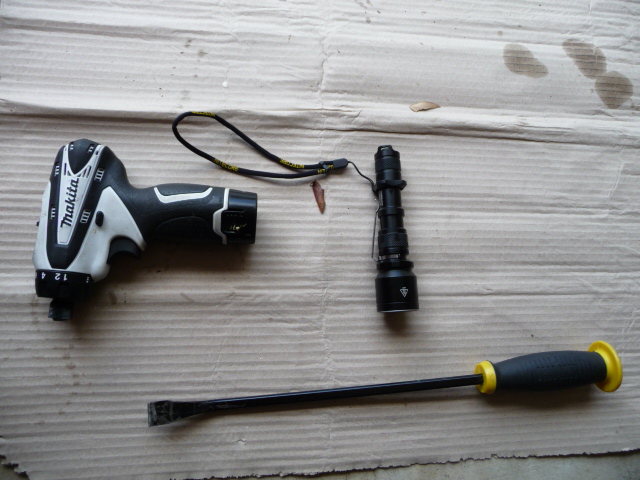
Tools Required:
- E-10 Torx socket for the 13 Torx bolts, 5mm Allen sockets for the (2) bolts for the oil pickup spacer, 8mm Allen extension for the Porsche drain plug
- Flat head leverage bar - used to break the old sealant holding the oil pan to the engine block
- Socket Wrench
- Torque Wrenches (4 ft-lb up to 37 ft-lb range)… I had to use two torque wrenches to accommodate the lower and higher ranges required
- Oil Filter Wrench
- Flat blade from a box cutter to remove old sealant from the oil pan
- Brass cleaning brush to remove old sealant from the oil pan
- Oil catch pan… I like the low profile paint mixing tub from Home Depot


Optional Tools:
- Disposable gloves… I prefer to work without gloves as I can feel what I’m doing better
- Garbage bag for the obvious... paper towels are also handy as well
- A proper Boom Box so the neighbor’s won't hear you curse to high heaven should you slip and rack your knuckles across the engine block
- A power drill with adjustable settings and socket adapter to quickly fasten and/or remove the 13 Torx bolts
- A flashlight to illuminate the baffle when aligning it during installation
- Permatex Blue Hand Cleaner - no affiliation… but Advanced Auto had a promo and I picked a small tub. It’s my go to now to clean up afterwards.
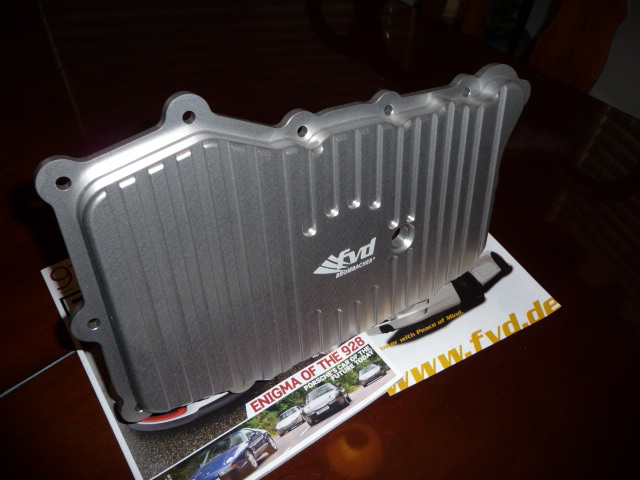
Parts:
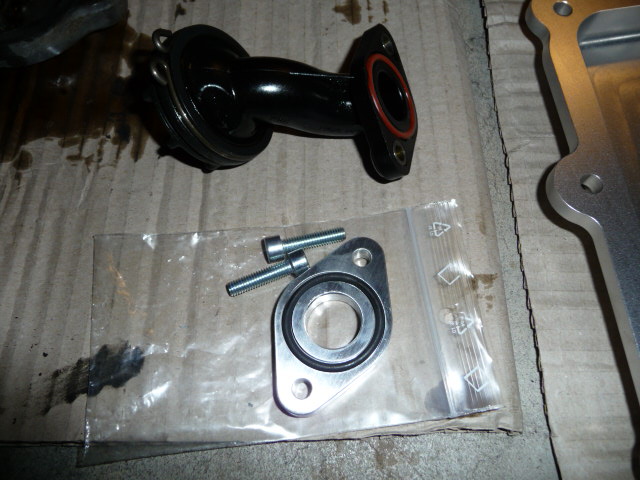
- FVD Oil with baffle Pan
- Installation kit (13 E10 bolts, Loctite 5900, and Drain Plug Sealing Ring) Highly recommended. I pieced together the parts for this kit and it cost much more than $29.
Or the Installation Kit parted out
1. Drain Plug Sealing Ring
2. 50 ml tube of Loctite 5900 oil pan sealant, p/n 00004320435… http://www.fvd.us/us/en/Porsche-0/-/...5900_50ml.html... this sealant is hard to find locally. I had to finally purchase it from my p-dealer for $23.
3. E10 bolts (13 if you want to use new bolts), p/n 90038500901… http://www.fvd.us/us/en/Porsche-0/-/...500901&x=0&y=0
- 10 quarts of oil(M1 0W-40)
- Oil Filter and filter housing seal http://www.pelicanparts.com/cgi-bin/...0Each%20%20%20
- Isopropyl Alcohol
- Brake Cleaning Solvent
Torque Values:
4 ft-lb for the (2) oil pickup extension bolts
8 ft-lb for the (13) oil pan E-10 bolts
19 ft-lb for the oil filter housing
37 ft-lb for the oil pan drain plug
Instructions:
- Jack the car up https://rennlist.com/forums/997-foru...ackstands.html
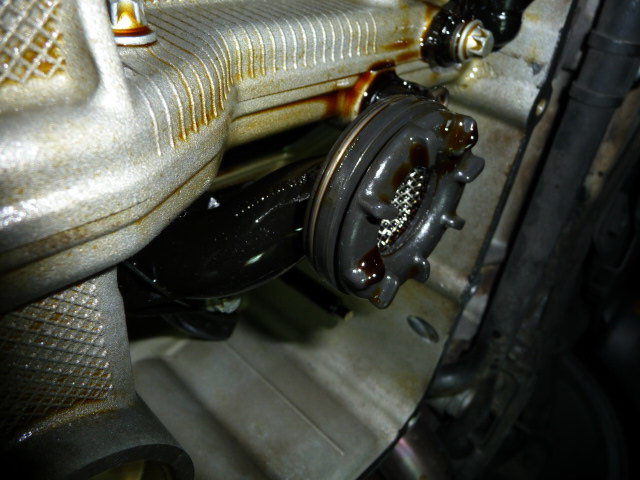
- Drain the oil: https://rennlist.com/forums/997-foru...nch-break.html I waited an hour for most of the oil to drip out. Also did a full oil change by replacing the oil filter as well.
- Remove (13) torx bolts using the E10 socket from the oil pan. If you want to re-use the old torx bolts they may need some cleaning with a brass brush to remove some of the old sealant material.
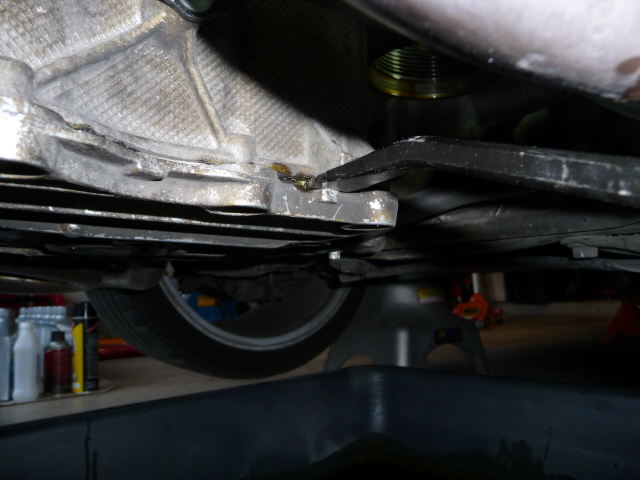
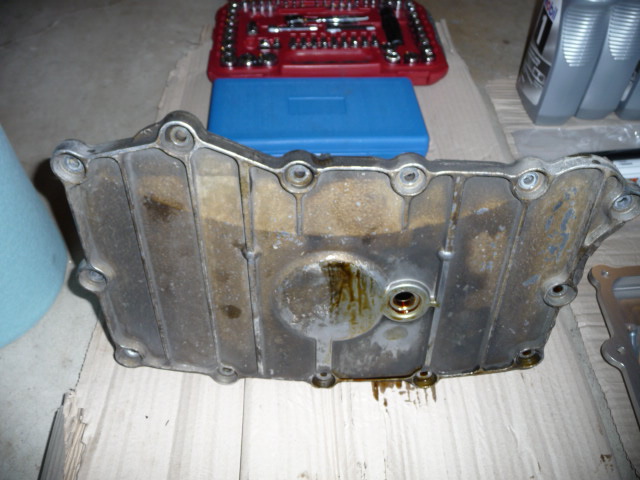
- Remove the old oil pan… I used a large flat headed leverage bar to break the old sealant holding the oil pan to the engine block.
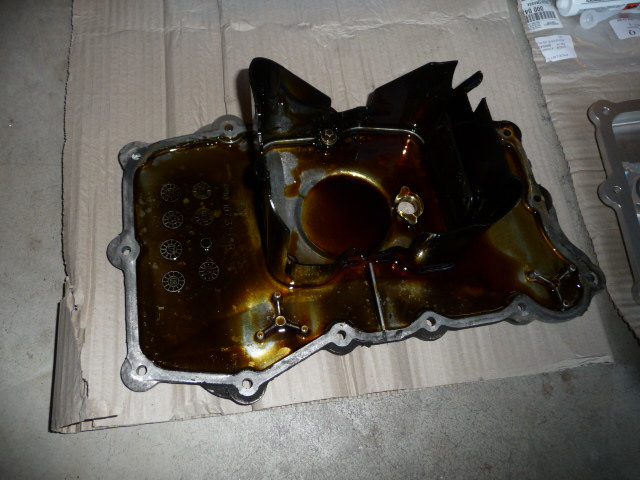
- This is a good time to inspect the oil remaining at the bottom of the old oil pan for signs of engine wear such as metal bits and/or plastic particles. I was glad to find an absence of any such particles.
- Clean the mating surfaces of the engine block with a flat edged blade (blade from a box cutter works well). Scrub away any residual sealant with a brass cleaning brush. Then clean both the mating surfaces of the engine block and the new oil pan with brake cleaner and then Isopropyl alcohol.
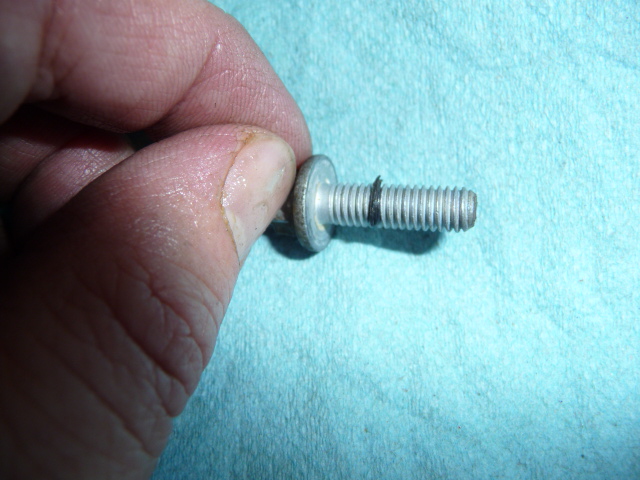
- Remove the (2) E-10 Torx bolts holding the oil pick up to engine block. Set these aside as the (2) FVD bolts will be used instead.
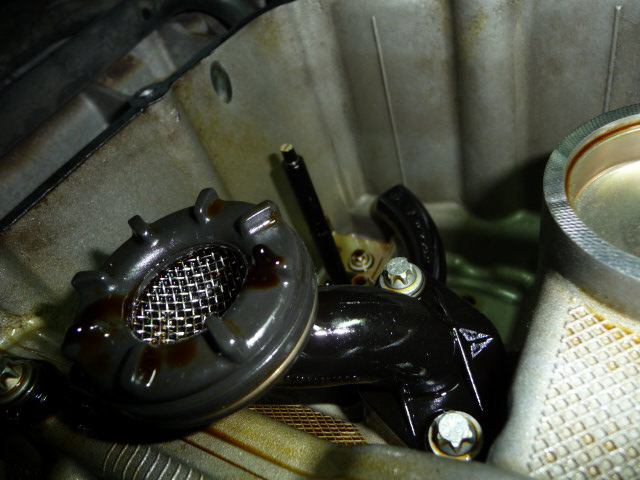
- Use the (2) supplied FVD bolts to secure the extension spacer between the engine block and the oil pick up. Note that one side of the extension spacer has a rubber gasket while the other side is flat. The side with the gasket should be mated to the engine block. It's important for the oil pick to be close to the bottom of the oil pan where oil foaming is minimized or non-existent.
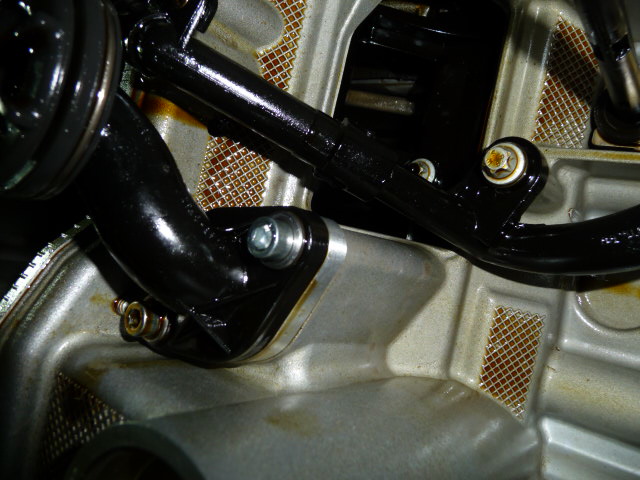
- Mock fit the new oil pan to the engine block. I found the driver side baffle fitment to be the most challenging part of the project… sliding the baffle in at a 60 deg angle and then straightening it out got it to fit properly. This is where the flashlight will help to illuminate the interior cavity of the engine block and how the baffle is aligned. Then thread (13) Torx bolts in by hand and tighten with a socket wrench using an E-10 socket driver. I used a small power hand drill to quicken the process… make sure to set the torque setting at a low value to avoid stripping the bolts and/or engine block threads. Once everything fits properly then remove all bolts and the oil pan to install with Loctite this time. Clean all mating surfaces once more with Isopropyl alcohol to ensure that you have a clean surface again.
- Apply a 1/4" bead of Loctite 5900 to the new pan… going completely around the edge of the pan w/o interruption if possible. The sealant will start to dry after 5 minutes but don't panic if it takes more time to squeeze out the sealant and mate the new pan to the engine block. The curing cycle takes much longer.
- Align the pan to the engine block and hand thread in (13) Torx bolts. Repeat the assembly process which worked during the mock fitting session. It may take some muscle to push the pan into place but if it’s aligned properly it will give and mate with the engine block. Again, I used the power drill to fasten all bolts quickly. Then used a torque wrench to tighten the bolts to 7.5 ft-lb. I used a cross pattern to lock down each bolt. Make sure to double check that each bolt is properly torqued… when using adhesive sealant you only get one chance to get it right. Otherwise a redo of the job may be in order if it leaks afterwards.
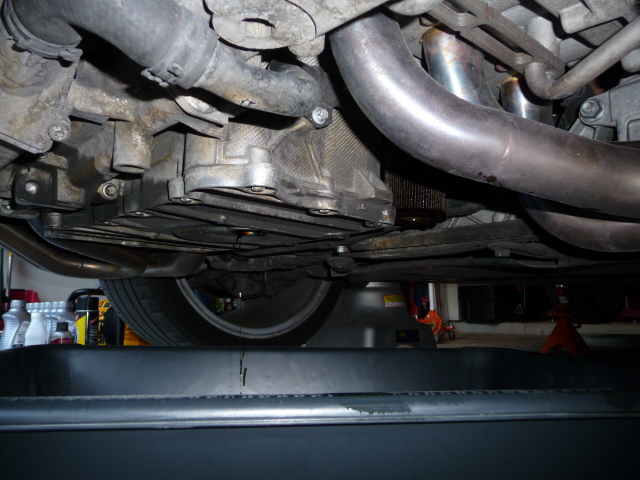
- I waited overnight to allow the Loctite sealant to cure. Apparently the p-dealer starts pouring oil back in after just an hour or two per my SA but I prefer to be on the safe side. So After an overnight wait I filled the engine with (2) quarts of MB-1. Enough to check for leaks… waited 2 more hours then checked again for leaks. Filled up the remaining (8) quarts of MB-1. BTW, it took all 10 quarts for the e-gauge to register 4 bars or full. I took her for an easy 15 mile drive to observe the oil pressure and oil temp gauges for any abnormalities. I noted a slightly different characteristic behavior of the oil pressure and oil temp gauges. When I was doing my initial warm up lap around the neighbor and the oil temp is still cold the oil pressure gave a reading of 4.5-5 bars even if I came to a stop. Once the engine was properly warmed up approaching 200degF the pressure gauge indications would normalize to its old characteristic behavior of 4-5 bars with load and 1.5-2 bars at a stop/no load.
Conclusion and note to self:
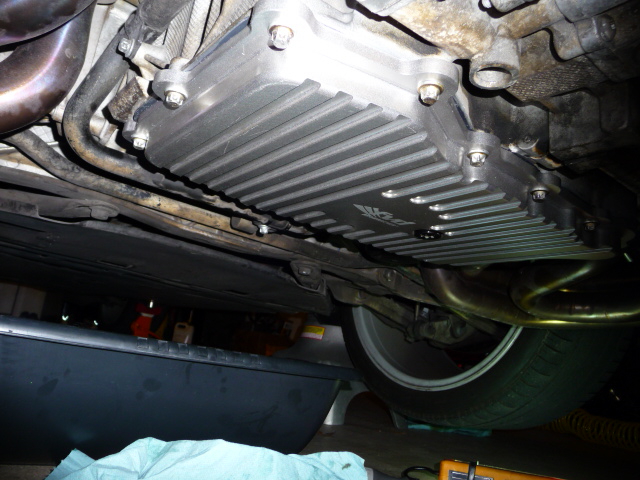
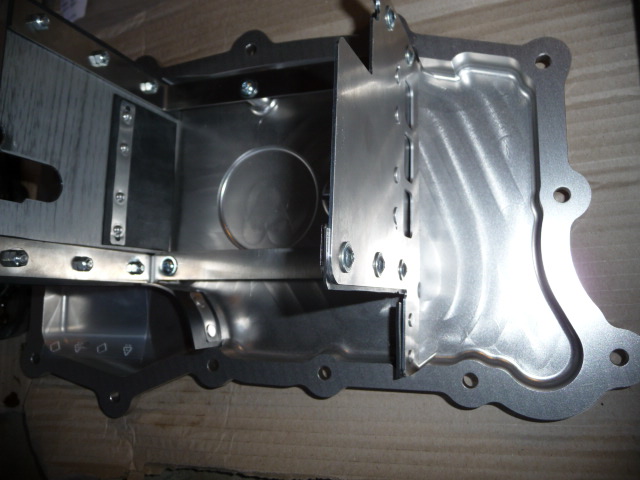
This mod is seemingly straight forward. The most challenging part of the job was fitting the driver side baffle into its proper place. Squeezing out the Loctite sealant took a bit of time to do properly as it required some muscle and a steady hand to apply the 1/4" line of bead perfectly around the edges… then quickly seating the pan in place before the sealant dries. The product is what I’ve come to expect from FVD – well engineered, built like a tank, and stands out attractively against the otherwise drab underbelly of the engine. Compared to the stock pan with minimal baffle the FVD pan has higher baffles to compartmentalize more oil which minimizes oil foaming. It also retains an additional quart of oil plus cooling fins. In fact, the pan appears to have been milled from a block of aluminum... very impressive. FVD customer service and support was excellent when I reached out to them. I'm looking forward to some track time this year and I'm feeling better about the car being one step closer to track ready with a 3rd radiator, new WP, and th extended oil pan plus baffles. Next project will be some windshield protection and SS braided brake lines plus full brake fluid flush.
My '08 C2S (997.1S) currently has 56K+ miles and 4.5 yrs on the clock. I've yet to track the car but with COTA on the outskirts of Austin and Texas World Speedway two hours away I'm looking forward to trying out a few DE sessions this season. Last year I started with a few mods that should help to protect and increase the reliability of the car on the track. The 3rd radiator and the grill mesh were installed to assist with cooling and protect the radiators. A new water pump was pre-emptively replaced as that is a known failure item. These DIY projects are listed on the RL 997 DIY sticky. In this DIY I’ll be adding an FVD oil pan with baffles as another step towards prepping the car for the track. I expect to see the following benefits:
- increased oil capacity (10 quarts vs. 9 quarts)
- cooling fins to help off vent some engine oil heat
- baffles to help compartmentalize oil and retain oil pressure during hard turns
I consider this DIY project a level 4 out of 10 mainly due to the tricky fitment of the baffles. Below are some instructions which may help others.
Tools Required:
- E-10 Torx socket for the 13 Torx bolts, 5mm Allen sockets for the (2) bolts for the oil pickup spacer, 8mm Allen extension for the Porsche drain plug
- Flat head leverage bar - used to break the old sealant holding the oil pan to the engine block
- Socket Wrench
- Torque Wrenches (4 ft-lb up to 37 ft-lb range)… I had to use two torque wrenches to accommodate the lower and higher ranges required
- Oil Filter Wrench
- Flat blade from a box cutter to remove old sealant from the oil pan
- Brass cleaning brush to remove old sealant from the oil pan
- Oil catch pan… I like the low profile paint mixing tub from Home Depot
Optional Tools:
- Disposable gloves… I prefer to work without gloves as I can feel what I’m doing better
- Garbage bag for the obvious... paper towels are also handy as well
- A proper Boom Box so the neighbor’s won't hear you curse to high heaven should you slip and rack your knuckles across the engine block
- A power drill with adjustable settings and socket adapter to quickly fasten and/or remove the 13 Torx bolts
- A flashlight to illuminate the baffle when aligning it during installation
- Permatex Blue Hand Cleaner - no affiliation… but Advanced Auto had a promo and I picked a small tub. It’s my go to now to clean up afterwards.
Parts:
- FVD Oil with baffle Pan
- Installation kit (13 E10 bolts, Loctite 5900, and Drain Plug Sealing Ring) Highly recommended. I pieced together the parts for this kit and it cost much more than $29.
Or the Installation Kit parted out
1. Drain Plug Sealing Ring
2. 50 ml tube of Loctite 5900 oil pan sealant, p/n 00004320435… http://www.fvd.us/us/en/Porsche-0/-/...5900_50ml.html... this sealant is hard to find locally. I had to finally purchase it from my p-dealer for $23.
3. E10 bolts (13 if you want to use new bolts), p/n 90038500901… http://www.fvd.us/us/en/Porsche-0/-/...500901&x=0&y=0
- 10 quarts of oil(M1 0W-40)
- Oil Filter and filter housing seal http://www.pelicanparts.com/cgi-bin/...0Each%20%20%20
- Isopropyl Alcohol
- Brake Cleaning Solvent
Torque Values:
4 ft-lb for the (2) oil pickup extension bolts
8 ft-lb for the (13) oil pan E-10 bolts
19 ft-lb for the oil filter housing
37 ft-lb for the oil pan drain plug
Instructions:
- Jack the car up https://rennlist.com/forums/997-foru...ackstands.html
- Drain the oil: https://rennlist.com/forums/997-foru...nch-break.html I waited an hour for most of the oil to drip out. Also did a full oil change by replacing the oil filter as well.
- Remove (13) torx bolts using the E10 socket from the oil pan. If you want to re-use the old torx bolts they may need some cleaning with a brass brush to remove some of the old sealant material.
- Remove the old oil pan… I used a large flat headed leverage bar to break the old sealant holding the oil pan to the engine block.
- This is a good time to inspect the oil remaining at the bottom of the old oil pan for signs of engine wear such as metal bits and/or plastic particles. I was glad to find an absence of any such particles.
- Clean the mating surfaces of the engine block with a flat edged blade (blade from a box cutter works well). Scrub away any residual sealant with a brass cleaning brush. Then clean both the mating surfaces of the engine block and the new oil pan with brake cleaner and then Isopropyl alcohol.
- Remove the (2) E-10 Torx bolts holding the oil pick up to engine block. Set these aside as the (2) FVD bolts will be used instead.
- Use the (2) supplied FVD bolts to secure the extension spacer between the engine block and the oil pick up. Note that one side of the extension spacer has a rubber gasket while the other side is flat. The side with the gasket should be mated to the engine block. It's important for the oil pick to be close to the bottom of the oil pan where oil foaming is minimized or non-existent.
- Mock fit the new oil pan to the engine block. I found the driver side baffle fitment to be the most challenging part of the project… sliding the baffle in at a 60 deg angle and then straightening it out got it to fit properly. This is where the flashlight will help to illuminate the interior cavity of the engine block and how the baffle is aligned. Then thread (13) Torx bolts in by hand and tighten with a socket wrench using an E-10 socket driver. I used a small power hand drill to quicken the process… make sure to set the torque setting at a low value to avoid stripping the bolts and/or engine block threads. Once everything fits properly then remove all bolts and the oil pan to install with Loctite this time. Clean all mating surfaces once more with Isopropyl alcohol to ensure that you have a clean surface again.
- Apply a 1/4" bead of Loctite 5900 to the new pan… going completely around the edge of the pan w/o interruption if possible. The sealant will start to dry after 5 minutes but don't panic if it takes more time to squeeze out the sealant and mate the new pan to the engine block. The curing cycle takes much longer.
- Align the pan to the engine block and hand thread in (13) Torx bolts. Repeat the assembly process which worked during the mock fitting session. It may take some muscle to push the pan into place but if it’s aligned properly it will give and mate with the engine block. Again, I used the power drill to fasten all bolts quickly. Then used a torque wrench to tighten the bolts to 7.5 ft-lb. I used a cross pattern to lock down each bolt. Make sure to double check that each bolt is properly torqued… when using adhesive sealant you only get one chance to get it right. Otherwise a redo of the job may be in order if it leaks afterwards.
- I waited overnight to allow the Loctite sealant to cure. Apparently the p-dealer starts pouring oil back in after just an hour or two per my SA but I prefer to be on the safe side. So After an overnight wait I filled the engine with (2) quarts of MB-1. Enough to check for leaks… waited 2 more hours then checked again for leaks. Filled up the remaining (8) quarts of MB-1. BTW, it took all 10 quarts for the e-gauge to register 4 bars or full. I took her for an easy 15 mile drive to observe the oil pressure and oil temp gauges for any abnormalities. I noted a slightly different characteristic behavior of the oil pressure and oil temp gauges. When I was doing my initial warm up lap around the neighbor and the oil temp is still cold the oil pressure gave a reading of 4.5-5 bars even if I came to a stop. Once the engine was properly warmed up approaching 200degF the pressure gauge indications would normalize to its old characteristic behavior of 4-5 bars with load and 1.5-2 bars at a stop/no load.
Conclusion and note to self:
This mod is seemingly straight forward. The most challenging part of the job was fitting the driver side baffle into its proper place. Squeezing out the Loctite sealant took a bit of time to do properly as it required some muscle and a steady hand to apply the 1/4" line of bead perfectly around the edges… then quickly seating the pan in place before the sealant dries. The product is what I’ve come to expect from FVD – well engineered, built like a tank, and stands out attractively against the otherwise drab underbelly of the engine. Compared to the stock pan with minimal baffle the FVD pan has higher baffles to compartmentalize more oil which minimizes oil foaming. It also retains an additional quart of oil plus cooling fins. In fact, the pan appears to have been milled from a block of aluminum... very impressive. FVD customer service and support was excellent when I reached out to them. I'm looking forward to some track time this year and I'm feeling better about the car being one step closer to track ready with a 3rd radiator, new WP, and th extended oil pan plus baffles. Next project will be some windshield protection and SS braided brake lines plus full brake fluid flush.
Last edited by USMC_DS1; 02-22-2013 at 02:52 AM.

The following users liked this post:
TV911 (08-24-2019)
02-22-2013, 02:19 AM
#3
Drifting
Thread Starter


Some of the CNC markings can clearly be seen in this pic.
The following users liked this post:
TV911 (08-24-2019)
 02-22-2013, 11:28 AM
#6
Racer
USMC -- Years ago at the beginning of my career, I was a professional technical writer and commercially successful author of How-To books and magazine articles. I must say I am extremely impressed by your DIY write-ups, thoroughly enjoy them whether I am interested in doing the same mod myself or not, and always look forward to the next one in (I hope) the series. Great job!
02-22-2013, 12:31 PM
#7
Drifting
Thread Starter
Thanks all for the encouragement. I'll keep the write-ups coming. I find that the documentation process helps me to organize my thoughts and tools upfront before starting a project...
Spokane, video is in the works. Thought I had recorded the session in it's entirety but such was not the case. Maybe I need to document how to use the camera.
Spokane, video is in the works. Thought I had recorded the session in it's entirety but such was not the case. Maybe I need to document how to use the camera.
Last edited by USMC_DS1; 02-22-2013 at 01:30 PM.
Trending Topics
02-22-2013, 12:50 PM
#8

Another trick is to get 2 longish bolts and cut the heads off of them, then thread them into two of the sump holes, on opposite sides of the sump. These become guide pins and the sump goes right on, square every time, without smearing the seallant.
The following users liked this post:
TV911 (07-08-2020)
02-22-2013, 01:03 PM
#9
Addict
Rennlist Member
Rennlist
Site Sponsor
Rennlist Member
Rennlist
Site Sponsor
Wow, really well done!! Nice to see so much detail in regards to the installation!!
__________________
__________________
FVD Brombacher - USA
Contact me directly to get the latest FVD forum member discount!
Rhonda Roxburgh
+1-954-571-2050 x 1
rhonda.roxburgh@fvd.net
Want to learn more about us? Click here...

__________________
FVD Brombacher - USA
Contact me directly to get the latest FVD forum member discount!
Rhonda Roxburgh
+1-954-571-2050 x 1
rhonda.roxburgh@fvd.net
Want to learn more about us? Click here...
 02-22-2013, 02:20 PM
#11
Rennlist Member

Excellent work and very easy to read and follow. Thanks for doing this, although I am not anticipating this mod, the basic oil pan removal / installation is helpful for many reasons.
Looking forward as well to your next series of DIY's. BTW brake pad replacement and bleeding is very easy and if you track any, very necessary. A simple 1 person job with a power bleeder (I use a Motive bleeder).
Again, very well done.
02-22-2013, 09:15 PM
#12
Rennlist Member
Another super DIY USMC DS1. While you're not The God, you are a god!! Wish we were neighbors.
BTW. Looks like the new pan hangs down 1 inch. Wonder if you could still fit an engine skid plate for protection. Assume there would be enough airflow.
BTW. Looks like the new pan hangs down 1 inch. Wonder if you could still fit an engine skid plate for protection. Assume there would be enough airflow.
02-23-2013, 12:02 AM
#13
Drifting
Thread Starter

Last edited by USMC_DS1; 02-23-2013 at 02:50 AM.
02-23-2013, 01:46 PM
#15
Rennlist Member
cvtbenhogan, you're too kind. The FVD pan is .75" thick whereas the stock pan is .6" around the rim so the Porsche skid plate may well fit but I left it off for better cooling theoretically. I'll check, however, to see if the p-skid will fit tomorrow. BTW, the FVD pan is so solid I figure it would take any impact... but suspenders and belt may be even better. Of course, it would be nice to protect the FVD pan/jewerly from road debris.
Now I'm thinking of getting the skid plate at suncoast just for the heck of it.

Is there any downside to the baffle pan? Just thinking it might be a good mod for general engine life too.