
Full Leather Sun Visors - DIY/MOD
 08-30-2012, 12:27 AM
#1
Drifting
Thread Starter
Background and Goals
My '08 C2S came optioned with full leather interior. I always felt, however, that the vinyl visors just detracted from the luxurious feel of the cabin. After some research I discovered that the DIY was actually quite easy. New leather visors are available from Suncoast for ~$1,200… now I know that's pricey but I love how that little bit of leather has reinvigorated the smell of new car leather back into the cabin of my now 4 yrs old Carrera S with 53K miles on the clock. Oh yeah, the car's interior feels just that much more richly leathered and that much less plasticy(is that a word?). BTW, I got my visors from a fellow RL member for a great price. Thank you rubber_ducky!
I consider this DIY project a level 2 out of 10. It's easy so if anything this DIY will really just help to overcome any fears/reservations others might have in tackling this job.
Tools Required:
- T25 torx driver
- plastic card… I used an old hotel room key but a c-card should also work
Parts:
- Full leather sun visors from Suncoast
Reference Materials:
PET Catalog - http://www.porsche.com/usa/accessori...artscatalogue/ Then select your model and MY
Installation Instructions:
1. Note the original vinyl sun visor below in it's standard attached position.
2. Now align it so that it is positioned along the front to back axis of the car. Using a plastic card... slip it under the plastic cover and pop the cover off. Be careful not to break any of the small tabs on the plastic cover. If you do then follow the note I have at the end to resolve this potential issue.
3. Using a T25 torx driver remove the torx screw holding the visor in place.
4. The visor will still remain in place until you work it back and forth to dislodge it from it's socket. It's less about force here and more about getting the angle right for it to pop out.
5. Once you have the original visor out then replace it with the new leather sun visor using the above instructions in reverse.
6. Upon completion it should look like this. Note the electrical contact points(positive and negative) on the visor to power the visor's light. Make sure the contact points are clean... if not use some electronic contact point cleaner or even a simple eraser will do. Check that the lights work when you open the visor.

Note: the visor's plastic cover has 3 small tabs which latch onto and cover the base of the visor mount point. These are delicate and can break easily. If you happen to break one of these then just utilize the cover from one of the vinyl visors you removed. To get the plastic cover out you will need to remove the metal dog leg arm by pulling it out of the visor... BTW, it takes a lot of force and a twisting motion to do so. You'll note that there is a bit of what looks to be white lithium grease on the inside of this metal arm. Don't swipe this off as it is required to allow free movement of the visor once it is back in place. Once you've swapped out the plastic cover then push back the metal arm into the sun visor. You will hear a snap/pop when it clicks back into place.
GL with the DIY and get ready to enjoy the smell of new car leather in the morning again.
My '08 C2S came optioned with full leather interior. I always felt, however, that the vinyl visors just detracted from the luxurious feel of the cabin. After some research I discovered that the DIY was actually quite easy. New leather visors are available from Suncoast for ~$1,200… now I know that's pricey but I love how that little bit of leather has reinvigorated the smell of new car leather back into the cabin of my now 4 yrs old Carrera S with 53K miles on the clock. Oh yeah, the car's interior feels just that much more richly leathered and that much less plasticy(is that a word?). BTW, I got my visors from a fellow RL member for a great price. Thank you rubber_ducky!
I consider this DIY project a level 2 out of 10. It's easy so if anything this DIY will really just help to overcome any fears/reservations others might have in tackling this job.
Tools Required:
- T25 torx driver
- plastic card… I used an old hotel room key but a c-card should also work
Parts:
- Full leather sun visors from Suncoast
Reference Materials:
PET Catalog - http://www.porsche.com/usa/accessori...artscatalogue/ Then select your model and MY
Installation Instructions:
1. Note the original vinyl sun visor below in it's standard attached position.
2. Now align it so that it is positioned along the front to back axis of the car. Using a plastic card... slip it under the plastic cover and pop the cover off. Be careful not to break any of the small tabs on the plastic cover. If you do then follow the note I have at the end to resolve this potential issue.
3. Using a T25 torx driver remove the torx screw holding the visor in place.
4. The visor will still remain in place until you work it back and forth to dislodge it from it's socket. It's less about force here and more about getting the angle right for it to pop out.
5. Once you have the original visor out then replace it with the new leather sun visor using the above instructions in reverse.
6. Upon completion it should look like this. Note the electrical contact points(positive and negative) on the visor to power the visor's light. Make sure the contact points are clean... if not use some electronic contact point cleaner or even a simple eraser will do. Check that the lights work when you open the visor.
Note: the visor's plastic cover has 3 small tabs which latch onto and cover the base of the visor mount point. These are delicate and can break easily. If you happen to break one of these then just utilize the cover from one of the vinyl visors you removed. To get the plastic cover out you will need to remove the metal dog leg arm by pulling it out of the visor... BTW, it takes a lot of force and a twisting motion to do so. You'll note that there is a bit of what looks to be white lithium grease on the inside of this metal arm. Don't swipe this off as it is required to allow free movement of the visor once it is back in place. Once you've swapped out the plastic cover then push back the metal arm into the sun visor. You will hear a snap/pop when it clicks back into place.
GL with the DIY and get ready to enjoy the smell of new car leather in the morning again.
 08-30-2012, 02:29 AM
#2

Background and Goals
My '08 C2S came optioned with full leather interior. I always felt, however, that the vinyl visors just detracted from the luxurious feel of the cabin. After some research I discovered that the DIY was actually quite easy. New leather visors are available from Suncoast for ~$1,200� now I know that's pricey but I love how that little bit of leather has reinvigorated the smell of new car leather back into the cabin of my now 4 yrs old Carrera S with 53K miles on the clock. Oh yeah, the car's interior feels just that much more richly leathered and that much less plasticy(is that a word?). BTW, I got my visors from a fellow RL member for a great price. Thank you rubber_ducky!
I consider this DIY project a level 2 out of 10. It's easy so if anything this DIY will really just help to overcome any fears/reservations others might have in tackling this job.
Tools Required:
- T25 torx driver
- plastic card� I used an old hotel room key but a c-card should also work
Parts:
- Full leather sun visors from Suncoast
Reference Materials:
PET Catalog - http://www.porsche.com/usa/accessori...artscatalogue/ Then select your model and MY
Installation Instructions:
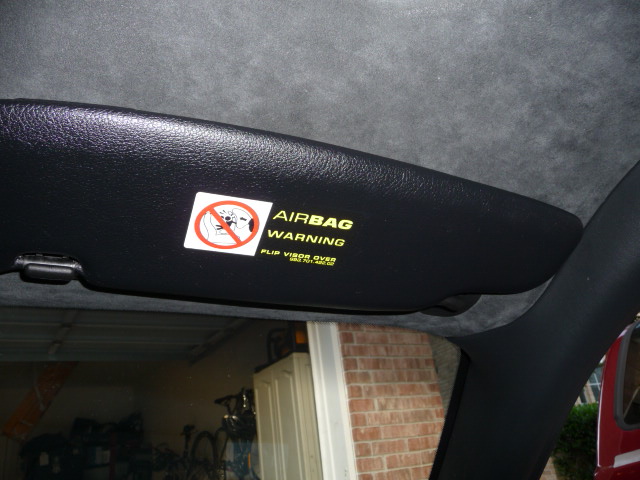
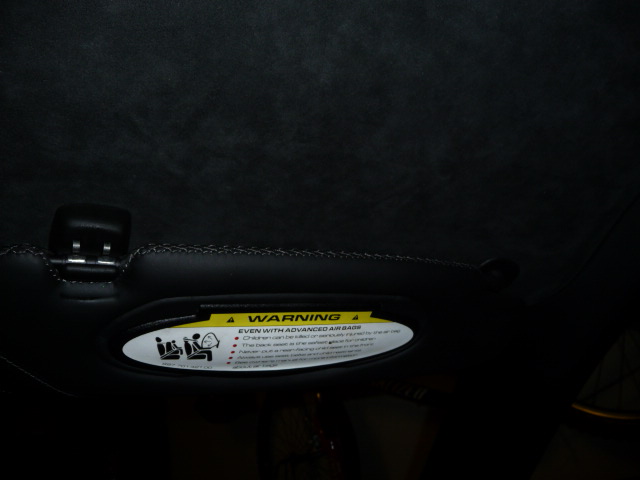
1. Note the original vinyl sun visor below in it's standard attached position.
Attachment 659974
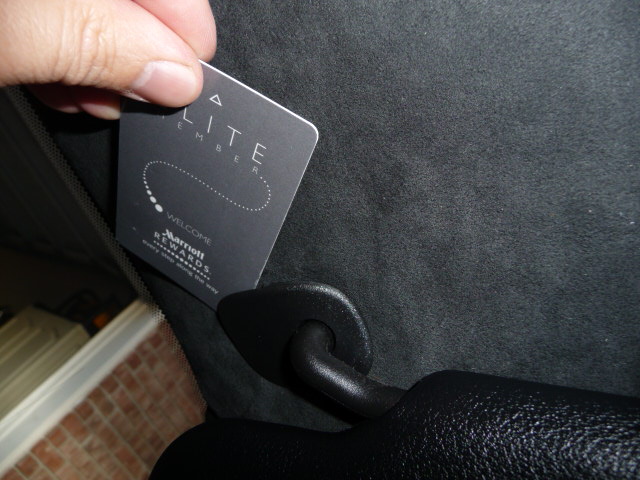
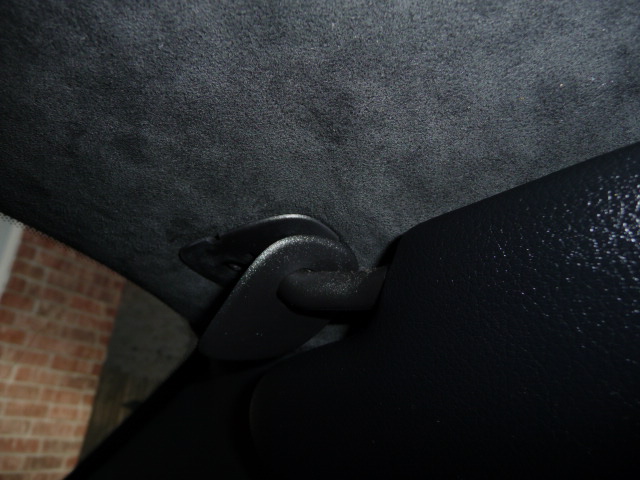
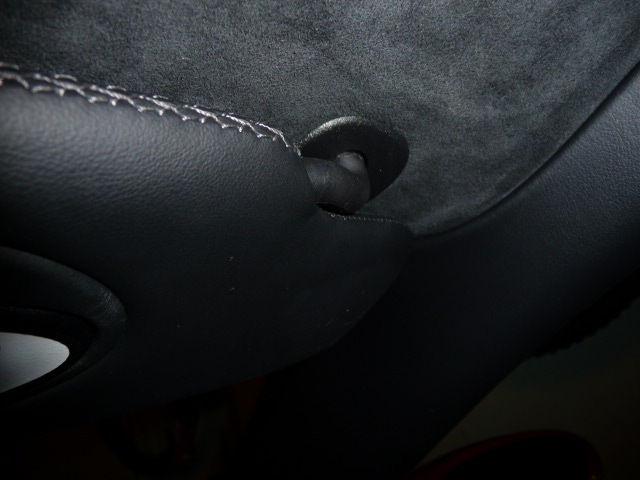
2. Now align it so that it is positioned along the front to back axis of the car. Using a plastic card... slip it under the plastic cover and pop the cover off. Be careful not to break any of the small tabs on the plastic cover. If you do then follow the note I have at the end to resolve this potential issue.
Attachment 659975
Attachment 659976
Attachment 659977
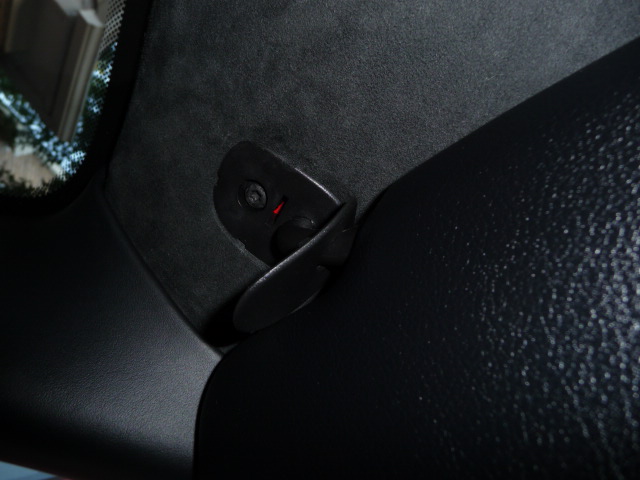
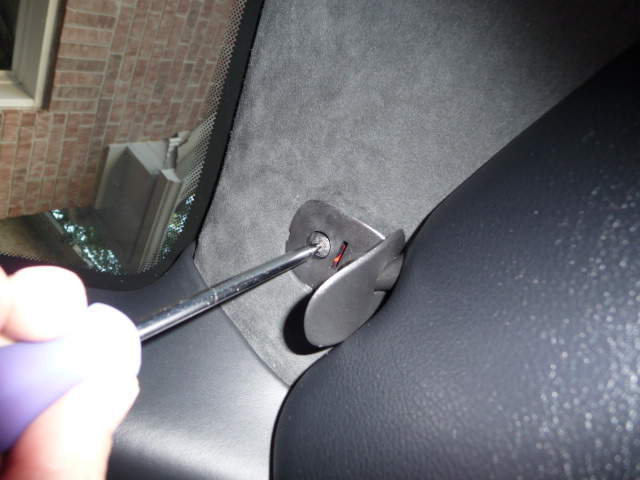
3. Using a T25 torx driver remove the torx screw holding the visor in place.
Attachment 659978
4. The visor will still remain in place until you work it back and forth to dislodge it from it's socket. It's less about force here and more about getting the angle right for it to pop out.
5. Once you have the original visor out then replace it with the new leather sun visor using the above instructions in reverse.
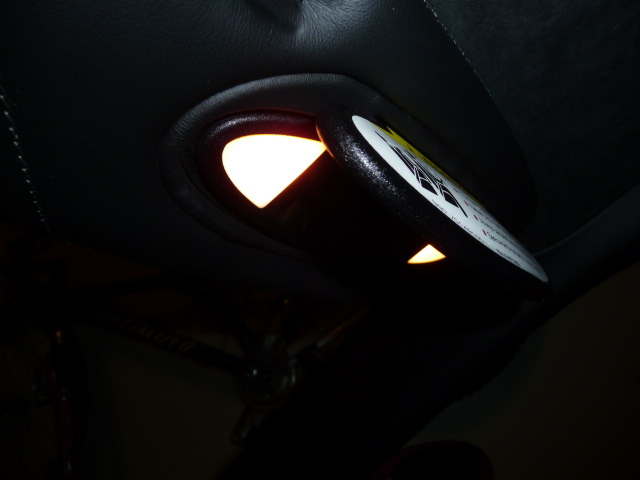
6. Upon completion it should look like this. Note the electrical contact points(positive and negative) on the visor to power the visor's light. Make sure the contact points are clean... if not use some electronic contact point cleaner or even a simple eraser will do. Check that the lights work when you open the visor.
Attachment 659980Attachment 659981
Attachment 659982Attachment 659983
Note: the visor's plastic cover has 3 small tabs which latch onto and cover the base of the visor mount point. These are delicate and can break easily. If you happen to break one of these then just utilize the cover from one of the vinyl visors you removed. To get the plastic cover out you will need to remove the metal dog leg arm by pulling it out of the visor... BTW, it takes a lot of force and a twisting motion to do so. You'll note that there is a bit of what looks to be white lithium grease on the inside of this metal arm. Don't swipe this off as it is required to allow free movement of the visor once it is back in place. Once you've swapped out the plastic cover then push back the metal arm into the sun visor. You will hear a snap/pop when it clicks back into place.
GL with the DIY and get ready to enjoy the smell of new car leather in the morning again.
My '08 C2S came optioned with full leather interior. I always felt, however, that the vinyl visors just detracted from the luxurious feel of the cabin. After some research I discovered that the DIY was actually quite easy. New leather visors are available from Suncoast for ~$1,200� now I know that's pricey but I love how that little bit of leather has reinvigorated the smell of new car leather back into the cabin of my now 4 yrs old Carrera S with 53K miles on the clock. Oh yeah, the car's interior feels just that much more richly leathered and that much less plasticy(is that a word?). BTW, I got my visors from a fellow RL member for a great price. Thank you rubber_ducky!
I consider this DIY project a level 2 out of 10. It's easy so if anything this DIY will really just help to overcome any fears/reservations others might have in tackling this job.
Tools Required:
- T25 torx driver
- plastic card� I used an old hotel room key but a c-card should also work
Parts:
- Full leather sun visors from Suncoast
Reference Materials:
PET Catalog - http://www.porsche.com/usa/accessori...artscatalogue/ Then select your model and MY
Installation Instructions:
1. Note the original vinyl sun visor below in it's standard attached position.
Attachment 659974
2. Now align it so that it is positioned along the front to back axis of the car. Using a plastic card... slip it under the plastic cover and pop the cover off. Be careful not to break any of the small tabs on the plastic cover. If you do then follow the note I have at the end to resolve this potential issue.
Attachment 659975
Attachment 659976
Attachment 659977
3. Using a T25 torx driver remove the torx screw holding the visor in place.
Attachment 659978
4. The visor will still remain in place until you work it back and forth to dislodge it from it's socket. It's less about force here and more about getting the angle right for it to pop out.
5. Once you have the original visor out then replace it with the new leather sun visor using the above instructions in reverse.
6. Upon completion it should look like this. Note the electrical contact points(positive and negative) on the visor to power the visor's light. Make sure the contact points are clean... if not use some electronic contact point cleaner or even a simple eraser will do. Check that the lights work when you open the visor.
Attachment 659980Attachment 659981
Attachment 659982Attachment 659983
Note: the visor's plastic cover has 3 small tabs which latch onto and cover the base of the visor mount point. These are delicate and can break easily. If you happen to break one of these then just utilize the cover from one of the vinyl visors you removed. To get the plastic cover out you will need to remove the metal dog leg arm by pulling it out of the visor... BTW, it takes a lot of force and a twisting motion to do so. You'll note that there is a bit of what looks to be white lithium grease on the inside of this metal arm. Don't swipe this off as it is required to allow free movement of the visor once it is back in place. Once you've swapped out the plastic cover then push back the metal arm into the sun visor. You will hear a snap/pop when it clicks back into place.
GL with the DIY and get ready to enjoy the smell of new car leather in the morning again.
08-30-2012, 02:34 AM
#3
Poseur
Rennlist Member
Rennlist Member
I did it the easy way--ordered the car with them! It's silly what we have to pay to get an appropriate interior. Your guide is nice and simple!
08-30-2012, 03:09 AM
#4
Drifting
Thread Starter
VG, PITA BMW dealers forced my hand 15 years ago to start working on my cars more intently. They did me a big favor... it's been liberating ever since to DIY. Now I use whatever $$$ I save in DIY jobs to purchase more parts for mods.
Dan, ever so often I scratch my head and think WTF Porsche... then throw some more Krugerrand at the issue to finish/fix what Porsche should have done upfront on a $100K car... like the lack of leather sun visors in a full leather optioned car.
Dan, ever so often I scratch my head and think WTF Porsche... then throw some more Krugerrand at the issue to finish/fix what Porsche should have done upfront on a $100K car... like the lack of leather sun visors in a full leather optioned car.
08-30-2012, 04:27 AM
#5
VG, PITA BMW dealers forced my hand 15 years ago to start working on my cars more intently. They did me a big favor... it's been liberating ever since to DIY. Now I use whatever $$$ I save in DIY jobs to purchase more parts for mods.
Dan, ever so often I scratch my head and think WTF Porsche... then throw some more Krugerrand at the issue to finish/fix what Porsche should have done upfront on a $100K car... like the lack of leather sun visors in a full leather optioned car.
Dan, ever so often I scratch my head and think WTF Porsche... then throw some more Krugerrand at the issue to finish/fix what Porsche should have done upfront on a $100K car... like the lack of leather sun visors in a full leather optioned car.
Seems like with the P-cars..we get the Poor service, Ponies (as in HP that is), and Plenty of options to pay more for (where they are now becoming standard with other manufacturers out there). In our case, a full leather optioned car (with yet still, the option to buy leather visors)
 -to Porsche!
08-30-2012, 09:57 AM
-to Porsche!
08-30-2012, 09:57 AM
#6
Rennlist Member

VG, PITA BMW dealers forced my hand 15 years ago to start working on my cars more intently. They did me a big favor... it's been liberating ever since to DIY. Now I use whatever $$$ I save in DIY jobs to purchase more parts for mods.
Dan, ever so often I scratch my head and think WTF Porsche... then throw some more Krugerrand at the issue to finish/fix what Porsche should have done upfront on a $100K car... like the lack of leather sun visors in a full leather optioned car.
Dan, ever so often I scratch my head and think WTF Porsche... then throw some more Krugerrand at the issue to finish/fix what Porsche should have done upfront on a $100K car... like the lack of leather sun visors in a full leather optioned car.
08-30-2012, 11:48 AM
#7
Drifting
Thread Starter
Very nice - I wish I had known you were going to do this I would have told you not to take off the bracket - the visors just slip on/off the mounting bracket. Takes a little strength and be careful you pull straight and they come right off. I've done it on 3 cars over the last 6 years - not only is the leather a great upgrade but you don't have to look at those stickers. Again, nice job!!
Trending Topics
08-30-2012, 02:42 PM
#8
Race Director
Nice write up! I'd also heard that the visors could be pulled off the post but like you, was afraid to apply too much force and removed everything, of course breaking one of the little plastic tabs on each cover. Since I didn't have replacement pieces ( I took the visors off to remove the stickers) I cut 2-sided tape to size to fit inside the plastic covers. I've had no issues with this fix. Your leather visors look great; love the stitching along the edge.
08-30-2012, 03:15 PM
#10
Poseur
Rennlist Member
Rennlist Member
Sadly, some time back Porsche learned that a la carte was the most profitable. Years ago when you ordered a full leather interior you got a full leather interior. Today, you have to spell out every little piece. If you fully load an interior with leather it can easily set you back tens of thousands of dollars.
The trick to leather in these 997s is to put leather in the higher wear areas along with the areas that you want that nice leather tactile feedback. They cheapen these cars with that crappy slush finish in high wear areas and the difference between one with the leather and one without is substantial. For example, the central console, if not covered in leather or wood, is going to look cheap in about 2 years--bad for the next guy.
Even the leather dash is broken up into a couple of pieces--the leather dash and the section that meets the windshield--separate, and calls for another option code to get it covered in cowhide. Ditto for things like door finishers, and speakers, etc. Just don't waste money on areas that you will never touch.
IMO, having leather visors is more important for finishing off a cabriolet. It's not as noticeable for a coupe.
08-30-2012, 04:14 PM
#12
Rennlist Member

USMC_DS1... happy to help. Looks much, much better than the stock vinyl units.
Edgy01... That interior is phenomenal, but it's screaming for a leather covered rear view mirror.
Edgy01... That interior is phenomenal, but it's screaming for a leather covered rear view mirror.
08-30-2012, 07:36 PM
#14
Drifting
Thread Starter
LOL, there are a lot of folks who would think that off you for just pulling up in a Porsche, a Carrera, and a Convertible no less... But why would you care if it makes you happy. Let's not try to convince each other that we're poor and bought a p-car because we couldn't afford anything else. A 400hp Mustang would be far less than a Carrera but it just wouldn't do for those of us who now want the best in life... like a pair of leather sun visors to complete our Carrera. But to each his own... 
08-30-2012, 09:29 PM
#15
Don't get me wrong... I appreciate nice, tasteful things more than the average person- and I am fortunate enough to have lots of them. That being said..... This thread was sounding a bit pretentious to my ears.