

Maintenance: Replace Serpentine Belt
 03-26-2012 | 04:17 AM
#16
Rennlist Member
Joined: Feb 2011
Posts: 6,244
Likes: 1,293
From: Vancouver, BC, Canada
Thanks guys. I believe many of us have these tools from previous cars we've enjoyed working on but some reason we feel 'obliged' to have the dealership do the work to not void the warranty or that they are too exotic etc... You know what I mean? So these instructional posts (oil changes, serpentine belt etc...) are great.
Now here's my request list for future instructs:
- pollen filter (I'm sure very easy but where is it?)
- air filter - easy too I'm sure...
- brake pads...
- brake line flush...
Now here's my request list for future instructs:
- pollen filter (I'm sure very easy but where is it?)
- air filter - easy too I'm sure...
- brake pads...
- brake line flush...
03-31-2012 | 06:09 PM
#17

Banned
Joined: Feb 2012
Posts: 1,251
Likes: 21
Thanks for all the input from everyone - it was very helpful. I did this today and it was very simple and I doubt it took more than 30 minutes. I went ahead and changed the air filter knowing the air box would be removed.
04-01-2012 | 02:02 PM
#18
Thread Starter
Drifting
Joined: Feb 2011
Posts: 3,024
Likes: 57
From: Austin, TX
Good job JW. I find that these cars are fairly inexpensive to maintain if I avoid the stealership for basic service items. Asked my p-dealer about swapping out the spark plugs last year. "You need a Porsche mech for that job"... and that's why they want $1,200. A few hours of DIY sweet equity, $60 for plugs, simple search on RL and RT... I saved enough $$ for some nice mods. RL and RT have saved me thousands. Best membership value there is.
 04-01-2012 | 07:57 PM
#20
Thread Starter
Drifting
Joined: Feb 2011
Posts: 3,024
Likes: 57
From: Austin, TX
Have to agree... looked at a 991 at the p-dealer last week. Opened the engine compartment and even looked at it from underneath. I indicated to the Sales Rep that I like to do my own maintenance... his genuine reply was: "then you won't like this one." He was right. The 991 may be a skip gen 911 for me... perhaps there's hope for the next gen in 10 yrs?

 09-16-2012 | 09:16 PM
#22
Thread Starter
Drifting
Joined: Feb 2011
Posts: 3,024
Likes: 57
From: Austin, TX
Good job and that's a positive indicator that your pulleys are in good shape. BTW, keep the old s-belt in the emergency car kit. Never know when you might be stuck in a remote area and might just need one.
 09-18-2012 | 04:02 PM
#25
Cruisin'
Joined: Aug 2010
Posts: 9
Likes: 0
This has turned into a tough job for me - the tensioner puller nut (and bolt) turns in place and unloads the tensioner so it will not move far enough to hook on the new belt. Torque of the nut seems OK....grrrr 
Any ideas please? Thanks...
Any ideas please? Thanks...
09-18-2012 | 05:46 PM
#26
Thread Starter
Drifting
Joined: Feb 2011
Posts: 3,024
Likes: 57
From: Austin, TX
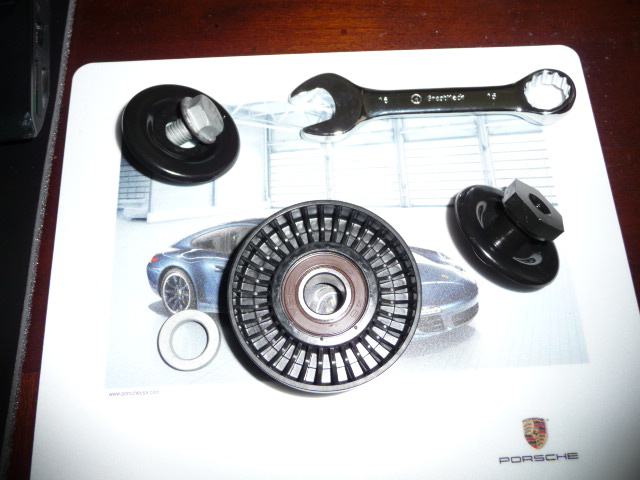
I had a similar issue earlier in the year. The t-pulley(#8) is held in place by a bolt(#4) and nut connected to the t-pulley and thru the arm/lever(#3). You're actually cranking down on the t-pulley nut to move the t-pulley arm/lever. If the bolt and nut become loose(out of torque) then you need to re-torque/tighten the bolt and nut. I could not find a torque reference so I just went by feel until it no longer moved without turning the arm/lever.
The bolt head is located in a super tight spot behind the t-pulley arm/lever and engine block. I found that a 16mm OPEN END BOX WRENCH wedges perfectly in there for this task. It's difficult to find a shorty 16mm at the local auto store, Sears, or Home Depot. I had to order a whole set of shorties from internet... try Amazon.
BTW, you could also remove the entire t-pulley bracket(#1) assembly but that looks to be much more involving job then just finding a shorty wrench. I'll likely do this within a year or so as I believe my t-pulley is suspect and will give at some point. GL and let us know the outcome.

Pic of a new t-pulley plus bolt, nut, etc... note there is some gummy pink substance on the bolt. I believe this behaves somewhat like locktite and provide resistance toward turning once set.
The bolt head is located in a super tight spot behind the t-pulley arm/lever and engine block. I found that a 16mm OPEN END BOX WRENCH wedges perfectly in there for this task. It's difficult to find a shorty 16mm at the local auto store, Sears, or Home Depot. I had to order a whole set of shorties from internet... try Amazon.
BTW, you could also remove the entire t-pulley bracket(#1) assembly but that looks to be much more involving job then just finding a shorty wrench. I'll likely do this within a year or so as I believe my t-pulley is suspect and will give at some point. GL and let us know the outcome.
Pic of a new t-pulley plus bolt, nut, etc... note there is some gummy pink substance on the bolt. I believe this behaves somewhat like locktite and provide resistance toward turning once set.
09-29-2012 | 02:23 PM
#27
Racer
Joined: Sep 2010
Posts: 314
Likes: 15
From: Maryland
Thank you all! Especially the tip on when the tensioner nut spins. I just did this project today.
The airbox came out with no major issues, and the old belt came right off.
When I went to put the new belt on, the nut started to slip and I could not get the tensioner over enough to put the new belt on. A few breaks to cool myself off, and a little help from my 9 year old daughter and we tightened the nut back up enough to get the tensioner over and get the new belt in place.
My input is that the top guide pulley is harder to use as the last pully to place the belt on. I used the one next to the tensioner (Just to it's left) as I could get more of my hands on the belt to push it onto the pulley. With my nut slipping a bit it was harder than I thought to get the new belt back on.
Also when pulling the airbox out of a 3.6L engine the Mass Airflow sensor and it's wire guide clip are easy to see, but there is also a fastener on the snorkel of the airbox going to another vertical tube on that side of the engine bay. Watch out for that. And keep an eye on the two rubber grommets that go into the frame under the airbox.
I ended up using a breaker bar and a deep well 24mm socket. I'd advise finding a shorter socket or 24mm wrench for this job. The deep well socket put the breaker bar right on the frame line and I ended up rubbing into that a bit during the process.
The new belt is now on, airbox was cleaned inside and out since I had it out of the car.
All in all it was not a tough task, I just got frustrated with the nut slipping, but my daughter and I had some great bonding time. She came through for me and rescued the day when I needed a 2nd set of hands.
Thanks to all for the great instructions and write ups! Again, this forum has saved me thousands of dollars to date and I really know a lot more about my car by working on it.
09-29-2012 | 05:12 PM
#28
Thread Starter
Drifting
Joined: Feb 2011
Posts: 3,024
Likes: 57
From: Austin, TX
Excellent work... that slipping t-belt nut can be tricky at 1st. Really like how you involved your 9 yrs old daughter as an assistant... my boys and I have had some great father/son wrench time together over the years. Now they do their own wrenching to maintain their vehicles.
09-29-2012 | 06:02 PM
#30
Thread Starter
Drifting
Joined: Feb 2011
Posts: 3,024
Likes: 57
From: Austin, TX
Should follow a similar procedure and require the same tools for the 997.2... s-belt p/n may be different. Just take a picture of the 997.2 s-belt routing before you proceed and go for it. Post a write up if you do.