When you click on links to various merchants on this site and make a purchase, this can result in this site earning a commission. Affiliate programs and affiliations include, but are not limited to, the eBay Partner Network.
I've owned my 2008 C4S for about four years now. Since the beginning it makes a squealing noise at startup, shutdown, and at very low RPMs such as when I'm backing slowly into the garage. Lately the squealing has gotten worse. When I first got the car I replaced the serpentine belt and all of the idler pulleys but realized that replacing the tensioner itself would be a very invasive job. While replacing the idler pulleys I checked the a/c compressor and the alternator but they were both operating smoothly and not suspect in the squealing. I also replaced the water pump so it's not suspect either.
So after four years of squealing, I finally decided to replace the tensioner itself. I didn't take a bunch of photos for a proper DIY but here are the major components that I had to remove to get to that darned thing (there were several little things that I won't list):
Airbox
Airbox to MAF plenum
MAF
Aft intake runner between the two intake manifolds
Disconnect battery
Alternator
Oil fill tube (tape over the hole into the engine as a dropped bolt would be disastrous!)
A/C compressor unbolted and set aside
Power steering pump reservoir (cover the opening to the power steering pump tank to prevent FOD)
Power steering pump drive pulley
Power steering pressure line (it's on the front right of the pump). I used duct tape to cover the pump outlet and reduce (not stop) leaking of power steering fluid. I did not attempt to disconnect the power steering low pressure return line.
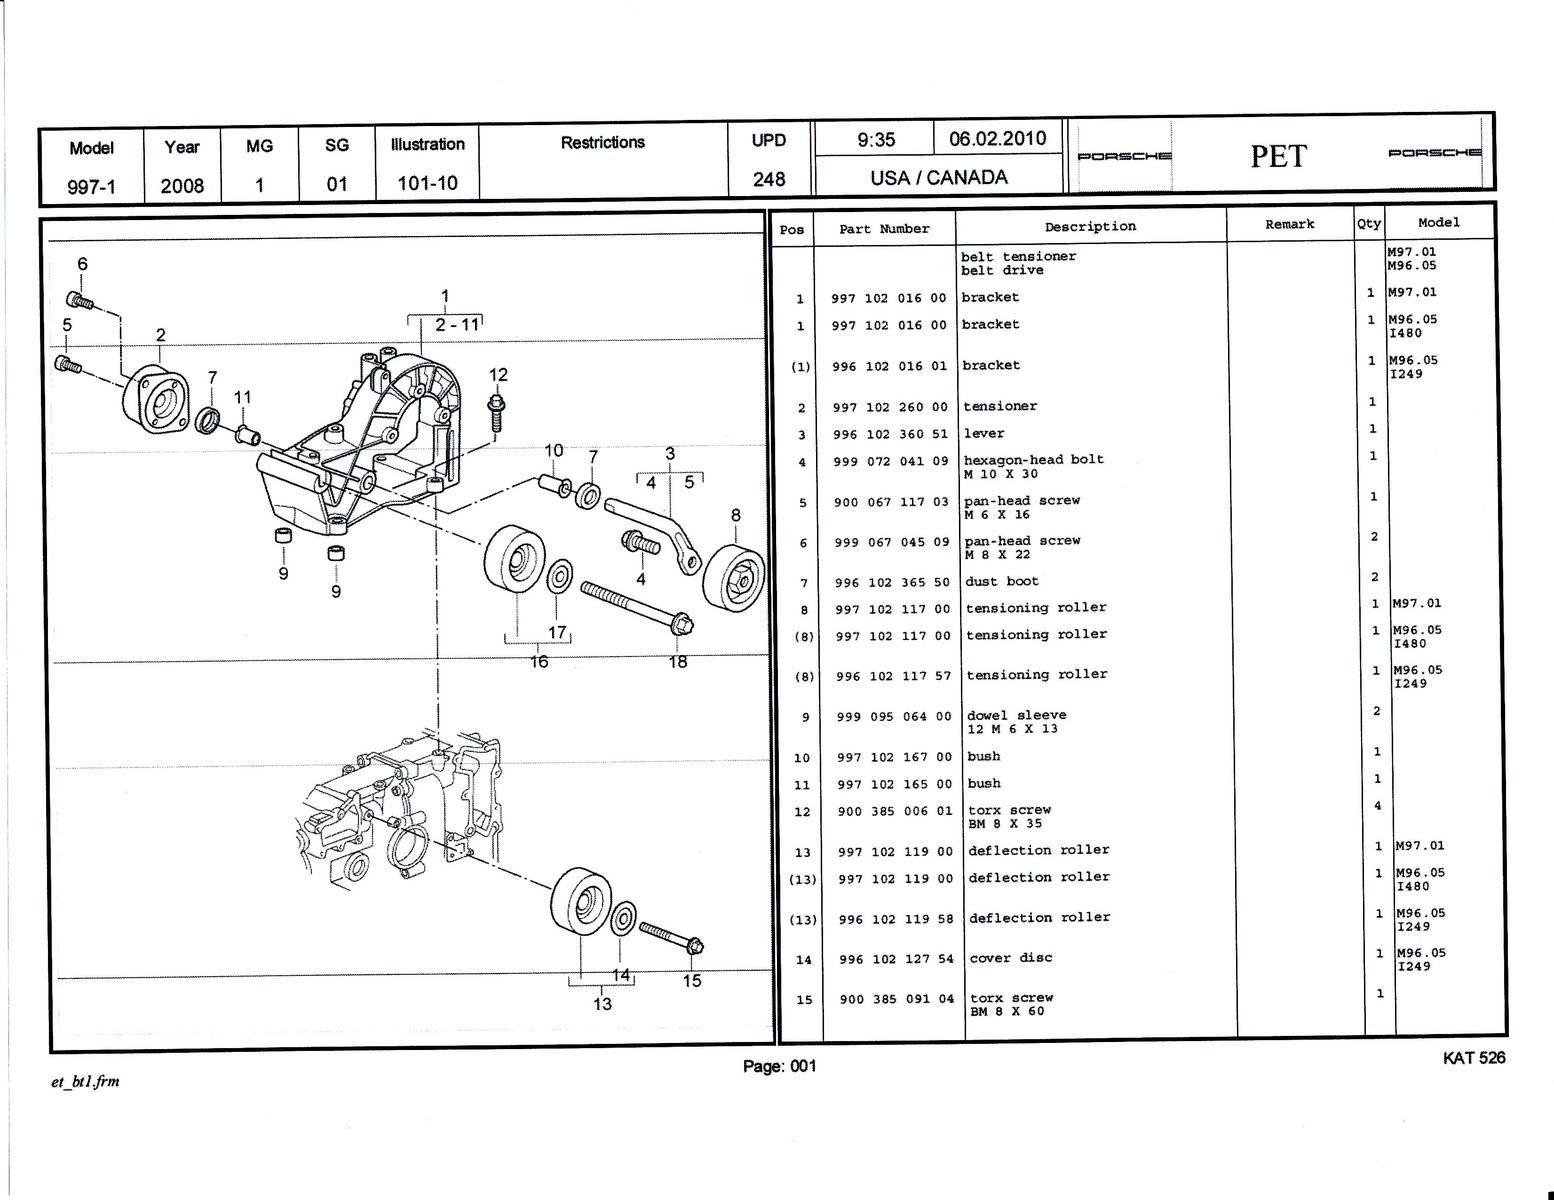
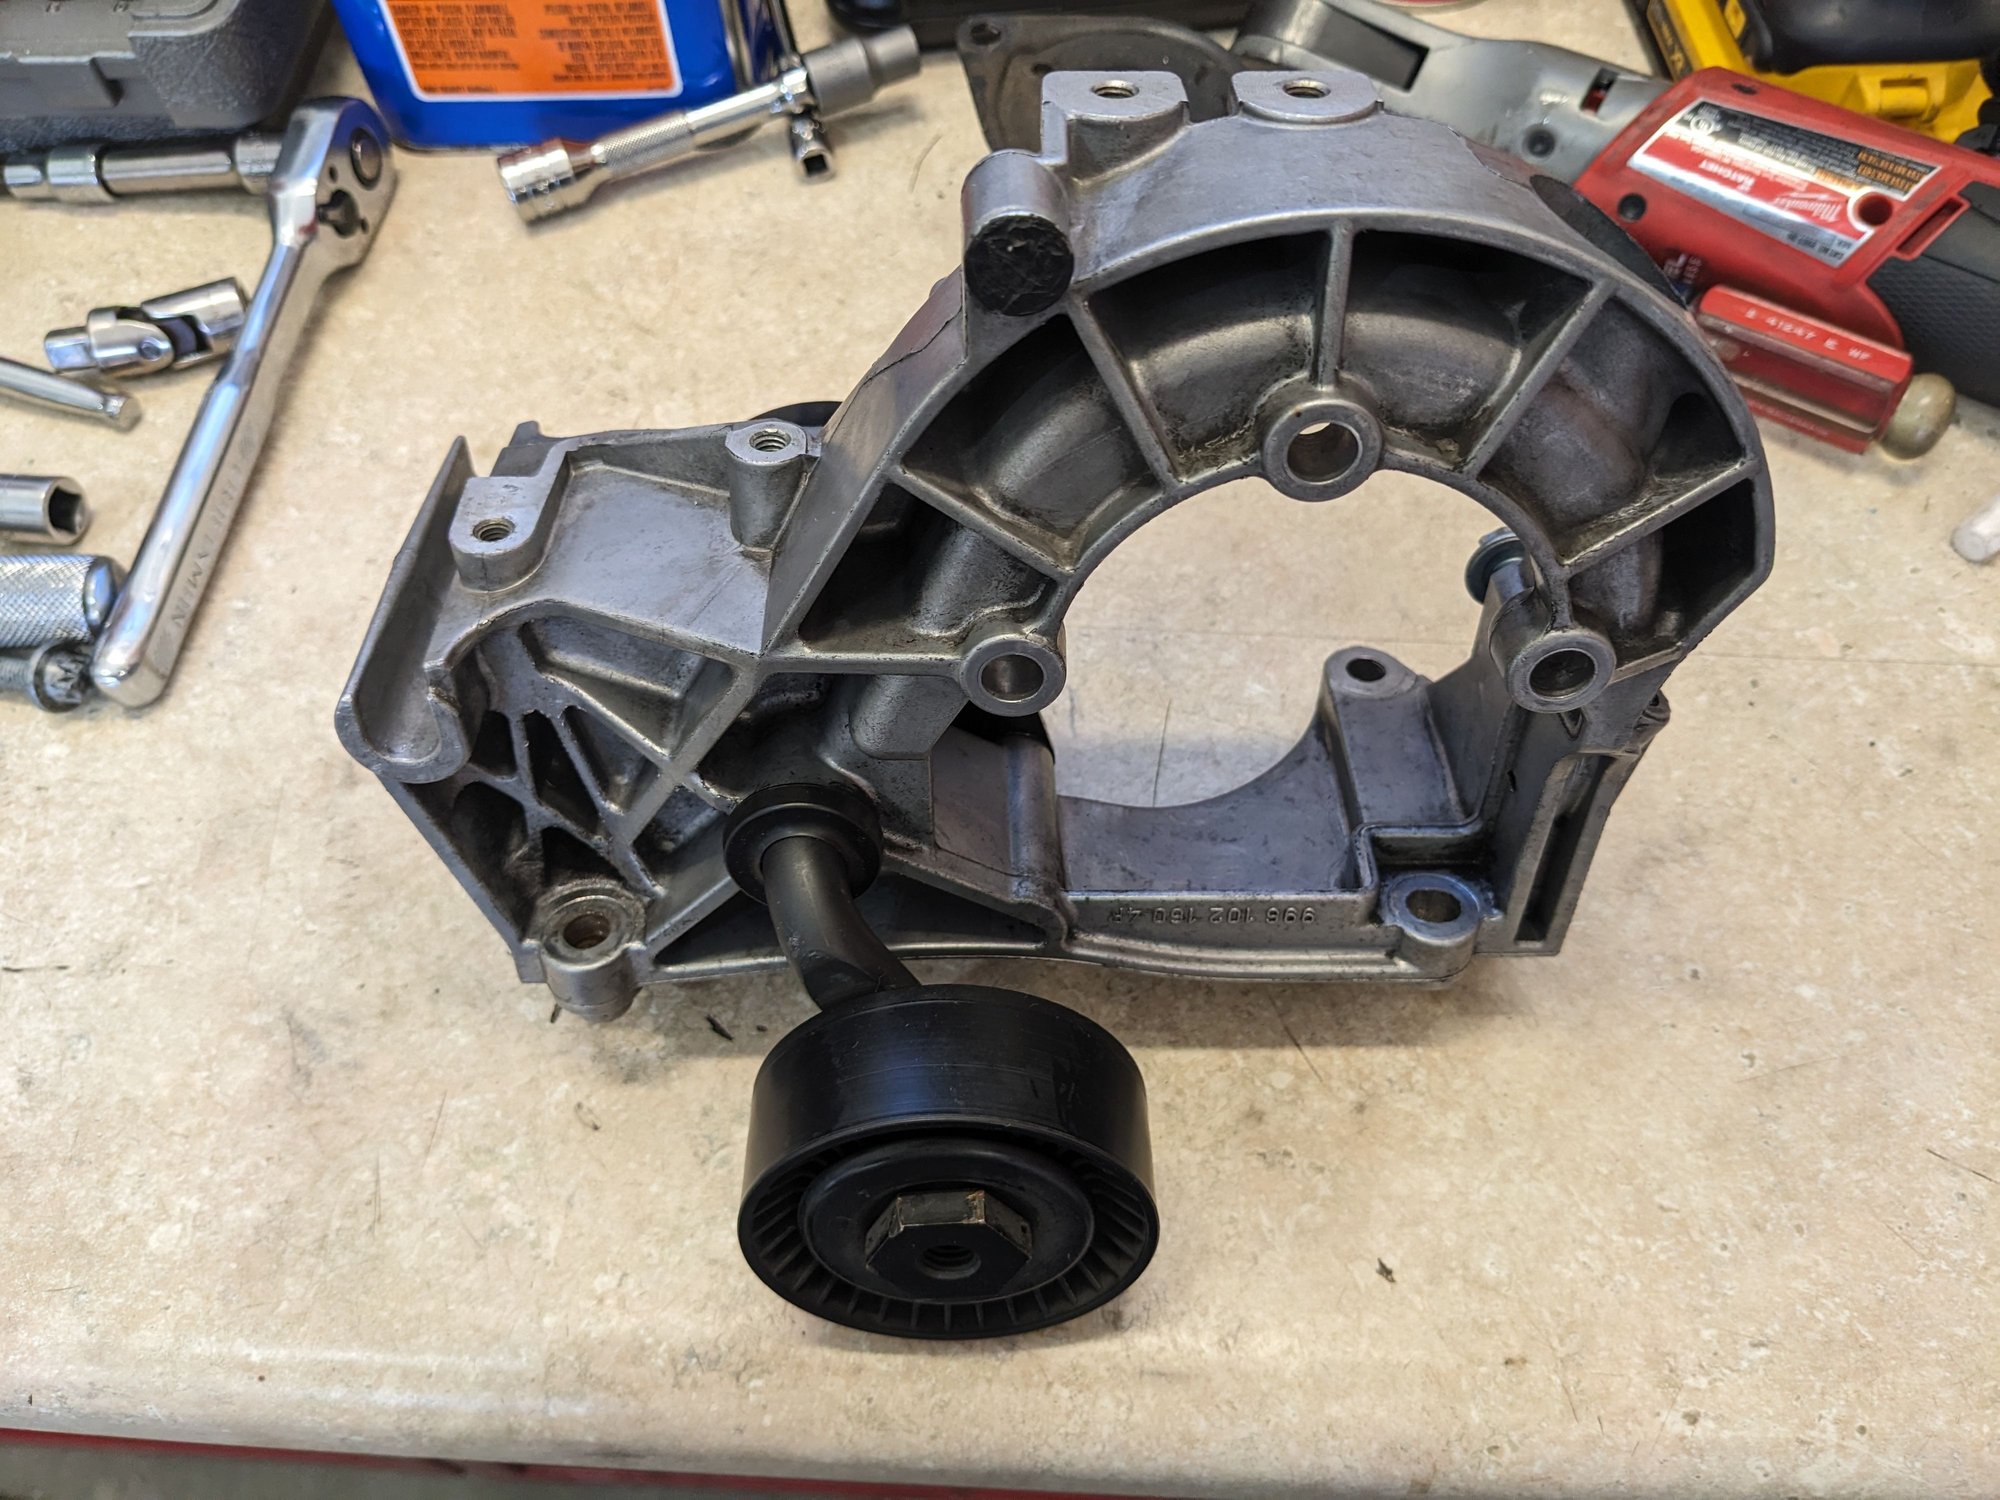
Unbolt power steering pump assembly from the cast aluminum bracket that encircles the pump (it also provides mounting locations for the alternator and a/c compressor) (PET graphic below). There were three bolts in the front and two in the back iirc.
Unbolt the cast aluminum bracket from the engine block. I had to carefully pry upwards because it has two dowel sleeves on the left (driver's side) two mounting bolt locations that were pressed tightly into the block.
With a ton of patience wiggle the power steering pump and the cast bracket to pull the bracket towards you and off of the power steering pump.
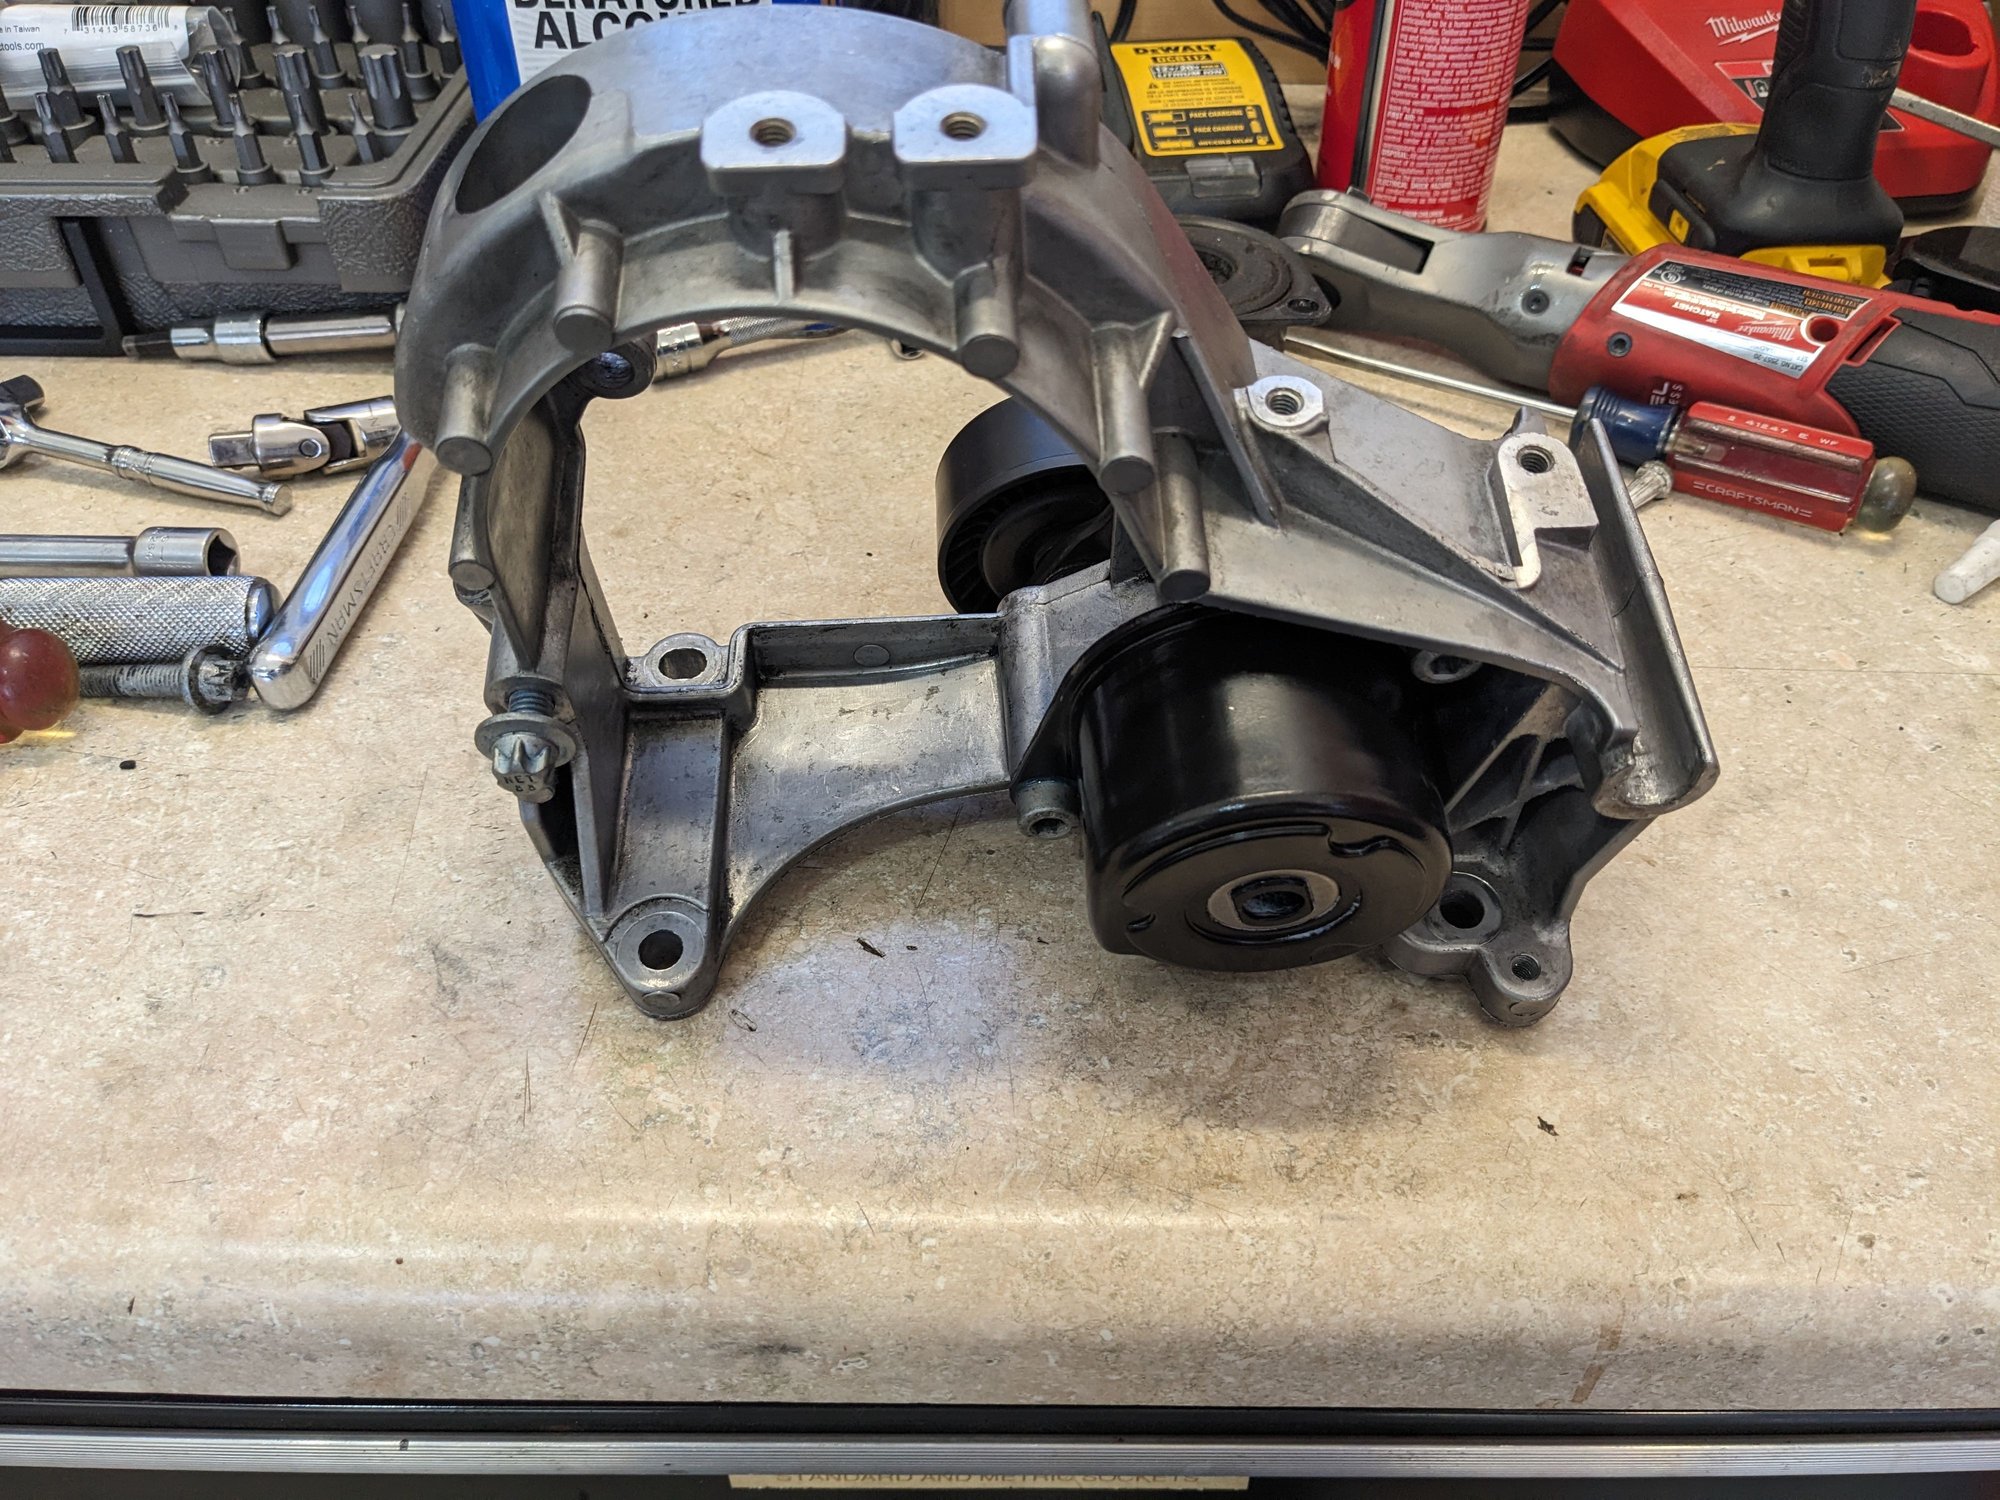
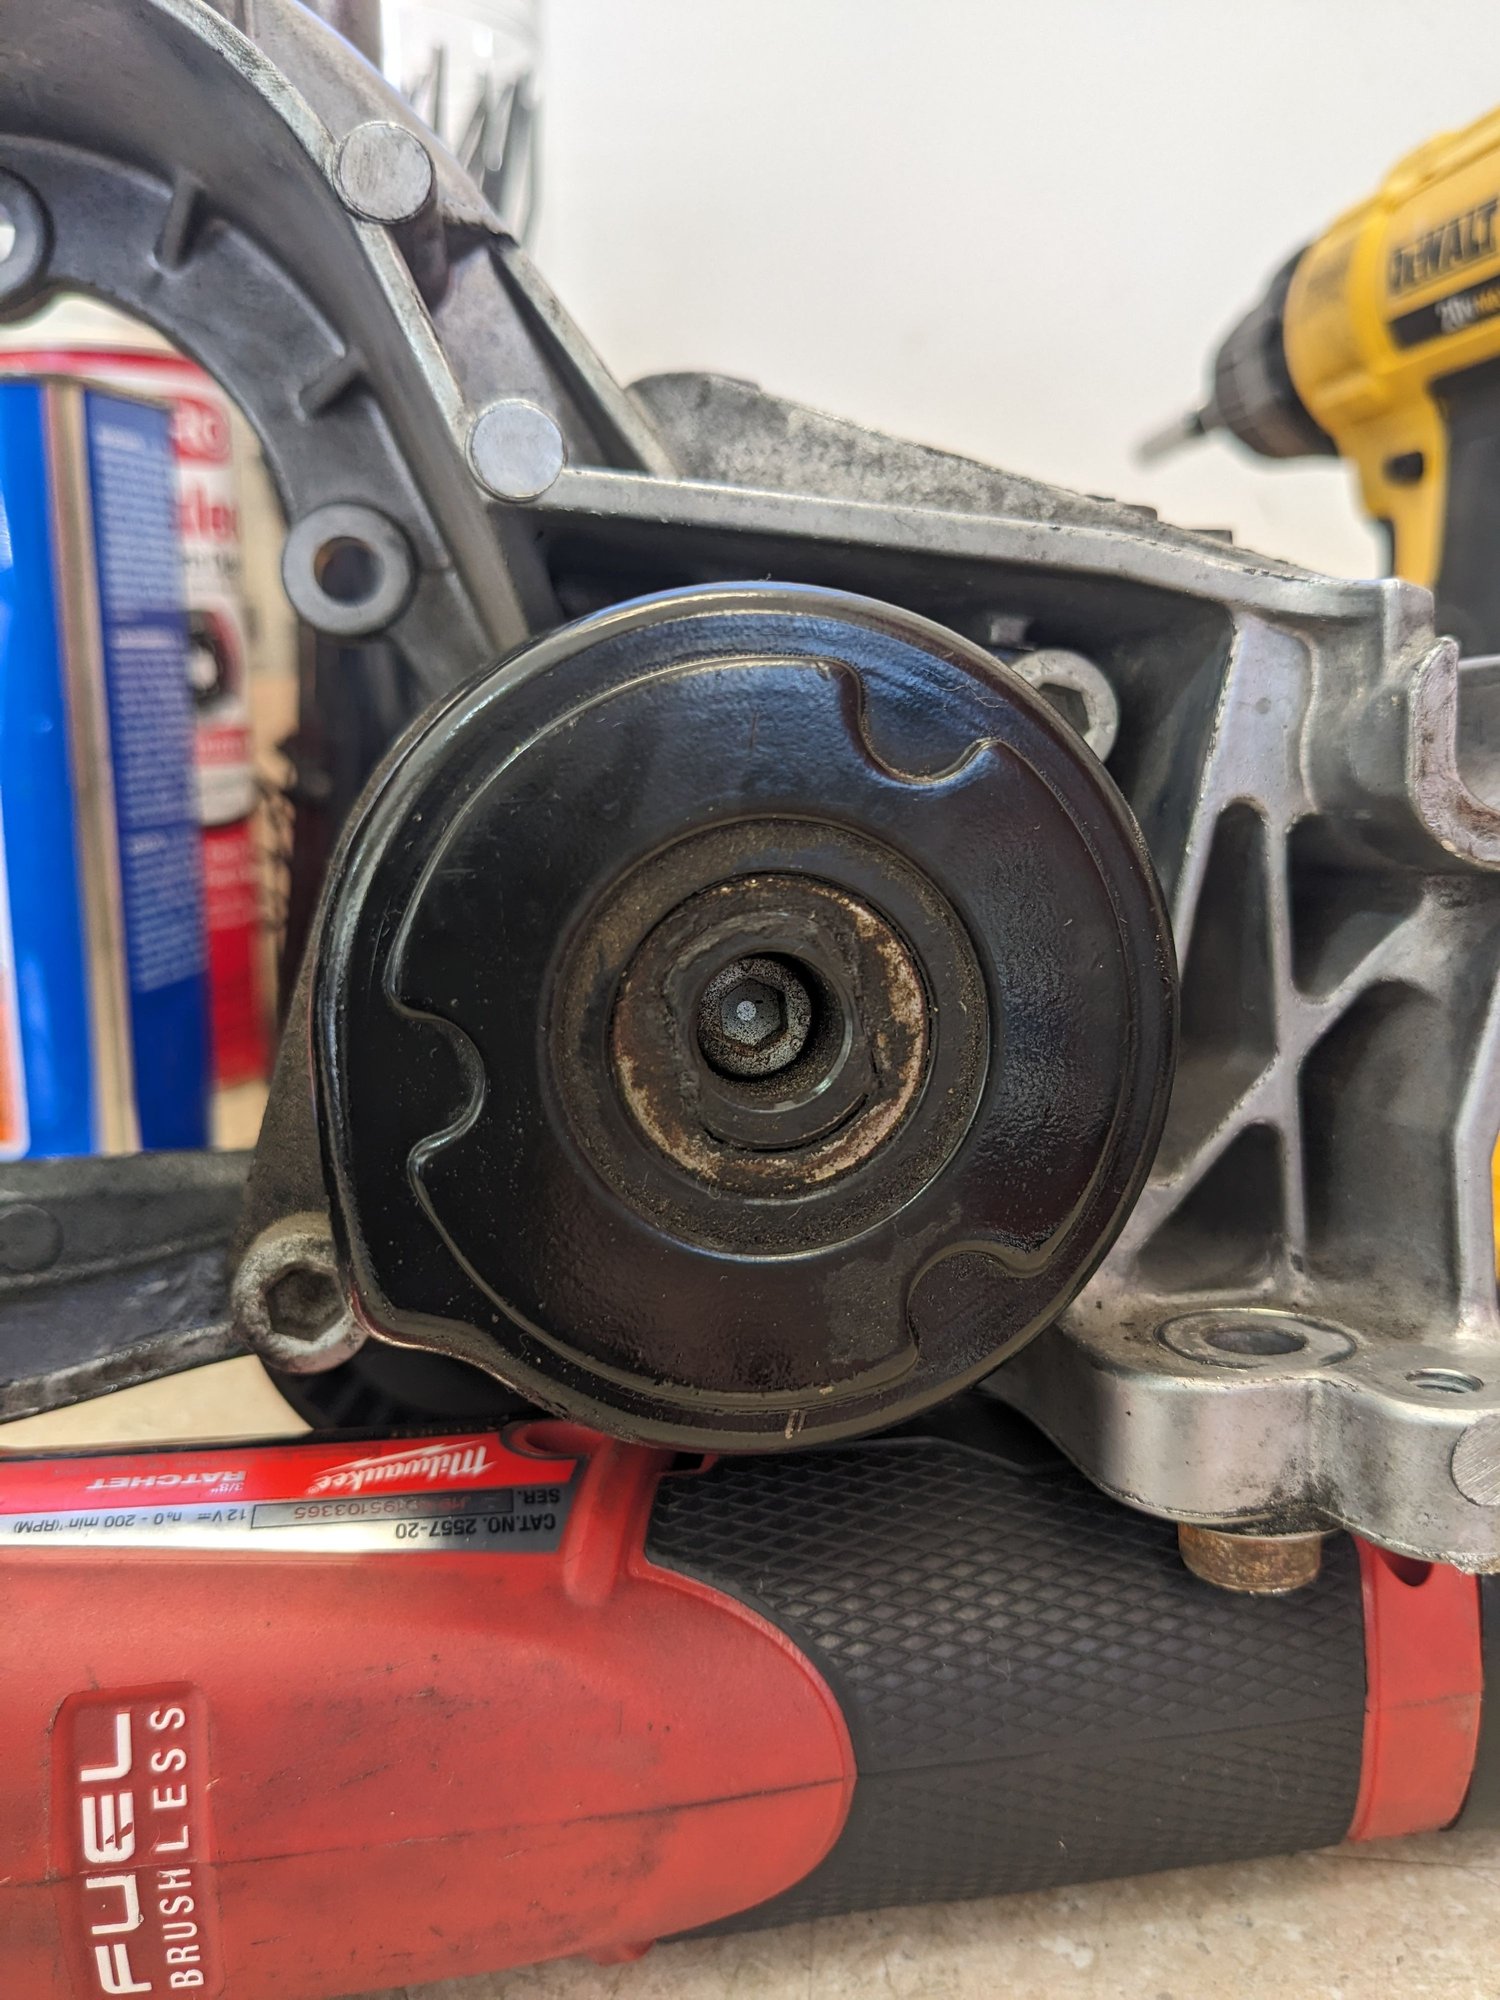
The belt tensioner is mounted onto the backside of the cast bracket with two cap screws that require a 6 mm hex
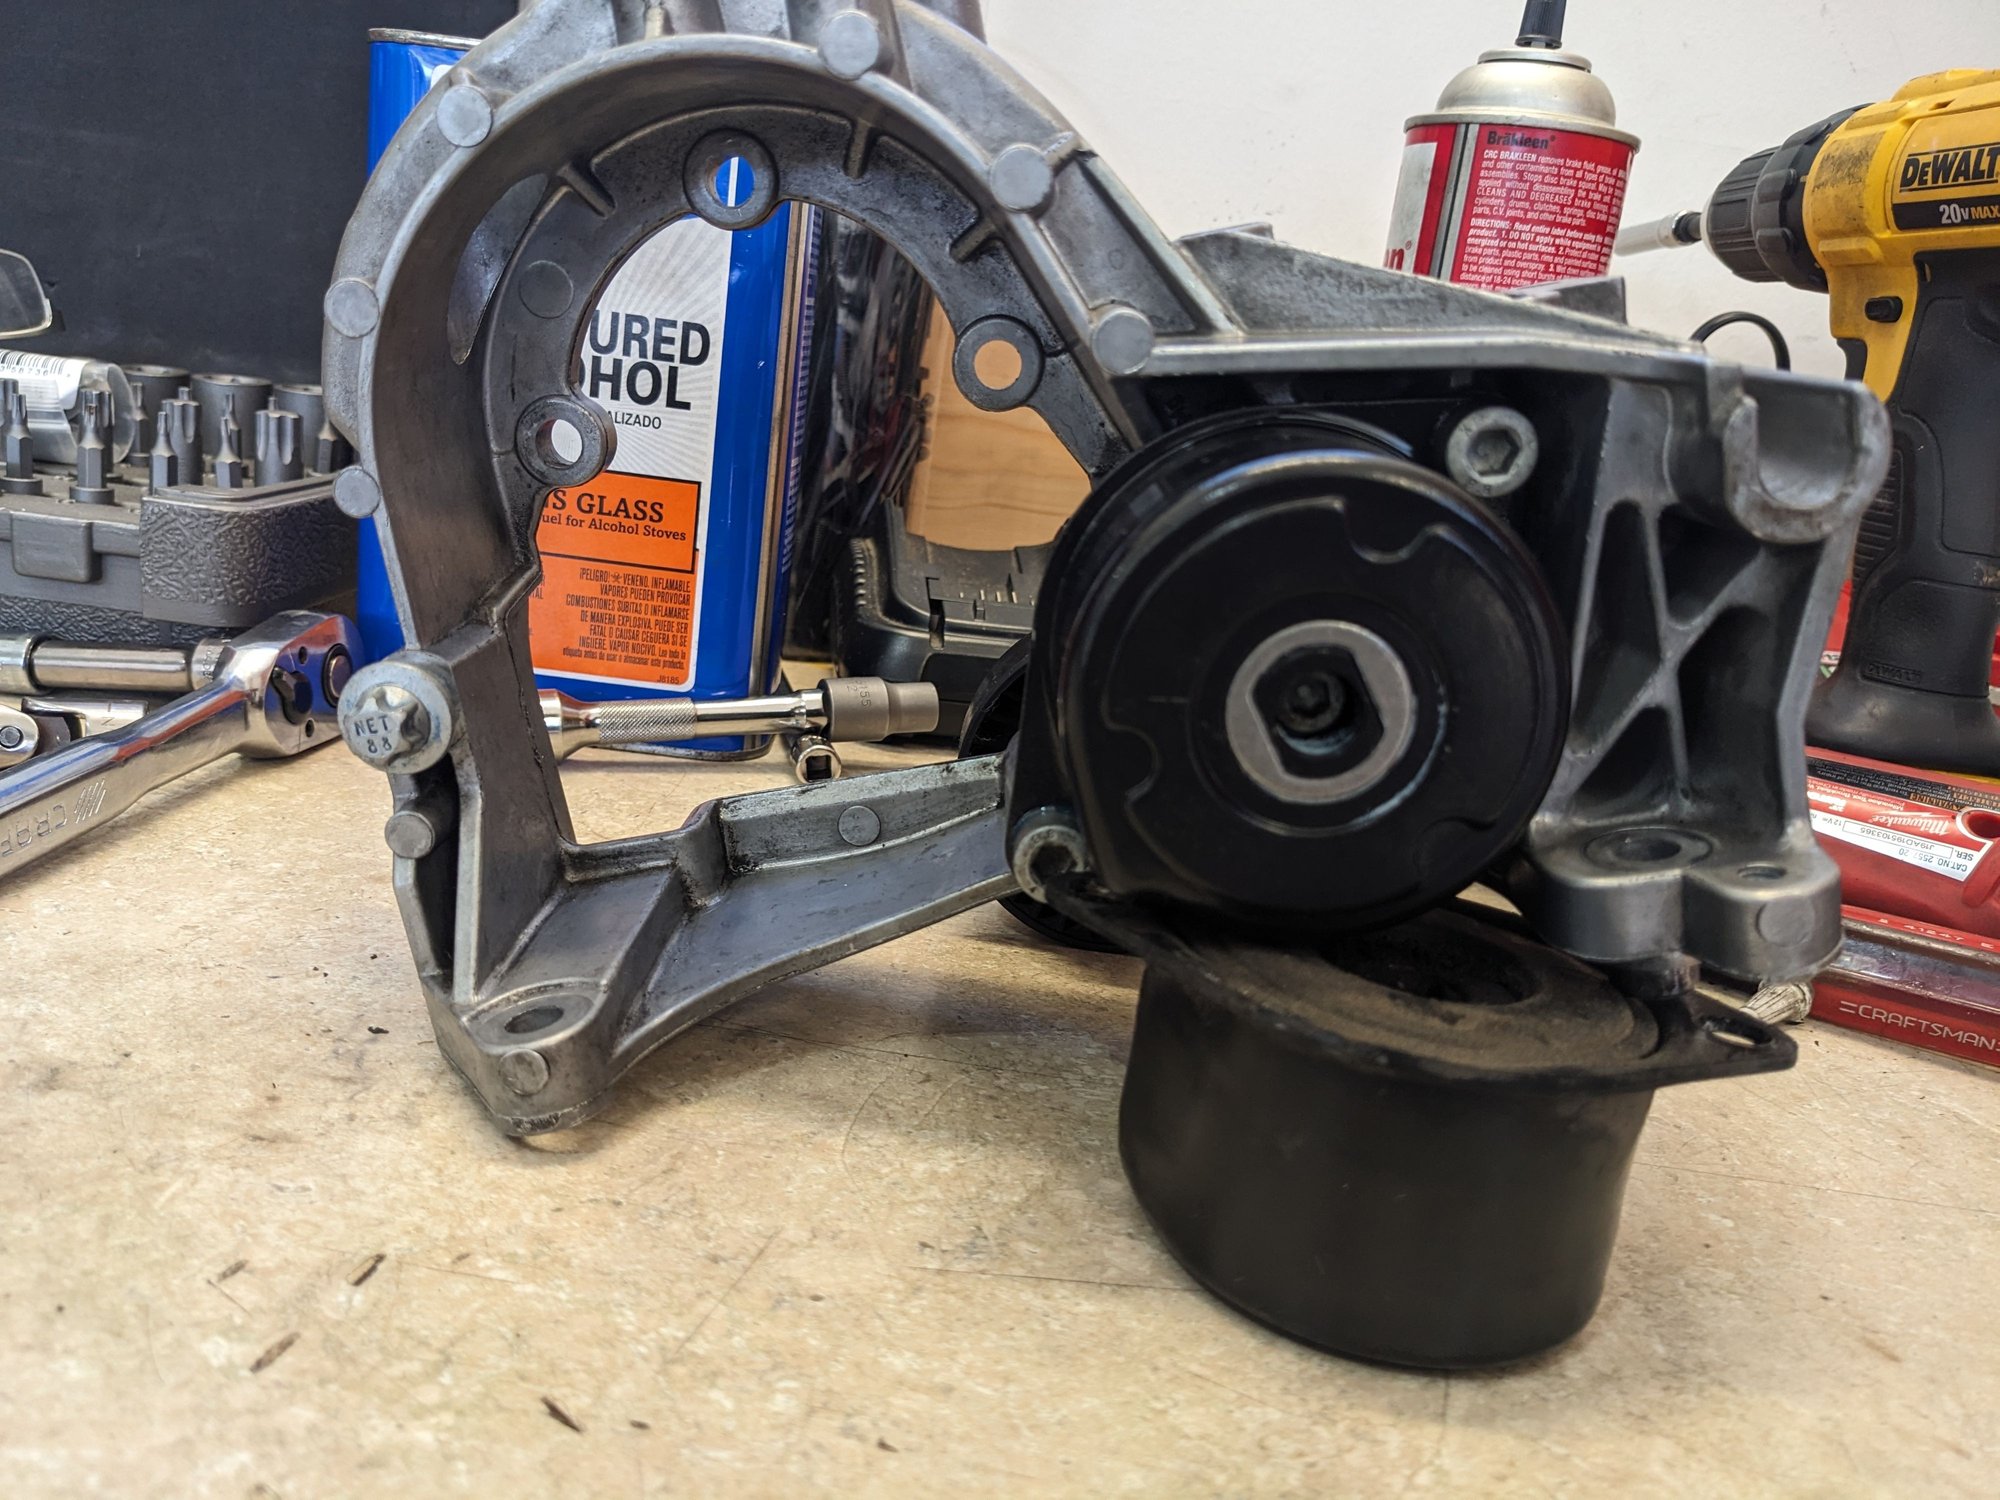
Note that the tensioning arm is held into the tensioner by a cap screw that uses a 5 mm hex. I mention this because I read in someone else's post that you can just pry the tensioner arm out of the tensioner if you want to remove it. To do so would require stripping out that cap screw (see photo below). Even with the cap screw removed it was necessary to pry the tensioner arm out of the tensioner and it took some gentle hammering to get it back into place in the tensioner.
With that done reassembly is the reverse. I'm about 80% complete in putting it back together but decided to type this up now. Hopefully I'll get it back together today and test it. Fingers crossed that the squealing is solved. I'll update the post once all is complete.
Cast bracket showing the tensioner arm and pulley. Cast bracket backside showing tensioner. Close up of tensioner showing two mounting bolts (upper right, lower left). Close up of tensioner showing the center bolt that screws into the end of the tensioner arm.
I think you did a bunch of extra work, but that happens the first time.
All I needed to do was remove: air box, air hose, belt, alternator, oil filler tube.
Reach back and remove the center M6 bolt holding the right angle arm.
Pry the arm toward the back of the car, and it will come off.
Take it to the bench and install the tensioner bearing. Reverse process.
I actually weld the bolt to the back of the right angle arm so I no longer have to hold the bolt with a wrench while removing the nut on the tensioner bearing assembly. The next time, no one will have to do all this madness again.
I've replaced the tensioner pulley in the past and still had the squeal. This project is to replace the spring loaded tensioner which is component #2 in the diagram.
Great photos for anyone fumbling blind trying to get this job done. Any time I see post like this I feel the need to mention how much easier future work will be if you weld bolt 4 to part 3 (the lever). Otherwise you have to hold a narrow wrench on the bolt while attempting the pulley removal.
Great photos for anyone fumbling blind trying to get this job done. Any time I see post like this I feel the need to mention how much easier future work will be if you weld bolt 4 to part 3 (the lever). Otherwise you have to hold a narrow wrench on the bolt while attempting the pulley removal.
It makes you wonder which German idiot designed it that way.
It makes you wonder which German idiot designed it that way.
OP, great job tackling this yourself!
You have to remember that the engines are completely assembled separately from the car and lifted in as a complete lump. This type of stuff is what makes working on my supercharged engine oh so much fun. I've figured out tips and tricks after removing the supercharger a few times and made notes about the sequence things need to go back together in, orientation of clamps, etc but its still brutal whenever the kompressor needs to come out.
It makes you wonder which German idiot designed it that way.
Many P-engineers have 2 extra joints between wrist and elbow, plus tiny hands and long fingers with incredible strength. A few also have focal-plane specific x ray vision (forus at a specific distance) to see hidden parts. Not everyone knows these little known facts. There is also the unwritten rule that any simple part Must be made more complicated and expensive. Many parts require "Special Pxx1.1" tools that may/may-not be found outside of Germany as simple revenue enhancement procedures. (AOS as an example...)
Having worked on Porsche engines, I can attest to these facts.

 03-14-2024, 10:12 AM