When you click on links to various merchants on this site and make a purchase, this can result in this site earning a commission. Affiliate programs and affiliations include, but are not limited to, the eBay Partner Network.
Hello, I just finished up installing my rear view camera and wanted to write this up. I found a bunch of resources that helped but wanted to put it all in one place and add some new information that I found along the way. Hope this helps someone in the future!
Section 0: Preface and Warnings
I do not take responsibility for anything that was broken, or damaged by using this guide. These steps worked for me and you may need to tweak your procedure to get similar results. Ensure the data being provided below is accurate by testing on your vehicle and confirming as you go.
Section 1: Installing PCCM
If you haven't already done this, I would start here. It's not terribly hard to install and can be done in an hour or two. Here's the resources I used and some new ones I found since I did my install a year ago. Obviously, we are not going to put the PCCM+ inside the infotainment center until we are done with the camera install.
Section 2: Test Equipment
Always best to test, than to do everything and then be confused why something doesn't work. Plug the FAKRA to RCA cable into the empty FAKRA cable above your mic port and then plug the RCA into the dongle you just plugged in.
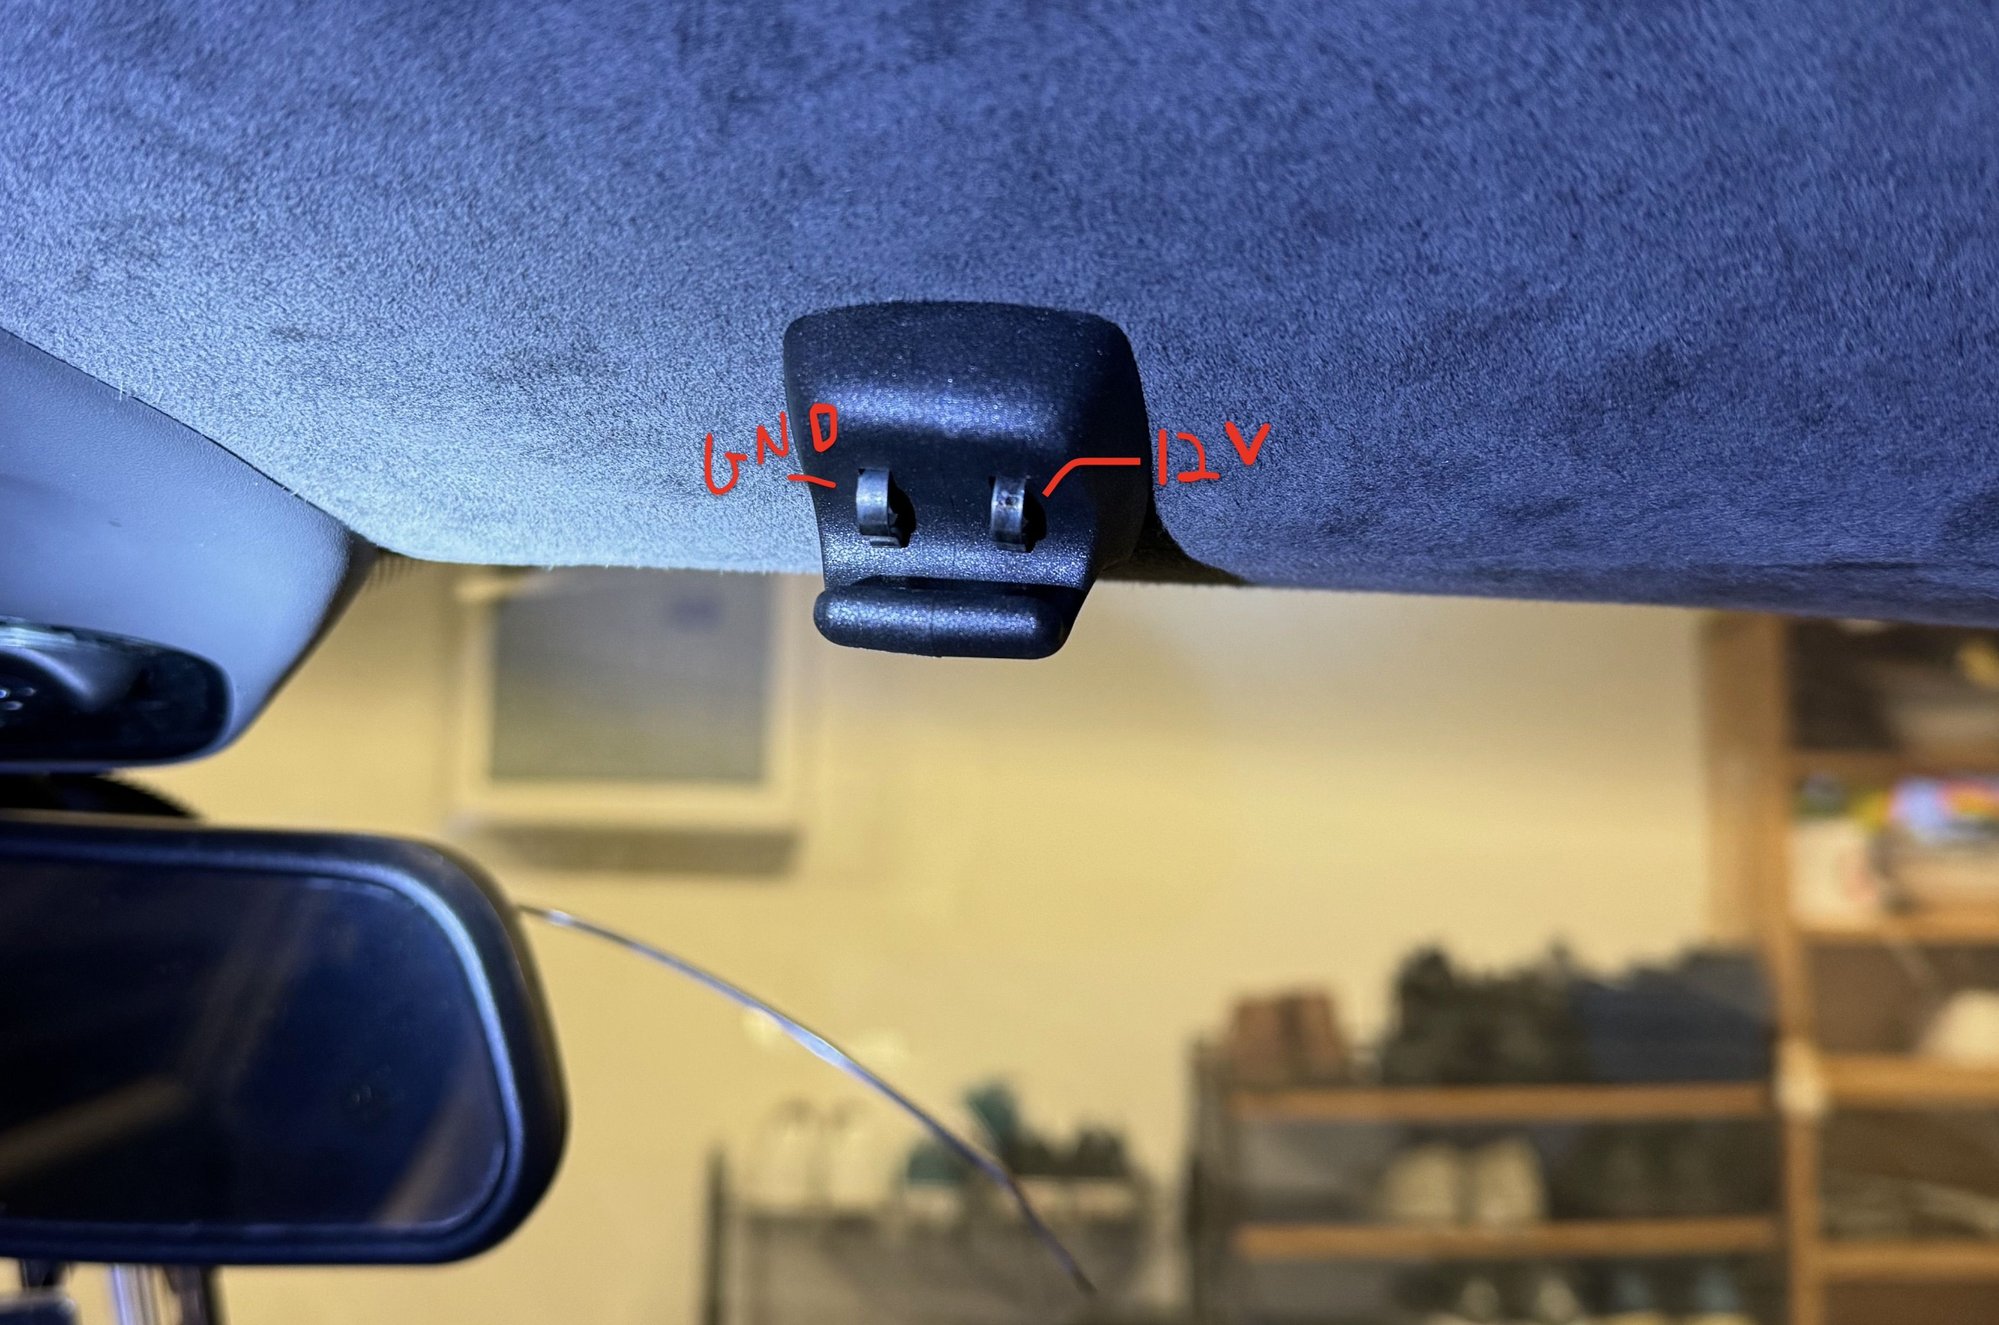
Surprisingly the lights for the mirror in your sunshade are powered by the clips that hold the sunshade in. In my car the right clip was +12V and the left clip was ground. I used some extra wire that I had to give both the camera and pin 6 (top left, next to existing yellow wire) a constant 12V signal. This should tell the PCCM+ that it's in reverse and to display the camera. If everything works right then you should be able to see the camera feed properly.
Section 3: Crossing the Firewall
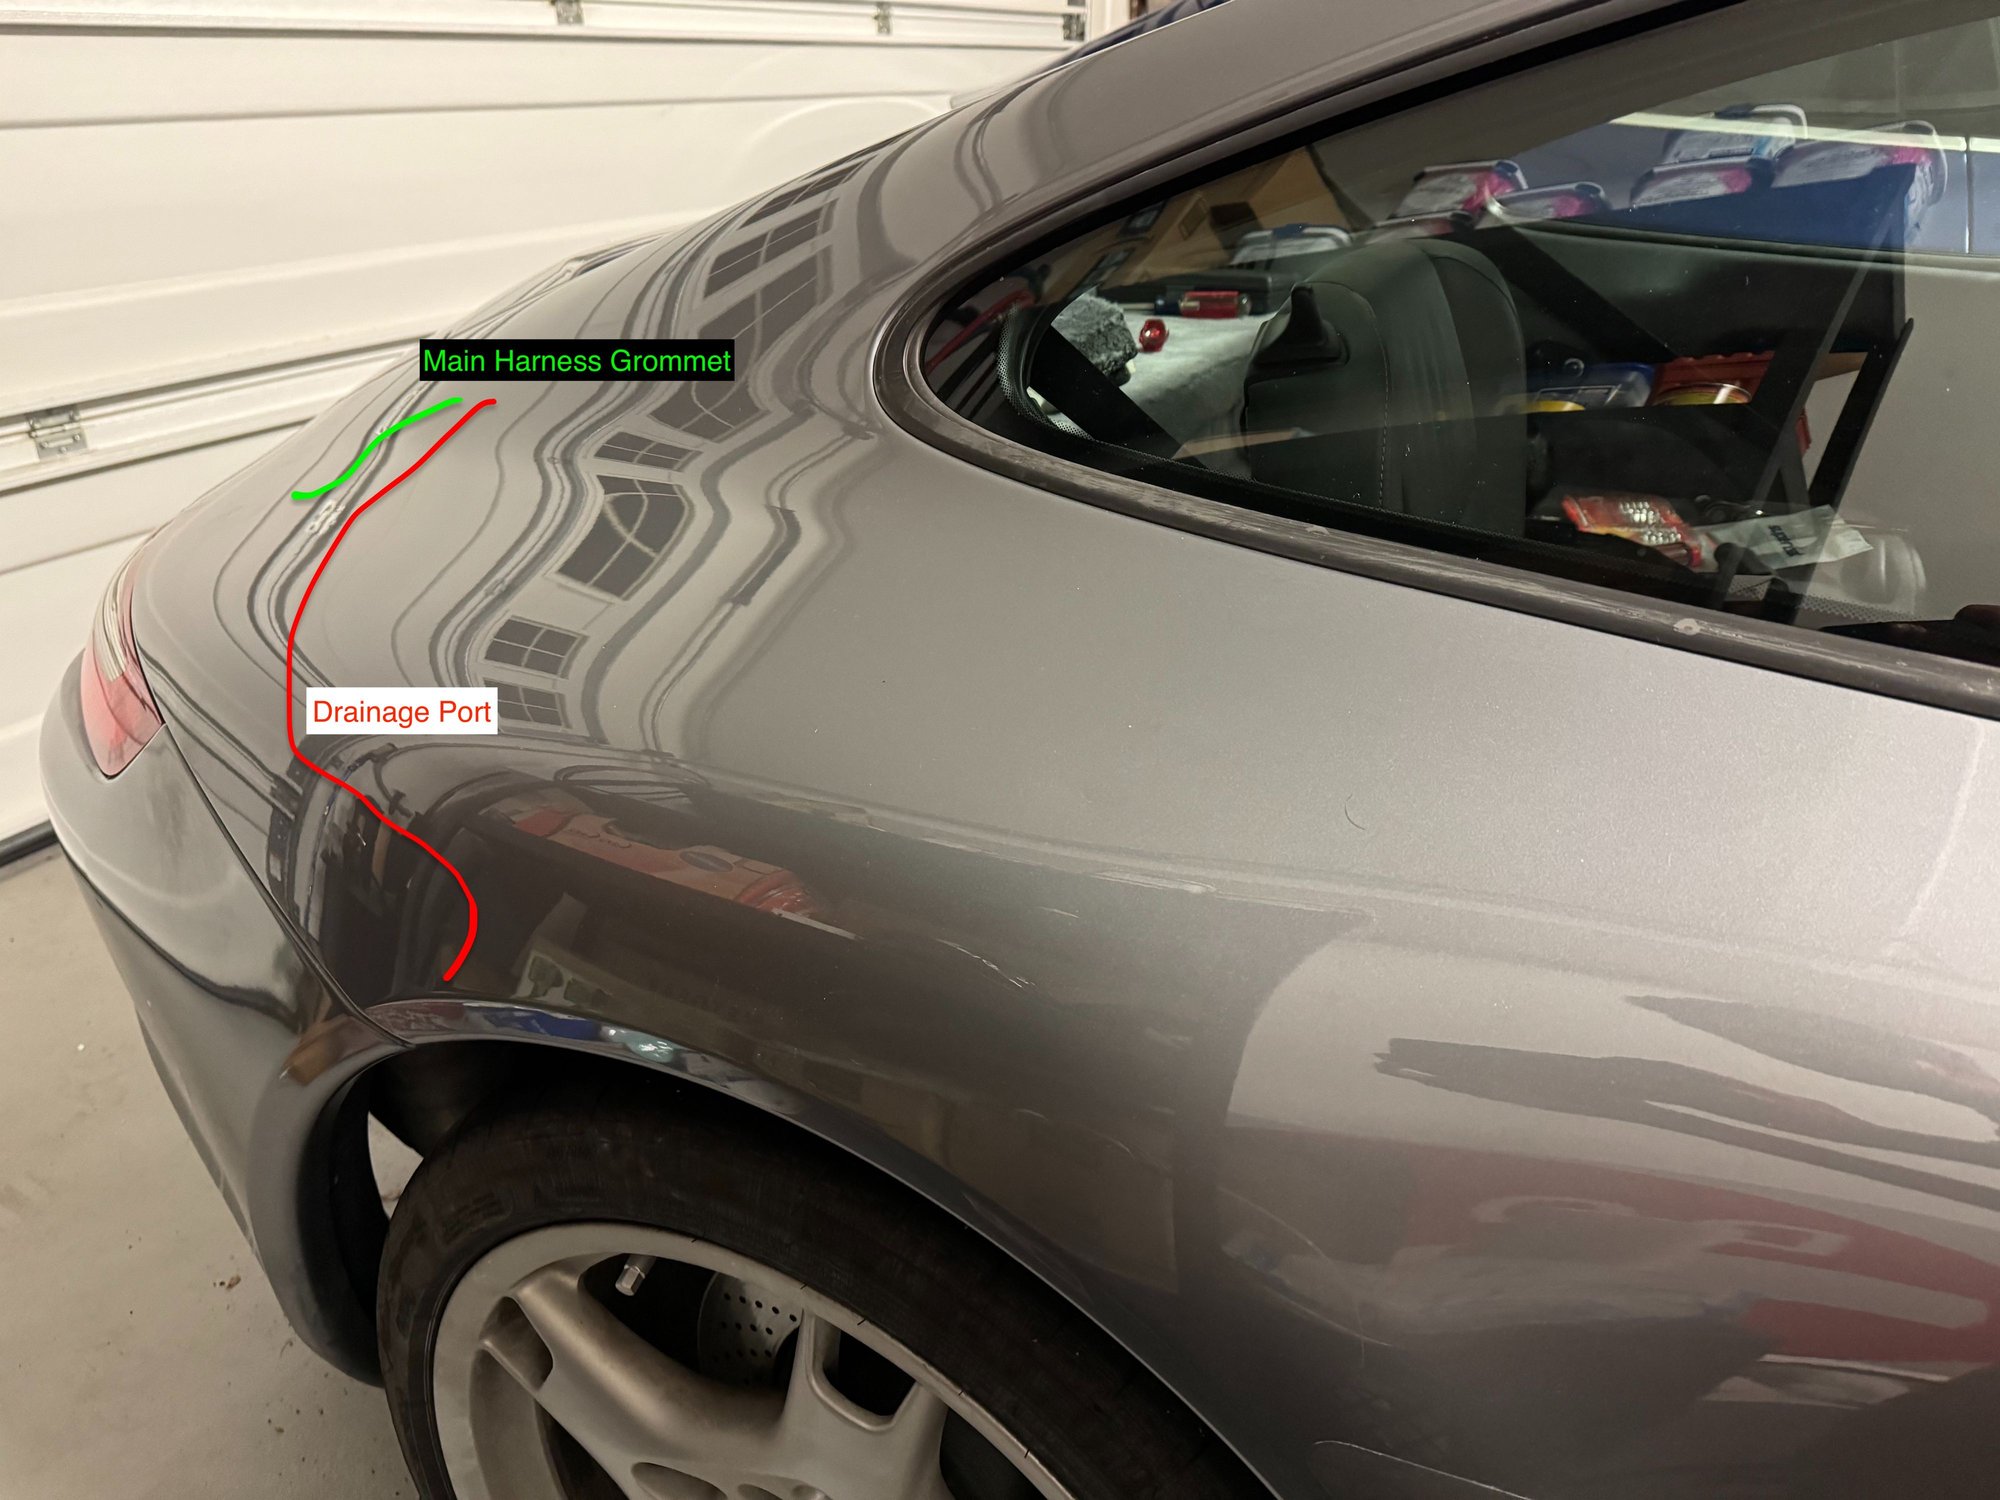
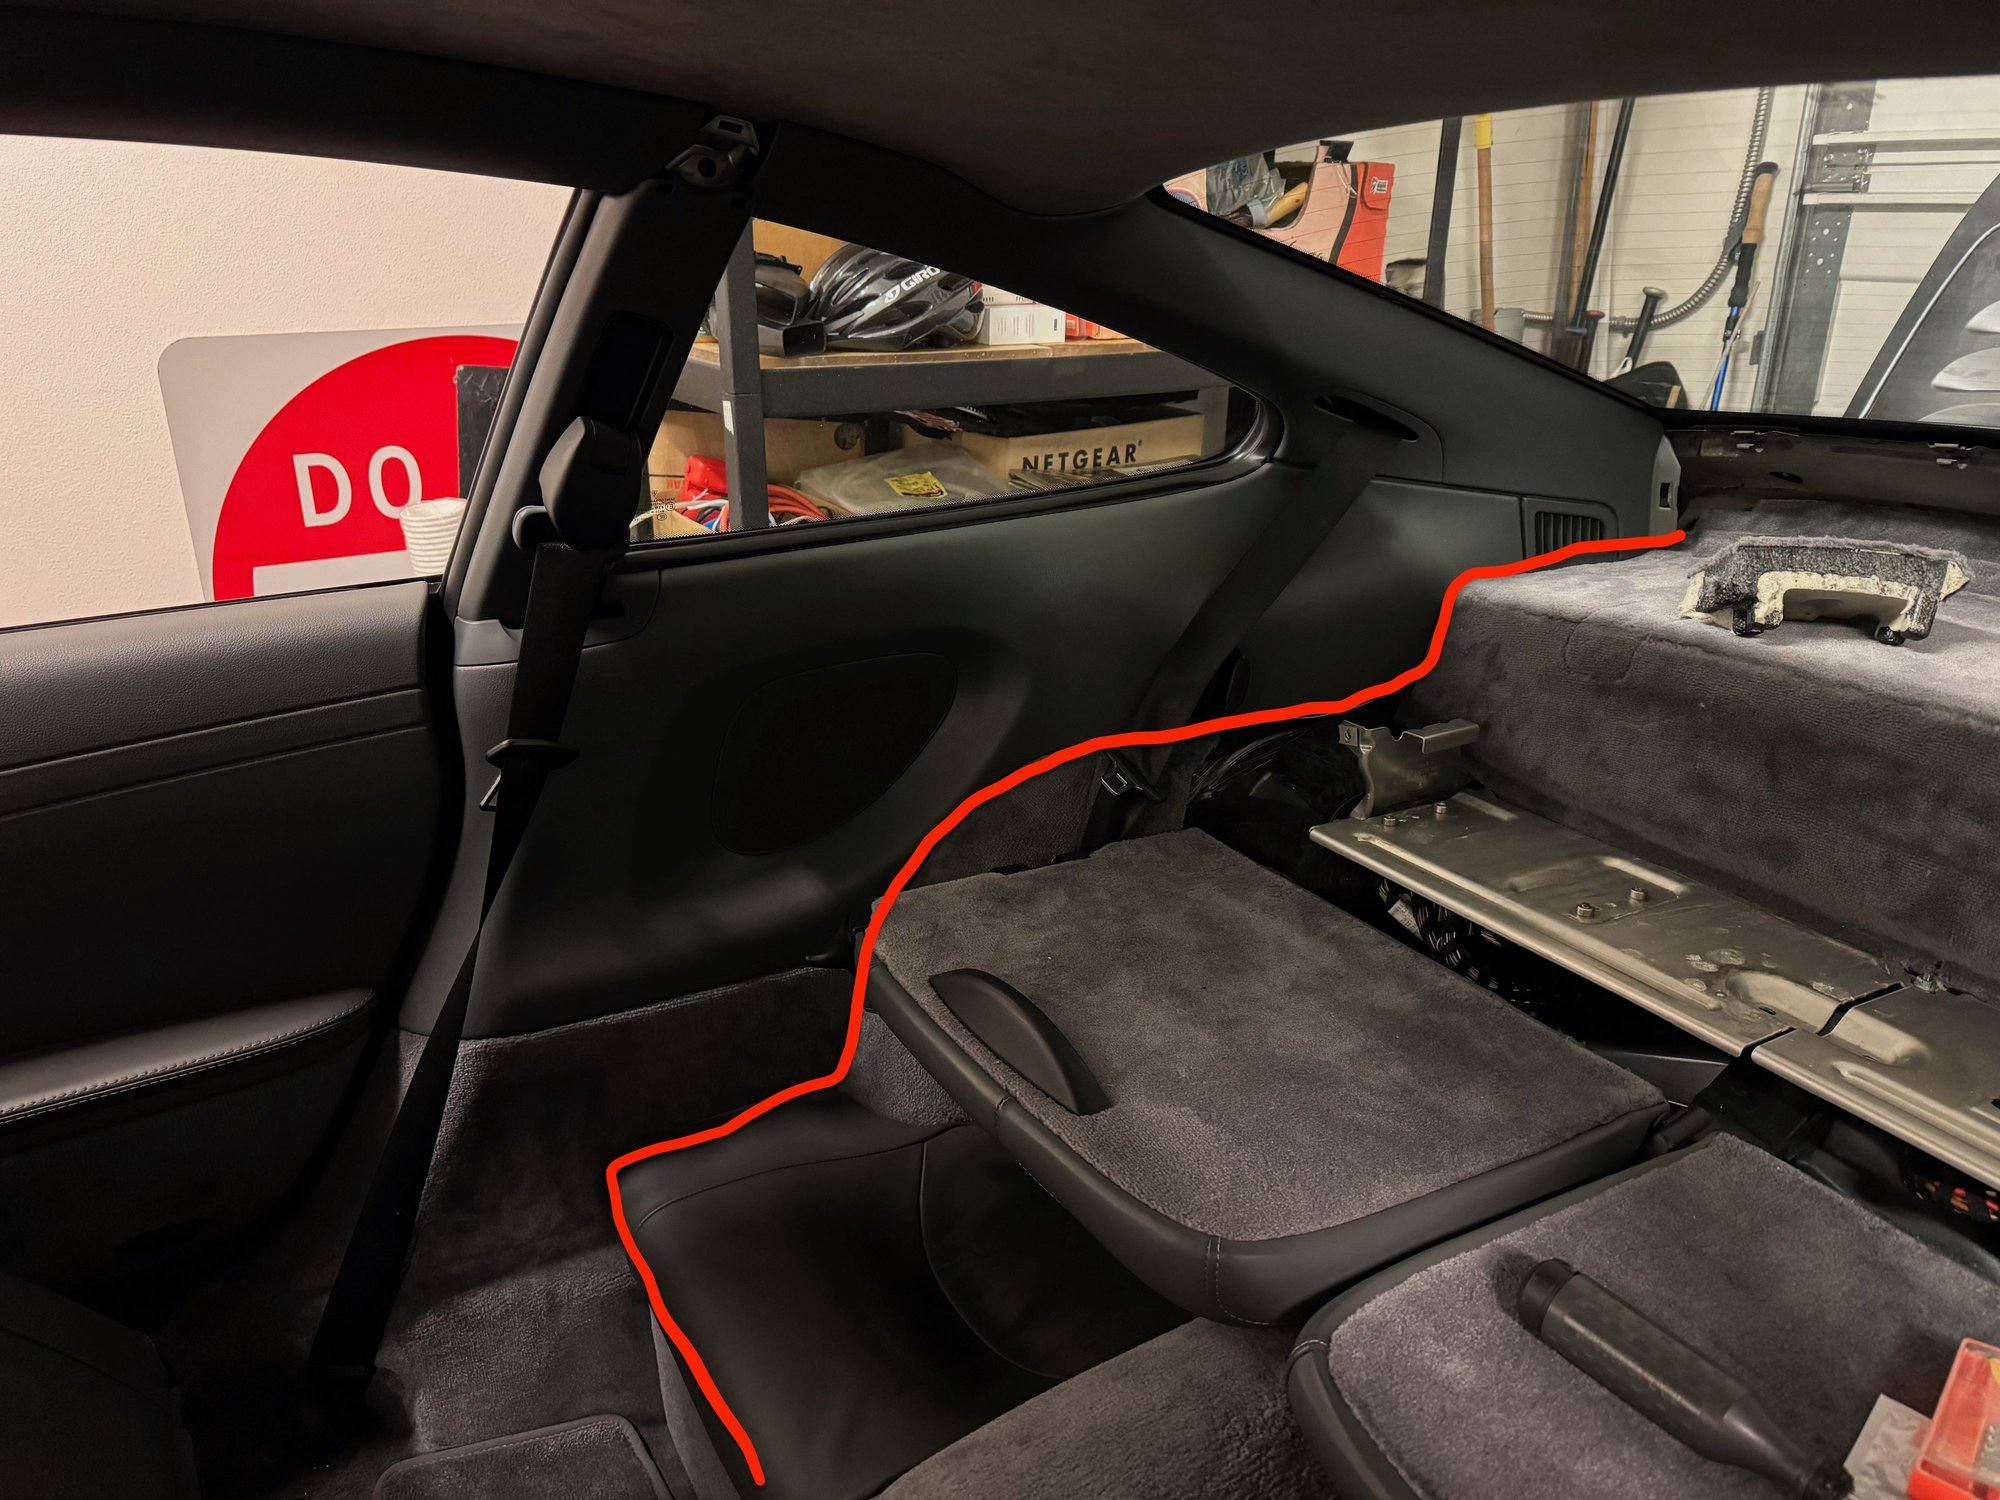
Personally this was the hardest part as I wanted to find any other way than punching a hole through the main wire harness grommet. The method I ended up with is personally better but objectively questionable (oh well), instead of punching a hole through the grommet, I used the sunroof drainage pipe that goes behind the C-pillar and towards the rear right wheel. Whichever method you choose to do you are likely going to have to remove the rear carpeted piece right underneath the glass. I reached under the piece on the right side making my way up to the side and towards the top of the side, go as far up as you can before you start pulling at the piece. You are likely not going to break anything since the plastic pieces go straight and the S-clips that hold it are made out of metal but be cautious and don't force anything too hard. Once you have one side removed go along the back and pull to undo the clips and lift up as you pull out. This should remove the entire piece which should give you access to either the harness grommet (slide your hand slightly down and to the left and then straight forward) or the drainage hole (follow the corrugated pipe down).
Section 4: Routing Wires into Taillight Area
I decided to route my wires through the drainage hole so this section will go through the steps I took to complete that.
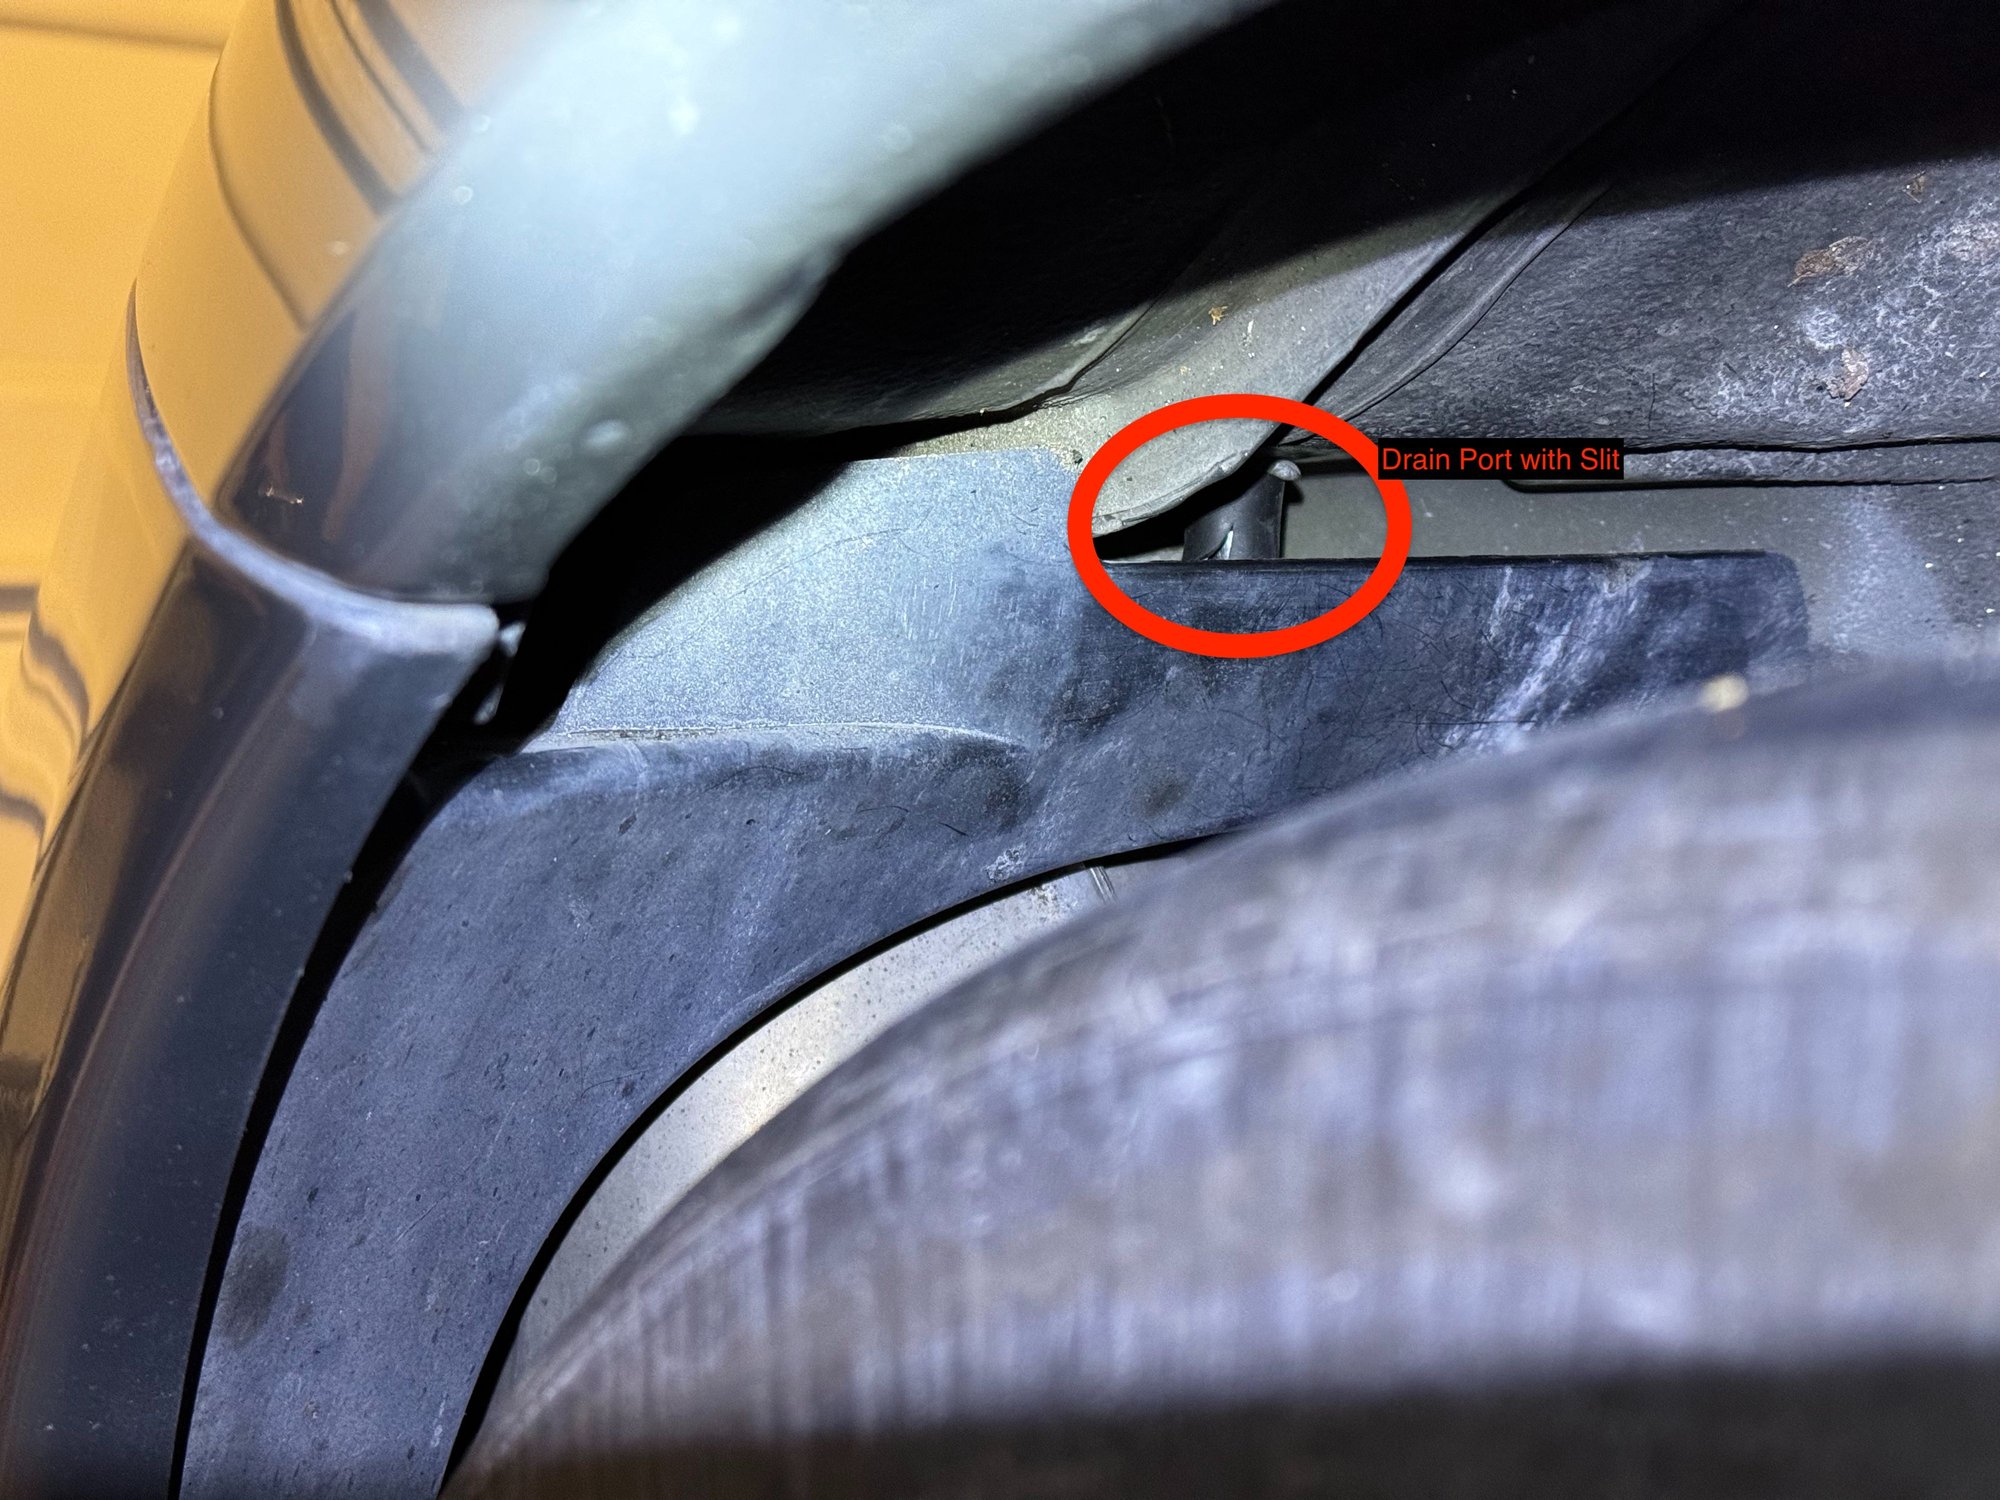
Temporarily remove the drainage pipe from the rubber gasket at the bottom and remove the rubber gasket to make some cuts. I would recommend cutting the tip to make the hole a little bigger, not only will this allow for wires to pass through but also prevent clogs from small debris passing through the hole. Optionally you can cut a slit in the side of the rubber gasket so the wires will be somewhat out of the way of the drainage pipe. Once you are done with this replace the gasket back into the hole and start feeding your RCA and optional power cable through this hole. Once through the hole, have a friend or yourself slowly pull the cable while feeding the cable from the inside making sure it does not feel like the cable is getting caught or snagging on anything. You can pull all of this cable towards the tire and in front of the shield. Remember to replace the corrugated drainage pipe that was removed back into the rubber gasket it was removed from.
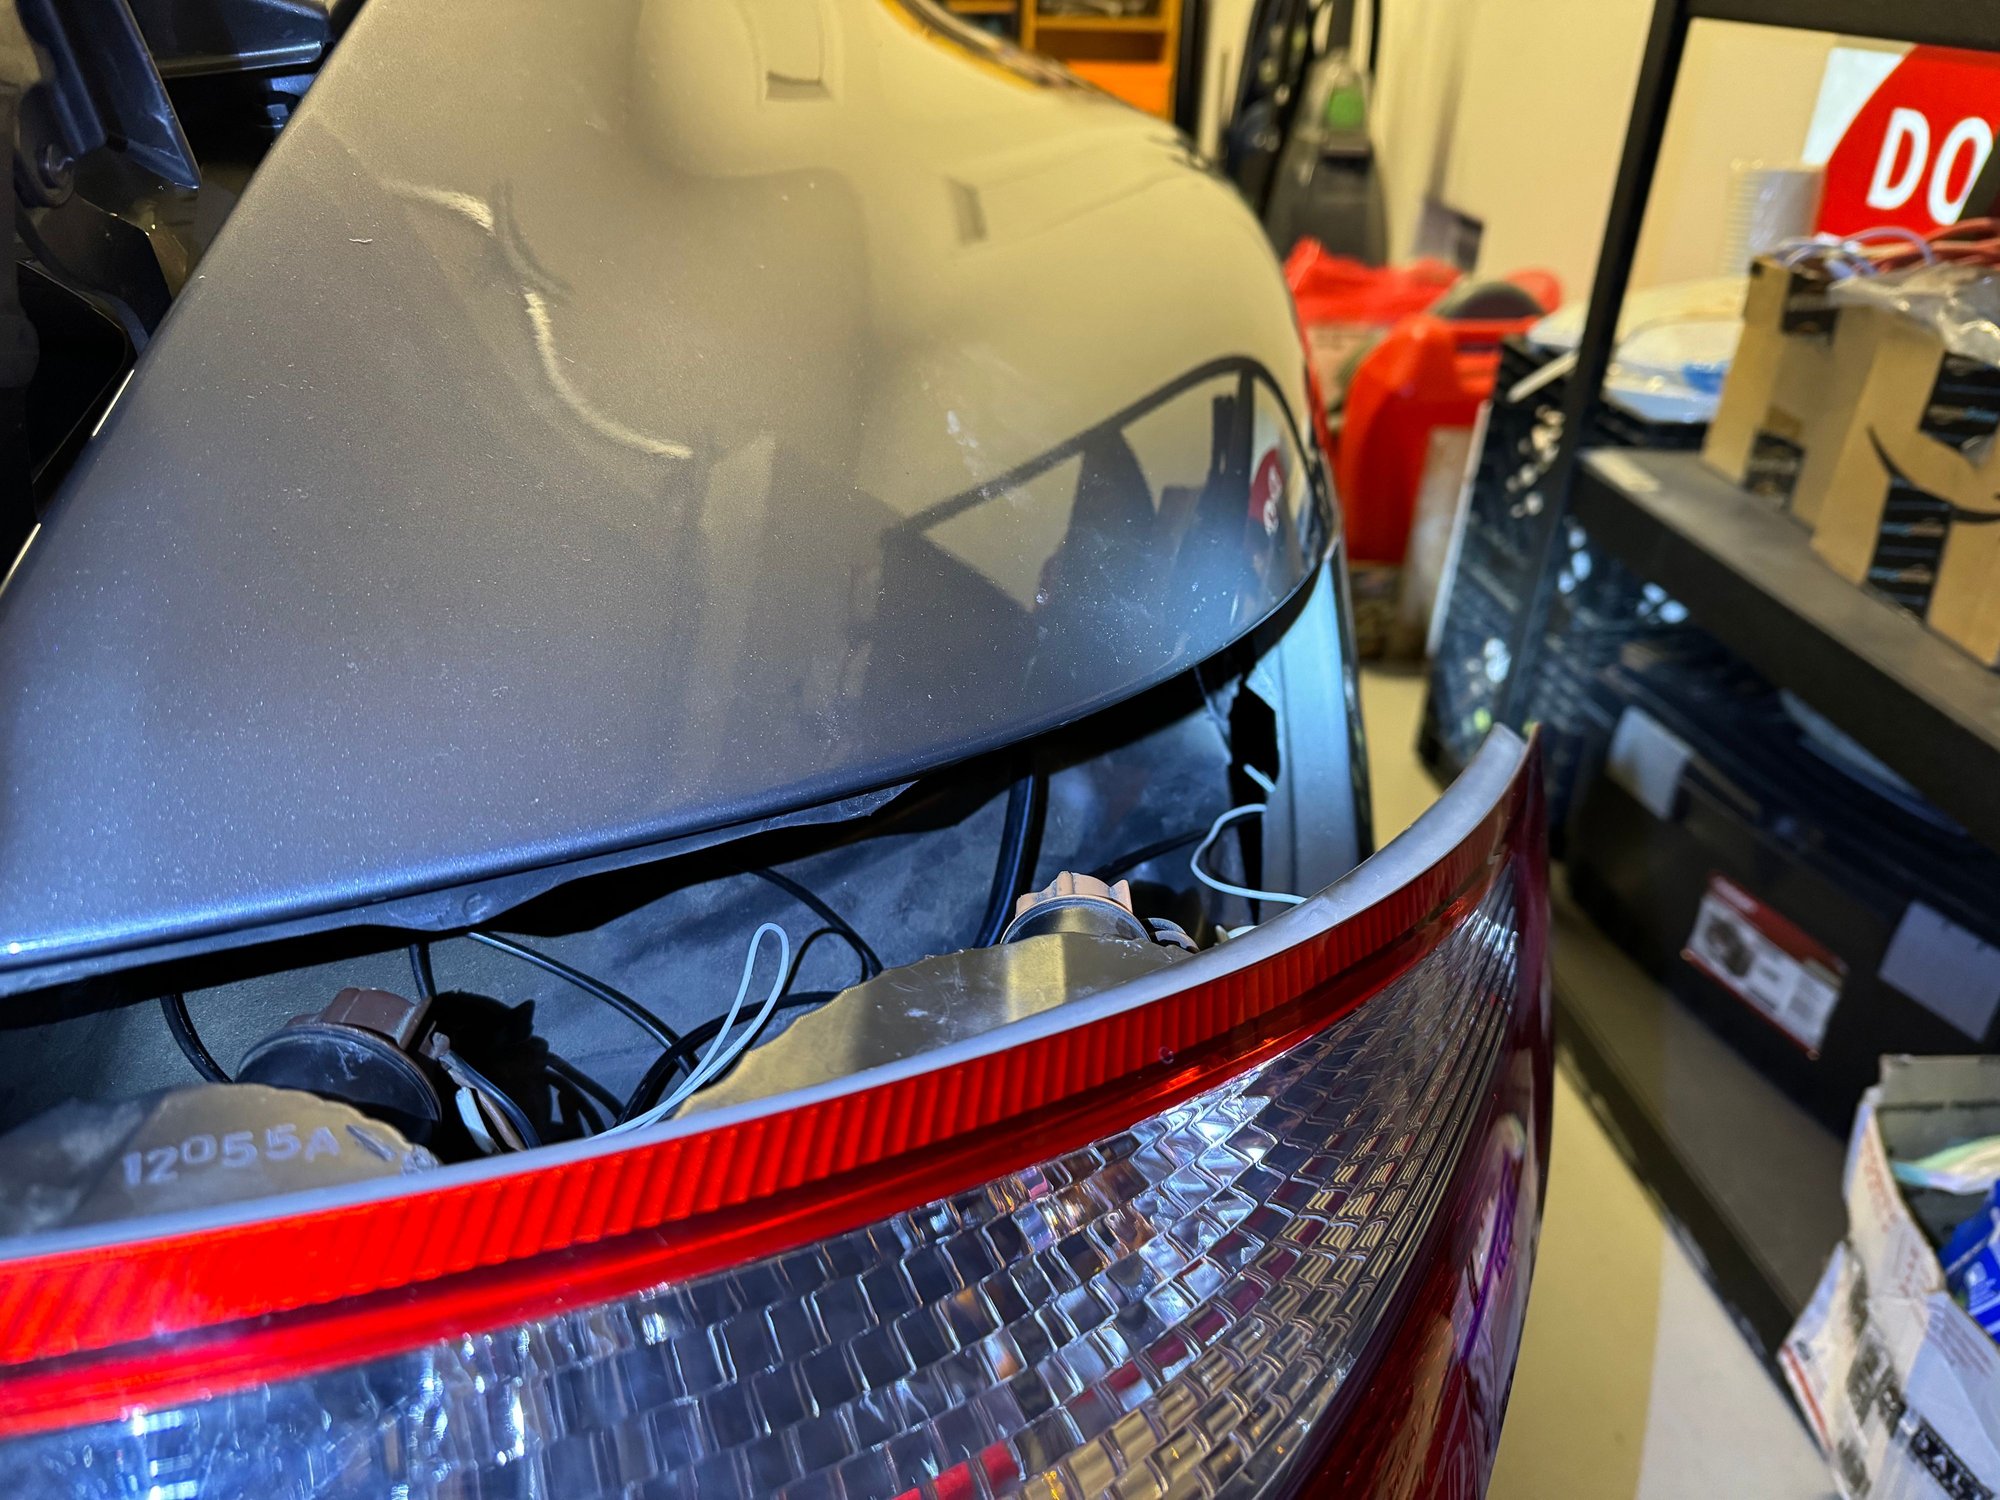
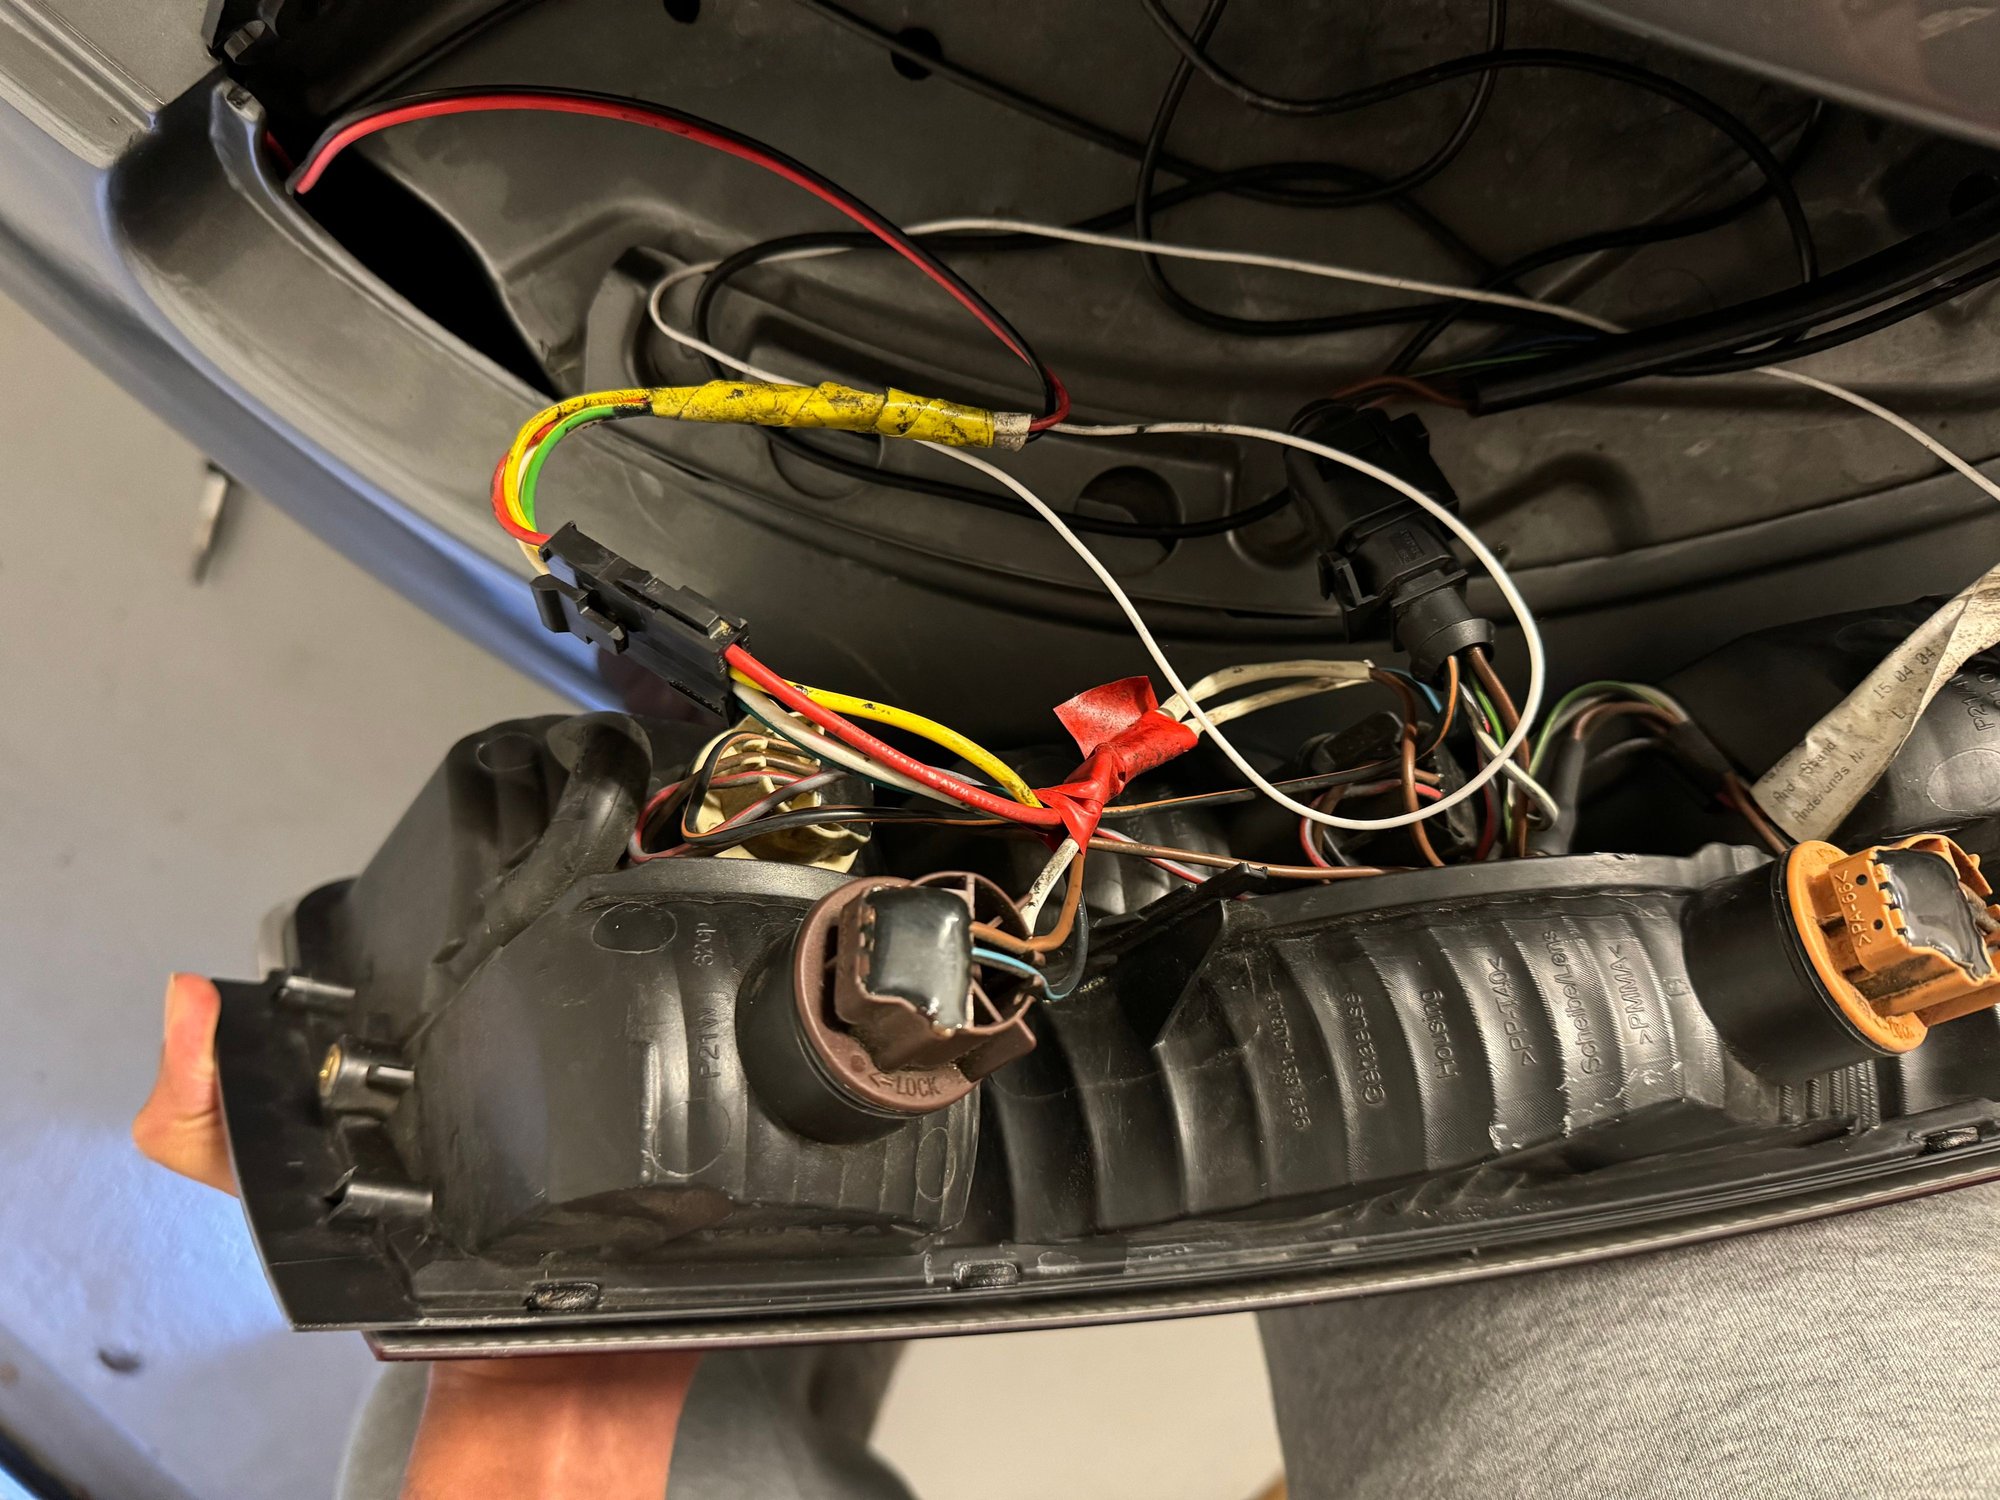
Next step is to open the trunk and remove the passenger rear taillight. This is held on by one screw, once undone the entire light assembly will slide forward (Do not twist). Undo the wiring harness and set aside the taillight for now. There is a gap between the fender and the taillight housing structure, send a really long zip tie or fish tape wire puller as straight forward as you can and it should peak through into wheel well. Tape the wires pulled from earlier to the wire puller and slowly pull this into the light structure. Make sure all the wire is pulled from the drainage port and that if a slit was made the wires slide into the slit.
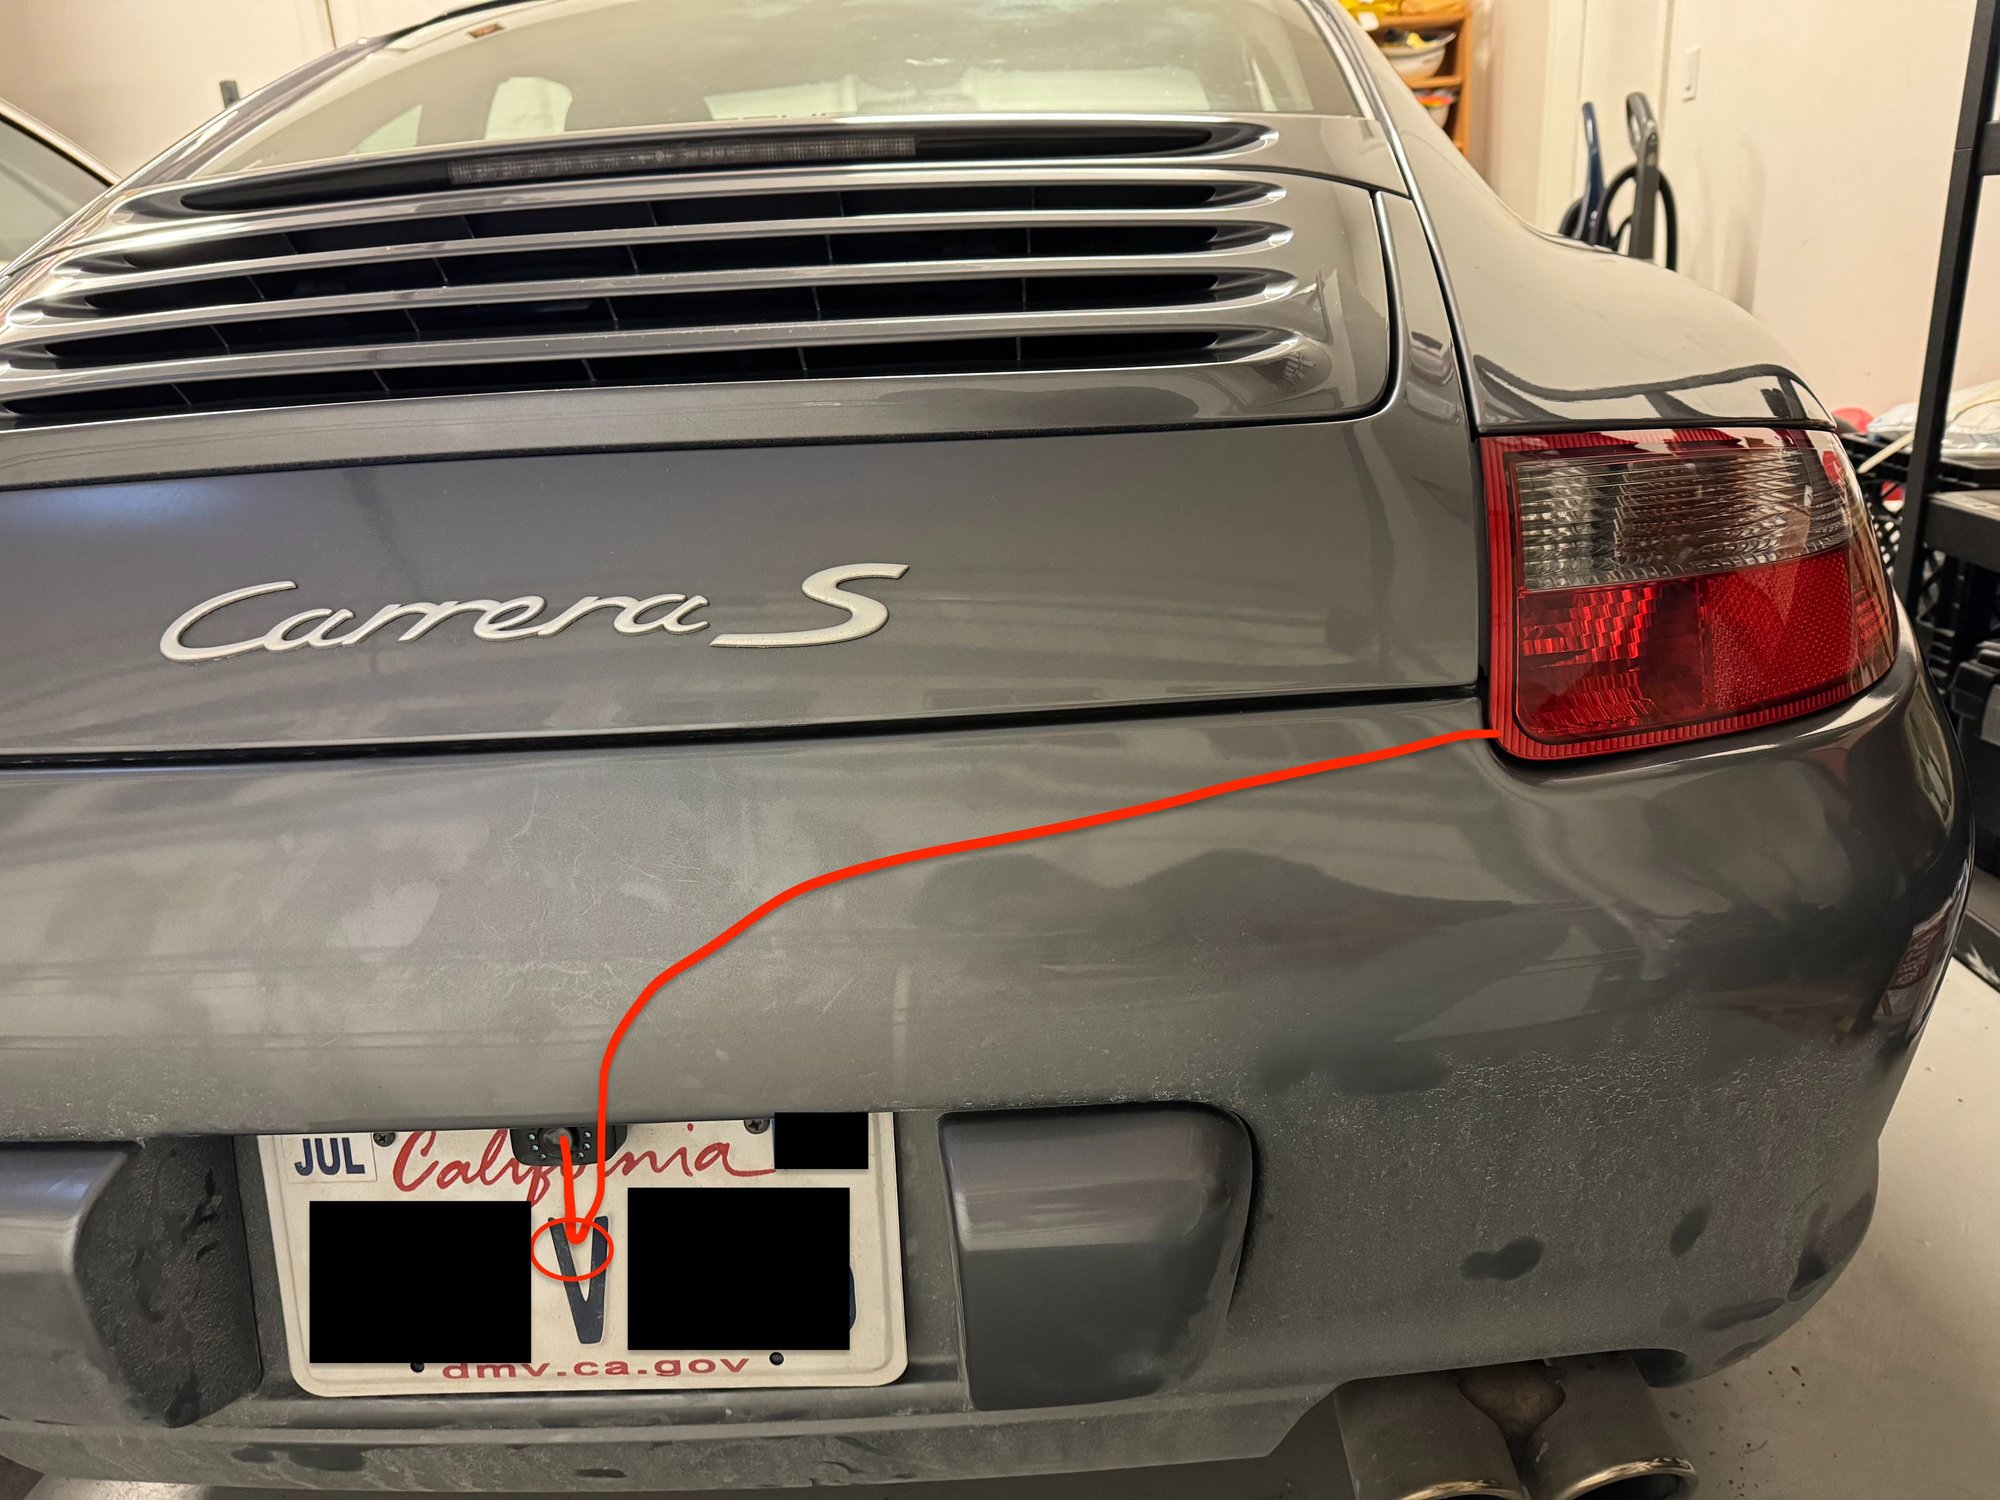
Section 5: Routing Wires from Rear Bumper into Taillight Area
There is a hole that can be used behind your license plate to pull wires from and to here. Using a wire puller send it through an opening in the bottom left side towards the hole in the bumper. You may need to put a finger through the hole in the bumper to reach the wire puller and pull this out of the hole. Depending on the amount and length of your cable on your camera, either send the RCA cable down and then bring the power cable up or bring the power and RCA connector up to the taillight area.
Section 6: Splicing and Powering up Cables
I had a random connector with four wires (only used two) on it that I used so I can disconnect the camera if needed without having to replace everything. You can either cut the reverse trigger wire (blue/black) on the wiring harness or the light assembly. I made my cut on the light assembly and spliced in the new connector. I also spliced into the ground, as for some reason nothing worked when I wasn't using the ground provided by the harness. Once this is done make sure that everything is powering up correctly and that no functionality has been lost.
Section 7: Hiding the Wiring in the Cabin
Optional - Removing Bose Subwoofer (if applicable) and ECU carpet. This is not necessary and I did this step in hopes of finding a different way through the firewall but no luck in that. It did help with hiding the wiring as it gave me much easier access to the side carpeting and making sure nothing was caught. It is very likely you can hide the wires without having to do this, but this is what I did. Follow this guide on carpet removal (may need to use wayback machine for pictures): https://www.sharkwerks.com/tech-arti...rera-s-gt2-gt3
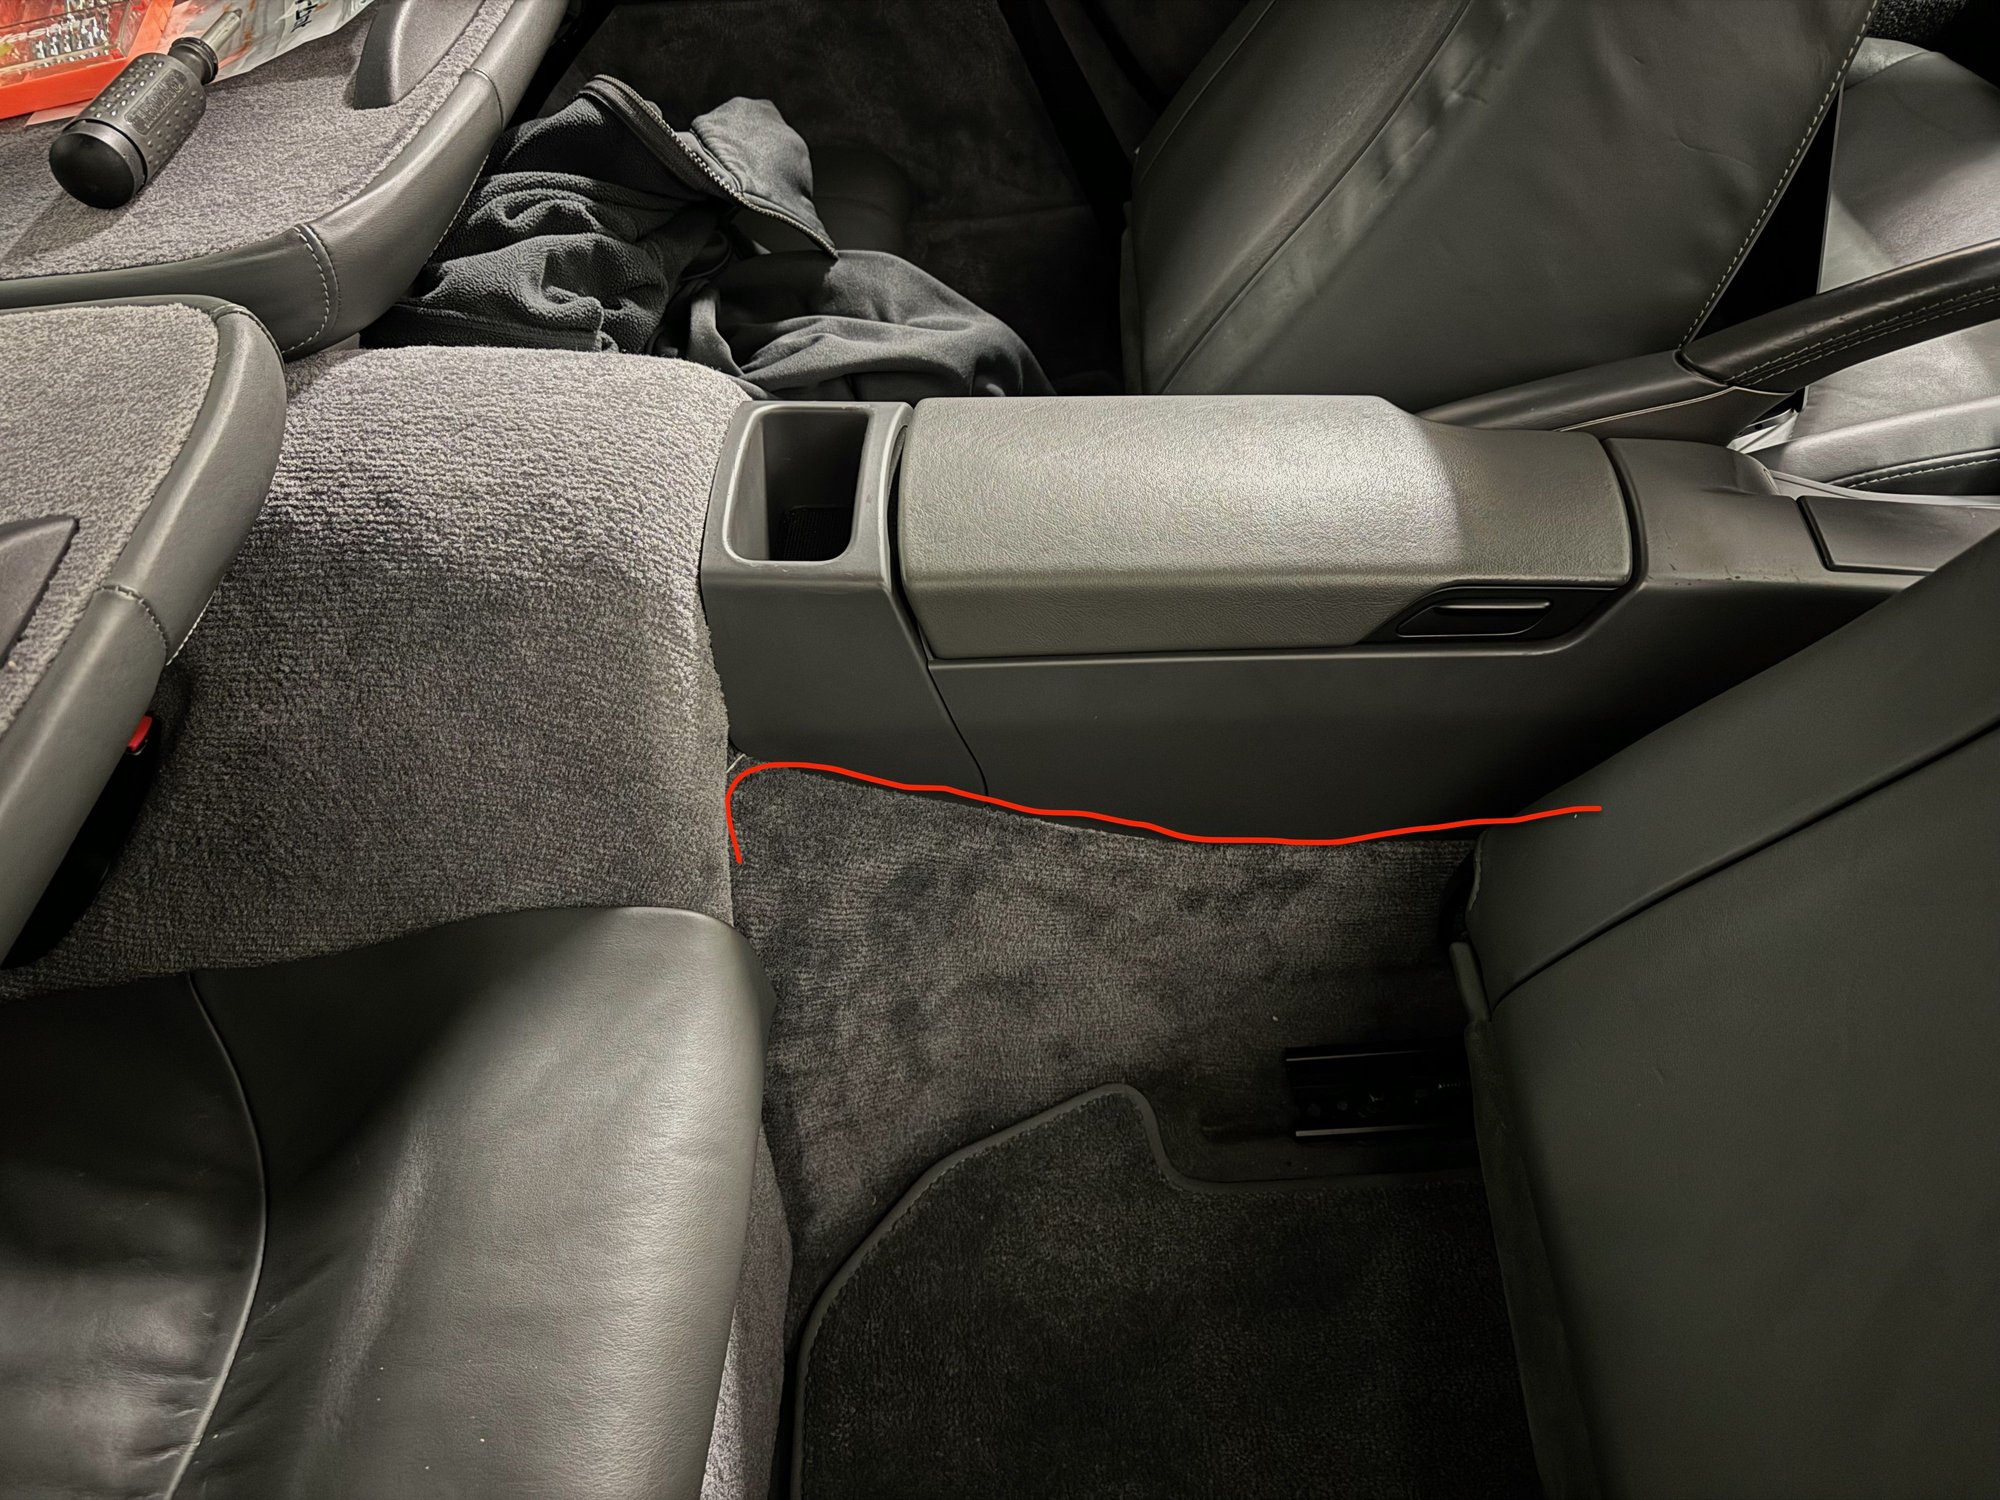
I followed the carpet edge between the plastic and parcel shelf carpet until I went into the open hole from the removal of the carpet. I then followed the seam between the leather and carpet all the way until I was at seat level. At this point I decided to run my wire underneath the seat ledge, but if you want you can make it cleaner by cutting under the seat ledge briefly, then following the seam to the floor then across the seat and then up towards the central tunnel. Once near the seat ledge underneath the central tunnel, follow the seam up and tuck the wire underneath the center console plastic. The edge of this can be slightly raised to tuck the wires in and hide from view. Follow this piece all the way to the front and by the 12V socket in the passenger footwell. Route the wires behind the plastic piece holding the central infotainment center while reaching in through where the PCCM+ would be and grabbing the wire up. At this point you can plug in your RCA and reverse trigger wire into the PCCM+ and do a test run to see if all systems work.
Section 8: Clean Up and Putting Everything Back
Complete necessary steps in reverse to put back any trim or carpeting removed for a put together look and you are done!
Last edited by akolluru; 02-06-2024 at 03:45 AM.
Reason: Aesthetics
Hello,
thanks a lot for this detailed post! Really appreciated.
I am in the stage of trying to have the cable going through the grummet behind the right tail rear light.
but I cannot see how to go through the little black plastic square behind the grummet and which seems to be the piece separating the interior (second picture from the inside).
How to drill this, if this is the way to go? Any recommendation?


 02-06-2024 | 03:42 AM