When you click on links to various merchants on this site and make a purchase, this can result in this site earning a commission. Affiliate programs and affiliations include, but are not limited to, the eBay Partner Network.
Interesting. So far I've set my QJ like demonstrated in their videos and instructions (car moving to the front).
But after reading this, I've done some Google searches and it seems like many are using it backwards with their 911s.
What is the advantage? Is it safer to use? More stable?
I mean, now that I look at my picture, it's kind of obvious why that would make sense! 🤯
It's all about leverage. By putting the label to the back on our rear engined cars, you're using the mechanical advantage of the weight being applied towards the locks. Plus, the hydraulics are working directly towards the heaviest part.
I normally jack them the "proper way" label to the front although as mentioned I do agree with the logic being a rear engine car. Either way is no big deal and poses no issue regardless .
I tried casters on mine for awhile and removed them after awhile as I found that they are more of a headache that they are worth as the castors hang up on floor debris or slightly on the jack frame. I always keep a few pieces of carboard around which I place underneath the jacks which makes them easier to slide underneath the car prior to lifting , besides they aren't that heavy or difficult to move around. The prices appear to have gone up a couple of hundred bucks on them since I got mine 2yrs ago.
Last edited by rileyracing1; 12-06-2022 at 12:13 PM.
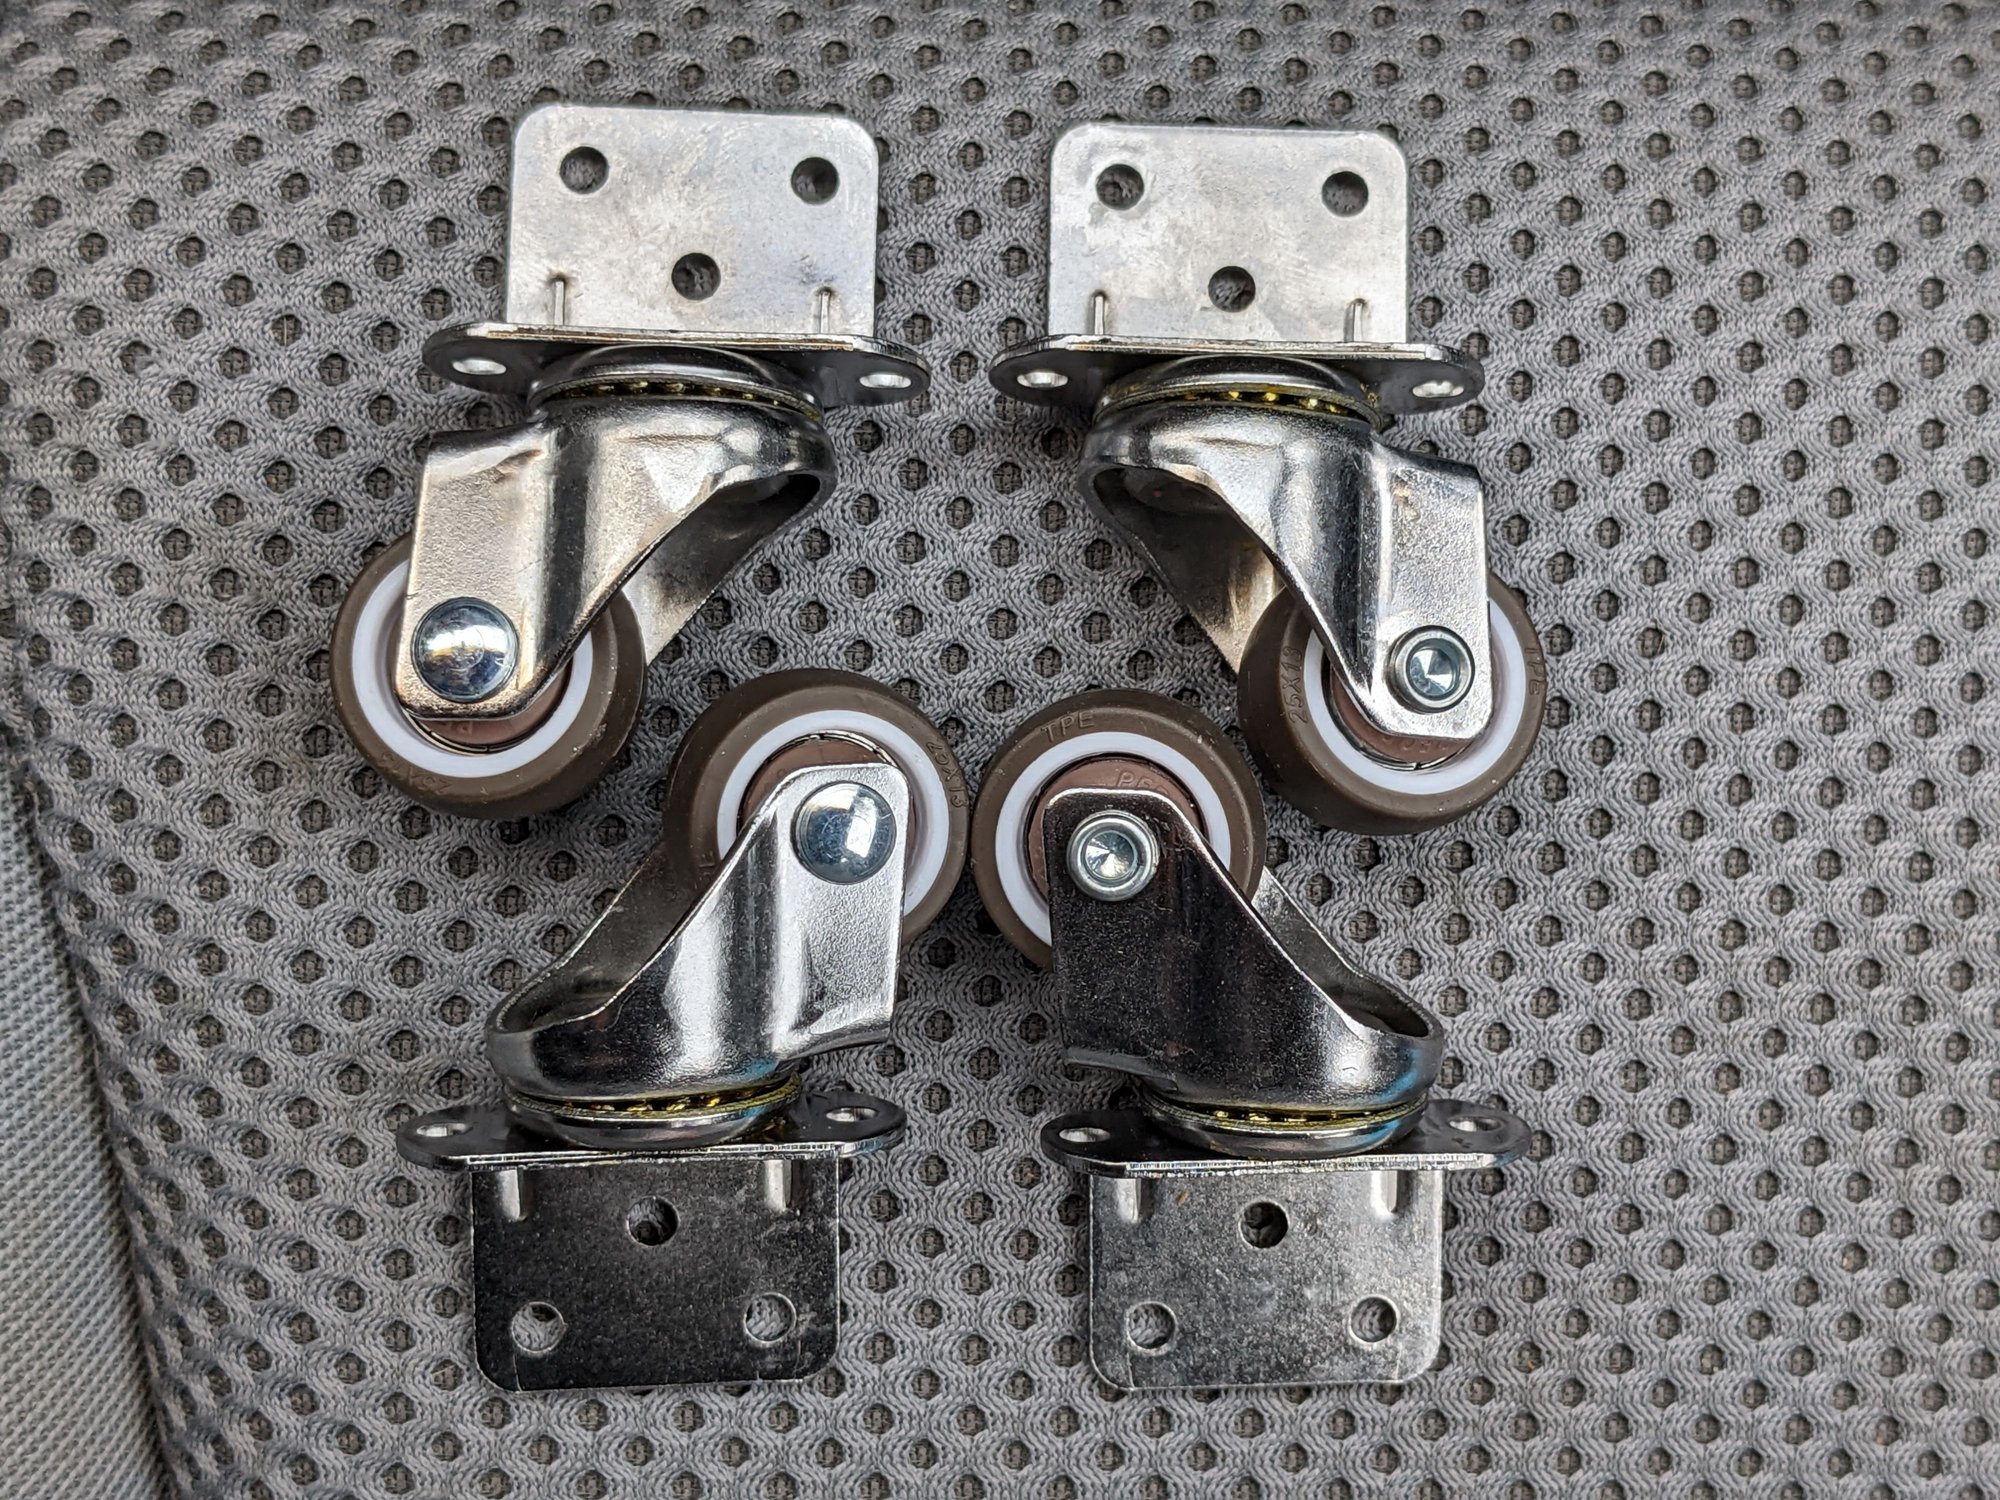
Thanks! If you don't mind, I'd be interested to see how you used those. I was planning to use 5/8" roller bearings like these: HF 5/8" Roller Bearings
I tried those ball roller bearings and did not like them. Much prefer smooth rubber swiveling wheels; the trick is to find small enough so they swivel without interference. In a few days I will send you pics of my setup.
I have the 7000 version and the jack fits under my 09 CS2 without a problem, and I use the standard rubber pucks that came with the jack to lift at the car's jack points. As for jack orientation, since almost all the work I do on the car is in the rear (plugs, mufflers, etc.) I've always had the hose connections toward the front of the car, that way the hoses are out of the way. I'll leave the leverage issue regarding the half-way stop for others who paid more attention in geometry class than I did. Cheers Socks
I tried those ball roller bearings and did not like them. Much prefer smooth rubber swiveling wheels; the trick is to find small enough so they swivel without interference. In a few days I will send you pics of my setup.
Here are pics of my setup. The roller bearings are
. They are mounted with the longer side of the mounting base along the bar to minimize intrusion. The pics show the unit hang on the wall (with the QJ roller wheels on the ground. The top rollers are about 9.5" from the top and the lower ones about 7" from the bottom. They do not interfere with the other QJ pieces.
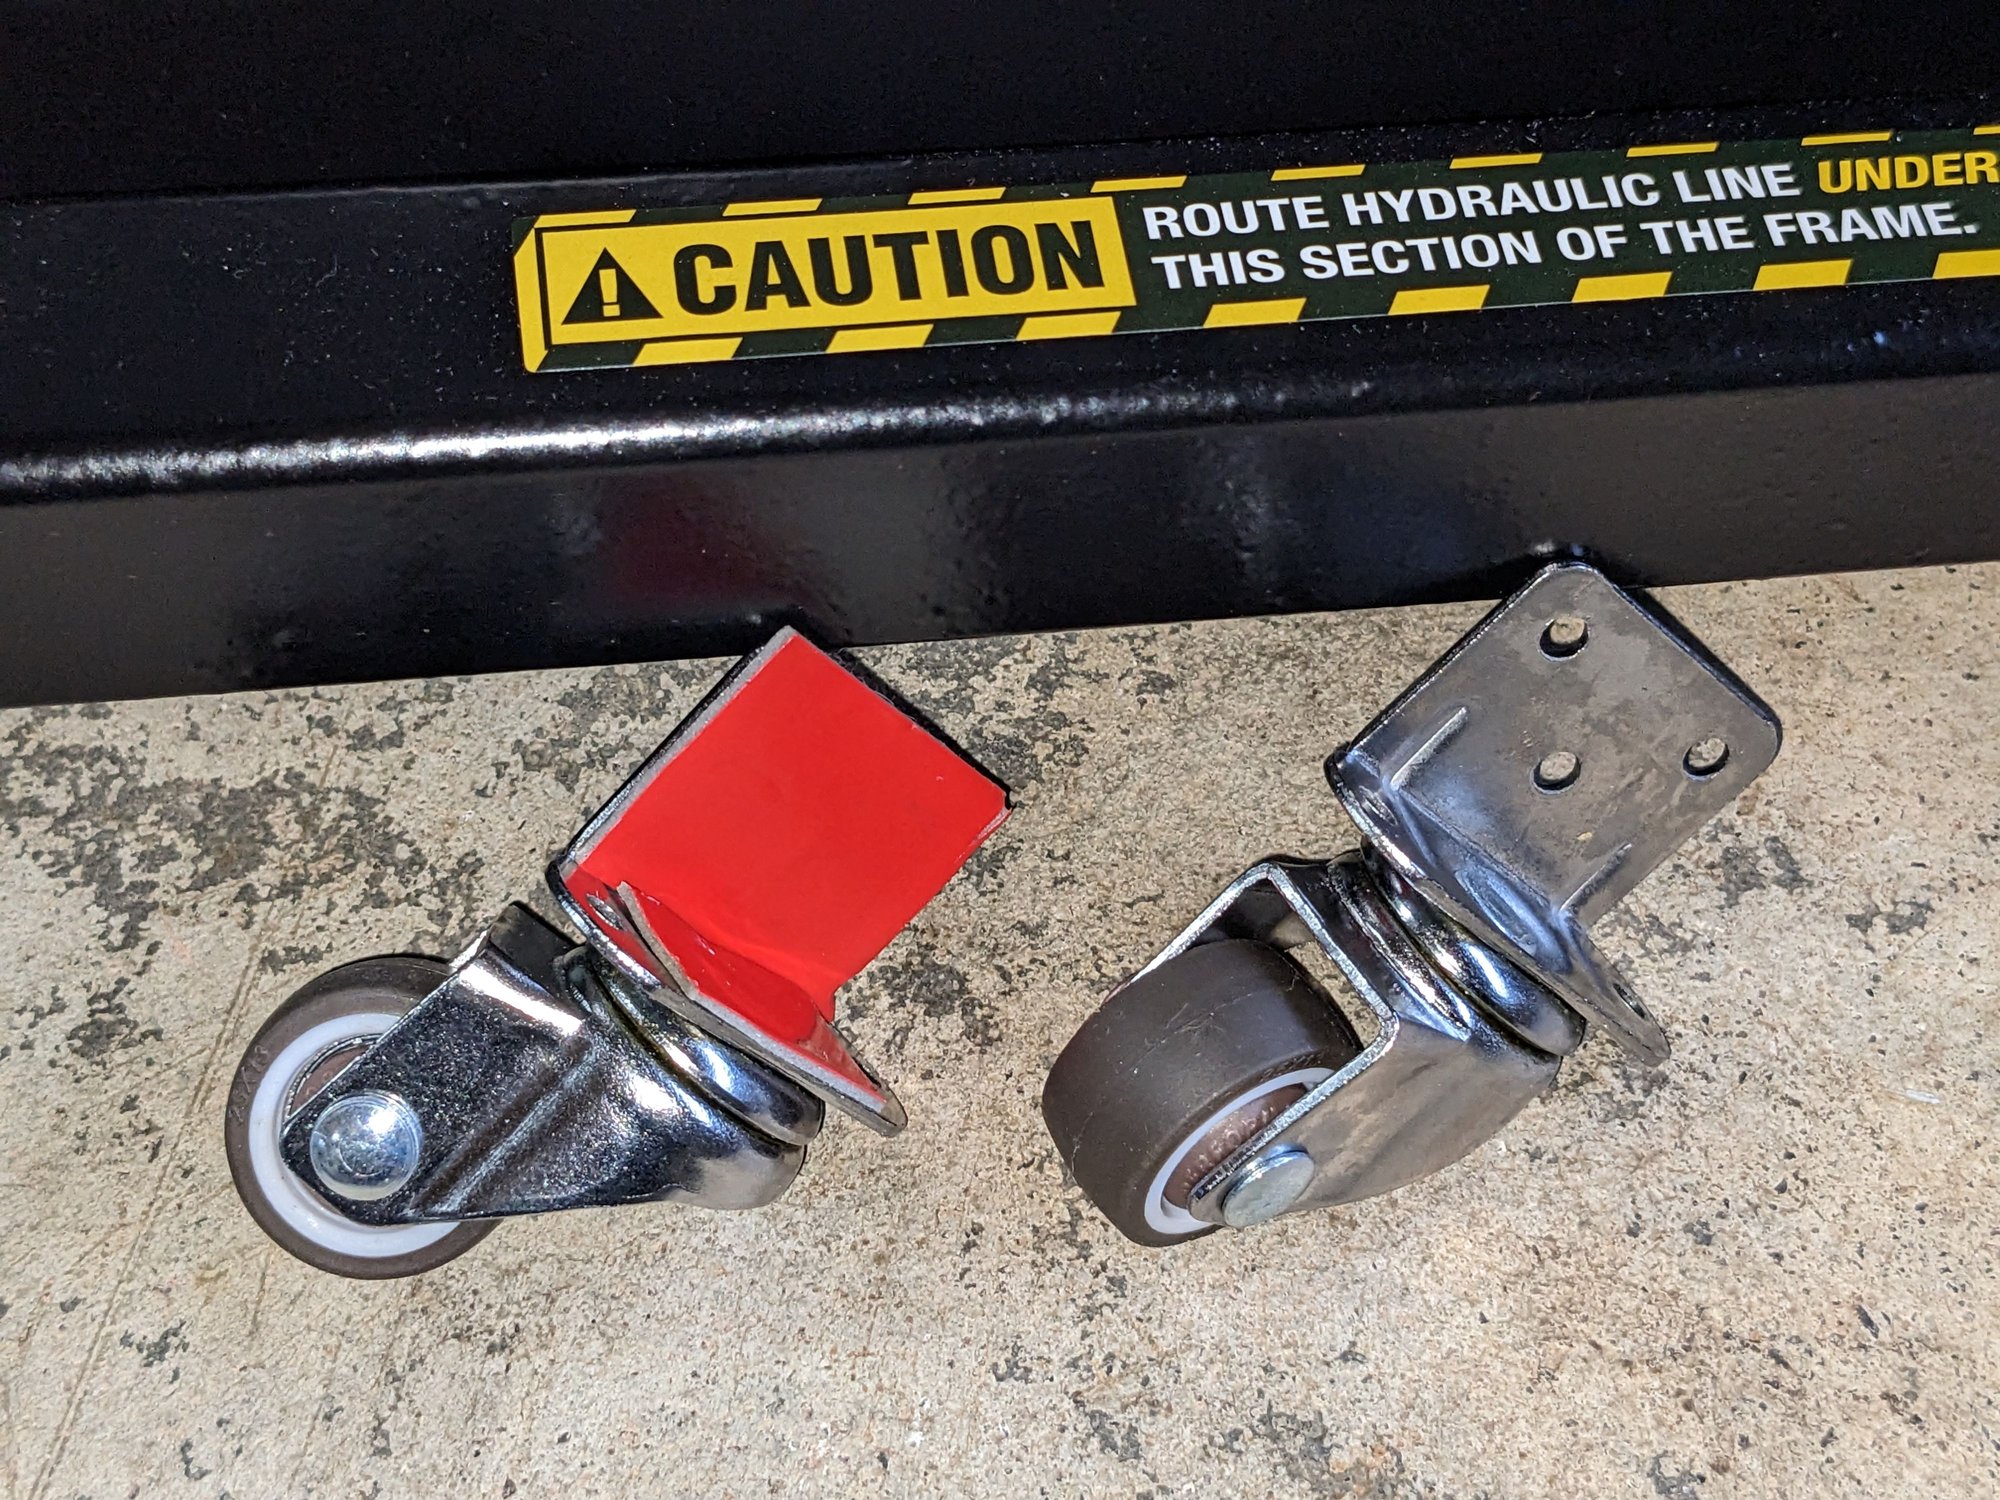
Thank you for the pics @ADias ! While I was waiting, I purchased similar casters with different brackets. My concern was the wheel hitting the inner frame when trying to slide it sideways. With this bracket, it'll move the wheel slightly outboard. I'll use 3M double sided tape on both faces and finish with zip ties. That should add another mm of clearance in addition to being offset.
Thank you for the placement measurements as well. Do you know how far your casters raise the QuickJacks off the floor in those positions?
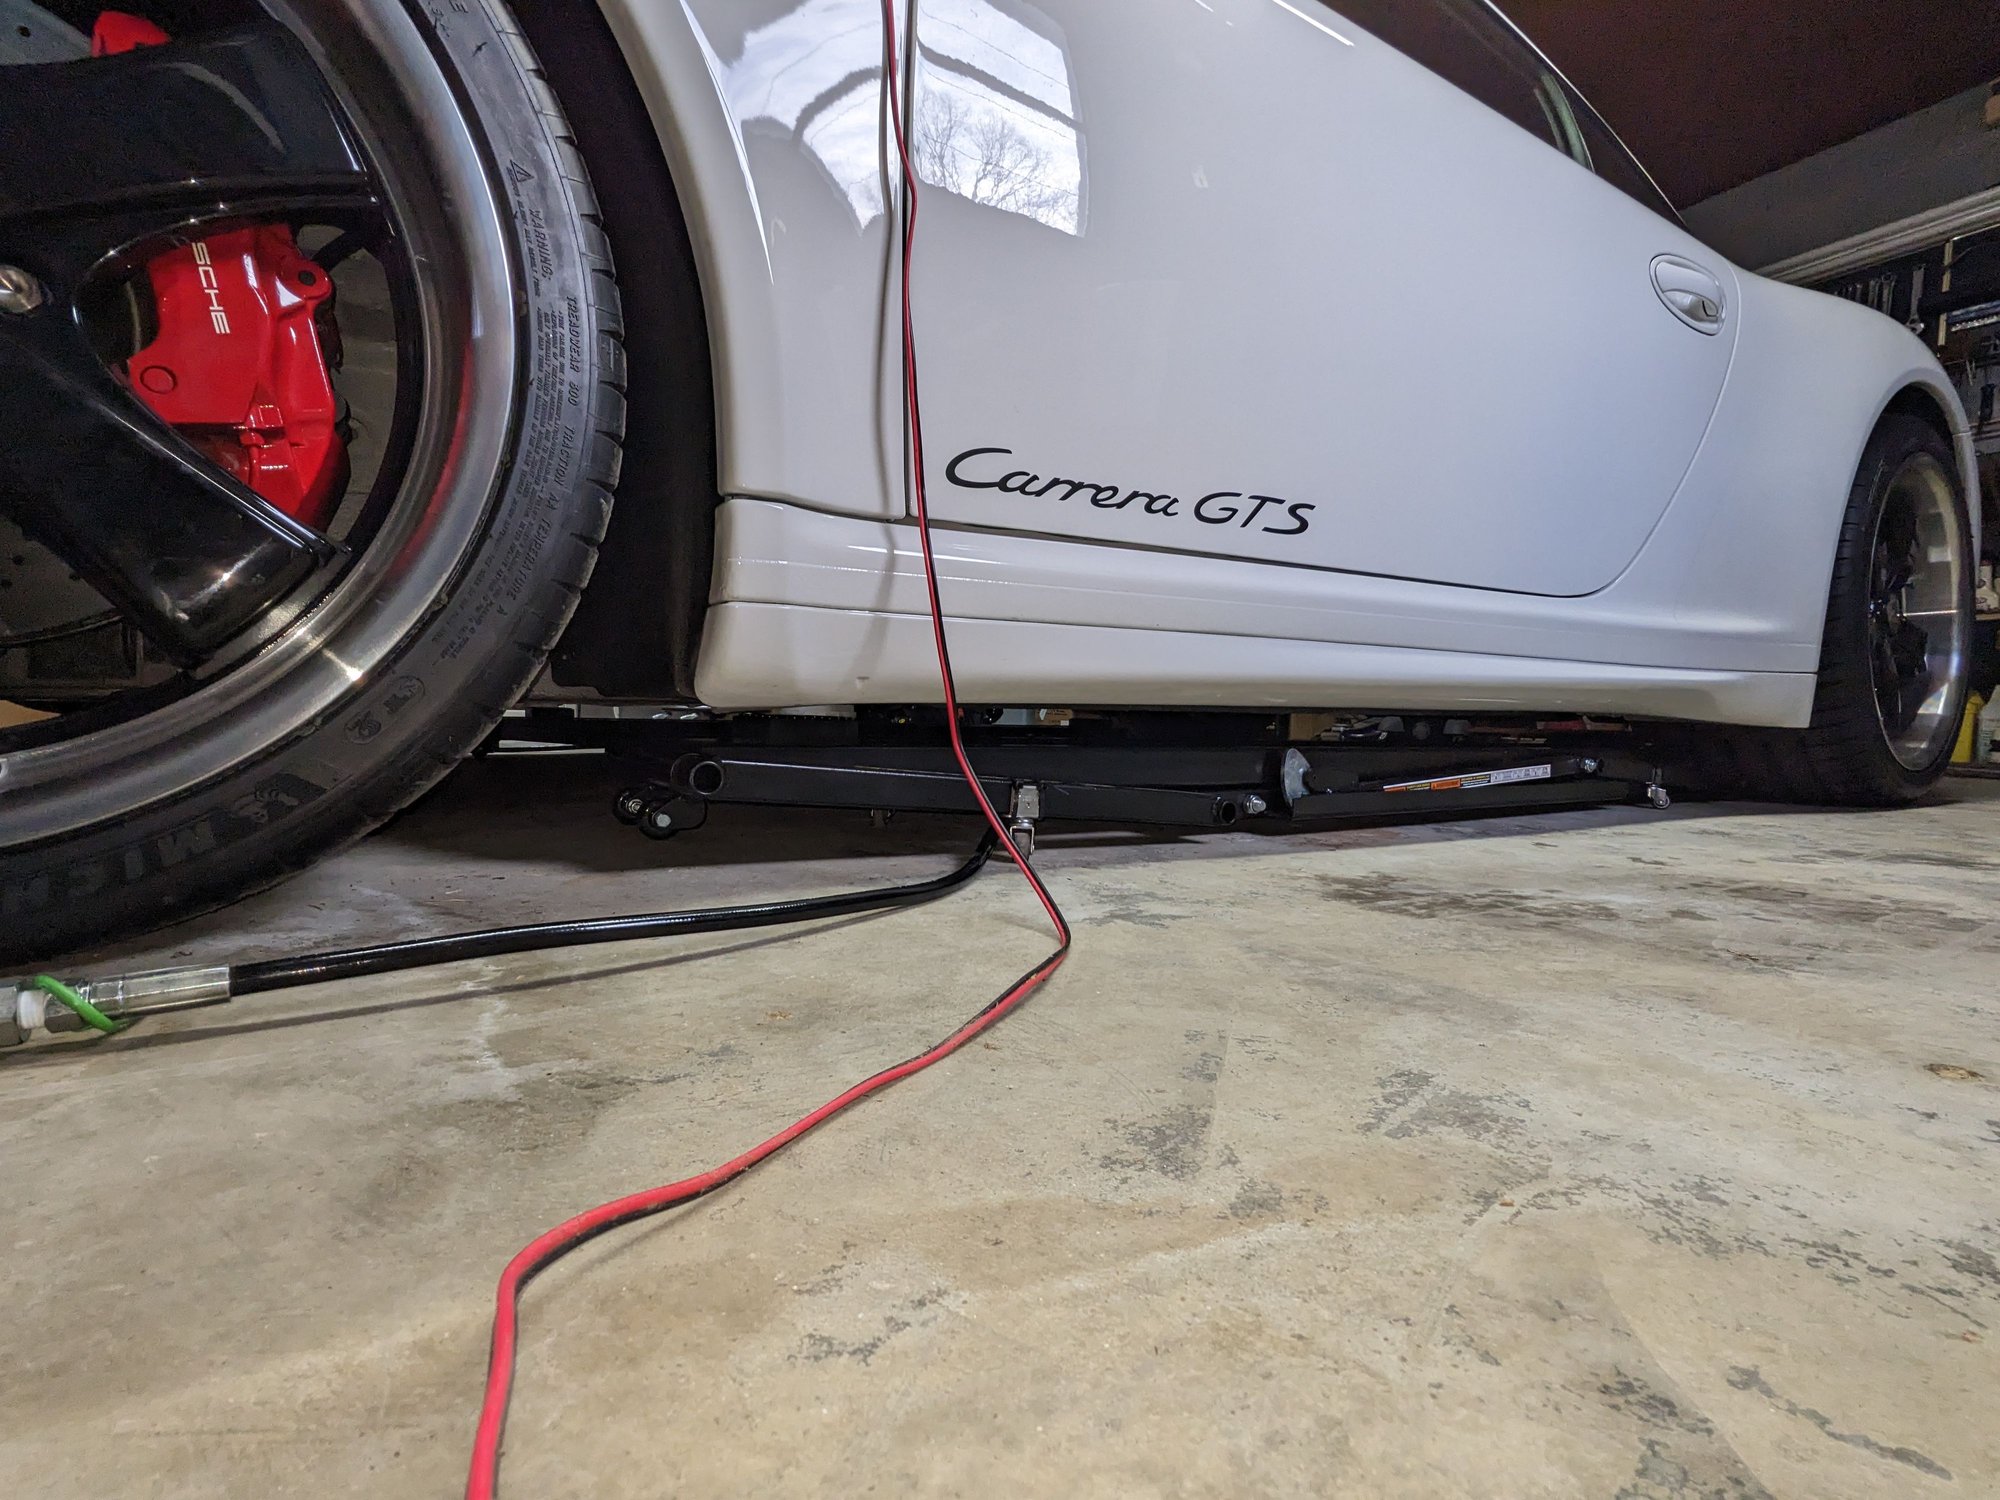
I got my QuickJacks assembled today and did the first three lifts to bleed the system. They were very smooth and even compared to what I've seen in other videos. Then I went to loosen the bleed screw and realized I left my metric Allens at home... So tomorrow, I'll install the casters after I finish bleeding the system. Thankfully, no leak so far!
Thank you for the pics @ADias ! While I was waiting, I purchased similar casters with different brackets. My concern was the wheel hitting the inner frame when trying to slide it sideways. With this bracket, it'll move the wheel slightly outboard. I'll use 3M double sided tape on both faces and finish with zip ties. That should add another mm of clearance in addition to being offset.
Mine do not interfere. The ones you have should work too. Just for reference... can you please post the source for your swiveling wheels?
Originally Posted by BG3
Thank you for the placement measurements as well. Do you know how far your casters raise the QuickJacks off the floor in those positions?
I did not measure but the unit is raised maybe 1/4", comfortable to slide around, not too high to slide under the car. Of course, when the QJ rises those wheels move away from the ground (as they should).
I finally got a chance to bleed my QuickJacks and finish the setup. Well, mostly finish. Here are some notes from my experience thus far.
The manual says you need metric Allen keys. Haven't found a use for them. The bleed screw was too large for a 4mm, too small for a 5mm. I ended up using a 3/16" and it was tight! There was very little air in the system. I decided to use O'reilly's AW-46 Hydraulic Fluid. A gallon was only $22 and hydraulic fluid is very pure.
I applied 3M double-sided tape to both faces of the side-mount casters. I haven't removed the backing yet. I secured them with zip-ties so I could adjust the position of the casters until I find the right spots. So far, I haven't. (The backing on the 3M tape made this a bit easier.) Since the pump doesn't create suction on the reverse, the QuickJacks want to sag. (see pic below) If I move the casters to where there is enough leverage to flatten out the bottom of the jacks, it raises them too far off the floor to fit under the car. Though, with the casters closer to the ends, I can push down on the ends of the jacks to flatten them a little as I move them. I saw a tip about placing small rare earth magnets between the bottom and top frames. This allows them to close up flat when lowering and easily separate when you start lifting. I have some so, I'll probably try that in addition to adjusting the casters to find the best locations.
I used. They clear the inside frames by a few millimeters when the wheel is pointed to the inside.
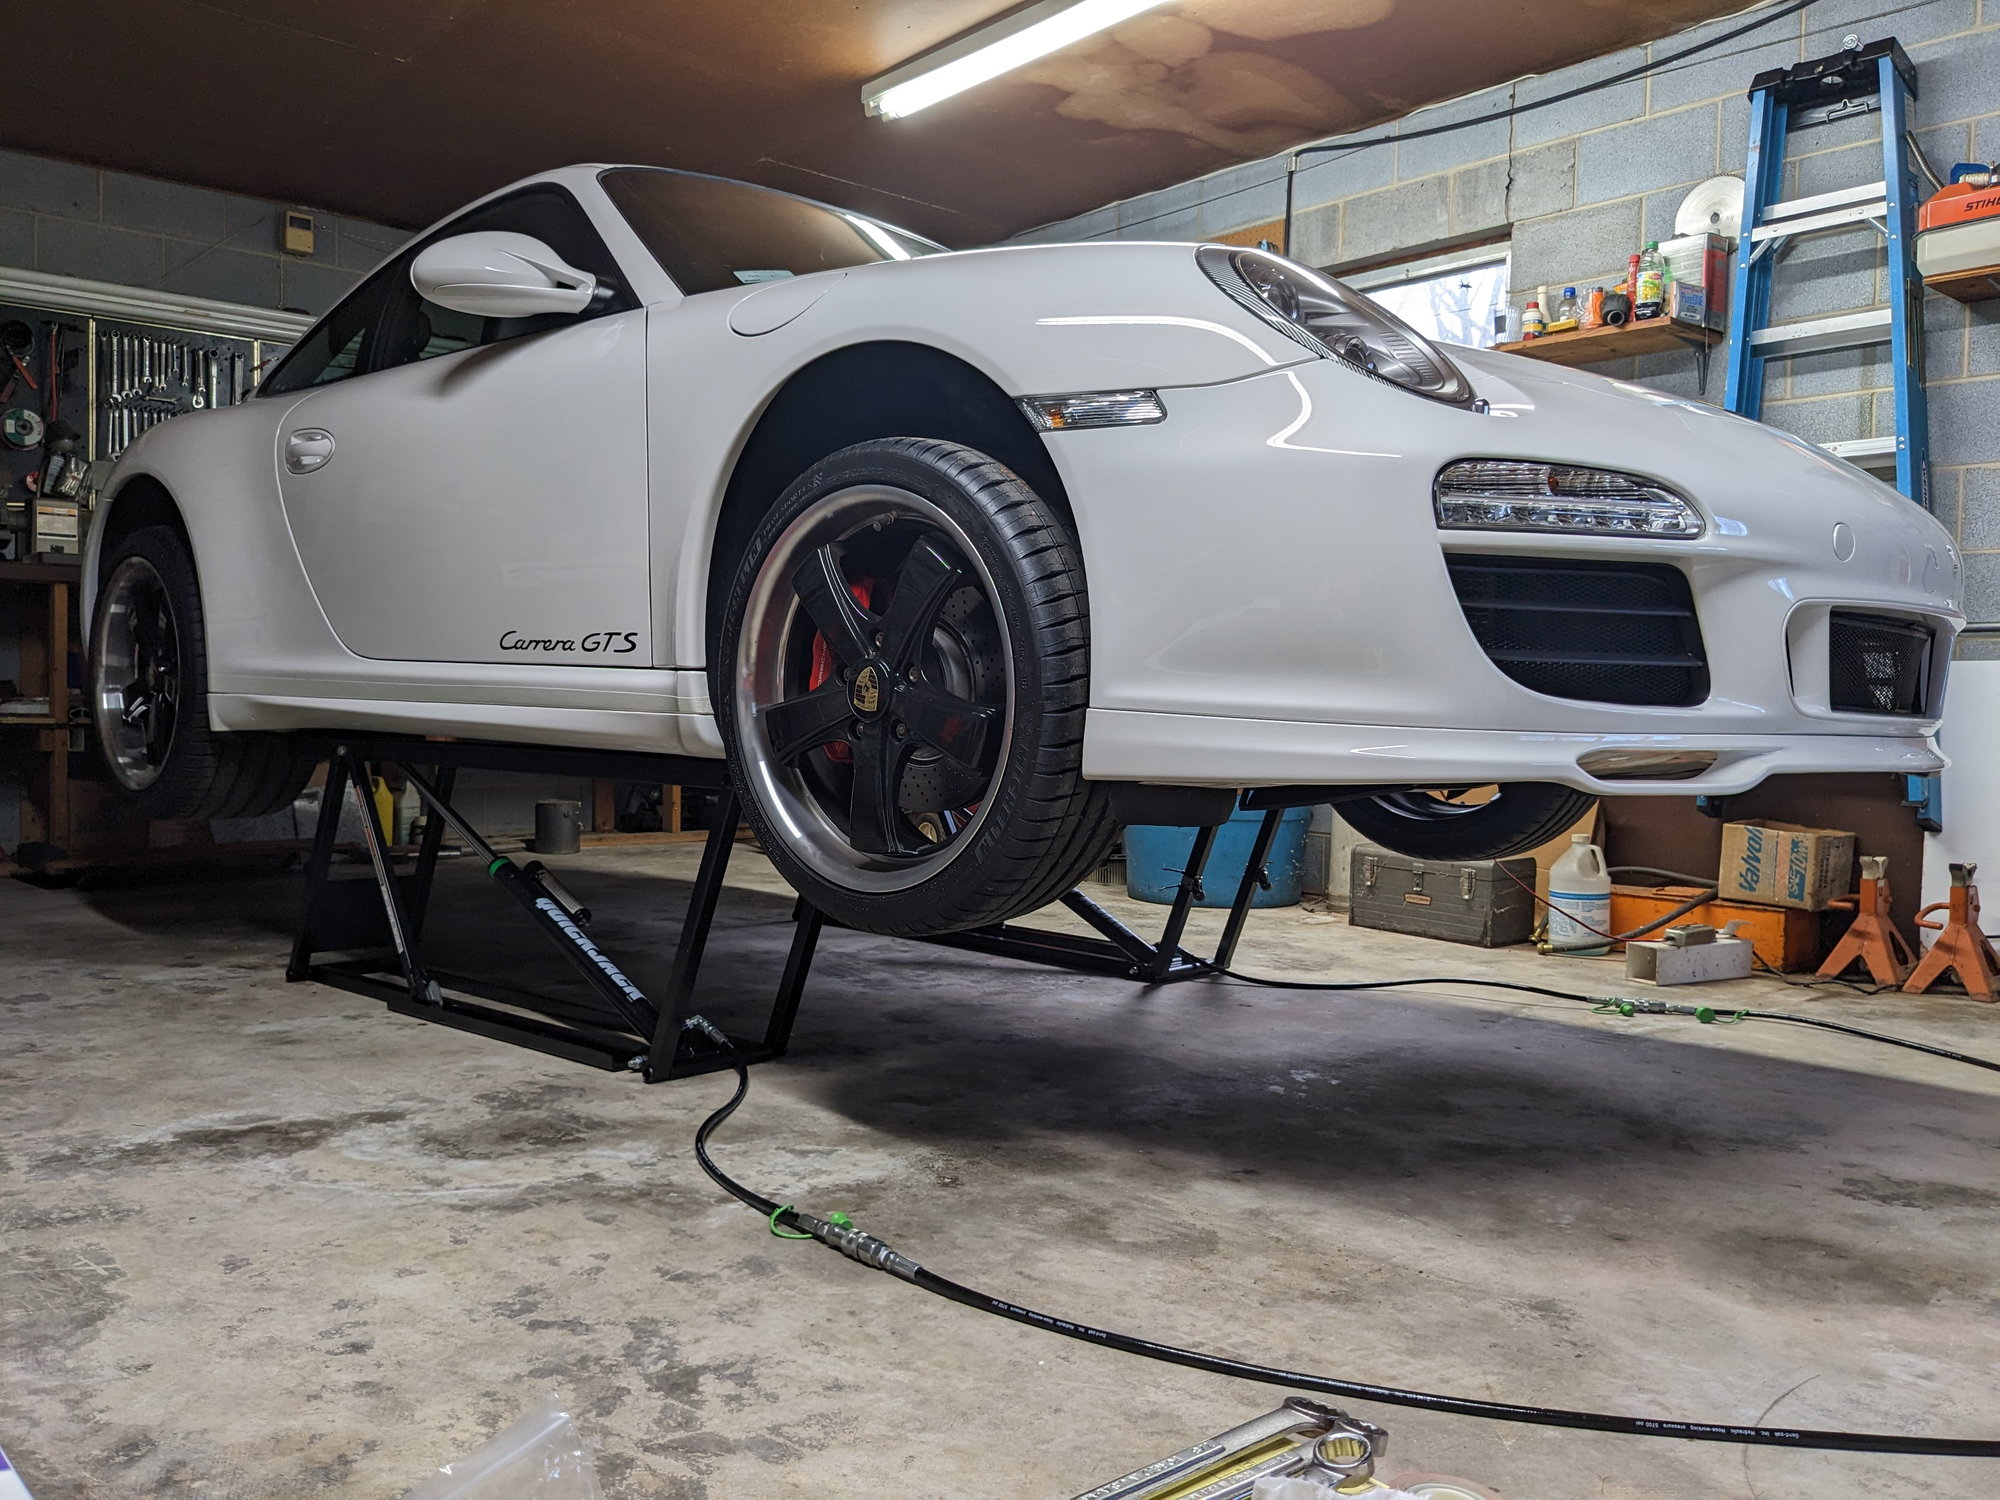
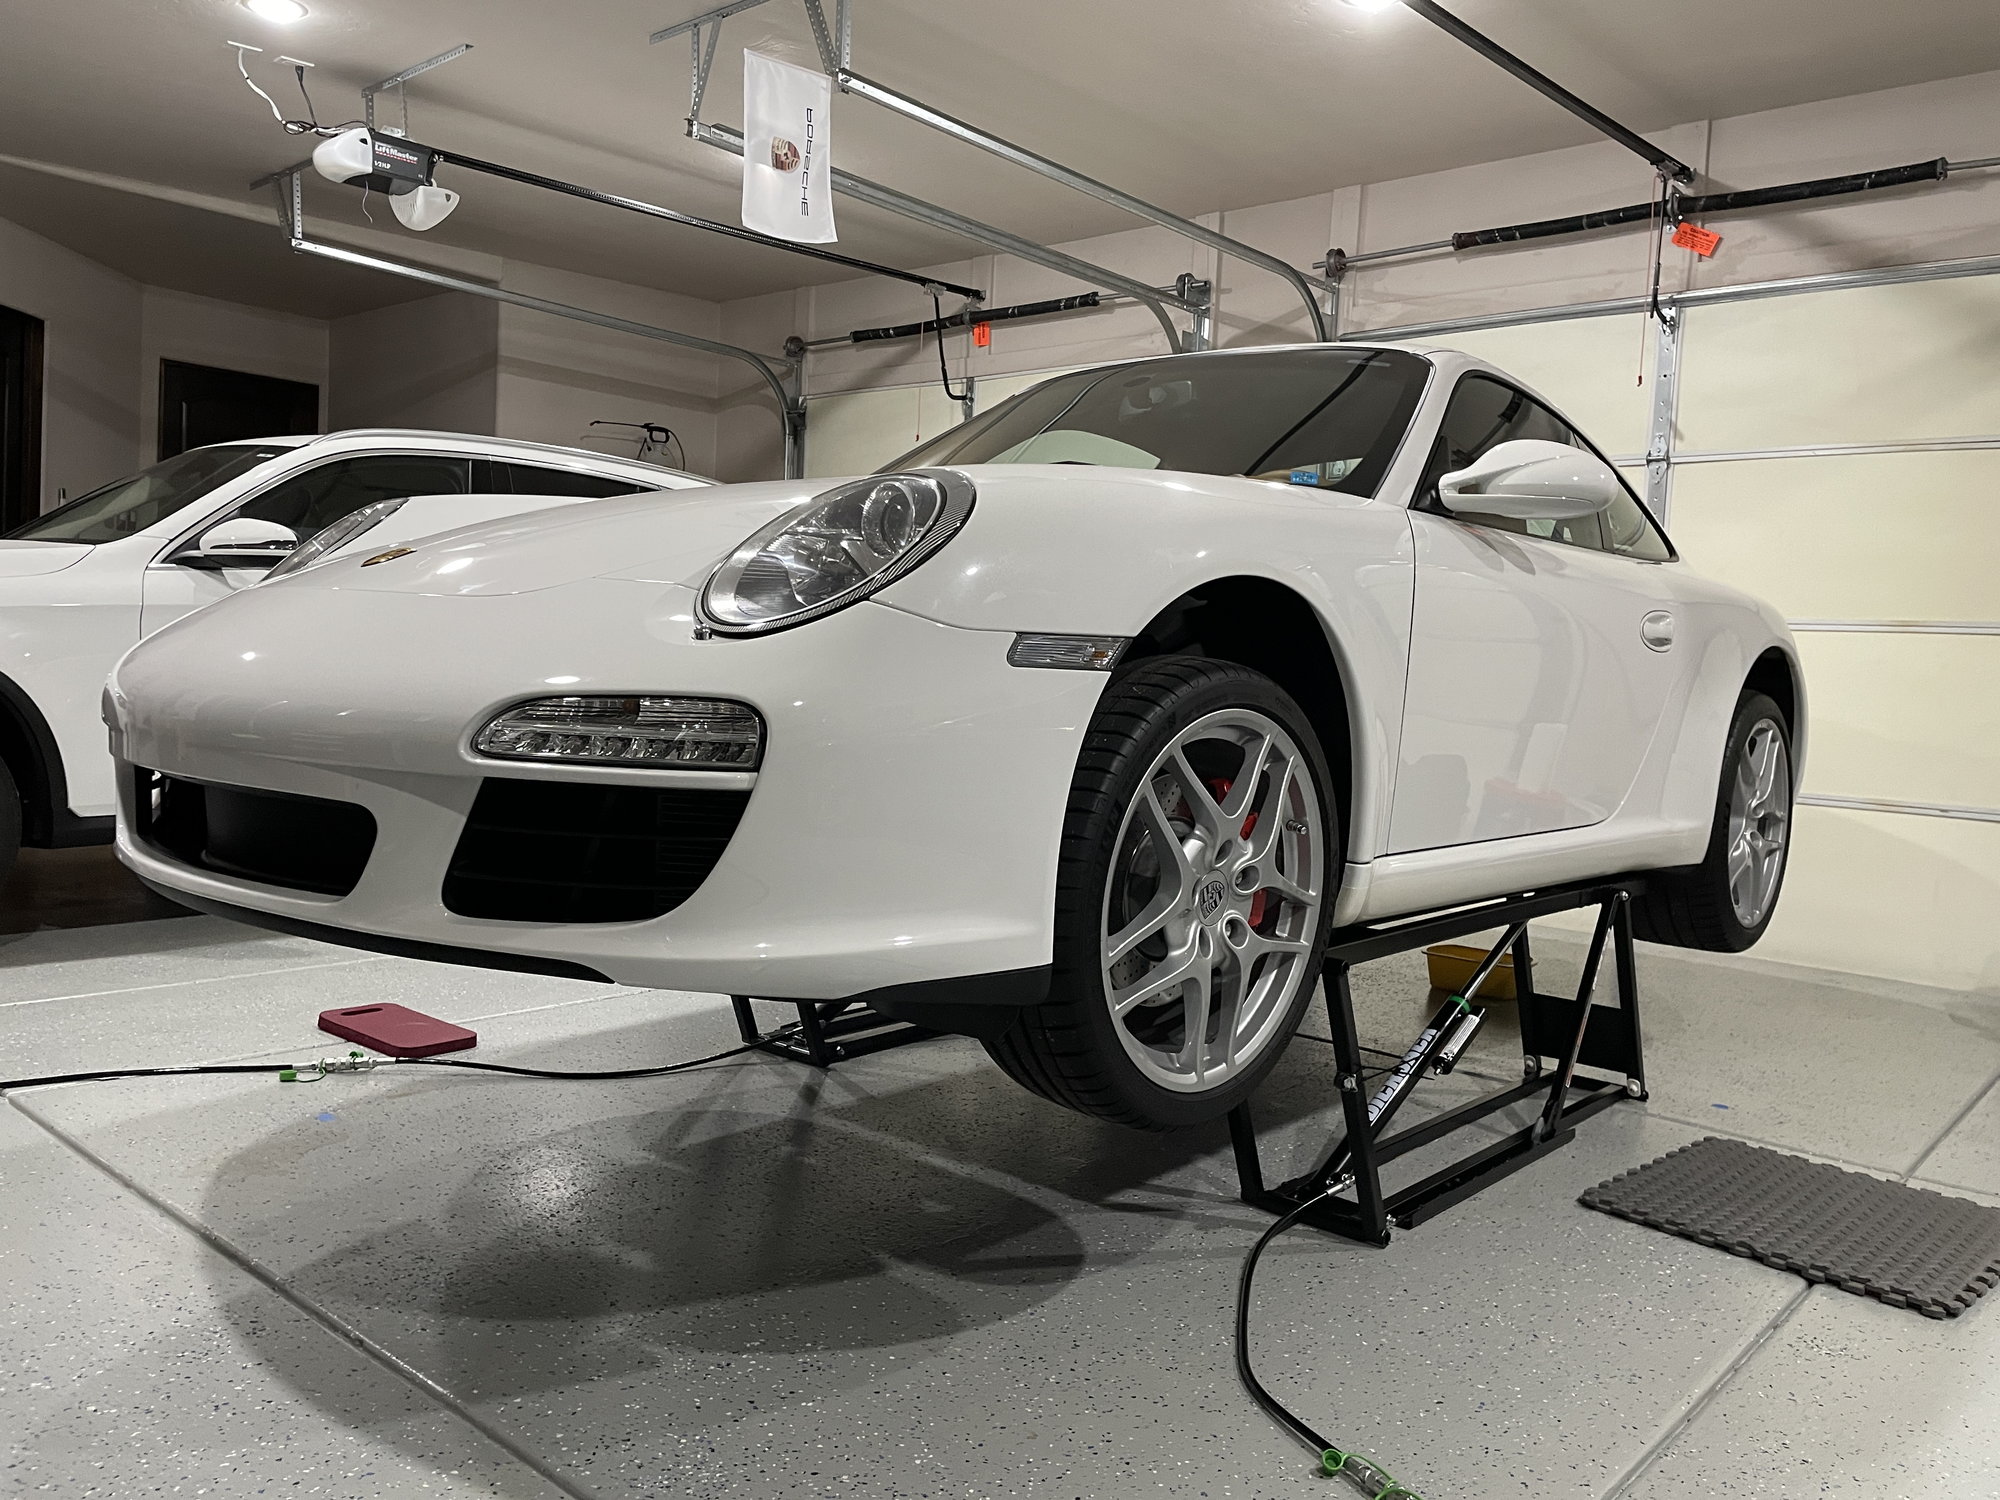
The first lift went pretty smooth. I stopped at the first stop and lowered the car back down. I didn't like the way the back of the jack lifted a little at first. So, I ended up using the 3" blocks at the back and the 2" blocks up front. That lets the jack hit at virtually the exact same time on the GTS. I also adjusted the position a little to make the jacks parallel. The first full lift to the second stop was very smooth and even. I did it in a few motions so I could check it along the way. I then let it rest on the stops a bit, before lowering it back to the ground. No issues or unevenness whatsoever. I'm very pleased with the amount of lift and the action.
Hopefully this thread will help others as it has helped me. My only regret so far is not buying them sooner. I did take advantage of the Costco Black Friday bundle but, it still would have been a bit cheaper a couple years ago...
Use the QJ a few more times and they will flatten out quickly. No need for air tanks or even less magnets. I would use the same size blocks - no concern about time coincident contact.
I use this QJ with a 997 band a couple other vehicles, and for one of them (far longer WB I have the QJ extender plates. It works.
The alignment on the floor is critical - parallel wit each other and parallel with the car axis.
Thank you for the input. I appreciate you sharing your experience. With 2" blocks front and rear, the back of the frame lifted off the floor until the rear blocks made contact with the rear jack points on the GTS. I don't like that. To me, it's just a potential opportunity for the back of the jacks to shift unknowingly and cause a potential safety issue. While I know it isn't likely to move given the weight/pressure on the front, it's just something else to have to check on that I can eliminate with the 3" blocks in the rear. The lift didn't move at all this way and was very smooth.
... With 2" blocks front and rear, the back of the frame lifted off the floor until the rear blocks made contact with the rear jack points on the GTS. ....
That is odd. These cars have a very slight rake but nothing to cause that. I wonder if one end of the QJ articulation is tighter than the other. I suggest you look at the various QJ hinges. They all should move without drag or resistance. You may need to lube them.


 12-06-2022 | 01:47 AM