When you click on links to various merchants on this site and make a purchase, this can result in this site earning a commission. Affiliate programs and affiliations include, but are not limited to, the eBay Partner Network.
So I decided to take a few hours this afternoon and install a 997.1 center radiator kit onto my 2010 C4S PDK manufactured in August of 2009. I mention the manufacturing date because I found some discrepancies that might be on account of it being one of the earlier .2 cars. FWIW the bumper is original from Porsche. So ...
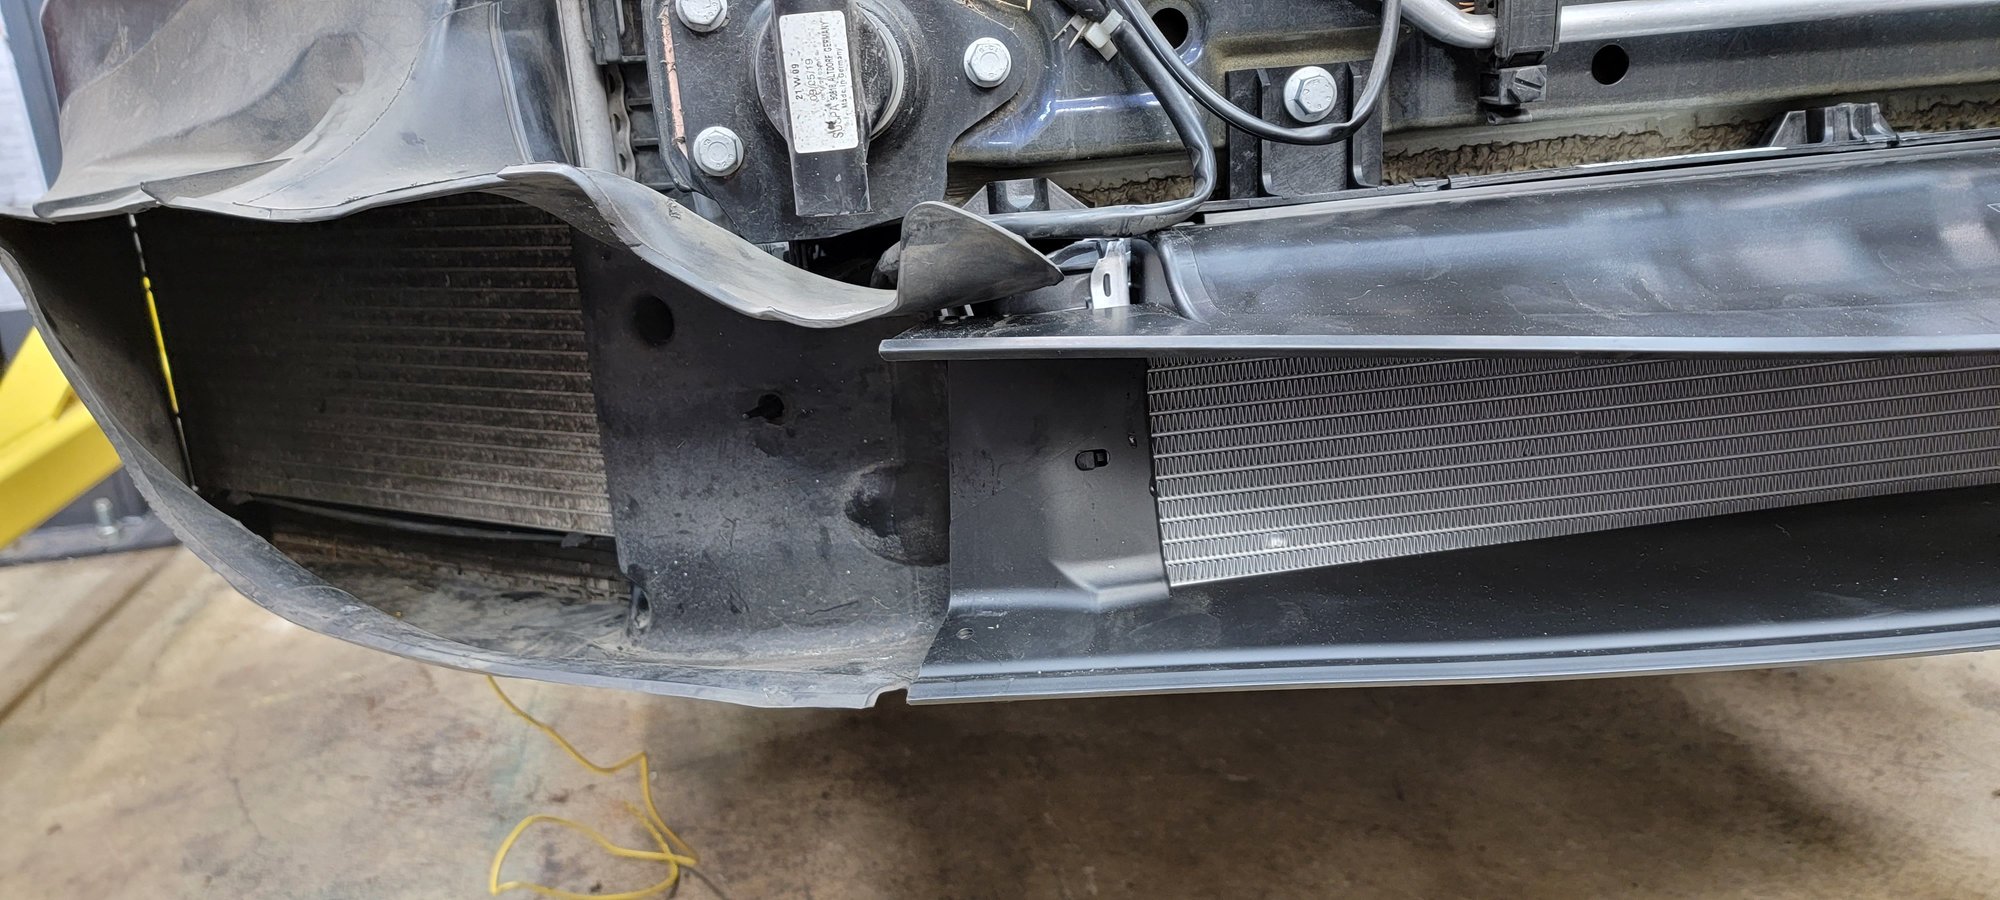
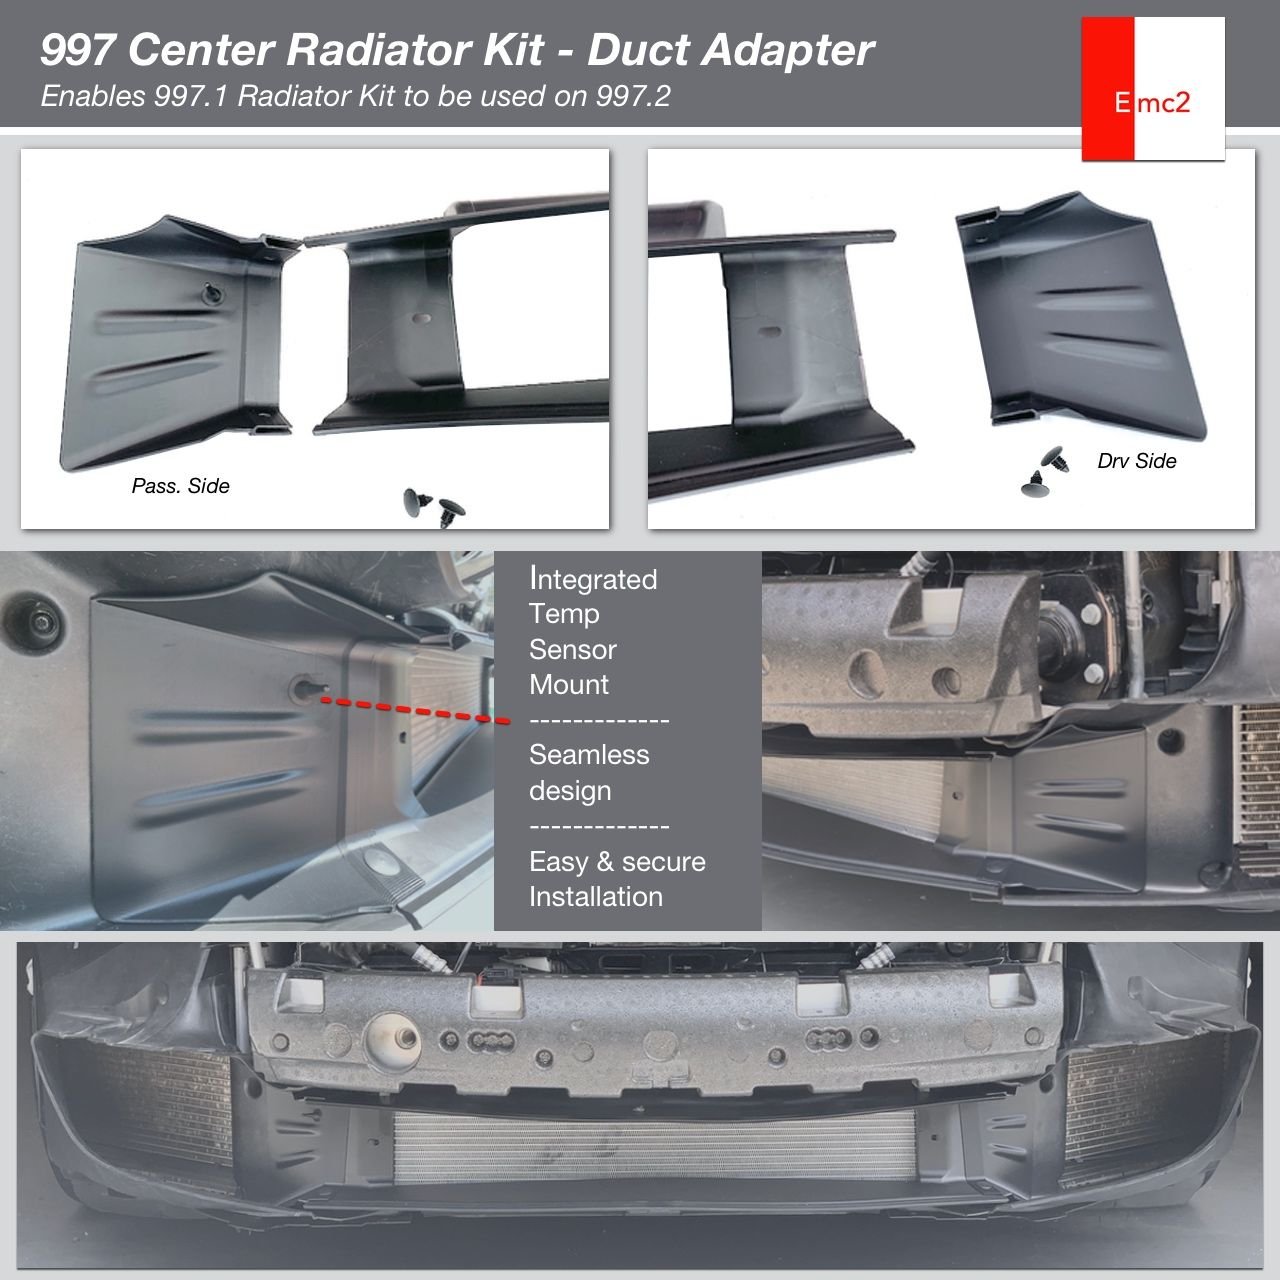
1. The EMC2 ducts flared too far forward from the OEM side ducts. I trimmed the side ducts and they butted up against the center radiator perfectly. I did not use the EMC2 ducts. Edit: I trimmed the radiator cowl and the EMC2 ducts worked out nicely. There may or may not have been some interference on the nesting fit into the bumper skin (I haven't figured out how to measure if this is real or not). EMC2 sent additional ducts in case I wanted to experiment.
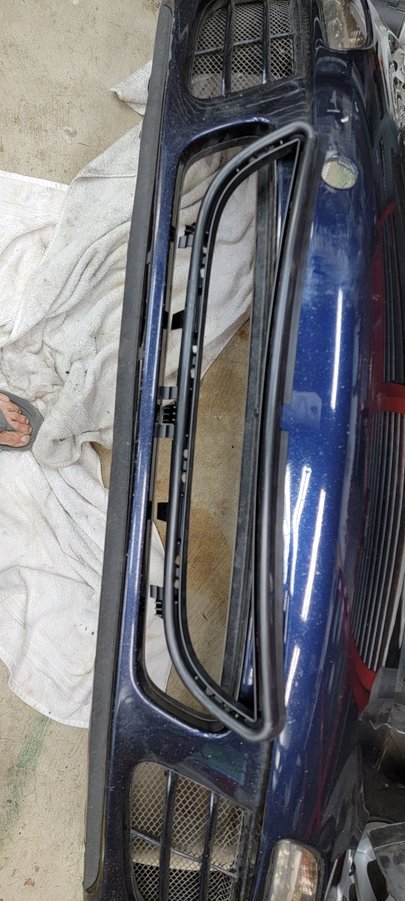
2. The 997.2 radiator cowl was useless. It was 3" too narrow so it would not span the bumper opening. The shape was wrong.The mounting tabs did not match in either type, position, or orientation. Edit: My brain fart. Mixed up part numbers and was treating the 997.1 piece as if it was a 997.2 piece. Sorry.
3. I ended up removing the center blocking piece from the bumper skin and using nothing on the skin. In a later step I discovered that the cowl that mounts to the new radiator lines right up and fits into my bumper perfectly. In fact, there is no room for another mating piece. So there was no need for either the .1 or the. 2 adaptor flange. Edit: See point 2 above.
As far as the installation goes ...
1. Remove front wheels, rear half of the fender liners, and then the front half of the fender lines.
2. Unplug electrical connectors on both sides as well as the headlight washer line on the left side.
3. Remove bumper mounting screws and slide out clips that attach under and to the front of the headlights. Then pull the bumper forward and off.
4. Remove the center duct blocking piece from the inside on the bumper. One set of clips was simple. The other side was a PITA.
5. Remove the actual (metal bar) bumper (two 16 mm head bolts).
6. Remove the horn bracket as well as the side radiator ducts.
7. With a bucket underneath remove the hose bung on the left side. This required a bit of effort with a pair of needle nose pliers. Note: I used the lift to raise just the front of the car 18 inches and attached the left hose immediately after removing the bung so I lost very little anti freeze. More on this later.
8. I then did the same thing on the right side.
9. I previously gave the radiator a quick rinse and assembled the rear and front flange with the metal plate and hardware from the kit so it was ready to go. This assembly then slid onto the two lower studs already on the car as I snapped the hoses onto the new radiator. Adding the nuts to the studs and two bolts at the top was quick as was mounting the horns and bumper bar.
10. Hold the side ducts in position and mark the area to cut so the ducts fit against the center radiator. Then install them.
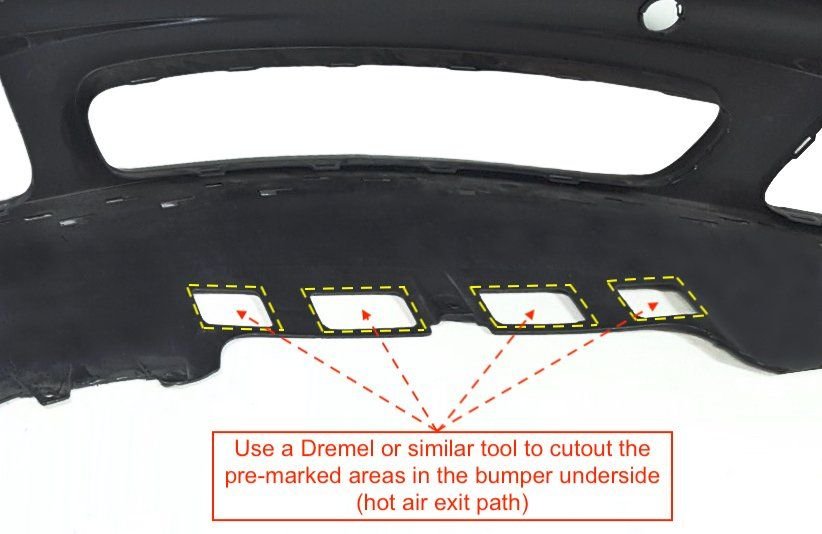
11. I then marked air escape slots (one on either side of center behind the radiator) at 3 by 11 inches. A right angle grinder, vibra saw, and file made easy cuts.
12. Mount the bumper skin (making sure the front radiator cowl nests into the bumper), plug in two connectors and the headlight washer hose. Then mount the fender liners and wheels.
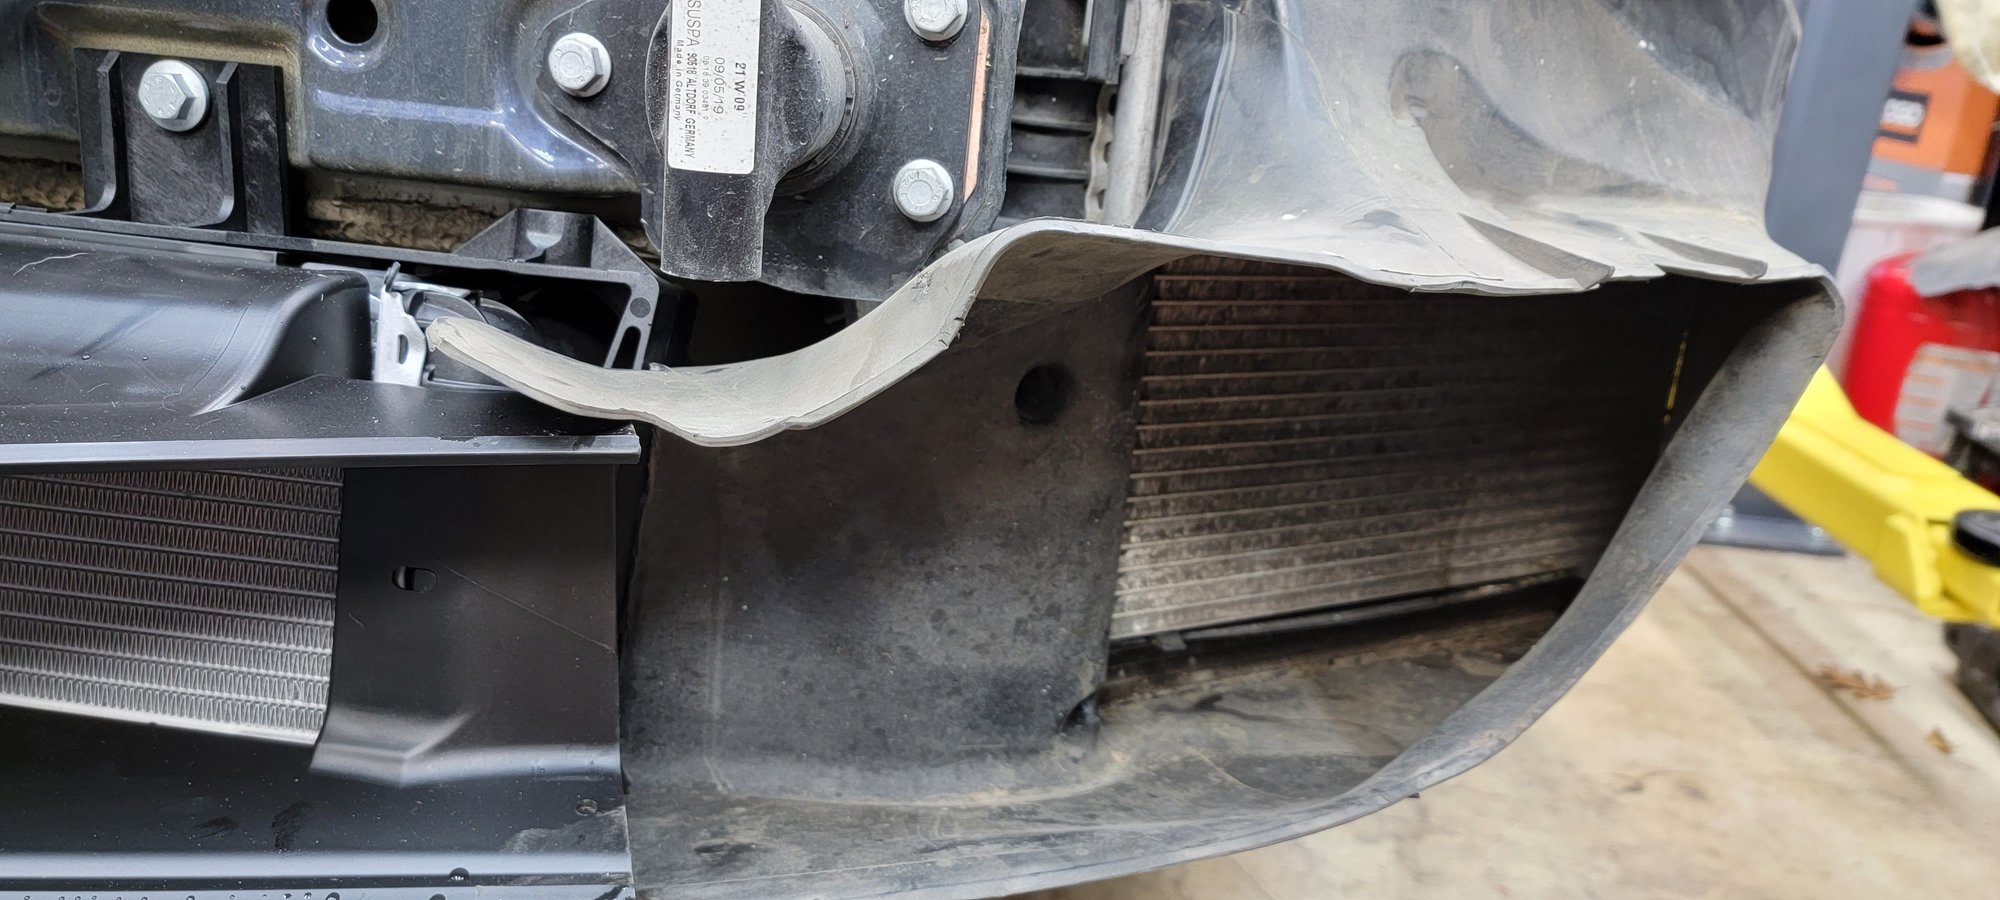
Edit: The front cowl was warped so the top did not align with the groove in the bumper skin. This can be remedied by pushing up on the cowl as the skin is pushed onto the car BUT if you have added a screen it is difficult to push it up. I ended up adding an 18x1.5x.125 arched aluminum bar on the top (drilled 2 holes and attached it to the cowl with a tie strap). I could then bend the bar until I had perfect alignment. Next was a matter of getting the height right ... done with a wire wrapped around the aluminum bar and the bumper bar.
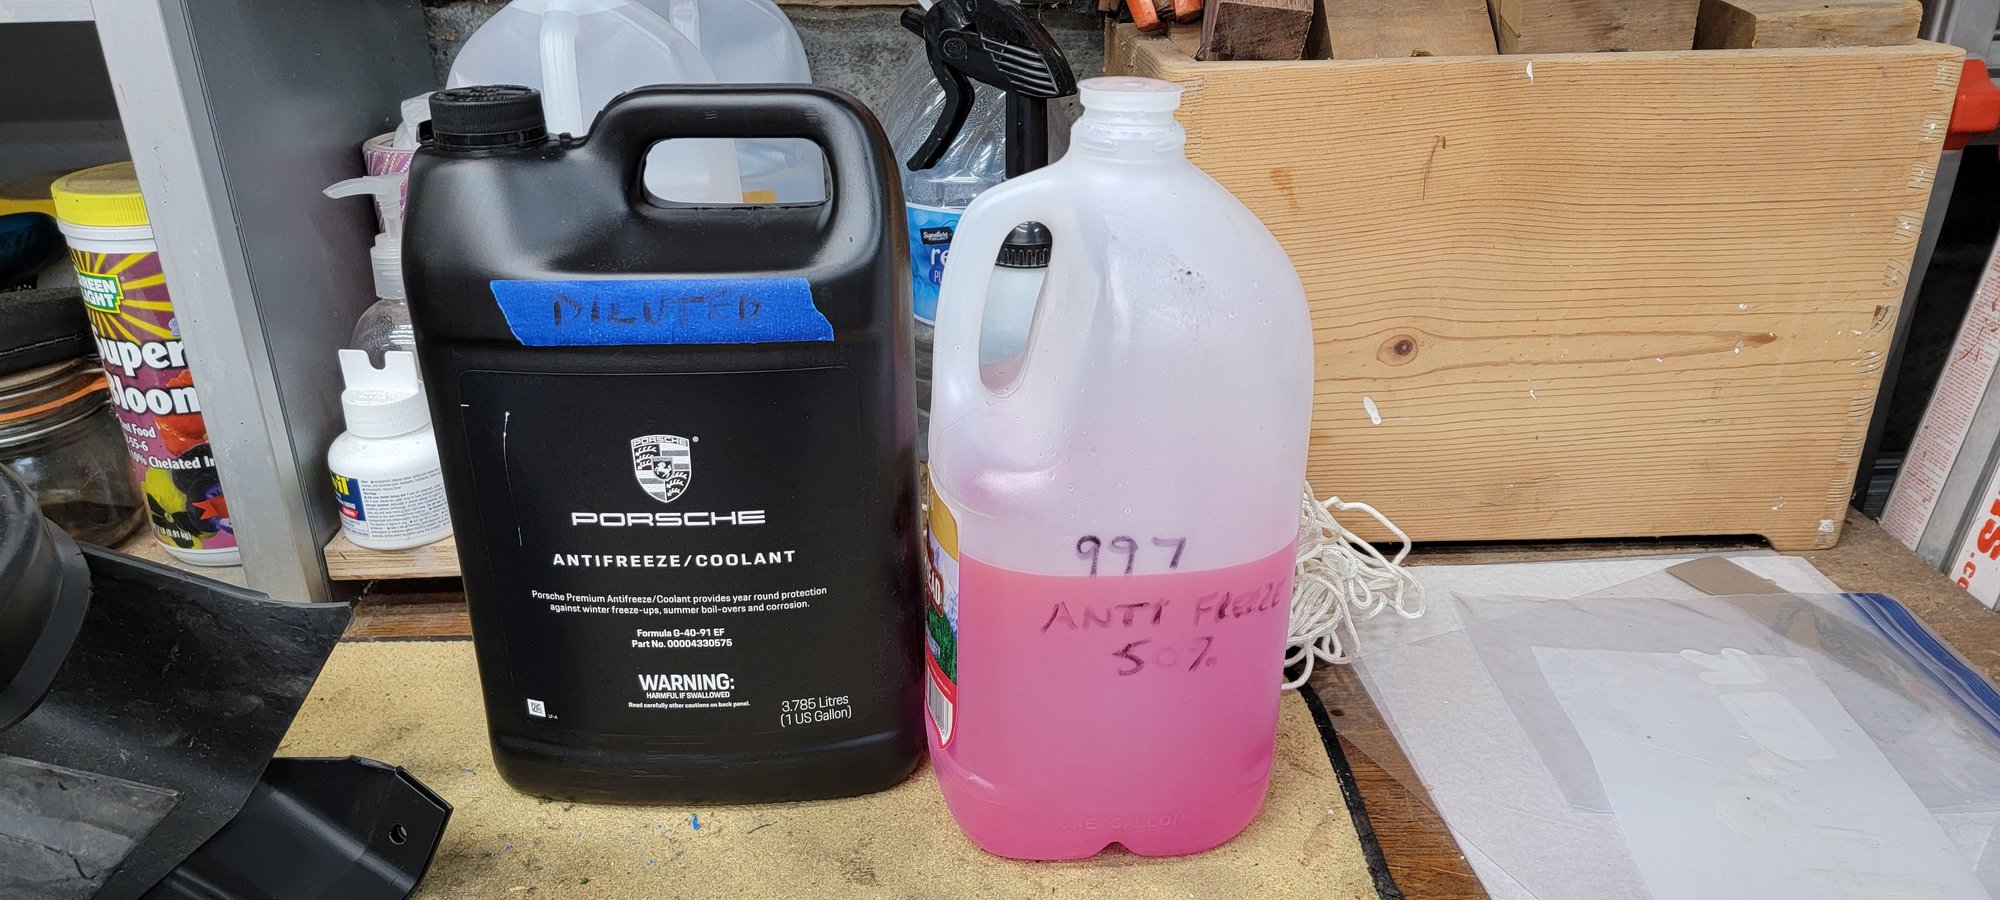
I lowered the car so the front would not be higher than the rear. I then mixed a gallon of Porsche anti freeze with almost a gallon of distilled water (I used a pint to rinse the radiator) in a bucket and used a vacuum lift to fill the system. It only took a quart.
That's a gallon and a half of solution left. A pint of rinse water through the new radiator plus a pint of anti freeze lost during the install means only an extra quart was added for the new radiator.
I turned the heater to high and went for a drive. Per usual it took time for the water temp to reach 175F. And as per usual the oil temp took a long time to budge. When the water reached temp I was still getting cold air out of the vents so I headed home to check water level. It was fine and cold in the reserve tank. So I went out again, this time using my 9xxresearch.com OBD II unit to track water temp on my phone. The temp varied from 185 to 190. After another 5 miles the oil temp started to rise but I was still getting only cold air from the heater. Finally after the oil got to 175 the heater started working. Upon return home the water level was still full. I'm thinking I'm fine but the heater operation concerns me. So I plan on multiple local trips to be sure all is good.
Total time was three hours but most of that time was figuring out the EMC2 and 997.2 ducts which I finally opted to not use. Again, it appears my car may be an oddity, since many before me have used those parts.
Edit: My car is not an oddity. See above edits.
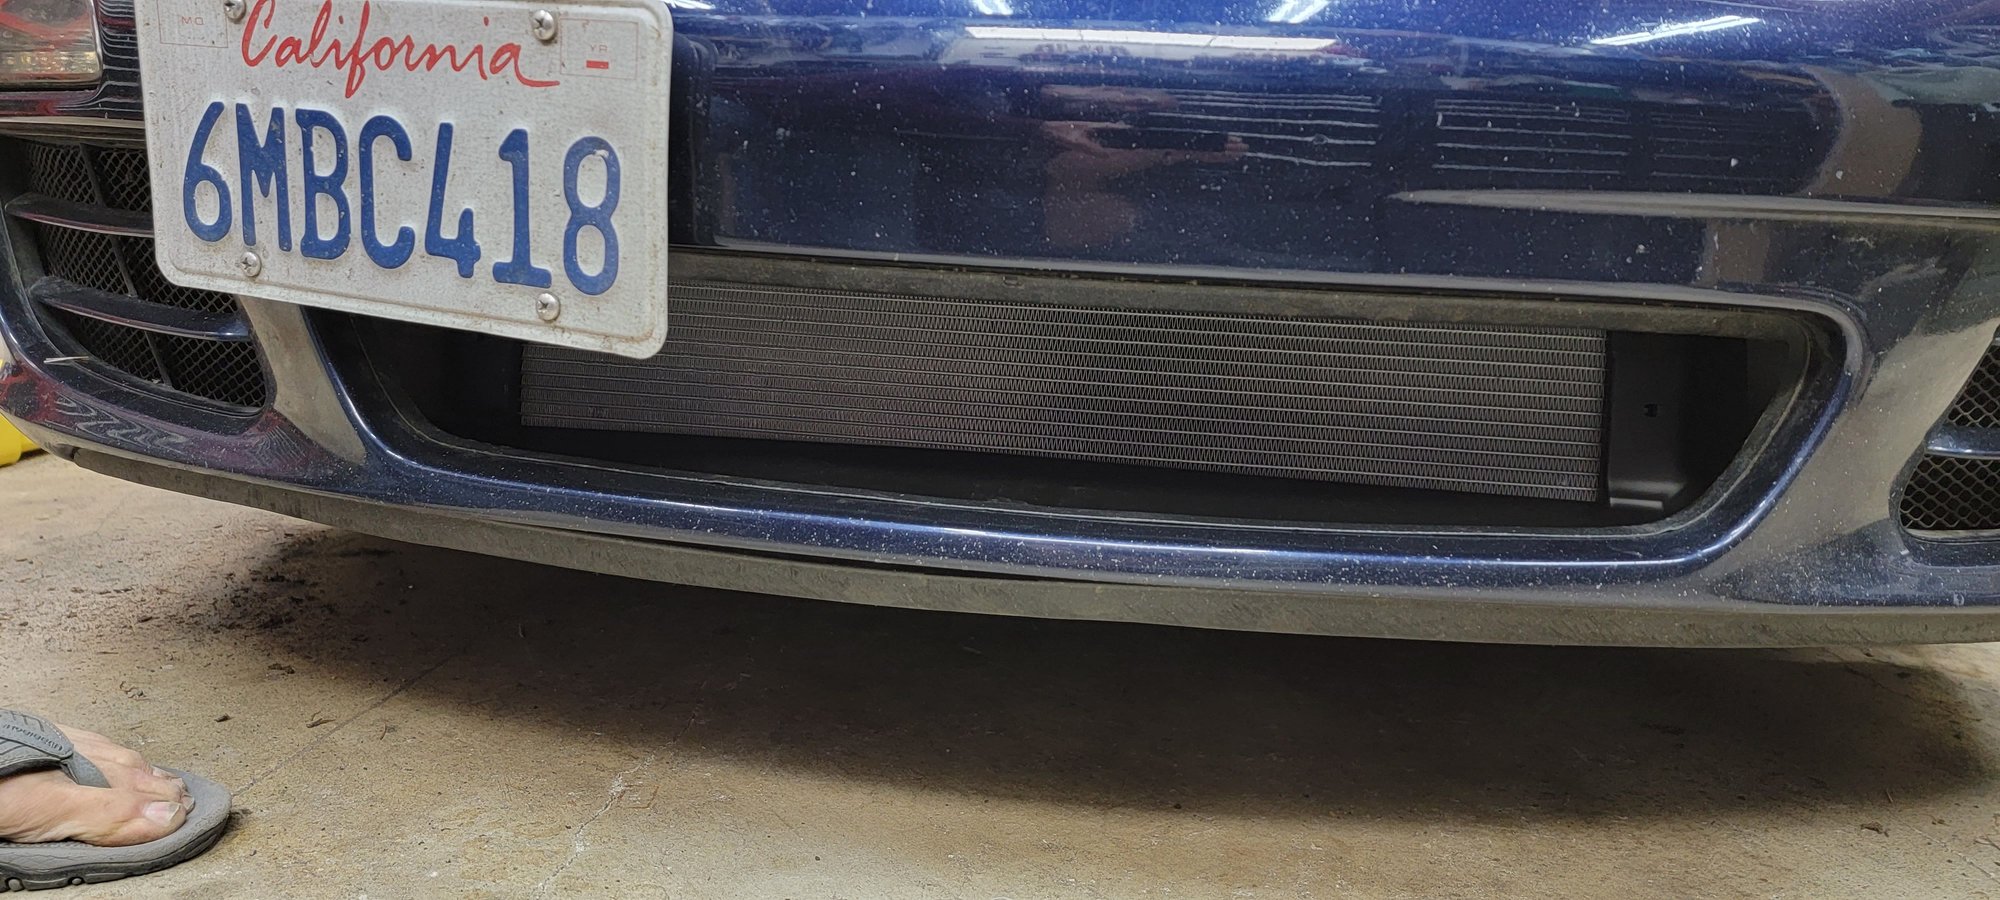
The radiator front flange nests into the bumper skin without the need for any other duct piece. The way things are here, and with trepidation about the 997.2 center bumper flange not sizing up, I'm not sure what to do about a protective screen. This was initial fit after a quick trim on the left side. The EMC2 flanges left a large gap. Next time I pull the bumper off I'll attach the top insides of the side radiator ducts so they lay down smoothly, although they're hidden and do not create any adverse situations. The 997.2 bumper duct is shaped wrong, is the wrong size, and has the wrong tabs. The part number is correct. I removed the blanking piece so air could reach the center radiator. The front radiator cowl then fit right into the bumper skin. Edit: See edits above.
Last edited by Wayne Smith; 01-17-2022 at 04:36 AM.
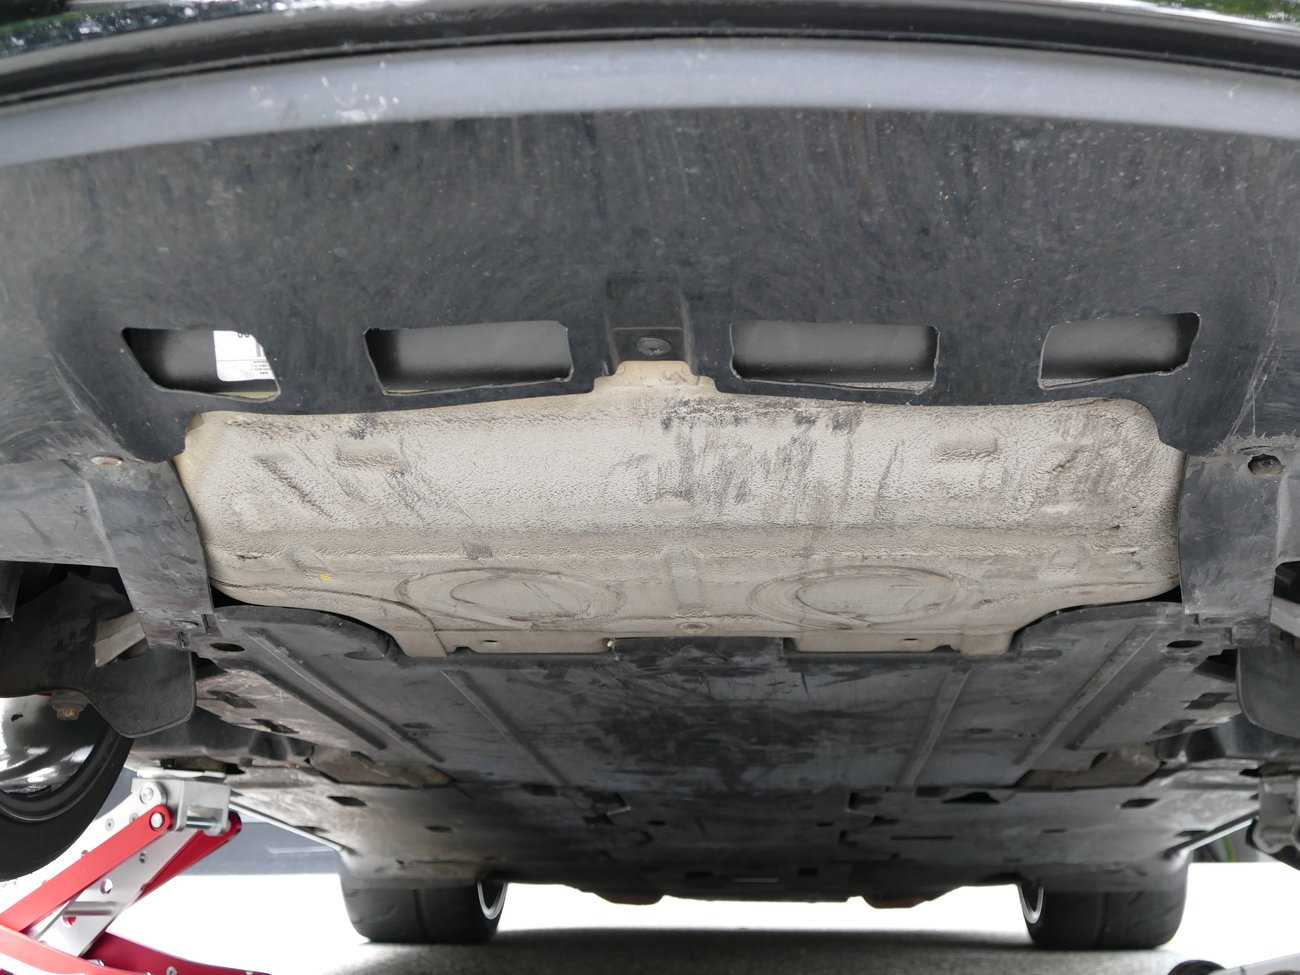
The most important part is to cut out the cooling flow venting on the bottom. The stock openings are not inadequate but you can really open up them up for superior results as I have done with Cayman and 997 race cars.
@Wayne Smith Could you please share any pics of the duct adapters in place as we've had many of these installed and everyone comments that they fit like a glove?
Also, my car and yours are the same build date with PDK and everything looks the same so I'm sure we can help you get it sorted.
Also please note that we are available via our support email (support@emc2design.com) including on weekends.
It looks like you trimmed the original rubber ducts differently than described in our install guide, but that should not be an issue. The flaring of the Emc2 ducts is to maintain the original shape when the bumper goes back on and will not cause any problems with the install.
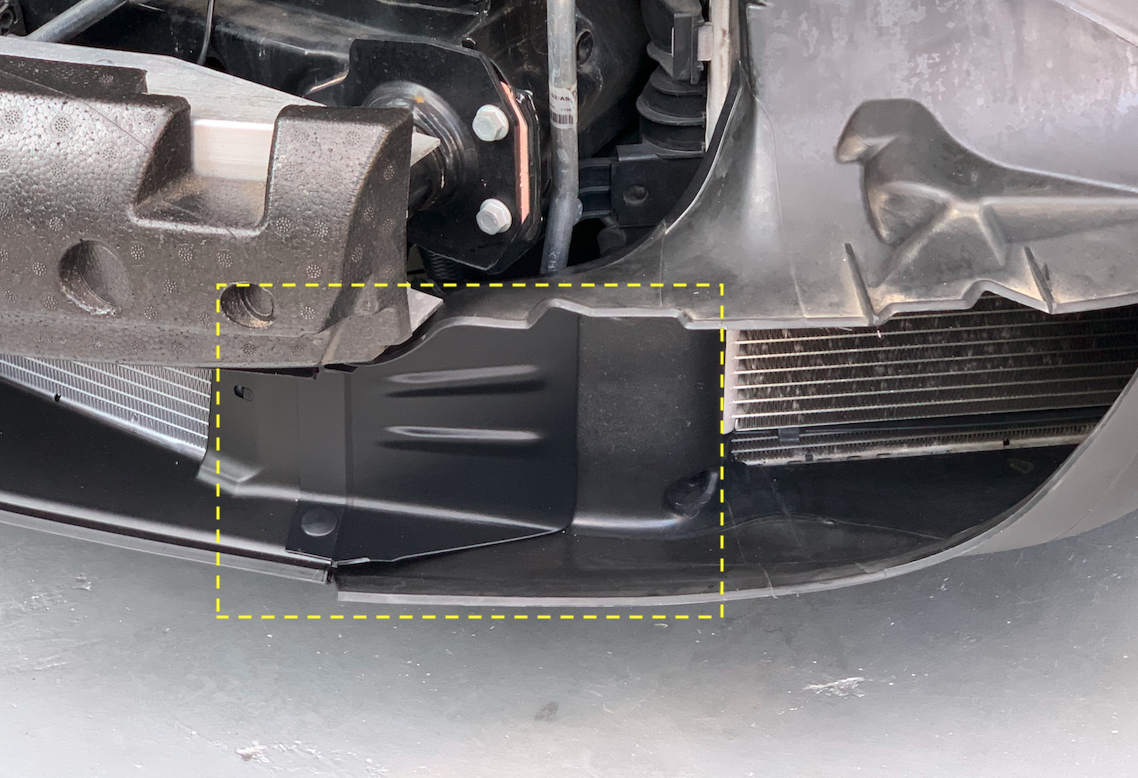
More importantly the idea of the ducts is to close the hole shown below that would be visible from the angle shown by the arrow.
@Wayne Smith Could you please share any pics of the duct adapters in place as we've had many of these installed and everyone comments that they fit like a glove?
Also, my car and yours are the same build date with PDK and everything looks the same so I'm sure we can help you get it sorted.
Also please note that we are available via our support email (support@emc2design.com) including on weekends.
It looks like you trimmed the original rubber ducts differently than described in our install guide, but that should not be an issue. The flaring of the Emc2 ducts is to maintain the original shape when the bumper goes back on and will not cause any problems with the install.
More importantly the idea of the ducts is to close the hole shown below that would be visible from the angle shown by the arrow.
from your post earlier:
With duct adapter installed:
Thanks for responding. You are fantastic in that regard. Much appreciated!!!
I actually trimmed less than what your instructions show. So I could cut more later. So if there is a solution we can still make your suggested cuts.
Unfortunately I don't have adequate pictures to show the gap. My current gap is a fraction of an inch. The gap with your ducts would have been over two inches.
Between that and the plastic bumper skin cowls not fitting I opted to put things back together in a prototype manner just to see what I had.
As I put the bumper skin on the radiator cowl mated up to the bumper perfectly. There was no way anything added to the bumper skin would not have been in the way. So that's weird since supposedly I would need to add to the bumper skin to mate to the radiator.
So upon reflection I'm thinking the radiator cowl is different and causing the problem. Or I've got a weird bumper. Not likely? Well, the bumper skin plastic inserts didn't fit. But then the radiator cowl nested into the skin perfectly.
Anyway, I've got some work lined up for friends and I want to drive a bit to evaluate the third radiator before I pull my bumper off again. So give me a few weeks to get pictures if you would.
This is probably a strange one off. I know your solution has worked for others. I'll be back to you. Thanks again for being there with your ideas and excellent support!!!
Thanks for the info and kind words @Wayne Smith
Just want to ensure we can help wherever possible.
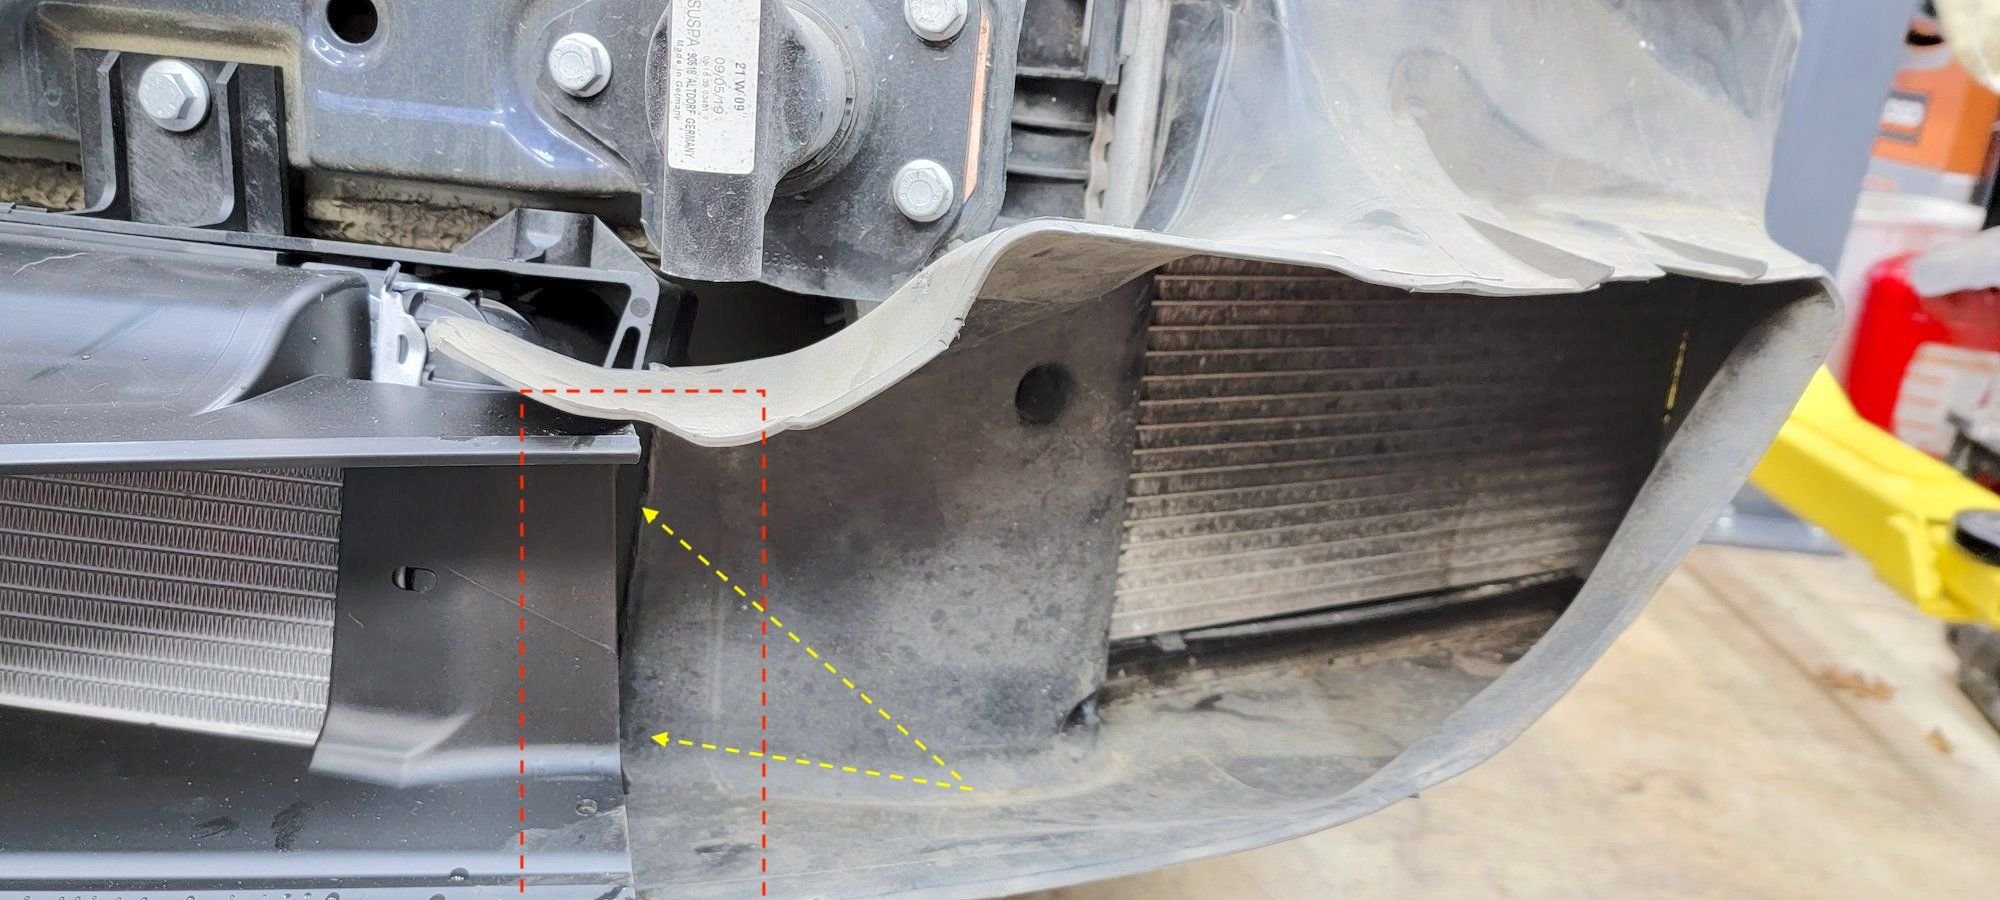
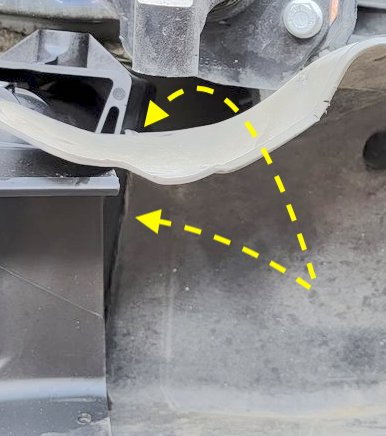
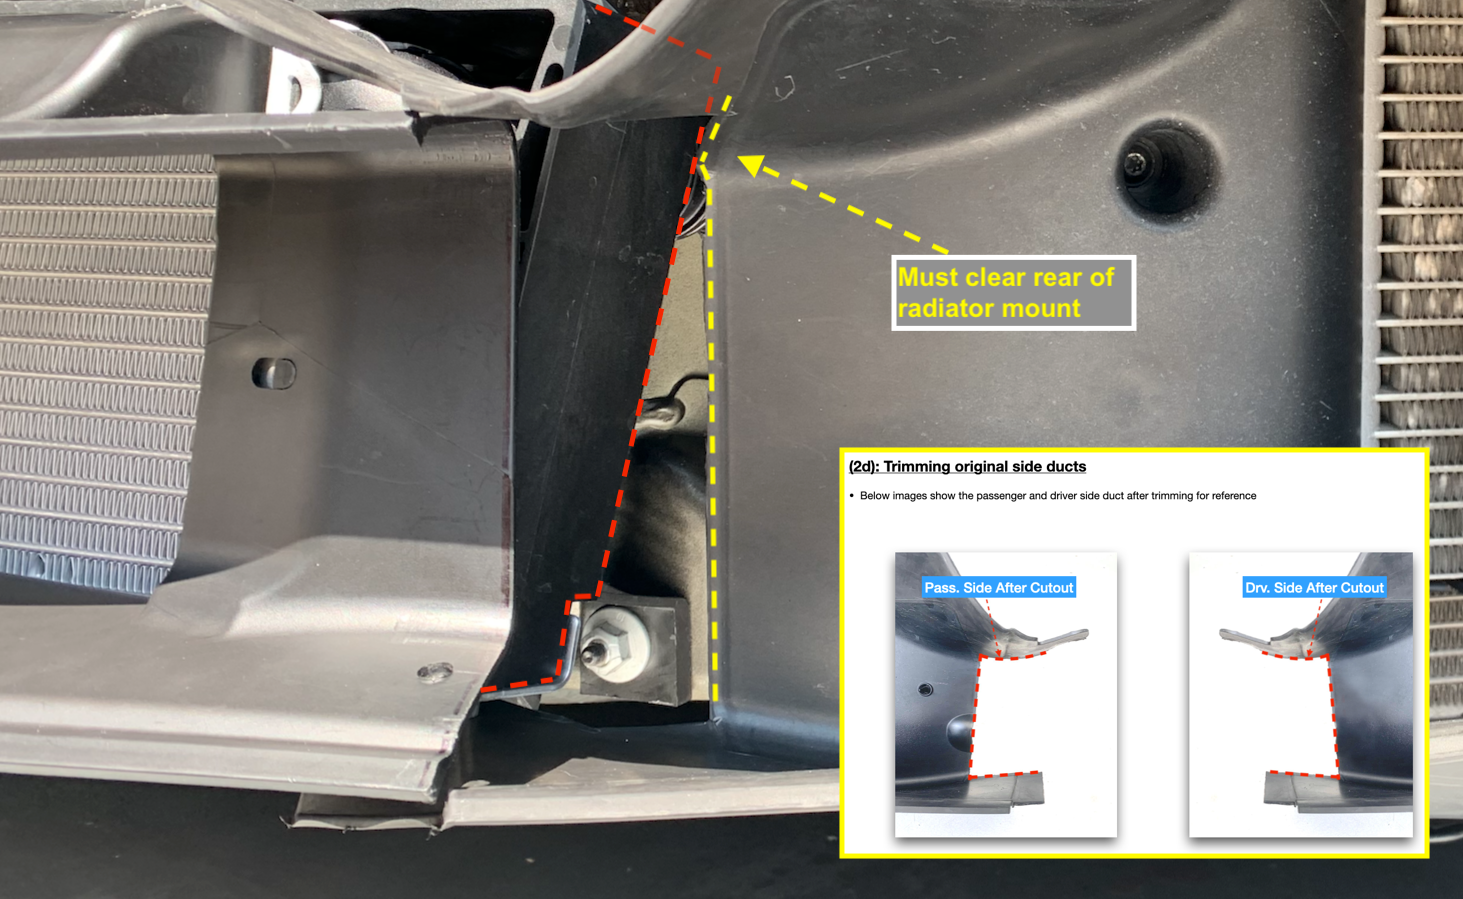
Taking a closer look I think the cut line may actually be worth checking again. The reason for using the marked cut lines in our install guide on the OEM ducts, is to ensure the ducts are not distorted by being pressed up against the radiator mount.
When I zoomed in closer on your pic it seems on your install, the OEM duct is pressing against the plastic radiator mount. This distortion will potentially twist the duct adapters and not allow them to sit flush along the flat outer edges.
See image below on my car which shows how the OEM duct clears the rear of the radiator mount (there is no interference between those 2 parts)
Let us know when you are ready to get the bumper off again and I'm certain we can get it 100%.
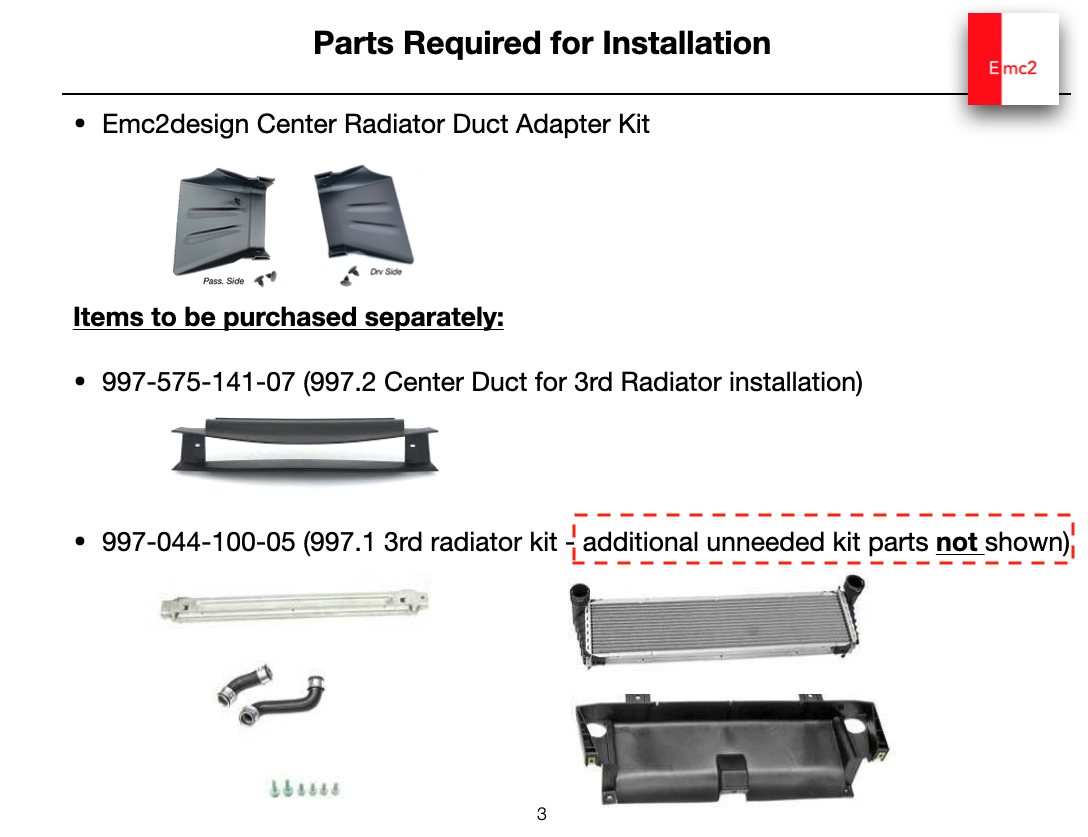
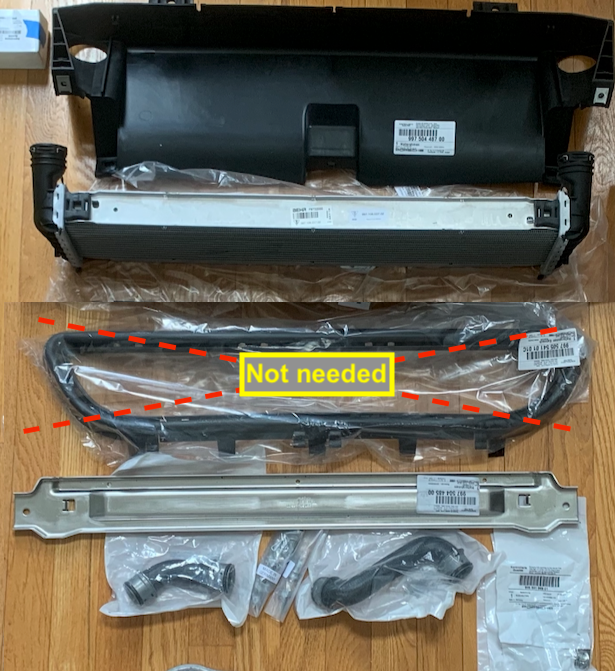
On the subject of parts not needed from the radiator kit - below are definitely the only parts you need (as you've described earlier). You will definitely end up with left over parts from the 997.1 3rd Rad Kit.
Regarding your post earlier "The 997.2 radiator cowl was useless. It was 3" too narrow so it would not span the bumper opening. The shape was wrong.The mounting tabs did not match in either type, position, or orientation. "
Did you also order an additional 997.2 part not listed below?
Thanks for the info and kind words @Wayne Smith
Just want to ensure we can help wherever possible.
Taking a closer look I think the cut line may actually be worth checking again. The reason for using the marked cut lines in our install guide on the OEM ducts, is to ensure the ducts are not distorted by being pressed up against the radiator mount.
When I zoomed in closer on your pic it seems on your install, the OEM duct is pressing against the plastic radiator mount. This distortion will potentially twist the duct adapters and not allow them to sit flush along the flat outer edges.
See image below on my car which shows how the OEM duct clears the rear of the radiator mount (there is no interference between those 2 parts)
Let us know when you are ready to get the bumper off again and I'm certain we can get it 100%.
On the subject of parts not needed from the radiator kit - below are definitely the only parts you need (as you've described earlier). You will definitely end up with left over parts from the 997.1 3rd Rad Kit.
Regarding your post earlier "The 997.2 radiator cowl was useless. It was 3" too narrow so it would not span the bumper opening. The shape was wrong.The mounting tabs did not match in either type, position, or orientation. "
Did you also order an additional 997.2 part not listed below?
The picture I posted was the special 997.2 part. The part number on the label was verified. The tabs were 90 degrees off. The shadow was wrong. The size was wrong. It makes me wonder about my bumper skin.
I was also surprised when I put things back together that the radiator cowl nested into the bumper skin perfectly.
I mounted your ducts onto the radiator before I installed the radiator. Your ducts fit on perfectly with a tight fit. I drilled holes but did not install the plugs. When I positioned the radiator things didn't look right so I took measurements. That's when I decided to do my initial cuts to verify the clearances.
@Wayne Smith
Sounds good - let us know whenever you are ready
Based on your parts invoice - the trim in your pic below is one of the unneeded parts (it is the 997.1 bumper trim that comes with the 997.1 3rd Rad Kit). I had the same part in my 997.1 3rd Rad Kit that I purchased (pic below also)
You simply reuse your front bumper skin with the center trim as it was before (no change needed). The new center radiator cowl will slide right into your bumper slots as you described.
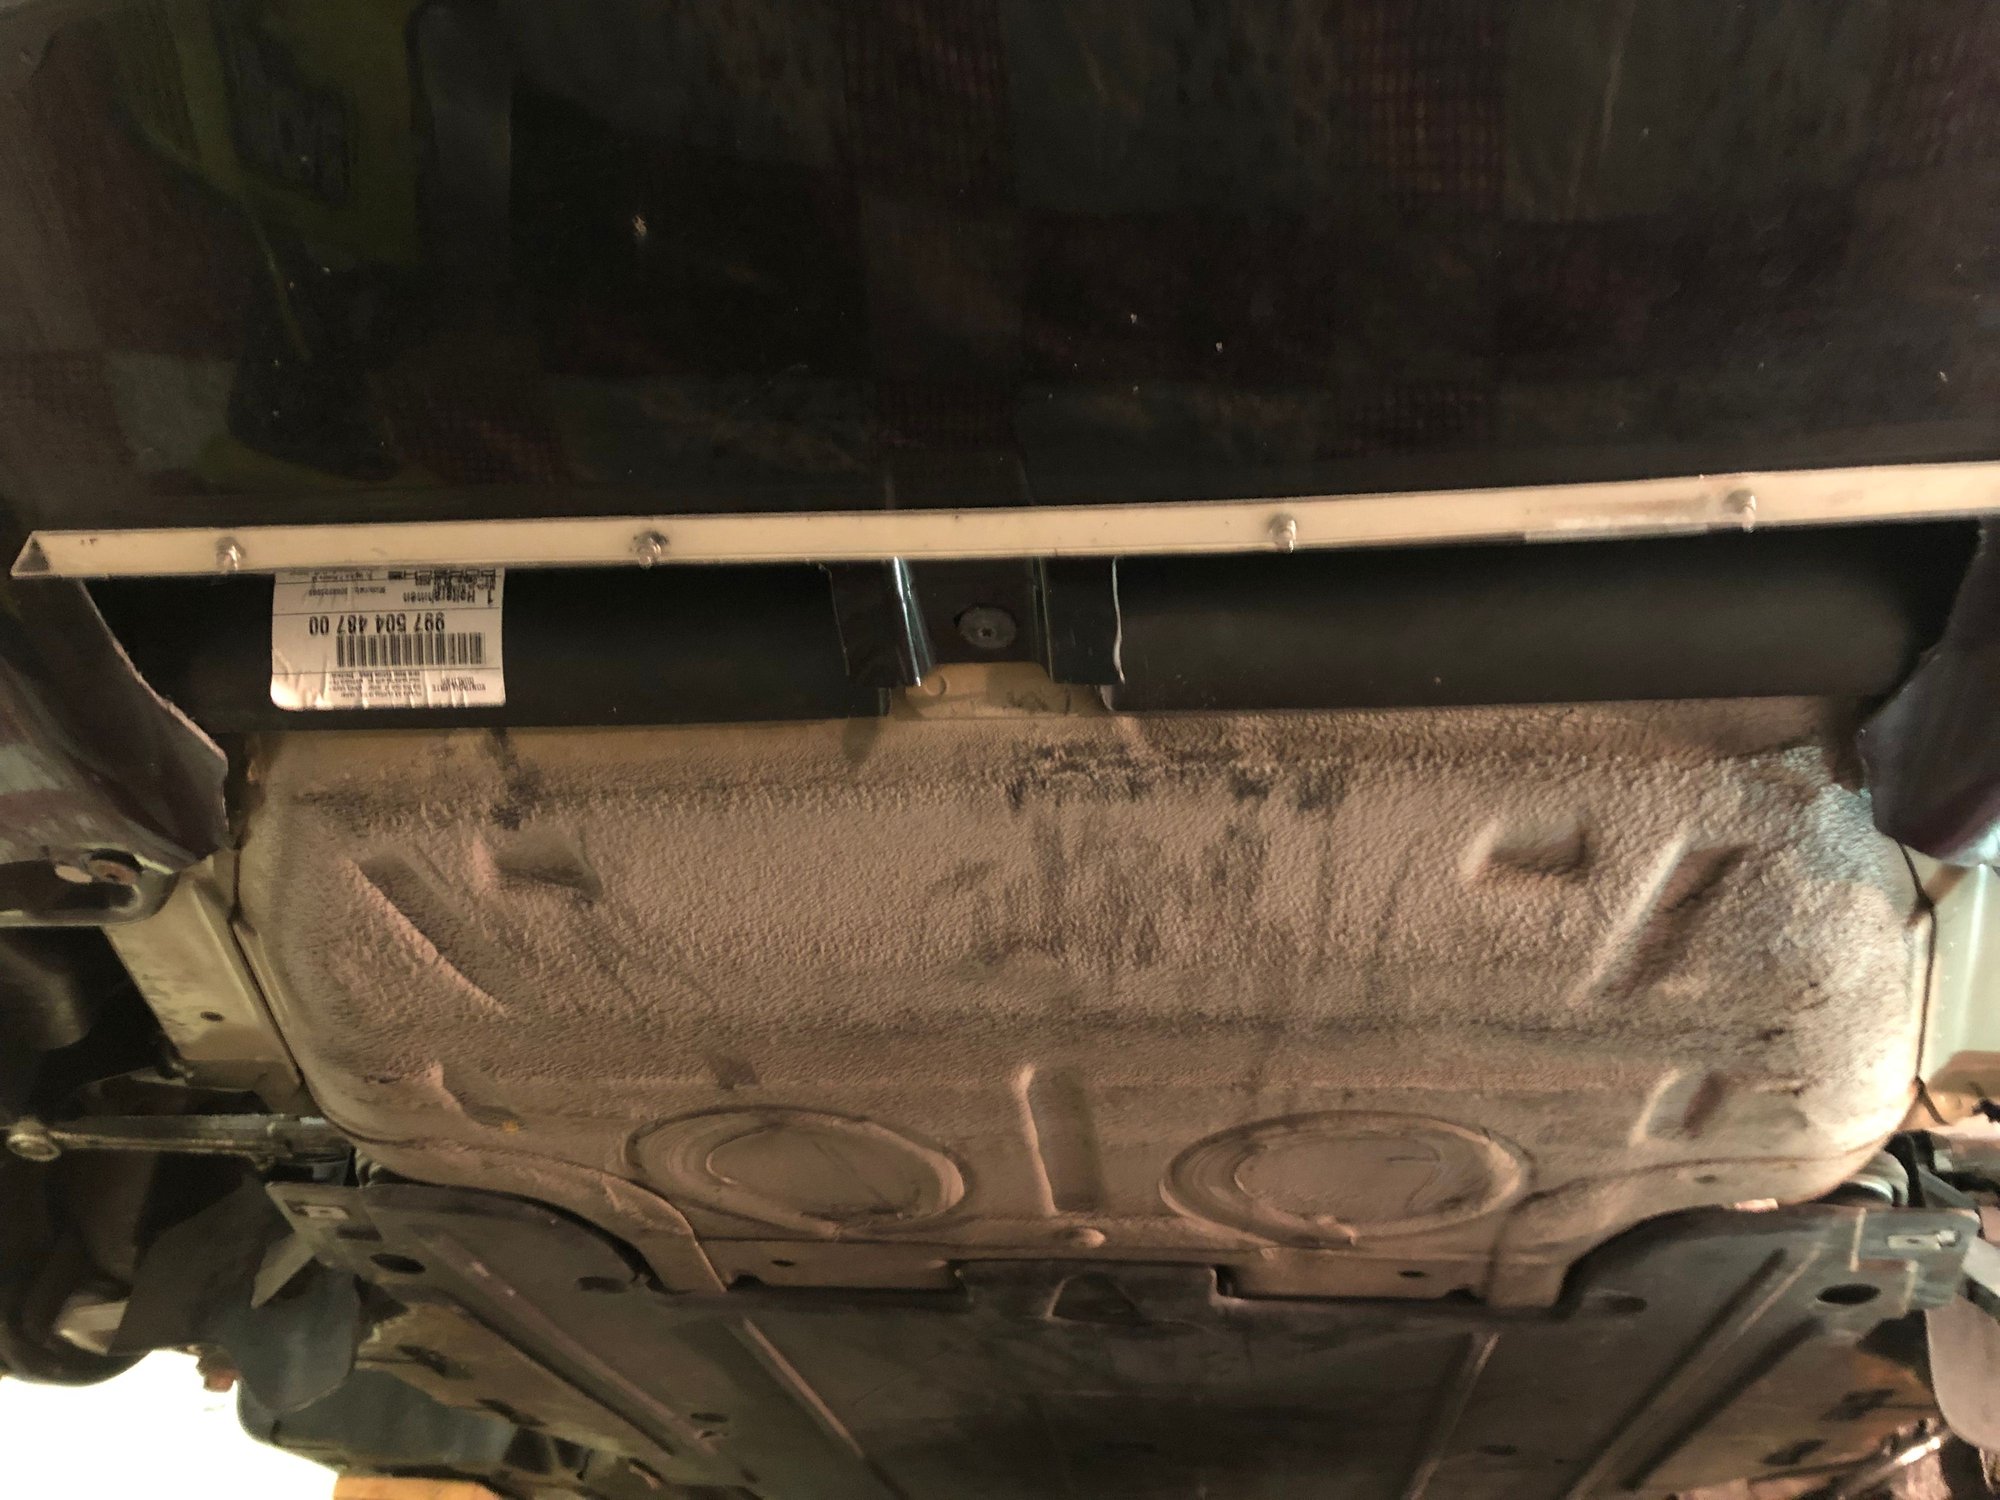
Pic of the 997.1 3rd rad kit
You are absolutely right. I assembled the radiator unit (radiator, rear cowl, 997.2 front cowl, and metal bar 3 weeks ago. And in my mind from what I had read I was thinking I needed to replace the bumper skin blanking piece with a substitute. Actually the 997.2 cowl connects to the bumper skin with no need for an additional piece. My old brain screwed up ... I reserve the right to be stupid!!! I post things here so people can correct me 😀
That explains why the cowl fit into the bumper so nicely.
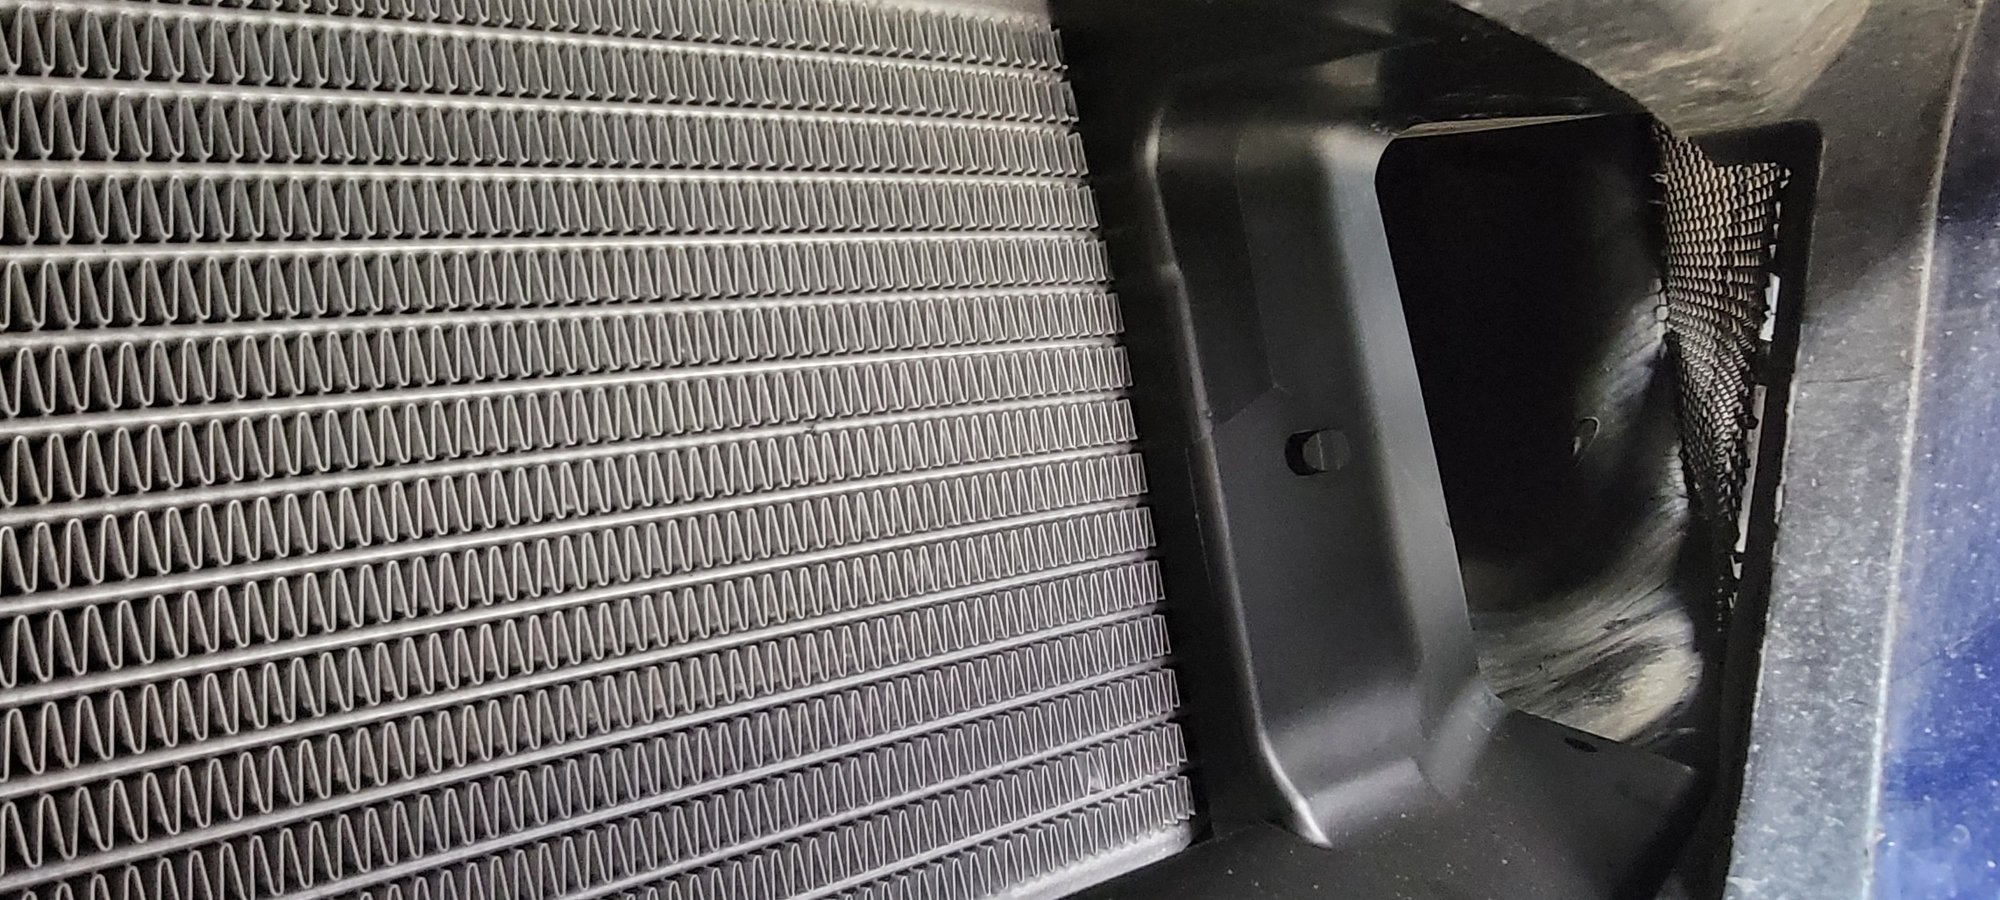
I am attaching pictures as best as I can take them without pulling the bumper. I can't slide your ducts through the gap so I won't get those shots to you until later. When I mounted your pieces I mated them fully onto to cowl. I did not want to angle them back since it seemed that to do so adequately would leave one side hanging in the air. Anyway, obviously I screwed up my thinking on one thing yesterday. Maybe I screwed up twice. The 997.2 does not have etched in markings for the bumper skin cut outs. Rather than four smaller holes I opted for two larger holes. As has been pointed out, this is the only venting that allows air to flow through the center radiator. My side duct trimming butted up to the left side of the radiator. But my approximation left a small hole on the left side bottom. The left side has a gap of 0. What looks like a gap towards the bottom is actually the side of the radiator. This points out that there are hard edges that the EMC2DESIGN ducts would cover. Inside view of the left side taken from the center. Inside view of the right side taken from the center.
On another note, I took a drive today using my 9xxresearch.com OBD II to phone scanner to track actual water temperature. The heater started working by the time the water reached 160F. Temperature varied from 185 to 190F. At one point, stopped at a light, I smelled a bit of anti freeze that appears to be from the resultant overfill created from the vacuum lift tool. Oil temp remained under 200F. Time to get spirited and see what the oil temp does!!!
@Wayne Smith
Did you use the UView Airlift tool to refill and did the gauge hold a strong and steady vacuum before refill?
Iask because I've had to do coolant related work more times than I'd care to (thanks to some infamous issues on Cayenne and Panamera V8's).
In my experience if you can hold a strong and steady vacuum for a couple min's before refill and then if it rapidly fills going fully to zero vacuum on the gauge, then you can be pretty confident there are no leaks in your system.
I know some like to positive pressure test also, but just sharing my experience.
I hate leaving things hanging so I decided to spend a few minutes yanking things apart tonight and taking better pictures. I was able to angle the EMC2 ducts and make them fit. I did this with my minimal trim job on the side ducts. Yes, the right duct isn't perfectly mated. I can live with this!!! I drilled an extra hole in the right duct so the ambient temperature sensor could stay where it was.
Tomorrow I'll fabricate a center protection screen and do some cleaning before final assembly. In the meantime ...
I used the Schwaben tool in the same method as you did. It held a vacuum. It filled quickly. It took very little to fill so I wasn't sure if I had a lot of air left in the system. But it appears I simply didn't need a lot of antifreeze. I did have the front well raised over the rear and inserted the hoses and radiator quickly.
A note for those who will do this service ... You can install the spring clips on the radiator and at the locations where you removed the plugs and then the hoses will push in and snap to locked. This saves you some hassle when you install the hoses since the space is tight.
I played a bit tonight and was able to remove the front fender liners without taking the rears out. The bumper took less than 10 minutes to remove from the time I put the car in the air. It helps to have practiced this a few times now.
So, photos ... Left duct in position. I left a lot more of the OEM side duct material. Left duct with extra angle and tie strap to secure the original Duct. Right duct angle and tie strap holding the original duct. Right duct with extra hole to allow the ambient temperature sensor to maintain its original soft rubber mount. 3D printed plastic can be hard and I felt better not trying to push the sensor through the new duct. Also since I trimmed the side duct less than suggested this worked better. Side view with the 997.2 cowl in place. This cowl completely takes the place of the bumper skin blanking piece that came with the car. 997.2 radiator cowl part number. The air lift system I used.
Again, big thanks to EMC2DESIGN for their support.
Last edited by Wayne Smith; 01-10-2022 at 11:42 PM.
@Wayne Smith Many thanks for the update. Glad you got things sorted.
@CAVU the heated air (post 3rd radiator) exits on the bumper underside (behind the 3rd rad) as shown below. The red and blue arrows in your diagram would all be ambient temp air.
\\
The duct adapters allow the temp sensor to remain directly in the cold/ambient air path as shown below:
Thanks. I do see the cut outs. Just do not have a feel for the design of added "box/tray" that the the radiator fits into and if its design ensures that no heated air is drawn down the back side of the added trim panel. Bernoulli can be sneaky and pesky.
Thanks. I do see the cut outs. Just do not have a feel for the design of added "box/tray" that the the radiator fits into and if its design ensures that no heated air is drawn down the back side of the added trim panel. Bernoulli can be sneaky and pesky.
The air flow is down and out under the car with very little, if any, air trying to escape to the very flow restricted sides. This air would be behind the sensor rather than at the tip anyway.
There were no indications for cutting locations on my bumper, but I positioned the skin back on the car and it was obvious where the cuts were needed.
Forcing the fender liners to bend back inside the fenders makes me uncomfortable. For me that was the worst part of this quite simple job. In fact, that was almost half the time / effort required.


 01-09-2022, 11:53 PM