When you click on links to various merchants on this site and make a purchase, this can result in this site earning a commission. Affiliate programs and affiliations include, but are not limited to, the eBay Partner Network.
I am in the midst of assembling for install a set of B8 bilsteins and lowering springs, for my 997.2 C2S
Out of the box instructions don't show the strut using the orange foamy bump stop. Therefore the bottom washer is free to bounce around. Something is not right.
I did a search on bilstein strut assembly but have not found an answer,
Take a look at the info in this post - hopefully it can help (the Bilstein guides I have for the B6's (also for B8) only advise using the foam bump stops on the rears) https://rennlist.com/forums/997-foru...l#post13968636
I have the B 6 structs. The bump stop for the fronts is built into the struct. Therefore no yellow/ orange foam part. The rears do have the yellow foam bump stop. I am not sure about B 8 but would think they assemble just like the B 6. I have pics if necessary.
Do you have a photo of the strut? If the Bilstein replacement is like other cars, then they use an inverted design similar to their coilovers and b6/8 solutions. This means the bumpstop is internal to the strut body because the damper body is what protrudes out to mate with the top mount. You can usually tell an inverted body design right away by the girth of the piston assembly.
Edit: Looking at the diagram that @EMC2 posted, it looks like the b6 is indeed an inverted design so it'll use a bump stop internal to the strut body. You can check out this quick watch from a friend of mine disassembling some bilstein dampers for another platform. The exact dampers will differ from car but the construction is similar enough.
Reviving this thread as I have the exact same question pertaining to the lower washer... I am installing new B6's and i have everything installed in that order according to the pic the EMC posted. However the lower disc shaped washer just sits on top of the flat washer and just rattles around. Is that supposed to be how it is installed? This leads to my next question...how do you know how much to torque/tighten the main strut nut on the top to compress the spring? Sorry if this is a dumb question, my first time replacing suspension components and I'm going all out. I bought all new myle suspension control arms, drop links, hardware, new hub and wheel bearing, new shocks and struts, all because I had to rebuild my CV boot. Everything has been easy so far and now again my main 2 questions are those listed above. 1. Is that lower washer supposed to do anything or does it just sit there loose and rattle around? and 2. How do you know how much to tighten that upper main nut?
Do you have a photo of the strut? If the Bilstein replacement is like other cars, then they use an inverted design similar to their coilovers and b6/8 solutions. This means the bumpstop is internal to the strut body because the damper body is what protrudes out to mate with the top mount. You can usually tell an inverted body design right away by the girth of the piston assembly.
Edit: Looking at the diagram that @EMC2 posted, it looks like the b6 is indeed an inverted design so it'll use a bump stop internal to the strut body. You can check out this quick watch from a friend of mine disassembling some bilstein dampers for another platform. The exact dampers will differ from car but the construction is similar enough. https://www.youtube.com/watch?v=y7vt5Q6sPvY
That was really interesting, thanks for sharing - I didn't know you can take the strut and get to the bump stop like that!
Reviving this thread as I have the exact same question pertaining to the lower washer... I am installing new B6's and i have everything installed in that order according to the pic the EMC posted. However the lower disc shaped washer just sits on top of the flat washer and just rattles around. Is that supposed to be how it is installed? This leads to my next question...how do you know how much to torque/tighten the main strut nut on the top to compress the spring? Sorry if this is a dumb question, my first time replacing suspension components and I'm going all out. I bought all new myle suspension control arms, drop links, hardware, new hub and wheel bearing, new shocks and struts, all because I had to rebuild my CV boot. Everything has been easy so far and now again my main 2 questions are those listed above. 1. Is that lower washer supposed to do anything or does it just sit there loose and rattle around? and 2. How do you know how much to tighten that upper main nut?
Bumping this thread to see if answers were ever found to the above?
I'm not sure what washer the original question was referring to since they didn't specify front or rear. At any rate, the washers should make contact with the top mount and no rattle should occur.
As far as how to tighten down the center nut on the strut, you'll need a set of pass through wrenches or use the Schwaben strut socket to counterhold the strut/shock shaft in place. Torque specs are in the workshop manual which you should be referencing but iirc, the damper rod to top mount nut is 59 lbs-ft for the fronts. I don't remember the rears offhand though.
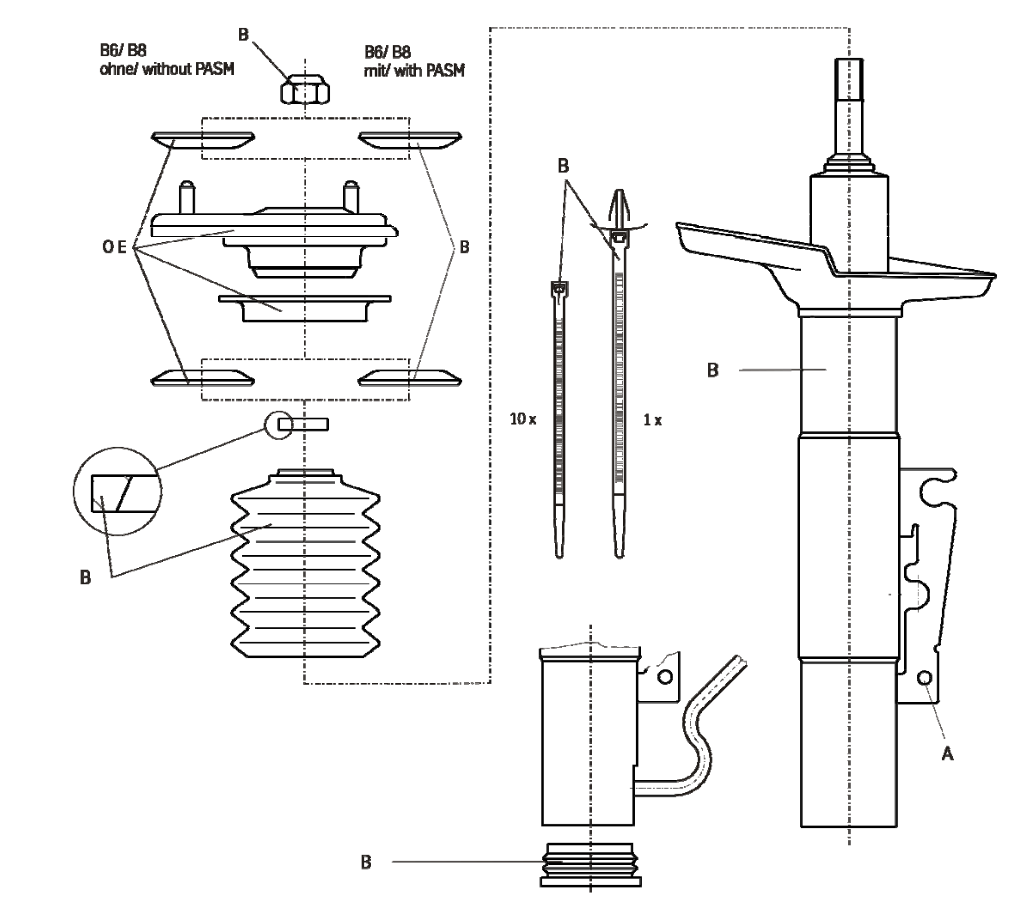
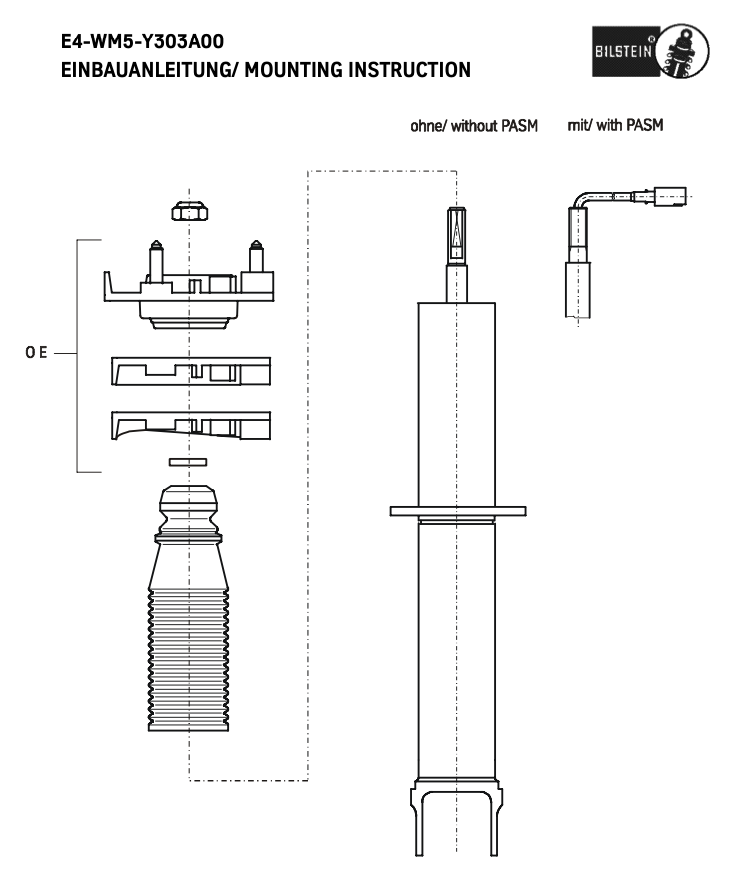
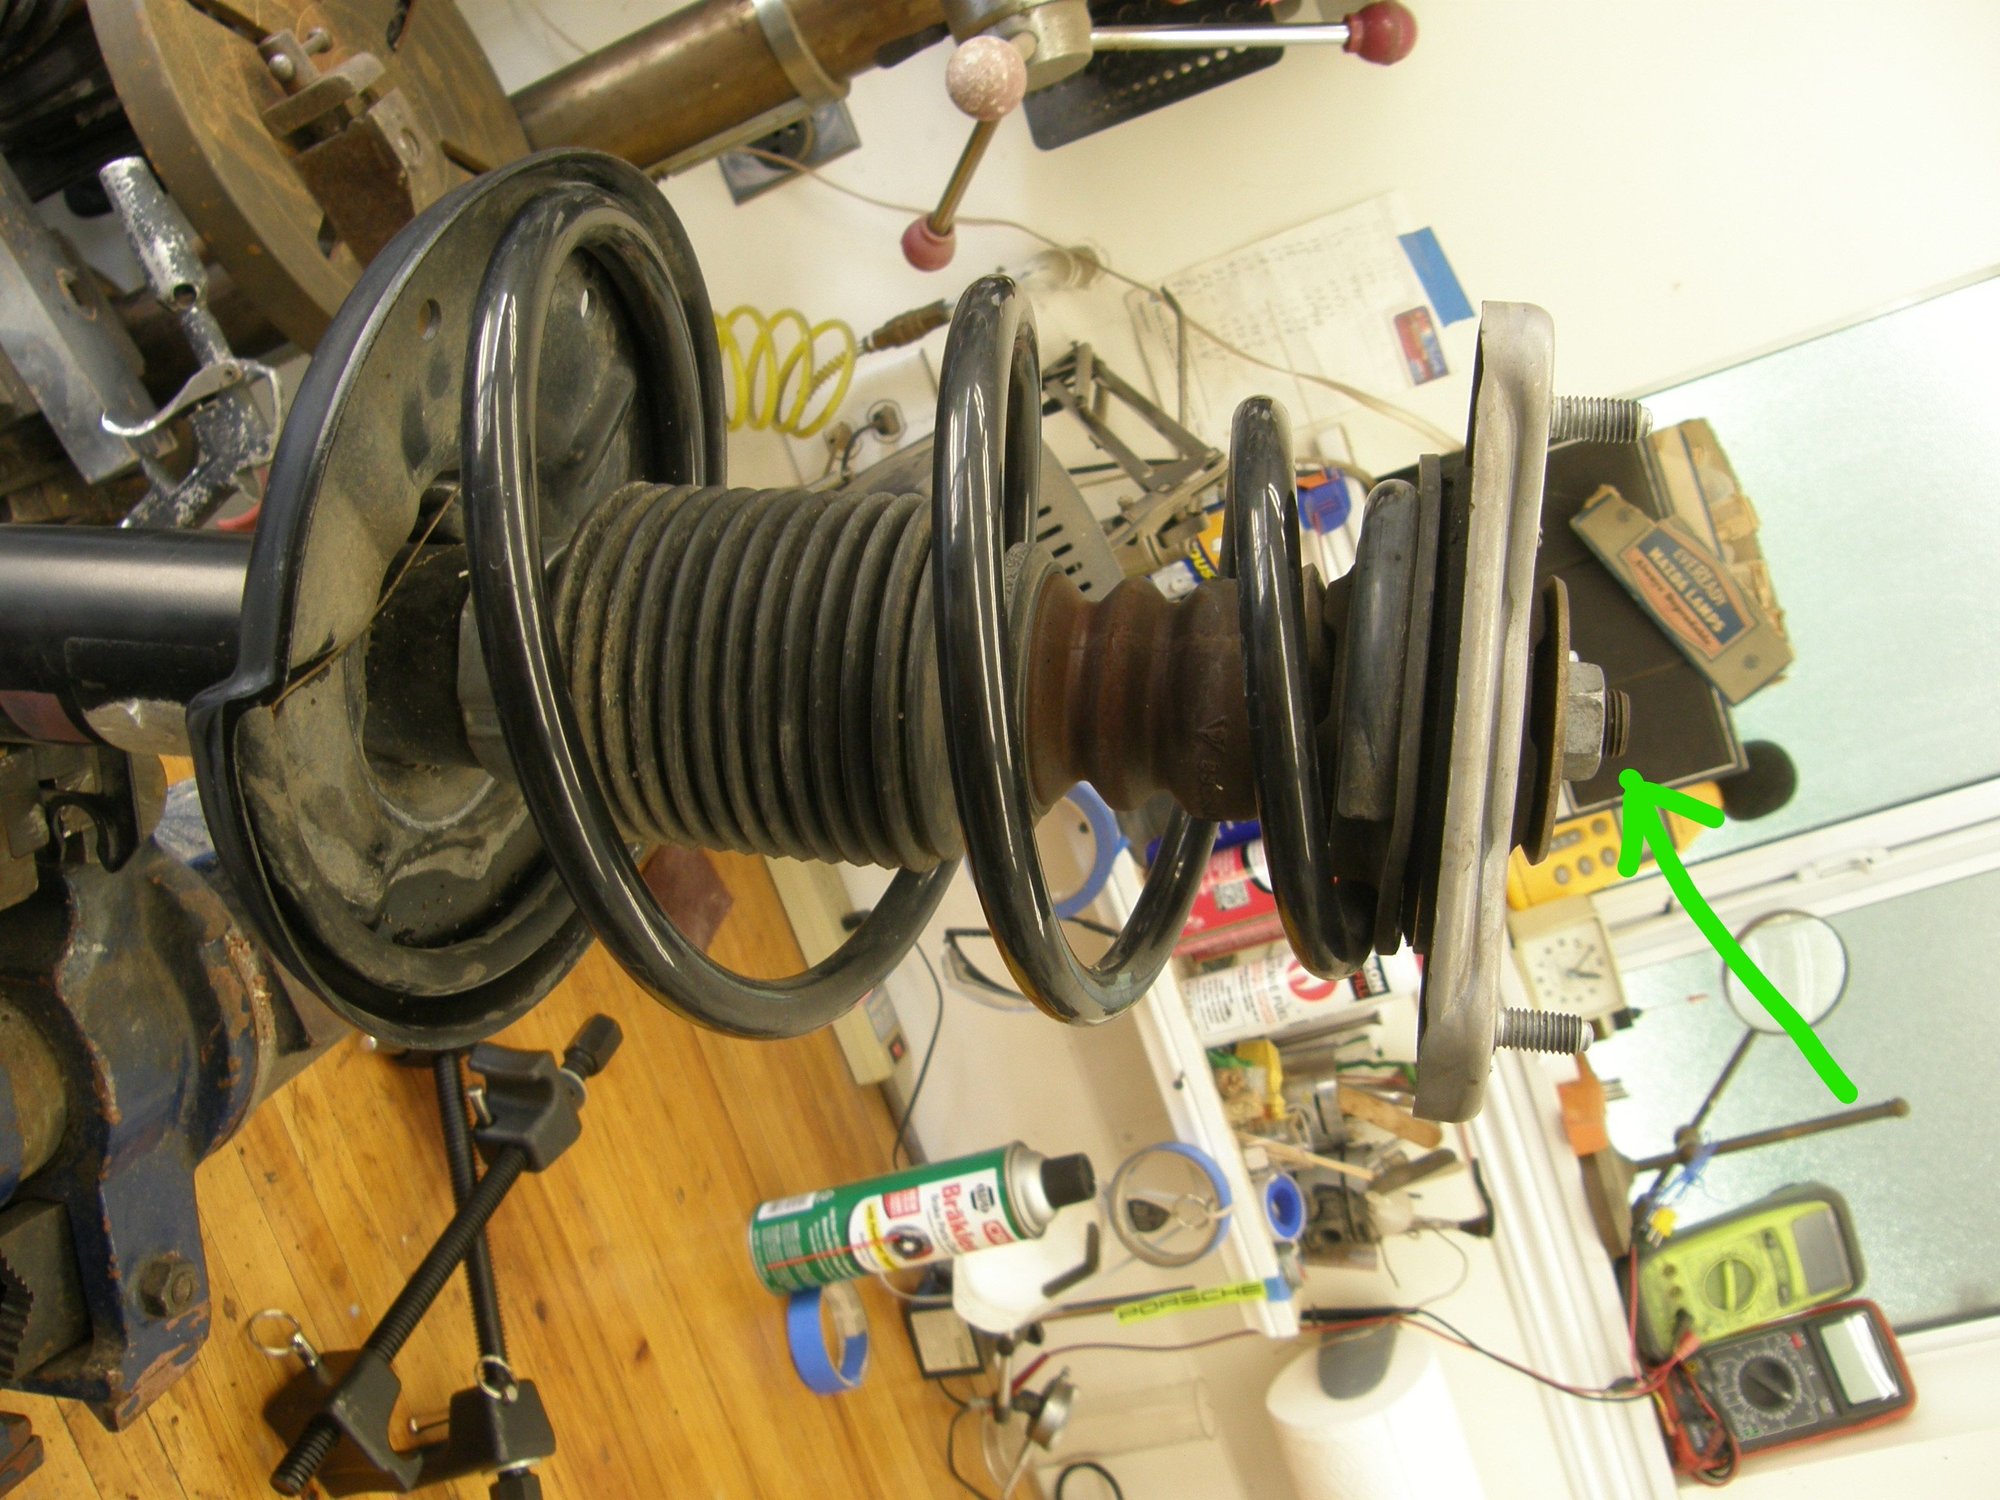
For the front strut , yes the new B6/8 units are inverted so the bump stop is inside the tube and at the bottom, unlike the stock unit where you have the orange (or what is left of it) bump stop at the top. However the assembly of the strut/spring/top mpunt is the same regardless of the bump stop or no bump stop. For the new strut assembly (strut standing upright ), 1) place black plastic/rubber bellows on the shaft. 2) place the small washer with the tapered inside onto the shaft. This is shown on the picture above with detail as to which way the taper points. This will sit down on the shoulder of the shaft. 3) place one of the "dish" washers convex side up , onto the shaft. This will seat onto the smaller diameter washer below it. 4) place the spring onto the strut and check the index on the pan.so it sits flat You may or may not have to compress the spring a bit. 5) next comes the bearing and top mount sandwich which sets on spring and the dished washer on the shaft. 6) place the other dish washer onto the shaft concave side up and finally install the nut. If you don't have the smaller washer then nothing is going to work.
The rear strut is the same as the original and does include the new bump stop.
Adding my 2 cents here for posterity's sake. I just installed the Bilstein B12 kit (Eibach lowering springs and Bilstein B8 dampers) and ran into this same issue with the lower cupped washer rattling around. I didn't actually notice it until after the install was complete and I went for a test drive. As soon as I pulled out of my driveway, I heard a rattle/clank and remembered this thread. Turned right around, went home, took the front wheels off, checked all of the suspension components I removed to make sure they were all torqued to spec, and they were. Then, sure enough, I saw that the lower cupped washer was moving freely.
I think the issue is this; the top nut on the Bilstein strut needs to be much further down the threads than the nut on the OEM strut. On the OEM assembly (which I referenced before I took it apart to note how far to screw the top nut down), about ~1/4" of threads are sticking out above the nut. When I assembled the Bilstein assembly, I placed the top nut in the same position on the strut rod, leaving the same amount of threads sticking out. Note that there is a torque spec for the top nut but I assembled with the springs compressed so I could screw the nut down as far as I wanted to.
Setting the top nut to the same position as OEM, caused this rattle. When I torqued the top nut down more, it compressed the assembly a bit more and forced the washer tightly against the bearing sandwich. Second test drive and no more noise. Luckily, I was able to torque the nut down from above without disassembly everything.
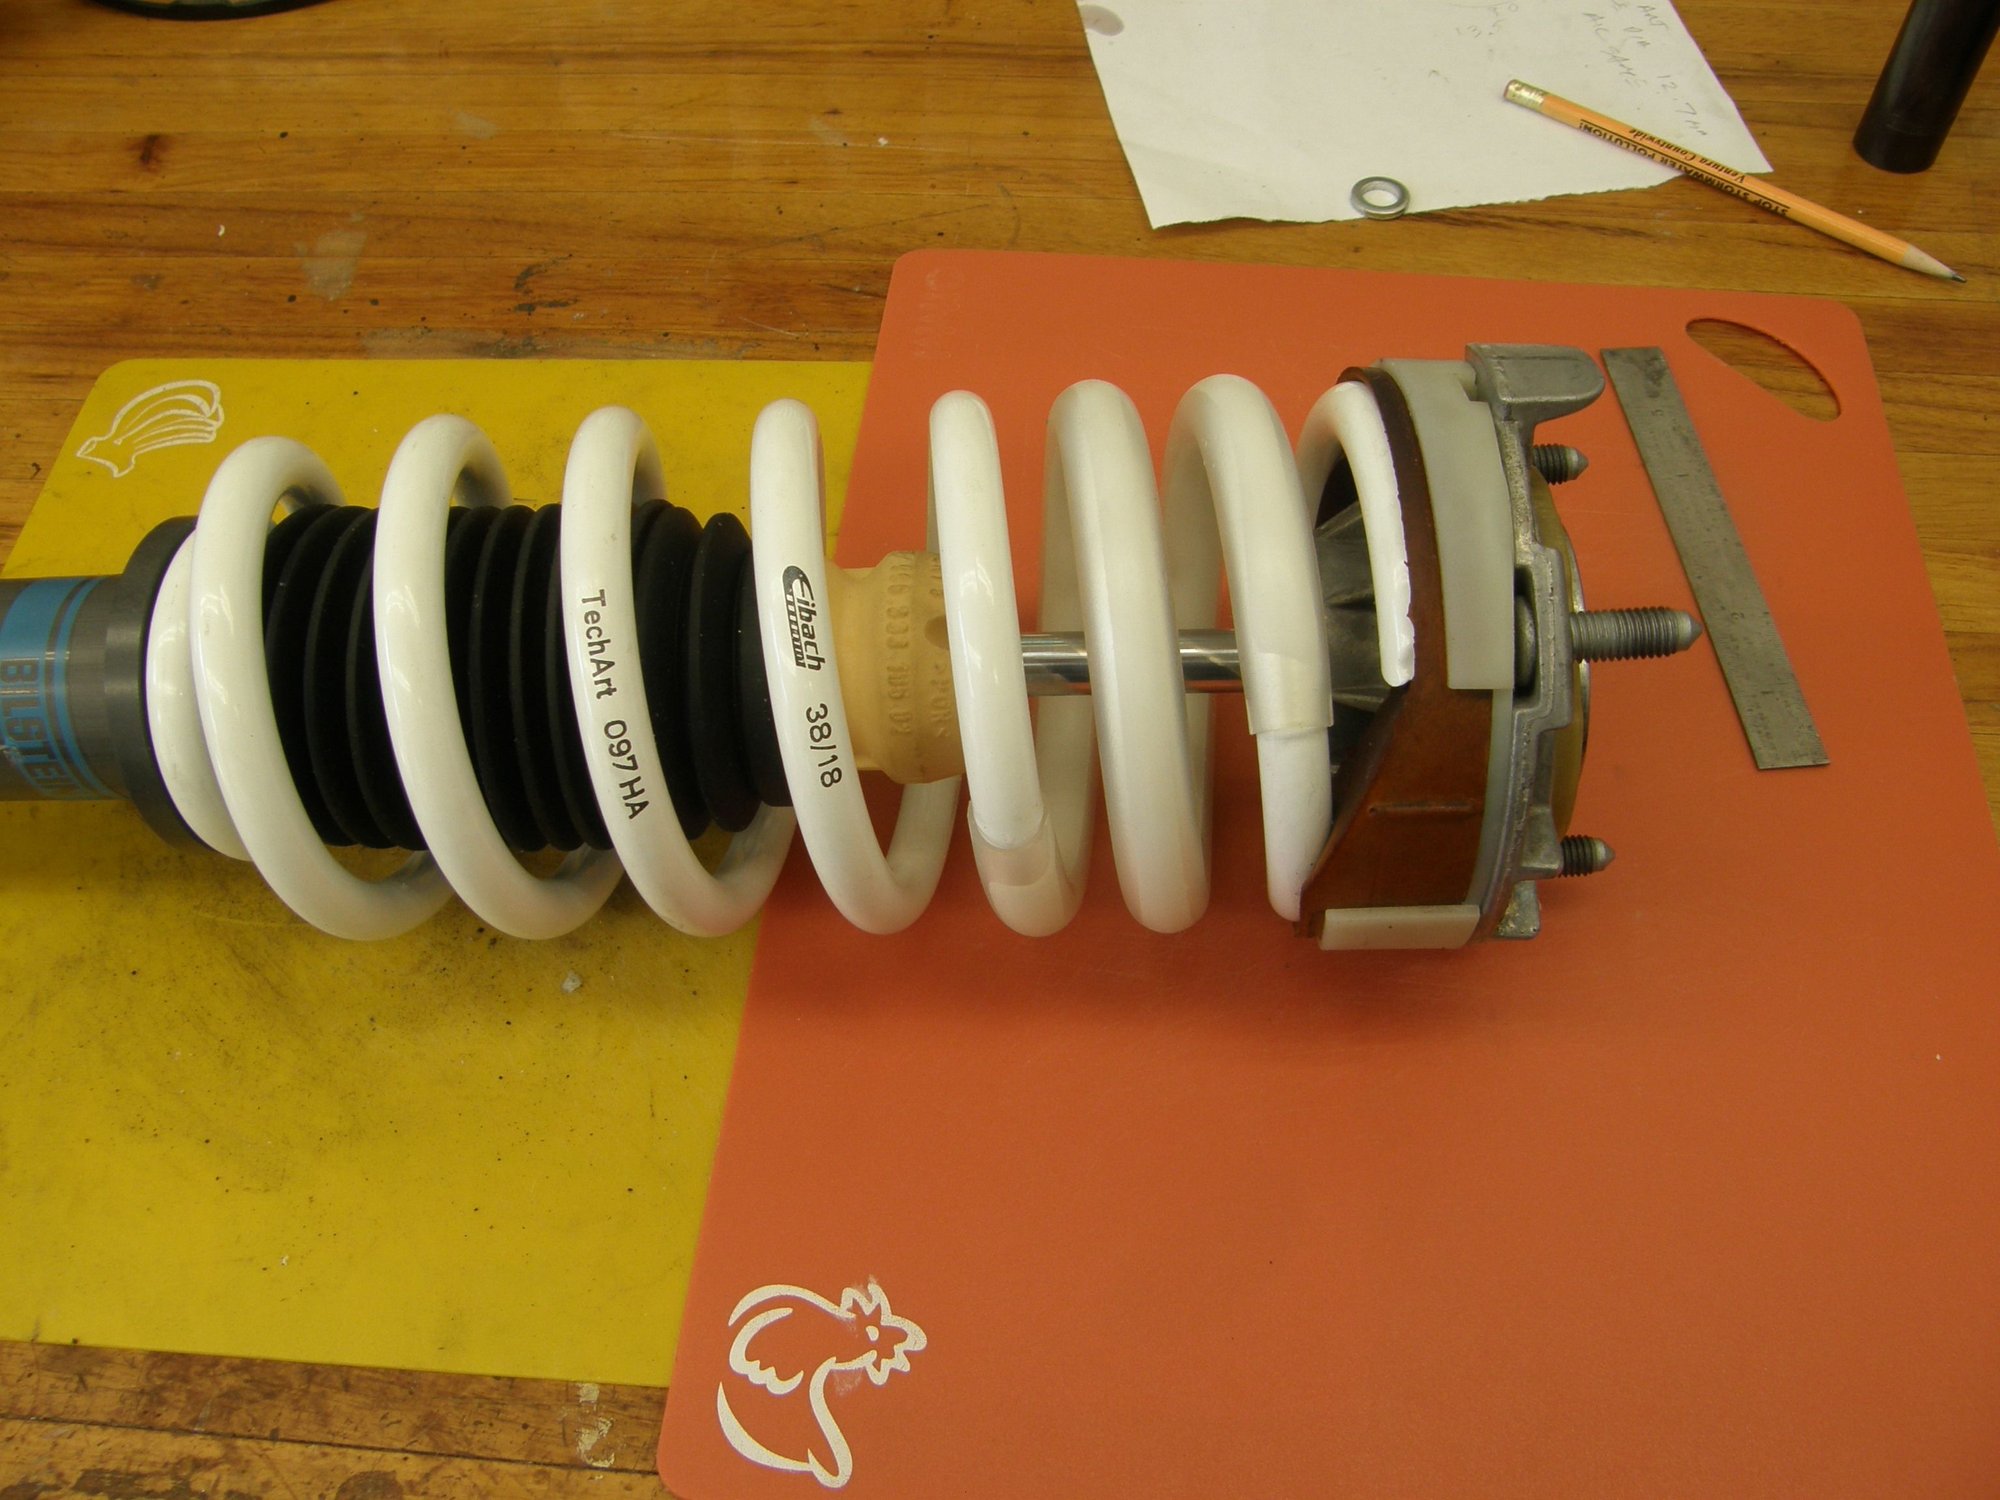
You can actually see how much thread is sticking out in Floyd540's pic above of his front strut. That is now what mine looks like and that is about double the amount of thread showing as OEM.
I almost wonder if this is a design flaw in that so much thread is now poking out, I think the top of the strut rod would actually make contact with the center strut tower hole if you tried for a really aggressive camber setting. The OEM setup is such that the strut rod is beneath the hole in the strut tower. To say it another way, you can no longer fit that circular black cap over the strut tower hole because the Bilstein strut rod pokes out too much. Note that I also installed Tarett front camber plates (in the less aggressive setting) so this may be a non issue if you are using OEM top mounts. Also, my OEM assembly used the 3mm compensating plate, which I re-used with the Bilsteins. Had I used the 6.5mm compensating plate, that 3.5mm difference may have been enough to tighten everything up that little bit more to stop the lower washer from rattling around.
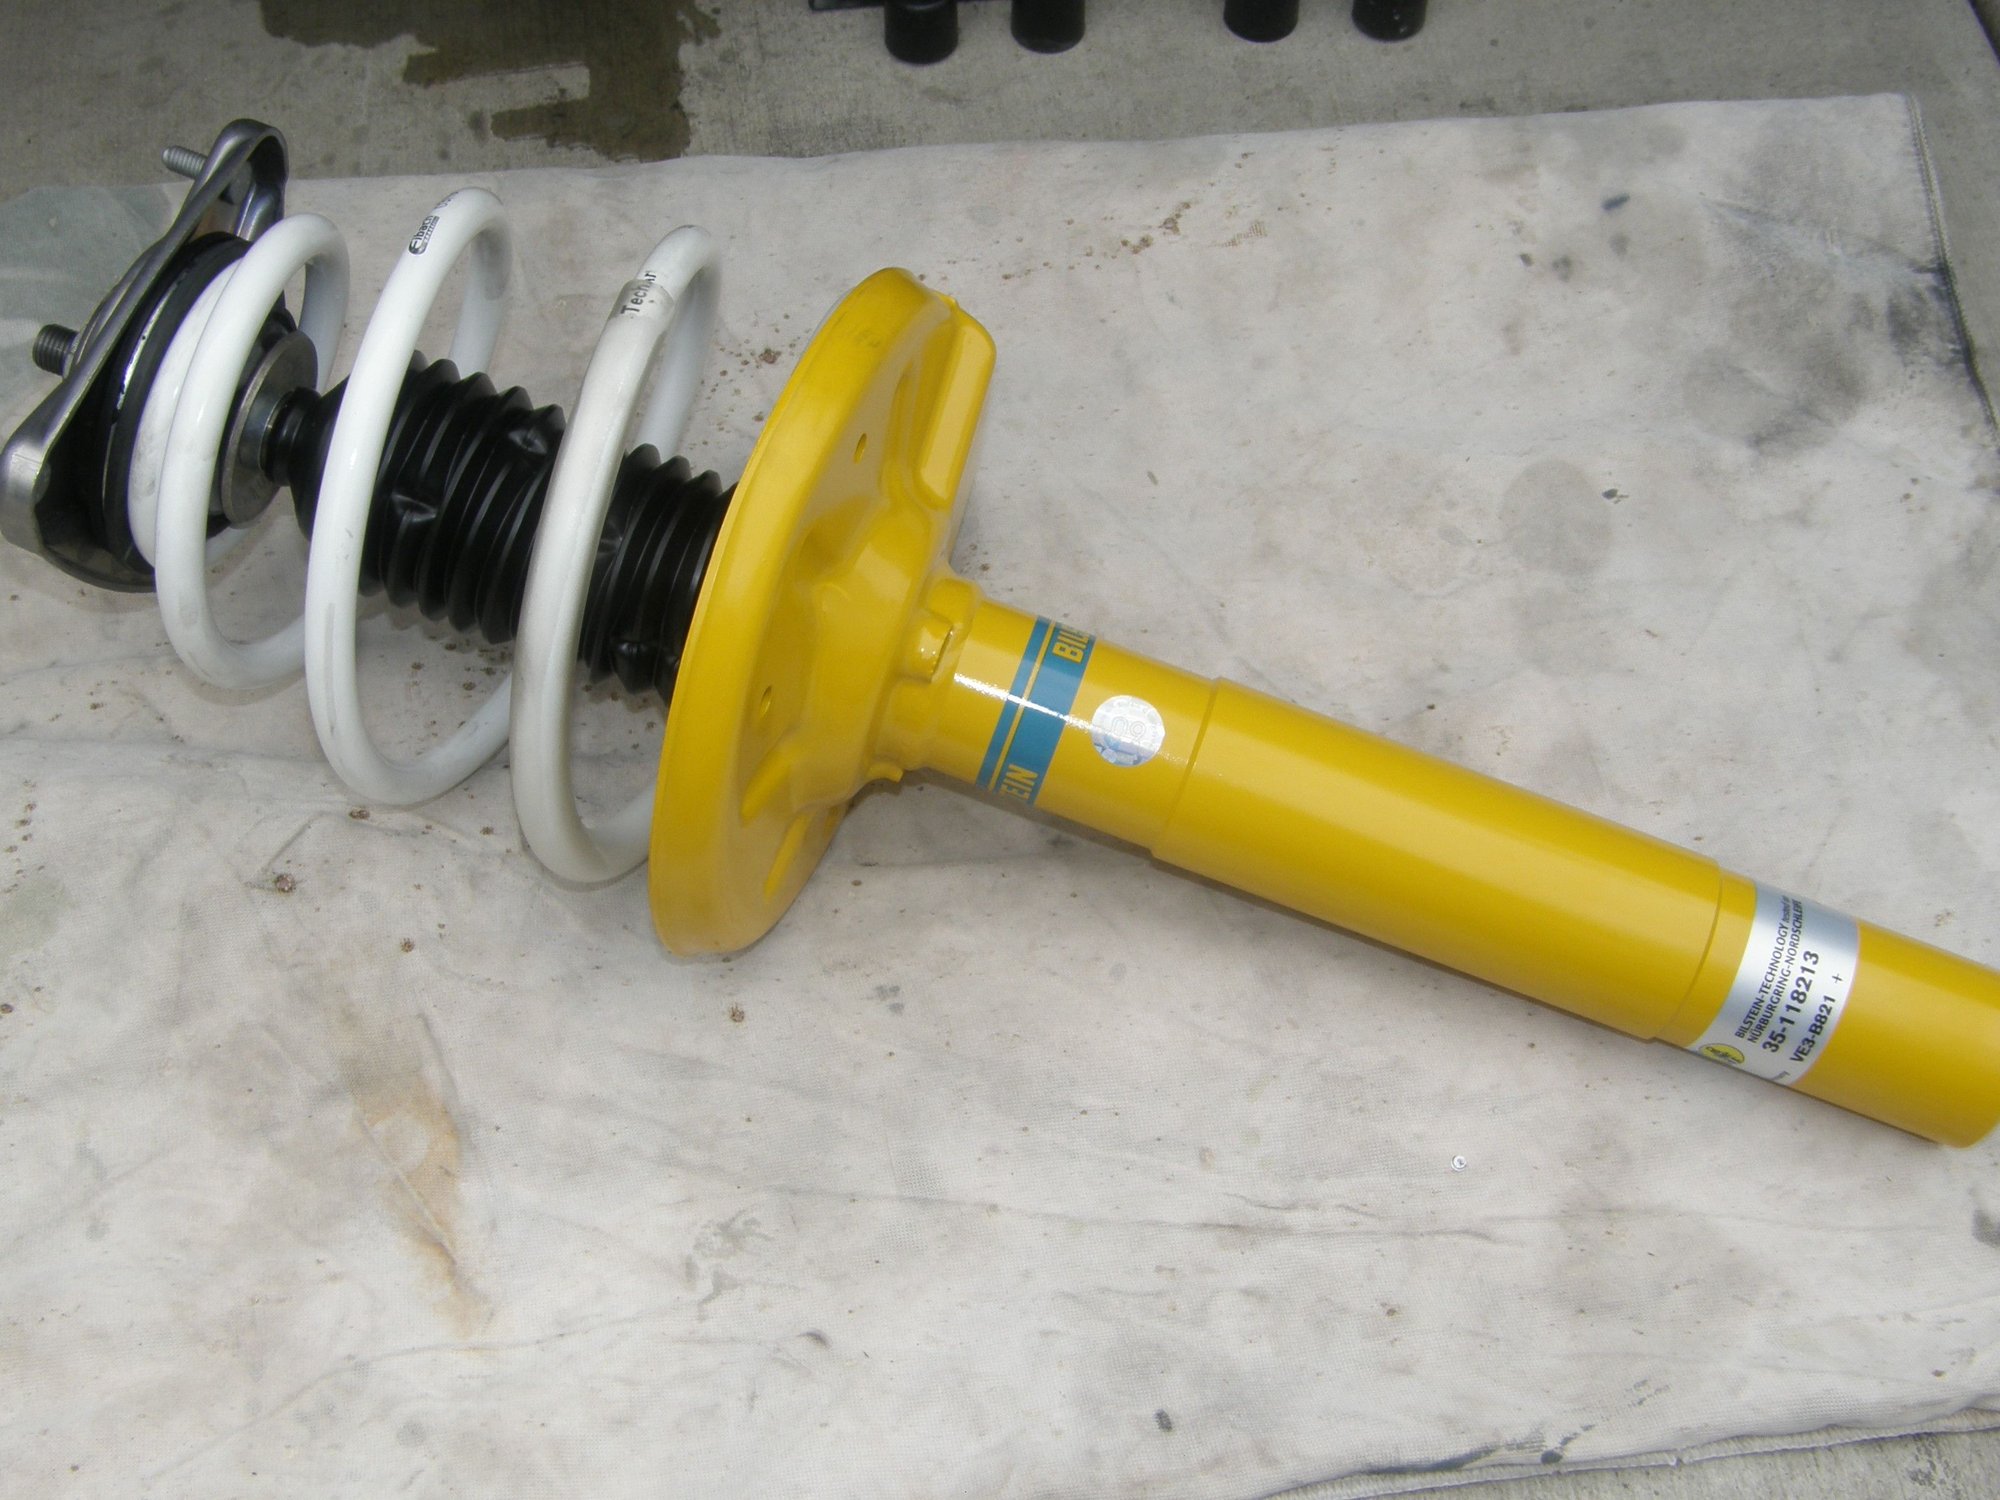
Sorry if anyone is using my "info" as info. Must be tough out there! On the front struts, yes, the new Bilsteins have more exposed thread than the OEM one does, however this has no effect on the assembly or the fitting of the rubber cap on the strut tower top. This is not a "design flaw" as these struts are not completely designed for just one application. They have various barrels in various lengths and diameters and various length rods , valves etc. They make a product to fit an application by using a specific combination of "oof the shelf" components. Attached is a pic of the original strut assembly and one of the new set up with the TechArt spring. ( highly recommened) showing the extra thread showing.
Sorry if anyone is using my "info" as info. Must be tough out there! On the front struts, yes, the new Bilsteins have more exposed thread than the OEM one does, however this has no effect on the assembly or the fitting of the rubber cap on the strut tower top. This is not a "design flaw" as these struts are not completely designed for just one application. They have various barrels in various lengths and diameters and various length rods , valves etc. They make a product to fit an application by using a specific combination of "oof the shelf" components. Attached is a pic of the original strut assembly and one of the new set up with the TechArt spring. ( highly recommened) showing the extra thread showing.
Thanks Floyd and, for the record, your post from February was very helpful in that it confirmed that the Bilstein strut does show more exposed thread than OEM. I just think some combinations of the Bilstein strut, along with which compensating plate and top mount you use can lead to the lower cupped washer rattling around if you don't torque the nut far down enough.
Sorry if anyone is using my "info" as info. Must be tough out there! On the front struts, yes, the new Bilsteins have more exposed thread than the OEM one does, however this has no effect on the assembly or the fitting of the rubber cap on the strut tower top. This is not a "design flaw" as these struts are not completely designed for just one application. They have various barrels in various lengths and diameters and various length rods , valves etc. They make a product to fit an application by using a specific combination of "oof the shelf" components. Attached is a pic of the original strut assembly and one of the new set up with the TechArt spring. ( highly recommened) showing the extra thread showing.
I've installed a "B12 Pro-Kit" ( which is essentially B8 structs & shocks + Pro-Kit lowering springs ) on my 2009 Carrera 997.2.
I believe I did everything according to the instructions, reassembled the struts pretty much the same way that OEM were assembled, as you said above:
on the strut shaft -> add the plate -> mount the bearing + mount sandwich ( steel insert -> rubber gasket -> bearing -> mount ) -> second plate & then bolt on the end of the shaft
as a result - the shaft will rotate together with the mount, which causes strong resistance & also stiff steering wheel.
I contacted Bilstein support, but they're saying that I did something wrong and that the shaft should not be set to the car's body, as rotating the shaft separate from the strut body will cause early damage to the whole setup.
What am I missing here? I don't understand how the shaft bolted to the mount can actually spin separately from the mount?
@Floyd540@andino@850tgul can you guys please confirm that my understanding of installation is correct?
The B8 (or whatever) front strut shaft is bolted down to the mount & is not moving when the steering wheel turns, so then the strut body rotates around the shaft?
I have a problem with that, that after installing the B12 kit - turning ths steering wheel has become fairly "hard"/"stiff", and the cause seems to be much friction between the shaft & the strut body during rotation. I contacted Bilstein support & they're saying that the inner shaft should not rotate against the strut body, or this will kill it fast. But I'm confused, how can it NOT rotate, if it's bolted down to the mount?
Sounds like the bearing assembly is not correct. In the assembly notes I made above I listed first to install the small washer with the tapered ID on first. This is shown on the Bilstein drawing. You did not mention this in your writeup. On top of the small washer goes one of the "saucer" washers cupped side down, then the spring , then the bearing assembly and upper mount., then the other cup washer and finally the nut. Check your bearing assembly to make sure it is working. When all together and ready to re-install in the car, you should be able to rotate the top mount (triangular plate with three mounting bolts) in relation to the lower strut/spring assembly. by hand pressure. I believe the shaft has to rotate in relation to the spring/strut assembly thru the 20 to 30+ degrees of steering angle. However the upper mount plate should be free to rotate with some drag in relation to the strut /spring /upright assembly.

 02-26-2021, 06:42 PM